Page 45 of 446
Safety features of your vehicle
28
3
Securing a child restraint seat
with tether anchorage system
Child restraint hook holders are
located on the floor behind the rear
seats.
1.Route the child restraint seat teth-er strap over the seatback.
For vehicles with adjustable head-
rest, route the tether strap under
the headrest and between the
headrest posts, otherwise route
the tether strap over the top of the
seatback. 2.Connect the tether strap hook to
the appropriate child restraint hook
holder and tighten to secure the
child restraint seat.
Check that the child restraint system
is secure by pushing and pulling it in
different directions. Incorrectly fitted
child restraints may swing, twist, tip
or separate causing death or serious
injury.
WARNING - Tether strap
Never mount more than one
child restraint to a single tether
or to a single lower anchorage
point. The increased load
caused by multiple seats may
cause the tethers or anchorage
points to break.
OUB031013N
Page 46 of 446

329
Safety features of your vehicle
Securing a child restraint seatwith child seat lower anchor sys-tem
Some child seat manufacturers
make child restraint seats that are
labeled as LATCH or LATCH-com-
patible child restraint seats. LATCH
stands for "Lower Anchors and
Tethers for Children". These seats
include two rigid or webbing mount-
ed attachments that connect to two
LATCH anchors at specific seating
positions in your vehicle. This type of
child restraint seat eliminates the
need to use seat belts to attach the
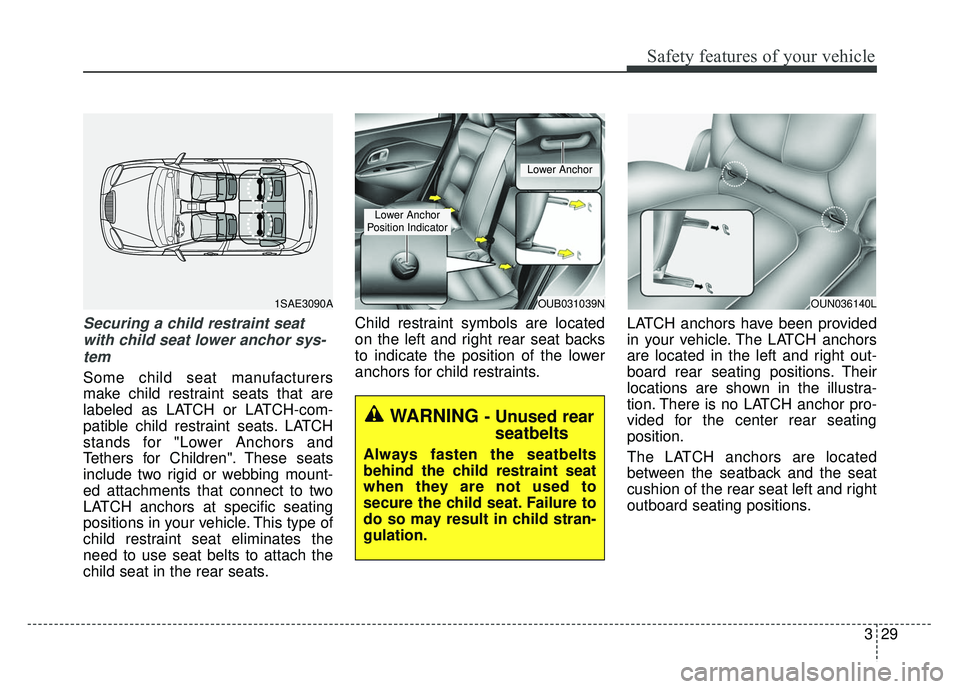
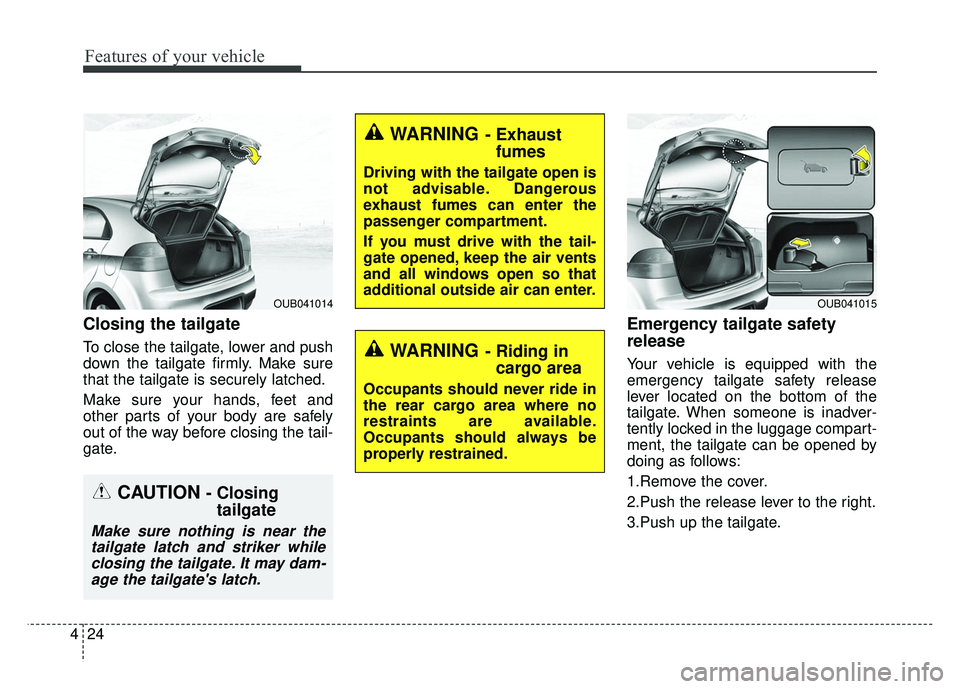
child seat in the rear seats. Child restraint symbols are located
on the left and right rear seat backs
to indicate the position of the lower
anchors for child restraints.
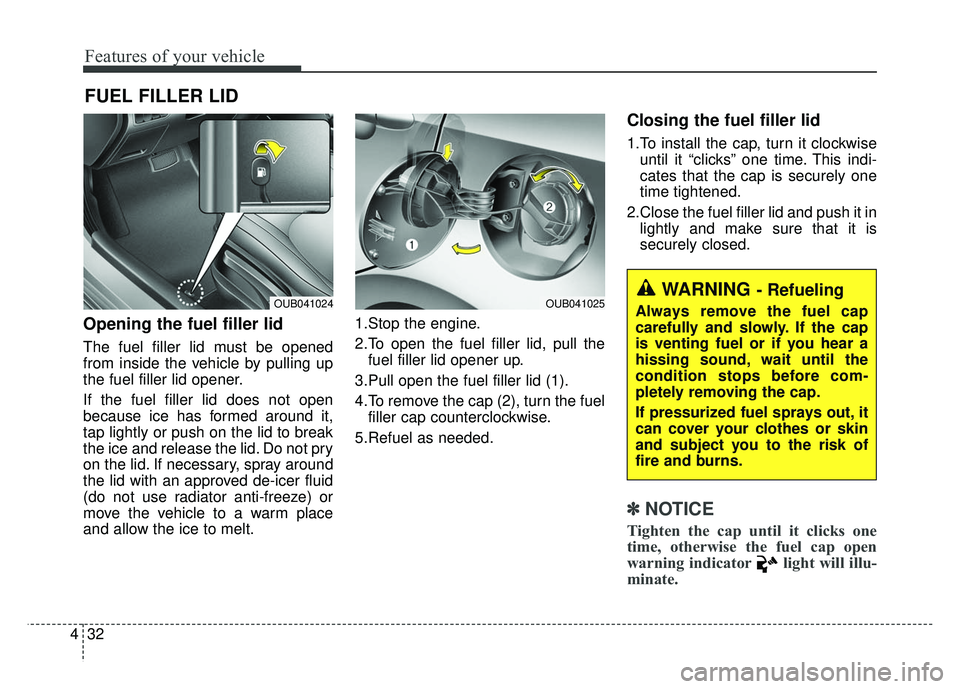
LATCH anchors have been provided
in your vehicle. The LATCH anchors
are located in the left and right out-
board rear seating positions. Their
locations are shown in the illustra-
tion. There is no LATCH anchor pro-
vided for the center rear seating
position.
The LATCH anchors are located
between the seatback and the seat
cushion of the rear seat left and right
outboard seating positions.
OUB031039N
Lower Anchor
Position Indicator
Lower Anchor
WARNING - Unused rear seatbelts
Always fasten the seatbelts
behind the child restraint seat
when they are not used to
secure the child seat. Failure to
do so may result in child stran-
gulation.
1SAE3090AOUN036140L
Page 87 of 446

Features of your vehicle
16
4
DOOR LOCKS
Operating door locks from
outside the vehicle
Turn the key toward the rear of the
vehicle to unlock and toward the
front of the vehicle to lock. If you lock/unlock the door with a
key, all vehicle doors will
lock/unlock automatically (if
equipped with power door locks).
From the driver’s door, turn the key toward the rear of the vehicle once
to unlock the driver’s door and
once more within 4 seconds to
unlock all doors (if equipped with
power door locks).
Doors can also be locked and unlocked with the transmitter key
(or smart key). (if equipped)
Once the doors are unlocked, they may be opened by pulling the door
handle.
When closing the door, push the door by hand. Make sure the doors
are closed securely.
✽ ✽
NOTICE
• In cold and wet climates, door lock
and door mechanisms may not
work properly due to freezing con-
ditions.
• If the door is locked/unlocked multiple times in rapid succession
with either the vehicle key or door
lock switch, the system may stop
operating temporarily in order to
protect the circuit and prevent
damage to system components.
OUB041004
■ Type B
■Type A
OUB043005
L
L
L
L
o
o
o
o
c
c
c
c
k
k
k
k U
U
U
U
n
n
n
n
l
l
l
l
o
o
o
o
c
c
c
c
k
k
k
k
Page 93 of 446
Features of your vehicle
22
4
Emergency trunk lid safety
release
Your vehicle is equipped with an
emergency trunk release cable locat-
ed inside the trunk. If someone is
inadvertently locked in the trunk,
pulling this handle will release the
trunk latch mechanism and open the
trunk.
Closing the trunk
To close, lower the trunk lid, then
press down on it until it locks. To be
sure the trunk lid is securely fas-
tened, always check by trying to pull
it up again.
WARNING
The trunk lid should be always
kept completely closed while
the vehicle is in motion. If it is
left open or ajar, poisonous
exhaust gases may enter the
car and serious illness or death
may result.
WARNING
No one should be allowed to
occupy the trunk at any time.
The trunk is a very dangerous
location in the event of a crash.
OUB041204K
Page 95 of 446

Features of your vehicle
24
4
Closing the tailgate
To close the tailgate, lower and push
down the tailgate firmly. Make sure
that the tailgate is securely latched.
Make sure your hands, feet and
other parts of your body are safely
out of the way before closing the tail-
gate.
Emergency tailgate safety
release
Your vehicle is equipped with the
emergency tailgate safety release
lever located on the bottom of the
tailgate. When someone is inadver-
tently locked in the luggage compart-
ment, the tailgate can be opened by
doing as follows:
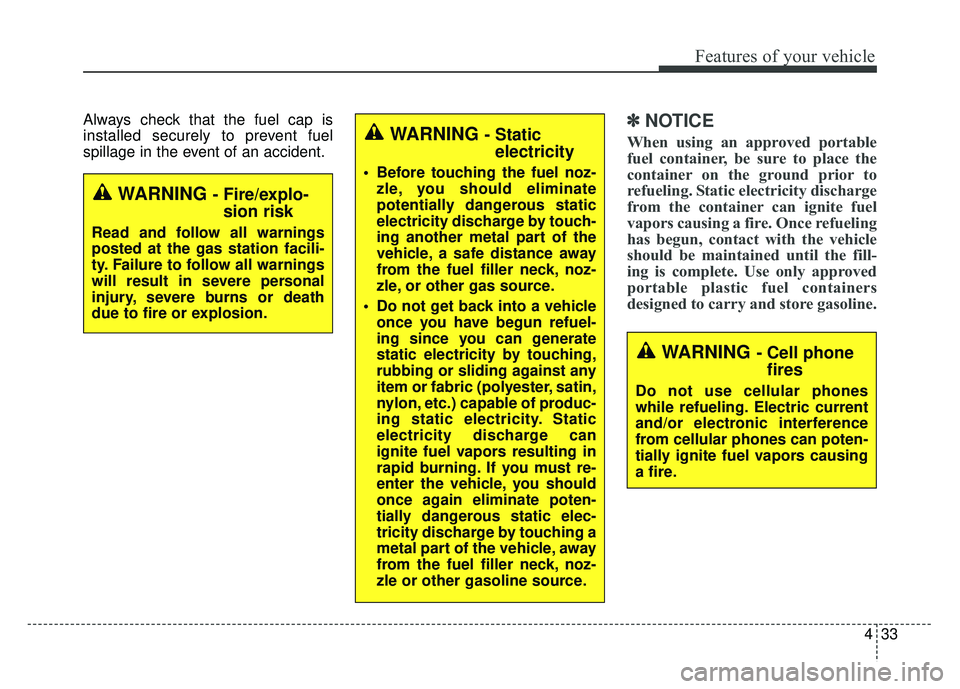
1.Remove the cover.
2.Push the release lever to the right.
3.Push up the tailgate.
CAUTION - Closing
tailgate
Make sure nothing is near the
tailgate latch and striker whileclosing the tailgate. It may dam-age the tailgate's latch.
OUB041014
WARNING- Exhaust fumes
Driving with the tailgate open is
not advisable. Dangerous
exhaust fumes can enter the
passenger compartment.
If you must drive with the tail-
gate opened, keep the air vents
and all windows open so that
additional outside air can enter.
WARNING- Riding incargo area
Occupants should never ride in
the rear cargo area where no
restraints are available.
Occupants should always be
properly restrained.
OUB041015
Page 102 of 446
431
Features of your vehicle
Closing the hood
1.Before closing the hood, check thefollowing:
partment must be correctly
installed.
bustible material must be
removed from the engine com-
partment.
2.Return the support rod to its clip to prevent it from rattling.
3.Lower the hood until it is about 1 ft. (30 cm) above the closed position
and let it drop. Make sure that it
locks into place. The support rod must be inserted
completely into the hole whenever
you inspect the engine compartment.
This will prevent the hood from falling
and possibly injuring you.
WARNING- Fire risk
Do not leave gloves, rags or any
other combustible material in
the engine compartment. Doing
so may cause a heat-induced
fire.
WARNING - Unsecured
engine Hood
If the engine hood is not
secured properly, it is likely to
fly up blocking your vision and
causing a crash.
Page 103 of 446

Features of your vehicle
32
4
Opening the fuel filler lid
The fuel filler lid must be opened
from inside the vehicle by pulling up
the fuel filler lid opener.
If the fuel filler lid does not open
because ice has formed around it,
tap lightly or push on the lid to break
the ice and release the lid. Do not pry
on the lid. If necessary, spray around
the lid with an approved de-icer fluid
(do not use radiator anti-freeze) or
move the vehicle to a warm place
and allow the ice to melt. 1.Stop the engine.
2.To open the fuel filler lid, pull the
fuel filler lid opener up.
3.Pull open the fuel filler lid (1).
4.To remove the cap (2), turn the fuel filler cap counterclockwise.
5.Refuel as needed.
Closing the fuel filler lid
1.To install the cap, turn it clockwise until it “clicks” one time. This indi-
cates that the cap is securely one
time tightened.
2.Close the fuel filler lid and push it in lightly and make sure that it is
securely closed.
✽ ✽
NOTICE
Tighten the cap until it clicks one
time, otherwise the fuel cap open
warning indicator light will illu-
minate.
FUEL FILLER LID
WARNING - Refueling
Always remove the fuel cap
carefully and slowly. If the cap
is venting fuel or if you hear a
hissing sound, wait until the
condition stops before com-
pletely removing the cap.
If pressurized fuel sprays out, it
can cover your clothes or skin
and subject you to the risk of
fire and burns.OUB041024OUB041025
Page 104 of 446

433
Features of your vehicle
Always check that the fuel cap is
installed securely to prevent fuel
spillage in the event of an accident.✽ ✽
NOTICE
When using an approved portable
fuel container, be sure to place the
container on the ground prior to
refueling. Static electricity discharge
from the container can ignite fuel
vapors causing a fire. Once refueling
has begun, contact with the vehicle
should be maintained until the fill-
ing is complete. Use only approved
portable plastic fuel containers
designed to carry and store gasoline.
WARNING - Fire/explo-
sion risk
Read and follow all warnings
posted at the gas station facili-
ty. Failure to follow all warnings
will result in severe personal
injury, severe burns or death
due to fire or explosion.
WARNING - Cell phonefires
Do not use cellular phones
while refueling. Electric current
and/or electronic interference
from cellular phones can poten-
tially ignite fuel vapors causing
a fire.
WARNING - Static electricity
Before touching the fuel noz-
zle, you should eliminate
potentially dangerous static
electricity discharge by touch-
ing another metal part of the
vehicle, a safe distance away
from the fuel filler neck, noz-
zle, or other gas source.
Do not get back into a vehicle once you have begun refuel-
ing since you can generate
static electricity by touching,
rubbing or sliding against any
item or fabric (polyester, satin,
nylon, etc.) capable of produc-
ing static electricity. Static
electricity discharge can
ignite fuel vapors resulting in
rapid burning. If you must re-
enter the vehicle, you should
once again eliminate poten-
tially dangerous static elec-
tricity discharge by touching a
metal part of the vehicle, away
from the fuel filler neck, noz-
zle or other gasoline source.