Page 61 of 212

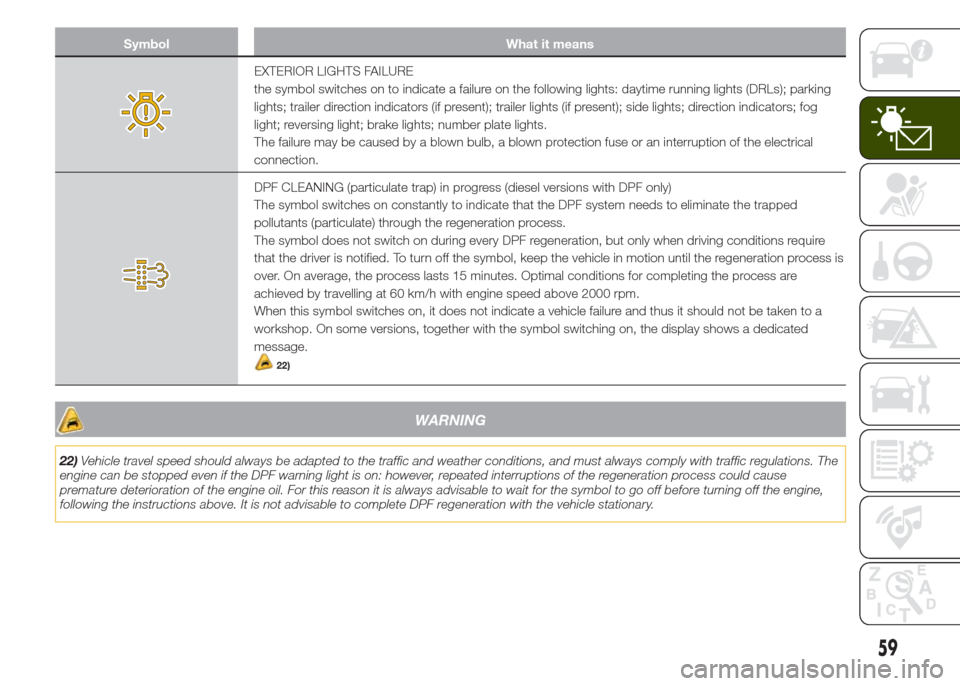
Symbol What it means
EXTERIOR LIGHTS FAILURE
the symbol switches on to indicate a failure on the following lights: daytime running lights (DRLs); parking
lights; trailer direction indicators (if present); trailer lights (if present); side lights; direction indicators; fog
light; reversing light; brake lights; number plate lights.
The failure may be caused by a blown bulb, a blown protection fuse or an interruption of the electrical
connection.
DPF CLEANING (particulate trap) in progress (diesel versions with DPF only)
The symbol switches on constantly to indicate that the DPF system needs to eliminate the trapped
pollutants (particulate) through the regeneration process.
The symbol does not switch on during every DPF regeneration, but only when driving conditions require
that the driver is notified. To turn off the symbol, keep the vehicle in motion until the regeneration process is
over. On average, the process lasts 15 minutes. Optimal conditions for completing the process are
achieved by travelling at 60 km/h with engine speed above 2000 rpm.
When this symbol switches on, it does not indicate a vehicle failure and thus it should not be taken to a
workshop. On some versions, together with the symbol switching on, the display shows a dedicated
message.
22)
WARNING
22)Vehicle travel speed should always be adapted to the traffic and weather conditions, and must always comply with traffic regulations. The
engine can be stopped even if the DPF warning light is on: however, repeated interruptions of the regeneration process could cause
premature deterioration of the engine oil. For this reason it is always advisable to wait for the symbol to go off before turning off the engine,
following the instructions above. It is not advisable to complete DPF regeneration with the vehicle stationary.
59
Page 127 of 212
BulbsType Power
Front side lights/Daytime running lights (DRL) P21/5W 21/5 W
Rear side lightsP21W 21 W
Main beam/dipped beam headlights (halogen) H4 60/55 W
Main beam/dipped beam headlights (Xenon gas discharge) D5S 25 W
Front direction indicatorsPY21W 21 W
Rear direction indicatorsW16W 16 W
Side direction indicators (front and on door mirror) WY5W 5 W
3rd brake lightLED –
Number plateW5W 5 W
Fog lightsH11 55 W
Rear fog lightW16W 16 W
Reverse lightW16W 16 W
Front courtesy lightsC5W 5 W
Front roof lights (sun visors)C5W 5 W
Rear roof light (versions without sun roof) C5W 5 W
Rear roof lights (versions with sun roof) C5W 5 W
Luggage compartment roof lights W5W 5 W
Glove compartment lightW5W 4 W
125
Page 129 of 212

❒turn anticlockwise (on the left device)
or clockwise (on the right device) and
remove the bulb and bulb holder
assemblies fig. 111: D = side
lights/daytime running lights (DRLs), E =
direction indicators;
❒replace the blown bulb: to remove
the bulb, press on it gently (1 fig. 112)
and at the same time turn it
anticlockwise (2);❒insert the new bulb, by pressing it fig.
112 and turning it clockwise, making
sure that it locks correctly;
❒then insert the bulb and bulb holder
units in their respective housings and
turn them anticlockwise (right side) and
clockwise (left side), ensuring that
they are locked correctly;
❒reconnect the electrical connectors;
❒finally, refit flap B fig. 109, completely
tightening fixing screws A.
Fog lights
To replace the bulbs proceed as
follows:
❒steer the wheels completely;
❒using the screwdriver, undo screws A
fig. 113 and remove flap B;
❒using tab C fig. 114, remove
electrical connector D;❒turn the bulb and bulb holder
assembly E fig. 114 anticlockwise and
then replace the bulb;
❒fit the new bulb and bulb holder
assembly, ensuring that it locks
correctly;
❒reconnect the electrical connector;
❒finally, refit flap B fig. 113, completely
tightening fixing screws A.
Side direction indicators
Side direction indicators on door
mirrors
(where provided)
For bulb replacement, contact a Jeep
Dealership.
Rear upper light cluster
This contains the bulbs for the side
lights, brake lights and direction
indicators.
111J0A0263C
112J0A0264C
113J0A0211C
114J0A0301C
127
Page 130 of 212

❒open the tailgate;
❒working at the point indicated by the
arrow, remove flap A fig. 115;
❒unscrew fixing device B fig. 116;
❒disconnect the electrical connector,
working on device C;
❒remove the rear light cluster,
outwards as indicated in fig. 117;
❒undo the four fixing screws D fig. 118
and remove the bulb holder unit;❒replace the bulb concerned (fig. 119:
E/G = brake lights, F = direction
indicators) (E and G bulbs always
switch on together);
❒fit the new bulb, making sure it is
correctly locked;
❒refit the bulb holder unit correctly on
the rear light cluster, completely
tightening the four fixing screws;
❒reposition the rear light cluster on the
vehicle;❒screw the rear light cluster fixing
device into position completely and
reconnect the electrical connector;
❒refit flap A fig. 115, ensuring that it
locks correctly;
❒finally, close the tailgate.
Rear lower light cluster
These contain the rear fog light bulbs
(left side) and reversing light bulbs (right
side).
To replace the bulbs proceed as
follows:
❒using the screwdriver, undo screws A
fig. 120 and B and remove flap C;
❒upper screw A is easy to access,
whereas for lower screw B it is
necessary to incline the blade of the
screwdriver appropriately as illustrated
in fig. 121;
115J0A0113C
116J0A0269C
117J0A0316C
118J0A0268C
119J0A0270C
128
IN AN EMERGENCY
To replace the bulbs proceed as
follows: