Page 17 of 126

CHILD RESTRAINTS
Children 12 years or younger should ride properly buckled up in a rear seat, if
available. According to crash statistics, children are safer when properly restrained in
the rear seats rather than in the front.
Every state in the United States and all Canadian provinces require that small
children ride in proper restraint systems. This is the law, and you can be prosecuted
for ignoring it.
NOTE:
•
For additional information, refer to www.seatcheck.org or call 1–866–SEATCHECK
(1–866–732–8243).
• Canadian residents, should refer to Transport Canada’s website for additional information:
http://www.tc.gc.ca/eng/roadsafety/safedrivers-childsafety-index-53.htm
LATCH — Lower Anchors And Tethers For CHildren
• Your vehicle is equipped with the child restraint anchorage system called LATCH,which stands for Lower Anchors and Tethers for CHildren.
• The rear outboard seating positions have lower anchors and top tether anchors. The rear center seating position has a top tether anchor only.
• You may use the LATCH anchorage system until the combined weight of
the child and the child restraint is
65 lbs (29.5 kg). Use the seat belt and
tether anchor instead of the LATCH
system once the combined weight is
more than 65 lbs (29.5 kg).
•
The lower anchorages are round
bars that are found at the rear of the
seat cushion where it meets the seat-
back. They are just visible when you
lean into the rear seat to install the
child restraint. You will easily feel
them if you run your finger along the
gap between the seatback and seat
cushion.
Lower Anchors
GETTING STARTED
15
Page 18 of 126

•In addition, there are tether strap anchorages behind each rear seating
position located on the back of the seat.
• Do not install child restraints with rigid lower attachments in the center
seating position. Only install this type
of child restraint in the outboard seat-
ing positions. Child restraints with
flexible, webbing mounted lower at-
tachments can be installed in any rear
seating position. In the center posi-
tion, the inner anchorages are 15.3
inches (390 mm) apart.
Installing The Child Restraint Using
The LATCH Lower Anchors
NOTE:
Never “share” a LATCH anchorage with
two or more child restraints.
1. Loosen the adjusters on the lower
straps and on the tether strap of the child seat so that you can more easily attach
the hooks or connectors to the vehicle anchorages.
2. Attach the lower hooks or connectors of the child restraint to the lower anchorages in the selected seating position.
3. If the child restraint has a tether strap, connect it to the top tether anchorage. See below for directions to attach a tether anchor.
4. Tighten all of the straps as you push the child restraint rearward and downward into the seat. Remove slack in the straps according to the child restraint
manufacturer’s instructions.
5. Test that the child restraint is installed tightly by pulling back and forth on the child seat at the belt path. It should not move more than 1 inch (25.4 mm) in any
direction.
Installing The Child Restraint Using The Vehicle Seat Belts
The seat belts in the passenger seating positions are equipped with a Switchable
Automatic Locking Retractor (ALR) that is designed to keep the lap portion of the
seat belt tight around the child restraint. Any seat belt system will loosen with time,
so check the belt occasionally, and pull it tight if necessary.
Always use the tether anchor when using the seat belt to install a forward facing child
restraint, up to the recommended weight limit of the child restraint.
Tether Anchors
GETTING STARTED
16
Page 19 of 126

To Install A Child Seat Using An ALR:
1. Pull enough of the seat belt webbing from the retractor to pass it through the beltpath of the child restraint. Do not twist the belt webbing in the belt path.
2. Slide the latch plate into the buckle until you hear a “click.”
3. Pull on the webbing to make the lap portion tight against the child seat.
4. To lock the seat belt, pull down on the shoulder part of the belt until you have pulled all the seat belt webbing out of the retractor. Then, allow the webbing to
retract back into the retractor. As the webbing retracts, you will hear a clicking
sound. This means the seat belt is now in the Automatic Locking mode.
5. Try to pull the webbing out of the retractor. If it is locked, you should not be able to pull out any webbing. If the retractor is not locked, repeat the last step.
6. Finally, pull up on any extra webbing to tighten the lap portion around the child restraint while you push the child restraint rearward and downward into the
vehicle seat.
7. If the child restraint has a top tether strap and the seating position has a top tether anchorage, connect the tether strap to the anchorage and tighten the tether strap.
See below for directions to attach a tether anchor.
8. Test that the child restraint is installed tightly by pulling back and forth on the child seat at the belt path. It should not move more than 1 inch (25.4 mm) in any
direction.
Installing The Top Tether Strap (With Either Lower Anchors Or Vehicle Seat
Belt):
When installing a forward-facing child restraint, always secure the top tether strap,
up to the tether anchor weight limit, whether the child restraint is installed with the
lower anchors or the vehicle seat belt.
1. Route the tether strap to provide the most direct path for the strap between theanchor and the child seat, routing it over the center of the head restraint.
2. Attach the tether strap hook of the child restraint to the top tether anchorage and remove slack in the tether strap according to the child restraint manufacturer’s
instructions.
GETTING STARTED
17
Page 20 of 126

WARNING!
• In a collision, an unrestrained child, even a tiny baby, can become a projectileinside the vehicle. The force required to hold even an infant on your lap could
become so great that you could not hold the child, no matter how strong you
are. The child and others could be severely injured or killed. Any child riding in
your vehicle should be in a proper restraint for the child's size.
• Rearward-facing child seats must never be used in the front seat of a vehicle
with a front passenger air bag. An air bag deployment could cause severe injury
or death to infants in this position.
• Only use a rearward-facing child restraint in a vehicle with a rear seat.
• Improper installation of a child restraint to the LATCH anchorages can lead to
failure of an infant or child restraint. The child could be severely injured or
killed. Follow the manufacturer’s directions exactly when installing an infant or
child restraint.
• An incorrectly anchored tether strap could lead to increased head motion and
possible injury to the child. Use only the anchor positions directly behind the
child seat to secure a child restraint top tether strap.
• If your vehicle is equipped with a split rear seat, make sure the tether strap
does not slip into the opening between the seatbacks as you remove slack in
the strap.
FRONT SEATS
Power Seats
The power seat switch is located on the
outboard side of the seat near the floor.
Use the switch to move the seat up,
down, forward, rearward, or to tilt the
seat.
Power Seat Switch
GETTING STARTED
18
Page 21 of 126
Manual Seat Adjustment
Forward/Rearward
• Lift up on the adjusting bar located at the front of the seat near the floor andrelease it when the seat is at the desired position. Then, using body pressure, move
forward and backward on the seat to be sure that the seat adjusters have latched.
Recliner
• Lift the recliner handle located on the outboard side of the seat, lean back andrelease at the desired position.
Driver’s Seat Height Adjustment
• The height adjustment lever is locatedon the outboard side of the seat. Raise
the lever to raise the seat. Lower the
lever to lower the seat.
Seat Adjusting Bar
Seat Height Adjustment/Recliner/Lumbar
1 — Height Adjustment
2 — Recliner
3 — Lumbar
GETTING STARTED
19
Page 22 of 126
Lumbar Support
• The lumbar lever is on the inboard side of the seatback. Rotate the lumbar leverdownward to increase the lumbar support or upward to decrease the lumbar
support as desired.
Fold-Flat Front Passenger Seat
The front passenger seat can be folded flat.
• Pull up on the recliner handle to thefull upward position to fold down the
seatback.
CAUTION!
Do not place any article under a power seat or impede its ability to move as it may
cause damage to the seat controls. Seat travel may become limited if movement
is stopped by an obstruction in the seat’s path.
Lumbar Support Lever
Seat Recliner Handle
GETTING STARTED
20
Page 23 of 126

WARNING!
• Adjusting a seat while the vehicle is moving is dangerous. The suddenmovement of the seat could cause you to lose control. The seat belt might not
be properly adjusted, and you could be severely injured or killed. Only adjust a
seat while the vehicle is parked.
• Do not ride with the seatback reclined so that the seat belt is no longer resting
against your chest. In a collision, you could slide under the seat belt and be
severely injured or killed. Use the recliner only when the vehicle is parked.
REAR SEATS
Folding Rear Seatback
• To fold each rear seatback, pull the strap forward to move the seatback forwardand flat.
Reclining Rear Seatback
• To recline each rear seatback, pull thestrap forward just enough to release
the seatback latch. Then push the
seatback to a reclined position, ap-
proximately 35 degrees maximum,
and release the strap.
WARNING!
Be certain that the seatback is securely locked into position. If the seatback is not
securely locked into position, the seat will not provide the proper stability for child
seats and/or passengers. An improperly latched seat could cause serious injury.
Rear Seatback Pull Straps
GETTING STARTED
21
Page 24 of 126

HEATED SEATS
Front Heated Seats
The controls for the front heated seats are located on the center instrument panel
area.
• Press the switch once to select High-level heating.
• Press the switch a second time to select Low-level heating.
• Press the switch a third time to shut the heating elements Off.
If the High-level setting is selected, the
system will automatically switch to Low-
level after approximately 30 minutes.
The Low-level setting will turn Off auto-
matically after approximately 30
minutes.
WARNING!
• Persons who are unable to feel pain to the skin because of advanced age, chronic illness, diabetes, spinal cord injury, medication, alcohol use, exhaus-
tion or other physical conditions must exercise care when using the seat heater.
It may cause burns even at low temperatures, especially if used for long periods
of time.
• Do not place anything on the seat that insulates against heat, such as a blanket
or cushion. This may cause the seat heater to overheat. Sitting in a seat that
has been overheated could cause serious burns due to the increased surface
temperature of the seat.
Heated Seat Switches
GETTING STARTED
22
 1
1 2
2 3
3 4
4 5
5 6
6 7
7 8
8 9
9 10
10 11
11 12
12 13
13 14
14 15
15 16
16 17
17 18
18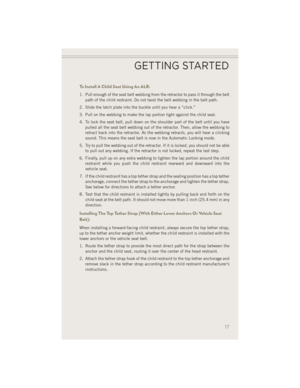 19
19 20
20 21
21 22
22 23
23 24
24 25
25 26
26 27
27 28
28 29
29 30
30 31
31 32
32 33
33 34
34 35
35 36
36 37
37 38
38 39
39 40
40 41
41 42
42 43
43 44
44 45
45 46
46 47
47 48
48 49
49 50
50 51
51 52
52 53
53 54
54 55
55 56
56 57
57 58
58 59
59 60
60 61
61 62
62 63
63 64
64 65
65 66
66 67
67 68
68 69
69 70
70 71
71 72
72 73
73 74
74 75
75 76
76 77
77 78
78 79
79 80
80 81
81 82
82 83
83 84
84 85
85 86
86 87
87 88
88 89
89 90
90 91
91 92
92 93
93 94
94 95
95 96
96 97
97 98
98 99
99 100
100 101
101 102
102 103
103 104
104 105
105 106
106 107
107 108
108 109
109 110
110 111
111 112
112 113
113 114
114 115
115 116
116 117
117 118
118 119
119 120
120 121
121 122
122 123
123 124
124 125
125
