2014 JEEP GRAND CHEROKEE reset
[x] Cancel search: resetPage 98 of 220
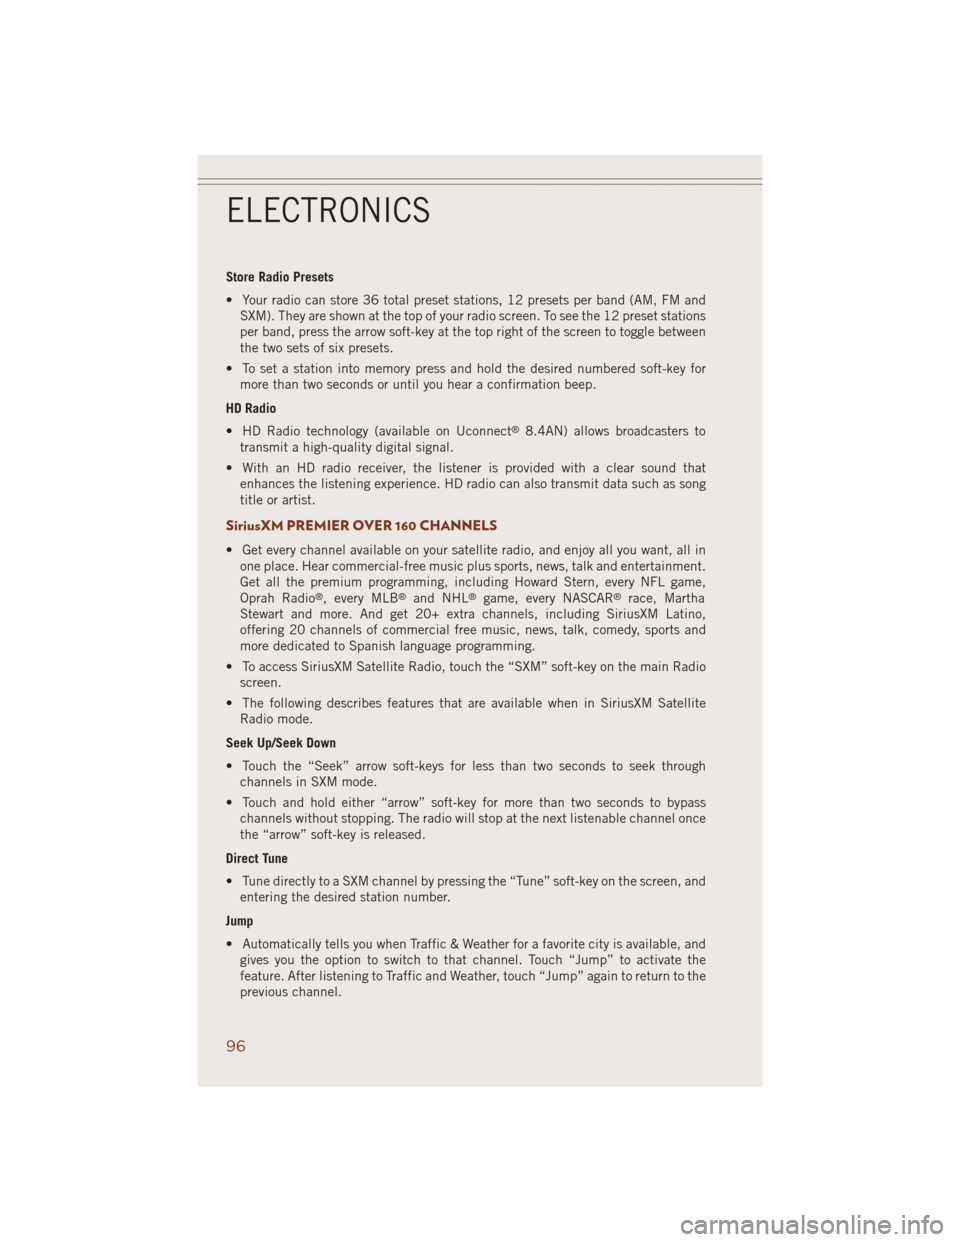
Store Radio Presets
• Your radio can store 36 total preset stations, 12 presets per band (AM, FM and
SXM). They are shown at the top of your radio screen. To see the 12 preset stations
per band, press the arrow soft-key at the top right of the screen to toggle between
the two sets of six presets.
• To set a station into memory press and hold the desired numbered soft-key for
more than two seconds or until you hear a confirmation beep.
HD Radio
• HD Radio technology (available on Uconnect
®8.4AN) allows broadcasters to
transmit a high-quality digital signal.
• With an HD radio receiver, the listener is provided with a clear sound that
enhances the listening experience. HD radio can also transmit data such as song
title or artist.
SiriusXM PREMIER OVER 160 CHANNELS
• Get every channel available on your satellite radio, and enjoy all you want, all in
one place. Hear commercial-free music plus sports, news, talk and entertainment.
Get all the premium programming, including Howard Stern, every NFL game,
Oprah Radio
®, every MLB®and NHL®game, every NASCAR®race, Martha
Stewart and more. And get 20+ extra channels, including SiriusXM Latino,
offering 20 channels of commercial free music, news, talk, comedy, sports and
more dedicated to Spanish language programming.
• To access SiriusXM Satellite Radio, touch the “SXM” soft-key on the main Radio
screen.
• The following describes features that are available when in SiriusXM Satellite
Radio mode.
Seek Up/Seek Down
• Touch the “Seek” arrow soft-keys for less than two seconds to seek through
channels in SXM mode.
• Touch and hold either “arrow” soft-key for more than two seconds to bypass
channels without stopping. The radio will stop at the next listenable channel once
the “arrow” soft-key is released.
Direct Tune
• Tune directly to a SXM channel by pressing the “Tune” soft-key on the screen, and
entering the desired station number.
Jump
• Automatically tells you when Traffic & Weather for a favorite city is available, and
gives you the option to switch to that channel. Touch “Jump” to activate the
feature. After listening to Traffic and Weather, touch “Jump” again to return to the
previous channel.
ELECTRONICS
96
Page 99 of 220
Fav
• Activates the favorites menu. You can add up to 50 favorite artists or songs. Just
touch “Add Fav Artist” or “Add Fav Song” while the song is playing. You will then
be alerted any time one of these songs, or works by these artists, is playing on other
SiriusXM channels.
SiriusXM Parental Controls
• You can skip or hide certain channels from view if you do not want access to them.
Touch the “More” soft-key, then the “Settings” soft-key, next touch the “Sirius
Setup” soft-key, then select “Channel Skip”. Touch the box, check-mark, next to
the channel you want skipped. They will not show up in normal usage.
• SiriusXM also offers the option to permanently block selected channels. Call
(1-888-601-6297 for U.S. customers, 1-877-438-9677 for Canadian custom-
ers) and request the Family - Friendly Package.
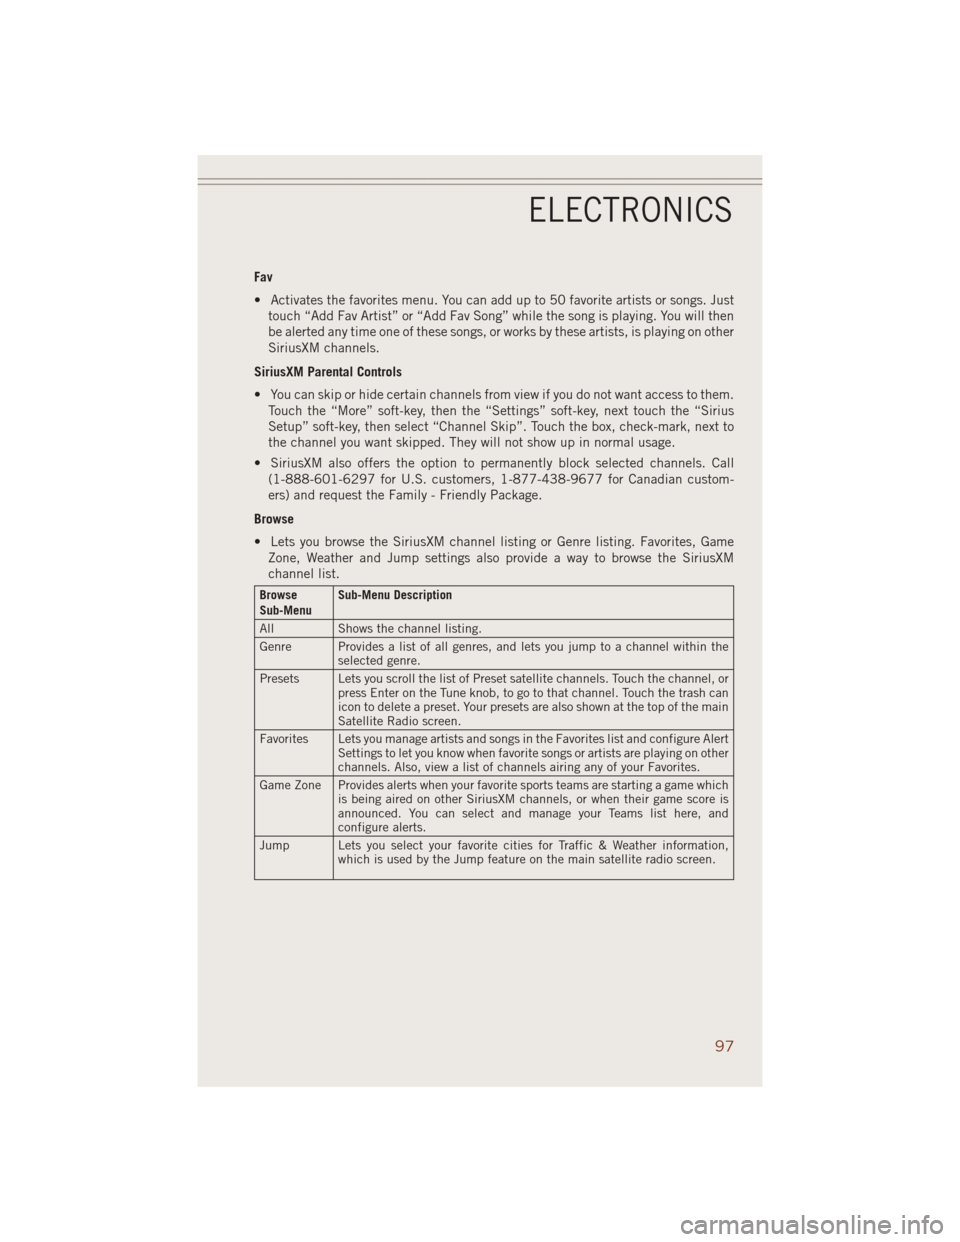
Browse
• Lets you browse the SiriusXM channel listing or Genre listing. Favorites, Game
Zone, Weather and Jump settings also provide a way to browse the SiriusXM
channel list.
Browse
Sub-MenuSub-Menu Description
All Shows the channel listing.
Genre Provides a list of all genres, and lets you jump to a channel within the
selected genre.
Presets Lets you scroll the list of Preset satellite channels. Touch the channel, or
press Enter on the Tune knob, to go to that channel. Touch the trash can
icon to delete a preset. Your presets are also shown at the top of the main
Satellite Radio screen.
Favorites Lets you manage artists and songs in the Favorites list and configure Alert
Settings to let you know when favorite songs or artists are playing on other
channels. Also, view a list of channels airing any of your Favorites.
Game Zone Provides alerts when your favorite sports teams are starting a game which
is being aired on other SiriusXM channels, or when their game score is
announced. You can select and manage your Teams list here, and
configure alerts.
Jump Lets you select your favorite cities for Traffic & Weather information,
which is used by the Jump feature on the main satellite radio screen.
ELECTRONICS
97
Page 113 of 220
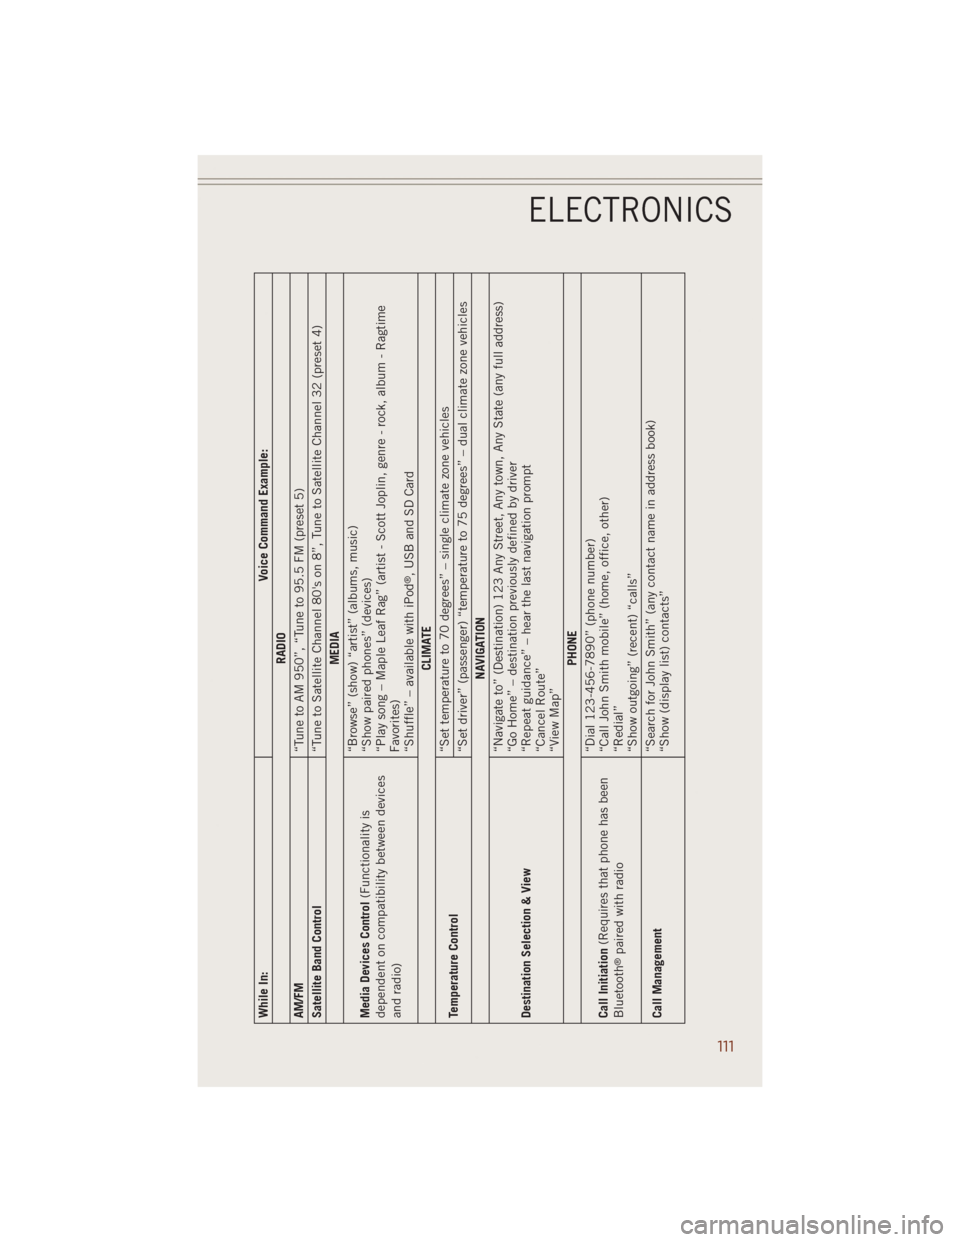
While In: Voice Command Example:
RADIO
AM/FM
“Tune to AM 950”, “Tune to 95.5 FM (preset 5)
Satellite Band Control
“Tune to Satellite Channel 80's on 8”, Tune to Satellite Channel 32 (preset 4)
MEDIA
Media Devices Control(Functionality is
dependent on compatibility between devices
and radio)“Browse” (show) “artist” (albums, music)
“Show paired phones” (devices)
“Play song – Maple Leaf Rag” (artist - Scott Joplin, genre - rock, album - Ragtime
Favorites)
“Shuffle” – available with iPod
®, USB and SD Card
CLIMATE
Temperature Control“Set temperature to 70 degrees” – single climate zone vehicles
“Set driver” (passenger) “temperature to 75 degrees” – dual climate zone vehicles
NAVIGATION
Destination Selection & View“Navigate to” (Destination) 123 Any Street, Any town, Any State (any full address)
“Go Home” – destination previously defined by driver
“Repeat guidance” – hear the last navigation prompt
“Cancel Route”
“View Map”
PHONE
Call Initiation(Requires that phone has been
Bluetooth
®paired with radio“Dial 123-456-7890” (phone number)
“Call John Smith mobile” (home, office, other)
“Redial”
“Show outgoing” (recent) “calls”
Call Management“Search for John Smith” (any contact name in address book)
“Show (display list) contacts”
ELECTRONICS
111
Page 116 of 220
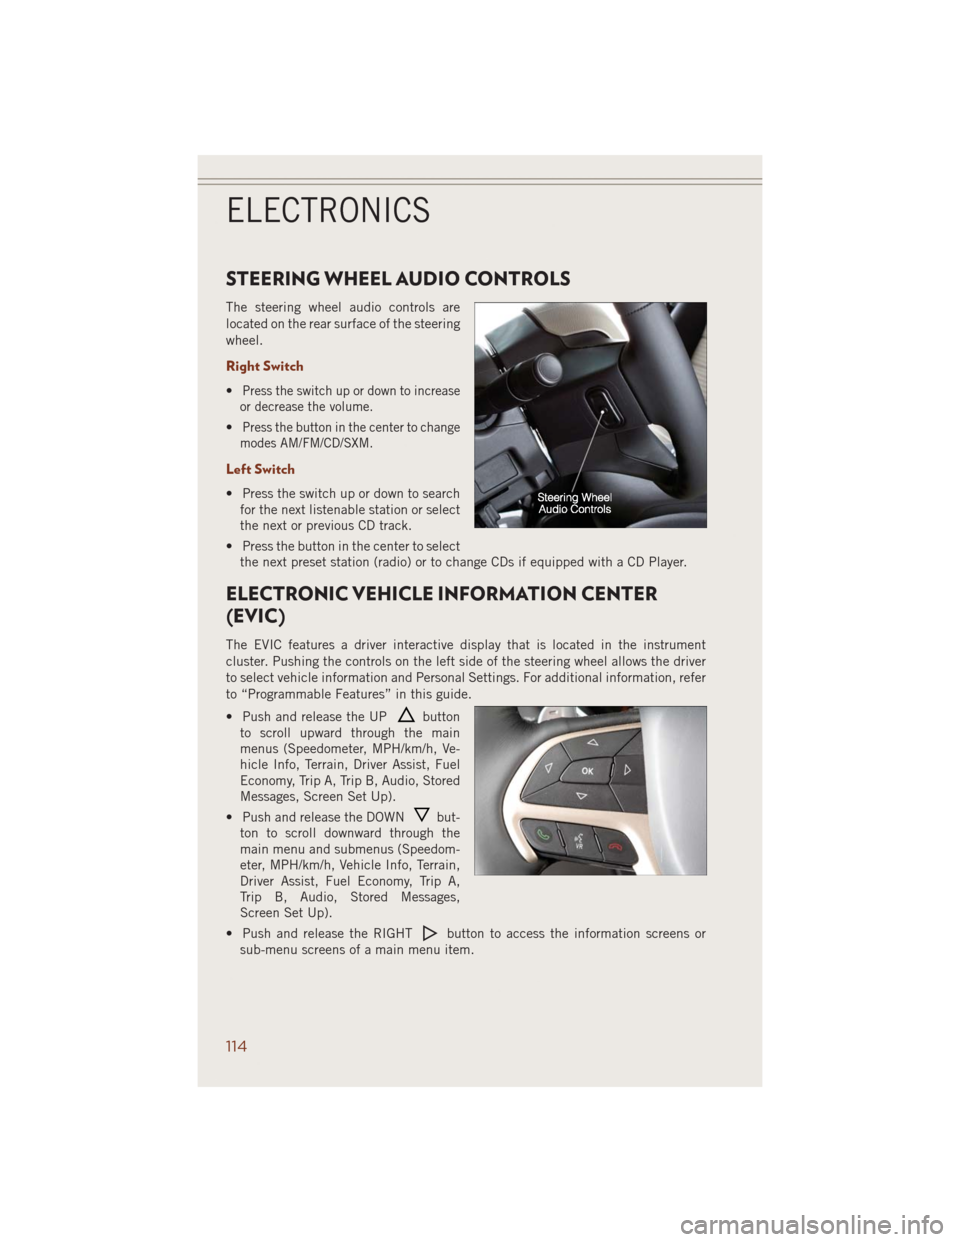
STEERING WHEEL AUDIO CONTROLS
The steering wheel audio controls are
located on the rear surface of the steering
wheel.
Right Switch
•Press the switch up or down to increase
or decrease the volume.
•Press the button in the center to change
modes AM/FM/CD/SXM.
Left Switch
• Press the switch up or down to search
for the next listenable station or select
the next or previous CD track.
• Press the button in the center to select
the next preset station (radio) or to change CDs if equipped with a CD Player.
ELECTRONIC VEHICLE INFORMATION CENTER
(EVIC)
The EVIC features a driver interactive display that is located in the instrument
cluster. Pushing the controls on the left side of the steering wheel allows the driver
to select vehicle information and Personal Settings. For additional information, refer
to “Programmable Features” in this guide.
• Push and release the UP
button
to scroll upward through the main
menus (Speedometer, MPH/km/h, Ve-
hicle Info, Terrain, Driver Assist, Fuel
Economy, Trip A, Trip B, Audio, Stored
Messages, Screen Set Up).
• Push and release the DOWN
but-
ton to scroll downward through the
main menu and submenus (Speedom-
eter, MPH/km/h, Vehicle Info, Terrain,
Driver Assist, Fuel Economy, Trip A,
Trip B, Audio, Stored Messages,
Screen Set Up).
• Push and release the RIGHT
button to access the information screens or
sub-menu screens of a main menu item.
ELECTRONICS
114
Page 117 of 220
• Push the BACK/LEFTbutton to access the information screens or sub-menu
screens of a main menu item.
• Push theOKbutton to access/select the information screens or sub-menu screens
of a main menu item. Push and hold the OK button for two seconds to reset
displayed/selected features that can be reset.
Compass Calibration
This compass is self-calibrating, which eliminates the need to set the compass
manually. When the vehicle is new, the compass may appear erratic and the EVIC will
display “– –” until the compass is calibrated.
You may also calibrate the compass by completing one or more 360 degree turns (in
an area free from large metal or metallic objects) until the “– –” message displayed
in the EVIC turns off. The compass will now function normally.
PROGRAMMABLE FEATURES
EVIC Programmable Features
The EVIC can be used to view or change the following settings. Push the UPor
DOWN
button until System Setup displays, then push the RIGHTbutton.
Scroll through the settings using the UP or DOWN buttons. Push the OK button to
change the setting. Push the BACK/LEFT
button to scroll back to a previous
menu or sub menu.
• Radio Info • Trip Info
• Fuel Economy Info • Tire Pressure
• Cruise Control Info • Vehicle Info
• Digital Vehicle Speed • Stored Warning Messages
• Screen Setup
Uconnect® Customer Programmable Features
• The Uconnect®system allows you to access Customer Programmable feature
settings such as Display, Clock, Safety/Assistance, Lights, Doors & Locks, Auto-On
Comfort & Remote Start, Engine Off Operation, Compass Settings, Audio, Trailer
Brake, Phone/Bluetooth
®, Suspension and SiriusXM Setup and System Informa-
tion through soft-keys.
ELECTRONICS
115
Page 121 of 220

Using HomeLink®
To operate, press and release the programmed HomeLink®button. Activation will
now occur for the programmed device (i.e., garage door opener, gate operator,
security system, entry door lock, home/office lighting, etc.,). The hand-held trans-
mitter of the device may also be used at any time.
WARNING!
• Your motorized door or gate will open and close while you are programming the
universal transceiver. Do not program the transceiver if people or pets are in the
path of the door or gate.
• Do not run your vehicle in a closed garage or confined area while programming
the transceiver. Exhaust gas from your vehicle contains Carbon Monoxide (CO)
which is odorless and colorless. Carbon Monoxide is poisonous when inhaled
and can cause you and others to be severely injured or killed.
POWER INVERTER
There is a 115 Volt, 150 Watt power inverter outlet located on the back of the center
console. This outlet can power cellular phones, electronics and other low power
devices requiring power up to 150 Watts.
NOTE:
The power inverter is designed with
built-in overload protection. If the power
rating of 150 Watts is exceeded, the
power inverter will automatically shut
down. Once the electrical device has
been removed from the outlet, the in-
verter should automatically reset. If the
power rating exceeds approximately
170 Watts, the power inverter may have
to be reset manually. To reset the inverter
manually, unplug the device and plug it in again. To avoid overloading the circuit,
check the power ratings on electrical devices prior to using the inverter.
WARNING!
To Avoid Serious Injury or Death DO NOT:
• insert any objects into the receptacles
• touch with wet hands
Close the lid when not in use. If this outlet is mishandled, it may cause an electric
shock and failure.
ELECTRONICS
119
Page 186 of 220

CAUTION!
• Mixing of engine coolant (antifreeze) other than specified Organic Additive
Technology (OAT) engine coolant (antifreeze), may result in engine damage and
may decrease corrosion protection. Organic Additive Technology (OAT) engine
coolant is different and should not be mixed with Hybrid Organic Additive
Technology (HOAT) engine coolant (antifreeze) or any “globally compatible”
coolant (antifreeze). If a non-OAT engine coolant (antifreeze) is introduced into
the cooling system in an emergency, the cooling system will need to be drained,
flushed, and refilled with fresh OAT coolant (conforming to MS-12106), by an
authorized dealer as soon as possible.
• Do not use water alone or alcohol-based engine coolant (antifreeze) products.
Do not use additional rust inhibitors or antirust products, as they may not be
compatible with the radiator engine coolant and may plug the radiator.
• This vehicle has not been designed for use with propylene glycol-based engine
coolant (antifreeze). Use of propylene glycol-based engine coolant (antifreeze)
is not recommended.
MAINTENANCE SCHEDULE — GASOLINE ENGINE
Your vehicle is equipped with an automatic oil change indicator system. The oil
change indicator system will remind you that it is time to take your vehicle in for
scheduled maintenance.
Based on engine operation conditions, the oil change indicator message will
illuminate. This means that service is required for your vehicle. Operating conditions
such as frequent short-trips, trailer tow, extremely hot or cold ambient temperatures,
and E85 fuel usage will influence when the “Oil Change Required” message is
displayed. Severe Operating Conditions can cause the change oil message to
illuminate as early as 3,500 miles (5,600 km) since last reset. Have your vehicle
serviced as soon as possible, within the next 500 miles (805 km).
Your authorized dealer will reset the oil change indicator message after completing the
scheduled oil change. If a scheduled oil change is performed by someone other than
your authorized dealer, the message can be reset by referring to the steps described
under “Instrument Cluster Warning Lights” in “What To Do In Emergencies” in this
guide or “Electronic Vehicle Information Center (EVIC)” in “Understanding Your
Instrument Panel” in your Owners Manual on the DVD for further information.
NOTE:
Under no circumstances should oil change intervals exceed 10,000 miles (16,000 km)
or twelve months, whichever comes first.
MAINTAINING YOUR VEHICLE
184
Page 191 of 220

SRT MAINTENANCE SCHEDULE
The Scheduled Maintenance services listed in this manual must be done at the times
or mileages specified to protect your vehicle warranty and ensure the best vehicle
performance and reliability. More frequent maintenance may be needed for vehicles
in severe operating conditions, such as dusty areas and very short trip driving.
Inspection and service should also be done anytime a malfunction is suspected.
The oil change indicator system will remind you that it is time to take your vehicle in
for scheduled maintenance.
On Electronic Vehicle Information Center (EVIC) equipped vehicles, “Oil Change
Required” will be displayed in the EVIC and a single chime will sound, indicating that
an oil change is necessary.
Based on engine operation conditions, the oil change indicator message will
illuminate. This means that service is required for your vehicle. Have your vehicle
serviced as soon as possible, within the next 500 miles (805 km).
NOTE:
• The oil change indicator message will not monitor the time since the last oil
change. Change your vehicle's oil if it has been six months since your last oil
change, even if the oil change indicator message is NOT illuminated.
•
Change your engine oil more often if you drive your vehicle off-road for an extended
period of time.
•Under no circumstances should oil change intervals exceed 6,000 miles (10,000 km)
or six months, whichever comes first.
Your authorized dealer will reset the oil change indicator message after completing the
scheduled oil change. If a scheduled oil change is performed by someone other than
your authorized dealer, the message can be reset by referring to the steps described
under “Instrument Cluster Warning Lights” in “What To Do In Emergencies” in this
guide or “Electronic Vehicle Information Center (EVIC)” in “Understanding Your
Instrument Panel” in your Owners Manual on the DVD for further information.
MAINTAINING YOUR VEHICLE
189