Page 358 of 615
Using The Remote Control
•Select an audio channel (Rear 1 for driver’s side rear
screen and Rear 2 for passenger’s side rear screen),
then press the source key and using the up and down
arrows, highlight disc from the menu and press the OK
button.
• Press the popup/menu key to navigate the disc menu
and options.
Play Video Games
Connect the video game console to the Auxiliary RCA/
HDMI input jacks located on the side of each seat.
Audio/Video RCA/HDMI Jacks (AUX/HDMI Jacks) on
the side of each seat enable the monitor to display video
directly from a video camera, connect video games for
display on the screen, or play music directly from an MP3
player.
Auxiliary RCA/HDMI Input Jacks
356 UNDERSTANDING YOUR INSTRUMENT PANEL
Page 360 of 615
Using The Remote Control
1. Press the SOURCE button on the Remote Control.
2. While looking at Rear 1 or 2, highlight DISC by eitherpressing Up/Down/Left/Right buttons, then press
ENTER/OK.
Using The Touchscreen Radio Controls
1. Press the Media soft-key on the Uconnect® radio
touchscreen.
2. Touch the Rear Media soft-key to display the Rear Media Control screen.
Select DISC Mode On The Rear Seat
Entertainment ScreenRear Media Control Screen
358 UNDERSTANDING YOUR INSTRUMENT PANEL
Page 363 of 615
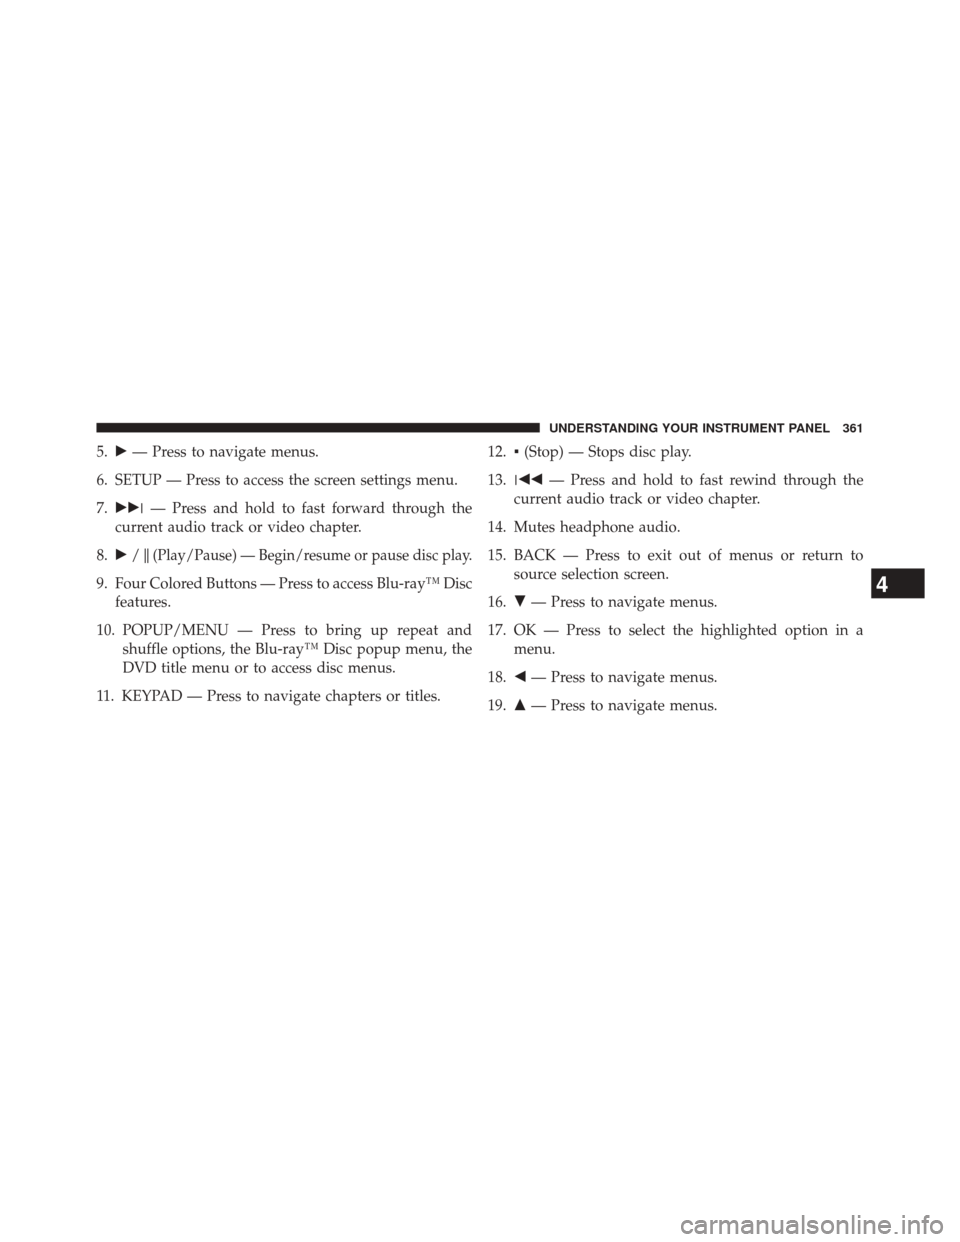
5.�— Press to navigate menus.
6. SETUP — Press to access the screen settings menu.
7. ��� — Press and hold to fast forward through the
current audio track or video chapter.
8. �/�
(Play/Pause) — Begin/resume or pause disc play.
9. Four Colored Buttons — Press to access Blu-ray™ Disc
features.
10. POPUP/MENU — Press to bring up repeat and shuffle options, the Blu-ray™ Disc popup menu, the
DVD title menu or to access disc menus.
11. KEYPAD — Press to navigate chapters or titles. 12.
▪(Stop) — Stops disc play.
13. ��� — Press and hold to fast rewind through the
current audio track or video chapter.
14. Mutes headphone audio.
15. BACK — Press to exit out of menus or return to source selection screen.
16. �— Press to navigate menus.
17. OK — Press to select the highlighted option in a menu.
18. �— Press to navigate menus.
19. �— Press to navigate menus.4
UNDERSTANDING YOUR INSTRUMENT PANEL 361
Page 375 of 615

Radio Operation
Pressing the top of the switch will “Seek” up for the next
listenable station and pressing the bottom of the switch
will “Seek” down for the next listenable station.
The button located in the center of the left-hand control
will tune to the next preset station that you have pro-
grammed in the radio preset pushbutton.
CD Player
Pressing the top of the switch once will go to the next
track on the CD. Pressing the bottom of the switch once
will go to the beginning of the current track, or to the
beginning of the previous track if it is within one second
after the current track begins to play.
If you press the switch up or down twice, it plays the
second track; three times, it will play the third, etc.
CD/DVD DISC MAINTENANCE
To keep a CD/DVD in good condition, take the following
precautions:
1.
Handle the disc by its edge; avoid touching the surface.
2. If the disc is stained, clean the surface with a soft cloth,wiping from center to edge.
3. Do not apply paper or tape to the disc; avoid scratch- ing the disc.
4. Do not use solvents such as benzene, thinner, cleaners, or anti-static sprays.
5. Store the disc in its case after playing.
6. Do not expose the disc to direct sunlight.
7. Do not store the disc where temperatures may become too high.
4
UNDERSTANDING YOUR INSTRUMENT PANEL 373
Page 381 of 615

Soft-Key
Use the small blower icon to reduce the blower setting
and the large blower icon to increase the blower setting.
Blower can also be selected by pressing the blower bar
area between the icons.
11. Modes
The airflow distribution mode can be adjusted so air
comes from the instrument panel outlets, floor outlets,
demist outlets and defrost outlets. The Mode settings are
as follows:•Panel Mode
Air comes from the outlets in the instrument
panel. Each of these outlets can be individually
adjusted to direct the flow of air. The air vanes of the
center outlets and outboard outlets can be moved up and
down or side to side to regulate airflow direction. There
is a shut off wheel located below the air vanes to shut off
or adjust the amount of airflow from these outlets. •
Bi-Level Mode
Air comes from the instrument panel outlets and
floor outlets. A slight amount of air is directed
through the defrost and side window demister outlets.
NOTE: BI-LEVEL mode is designed under comfort con-
ditions to provide cooler air out of the panel outlets and
warmer air from the floor outlets.
• Floor Mode
Air comes from the floor outlets. A slight amount
of air is directed through the defrost and side
window demister outlets.
•Mix Mode
Air comes from the floor, defrost and side window
demist outlets. This mode works best in cold or
snowy conditions.
4
UNDERSTANDING YOUR INSTRUMENT PANEL 379
Page 390 of 615

�DRIVING THROUGH WATER .............412
▫ Flowing/Rising Water ..................412
� POWER STEERING .....................414
�
FUEL SAVER TECHNOLOGY — IF EQUIPPED. . .415
� PARKING BRAKE ..................... .415
� ELECTRONIC BRAKE CONTROL SYSTEM . . . .418
▫ Anti-Lock Brake System (ABS) ............418
▫ Traction Control System (TCS) ............419
▫ Brake Assist System (BAS) ...............419
▫ Electronic Roll Mitigation (ERM) ..........420
▫ Electronic Stability Control (ESC) ..........421
▫ ESC Activation/Malfunction Indicator Light
And ESC OFF Indicator Light ............426
▫ Trailer Sway Control (TSC) ..............427�
TIRE SAFETY INFORMATION .............428
▫ Tire Markings ....................... .428
▫ Tire Identification Number (TIN) ...........431
▫ Tire Terminology And Definitions ..........433
▫ Tire Loading And Tire Pressure ...........434
� TIRES — GENERAL INFORMATION ........438
▫ Tire Pressure ....................... .438
▫ Tire Inflation Pressures .................440
▫ Tire Pressures For High Speed Operation . . . .441
▫ Radial Ply Tires ..................... .441
▫ Tire Types .......................... .442
▫ Run Flat Tires — If Equipped .............443
▫ Spare Tires — If Equipped ...............444
388 STARTING AND OPERATING
Page 400 of 615

Key Ignition Park Interlock
This vehicle is equipped with a Key Ignition Park Inter-
lock which requires the transmission to be in PARK
before the engine can be turned off. This helps the driver
avoid inadvertently leaving the vehicle without placing
the transmission in PARK. This system also locks the
transmission in PARK whenever the ignition switch is in
the OFF position.
Brake/Transmission Shift Interlock System
This vehicle is equipped with a Brake Transmission Shift
Interlock system (BTSI) that holds the shift lever in PARK
unless the brakes are applied. To shift the transmission
out of PARK, the engine must be running and the brake
pedal must be pressed. The brake pedal must also be
pressed to shift from NEUTRAL into DRIVE or REVERSE
when the vehicle is stopped or moving at low speeds.
Fuel Economy (ECO) Mode
The Fuel Economy (ECO) mode can improve the vehi-
cle’s overall fuel economy during normal driving condi-
tions. Press the “ECO” switch in the center stack of the
instrument panel and a green light will indicate the ECO
mode is engaged.
Fuel Economy Mode Switch
398 STARTING AND OPERATING
Page 407 of 615
, select TOW mode (refer
to�Selec-Trac®� in�Starting and Operating�) or use the
Paddle Shift switches (refer to �Paddle Shift Mode�in this
section for further informati")
or while towing heavy trailers), select TOW mode (refer
to�Selec-Trac®� in�Starting and Operating�) or use the
Paddle Shift switches (refer to �Paddle Shift Mode�in this
section for further information) to select a lower gear.
Under these conditions, using TOW mode or a lower
gear will improve performance and extend transmission
life by reducing excessive shifting and heat buildup.
During extremely cold temperatures (-22°F [-30°C] or
below), transmission operation may be modified depend-
ing on engine and transmission temperature as well as
vehicle speed. Normal operation will resume once the
transmission temperature has risen to a suitable level.
SPORT (S)
This mode alters the transmission’s automatic shift sched-
ule for sportier driving. Upshift speeds are increased to
make full use of available engine power. To switch between
DRIVE and SPORT modes, tap the shift lever rearward.
SPORT mode is only accessible from DRIVE.
Transmission Limp Home Mode
Transmission function is monitored electronically for
abnormal conditions. If a condition is detected that could
result in transmission damage, Transmission Limp Home
Mode is activated. In this mode, the transmission may
operate only in certain gears, or may not shift at all.
Vehicle performance may be severely degraded and the
engine may stall. In some situations, the transmission
may not re-engage if the engine is turned off and
restarted. The Malfunction Indicator Light (MIL) may be
illuminated. A message in the instrument cluster will
inform the driver of the more serious conditions, and
indicate what actions may be necessary.
In the event of a momentary problem, the transmission
can be reset to regain all forward gears by performing the
following steps:
5
STARTING AND OPERATING 405
,
then press the source key and using the up and down
arrows,")