2014 JEEP CHEROKEE charging
[x] Cancel search: chargingPage 3 of 204

INTRODUCTION/WELCOME
WELCOME FROM CHRYSLER
GROUP LLC.................. 3
CONTROLS AT A GLANCE
DRIVER COCKPIT .............. 6
INSTRUMENT CLUSTER .......... 8
GETTING STARTED
KEYFOB ................... 10
REMOTE START............... 12
VEHICLE SECURITY ALARM ....... 13
KEYLESS ENTER-N-GO™ ......... 14
SEATBELT .................. 18
SUPPLEMENTAL RESTRAINT SYSTEM
(SRS) — AIR BAGS ............ 19
CHILD RESTRAINTS ............ 20
FRONT SEATS ................ 25
REAR SEATS ................ 27
HEATED/VENTILATED SEATS ....... 28
HEATED STEERING WHEEL ....... 29
TILT/TELESCOPING STEERING
COLUMN ................... 30
OPERATING YOUR VEHICLE
ENGINE BREAK-IN
RECOMMENDATIONS ........... 31
TURN SIGNAL/HIGH BEAM LEVER . . . 31
HEADLIGHT SWITCH ............ 32
WIPER/WASHER LEVER .......... 33
SPEED CONTROL .............. 34
ADAPTIVE CRUISE CONTROL (ACC) . . . 36
FORWARD COLLISION WARNING (FCW)
WITHMITIGATION ............. 39
MANUAL CLIMATE CONTROLS WITHOUT
TOUCHSCREEN ............... 41
MANUAL CLIMATE CONTROLS WITH
TOUCHSCREEN ............... 42
AUTOMATIC TEMPERATURE
CONTROLS (ATC) .............. 43
ELECTRIC PARK BRAKE .......... 45
PARKSENSE
®................ 46
LANESENSE ................. 48
PARKVIEW
®REAR BACK-UP
CAMERA ................... 49
POWER SUNROOF ............. 50
WIND BUFFETING ............. 53
ELECTRONICS
YOUR VEHICLE'S SOUND SYSTEM . . . 54
IDENTIFYING YOUR RADIO ........ 56
Uconnect
®ACCESS ............. 57 Uconnect
®5.0 ................ 73
Uconnect®8.4A ............... 81
Uconnect®8.4AN ............. 100
STEERING WHEEL AUDIO
CONTROLS ................. 120
ELECTRONIC VEHICLE INFORMATION
CENTER (EVIC) .............. 121
PROGRAMMABLE FEATURES ...... 122
UNIVERSAL GARAGE DOOR OPENER
(HomeLink
®) ................ 122
POWER INVERTER ............ 125
POWER OUTLET ............. 126
WIRELESS CHARGING PAD ....... 128
OFF-ROAD CAPABILITIES
FOUR-WHEEL DRIVE OPERATION . . . 131
SELEC-TERRAIN™............ 134
UTILITY
CARGO AREA FEATURES ........ 135
TRAILER TOWING WEIGHTS (MAXIMUM
TRAILER WEIGHT RATINGS) ...... 135
RECREATIONAL TOWING (BEHIND
MOTORHOME, ETC.) ........... 136
WHATTODOIN
EMERGENCIES
ROADSIDE ASSISTANCE ......... 141
INSTRUMENT CLUSTER WARNING
LIGHTS ................... 141
INSTRUMENT CLUSTER INDICATOR
LIGHTS ................... 148
IF YOUR ENGINE OVERHEATS ..... 151
TIREFIT KIT ................ 151
JACKING AND TIRE CHANGING .... 158
JUMP-STARTING ............. 163
FREEING A STUCK VEHICLE ...... 166
RECOVERY STRAP ............ 167
SHIFT LEVER OVERRIDE ........ 167
TOWING A DISABLED VEHICLE .... 168
EVENT DATA RECORDER (EDR) .... 169
MAINTAINING YOUR VEHICLE
OPENING THE HOOD.......... 170
ENGINE COMPARTMENT ........ 171
FLUIDS AND CAPACITIES ........ 173
MAINTENANCE SCHEDULE ...... 175
FUSES .................... 179
TIRE PRESSURES ............. 184
WHEEL AND WHEEL TRIM CARE . . . 185
REPLACEMENT BULBS ......... 185
TABLE OF CONTENTS
Page 10 of 204

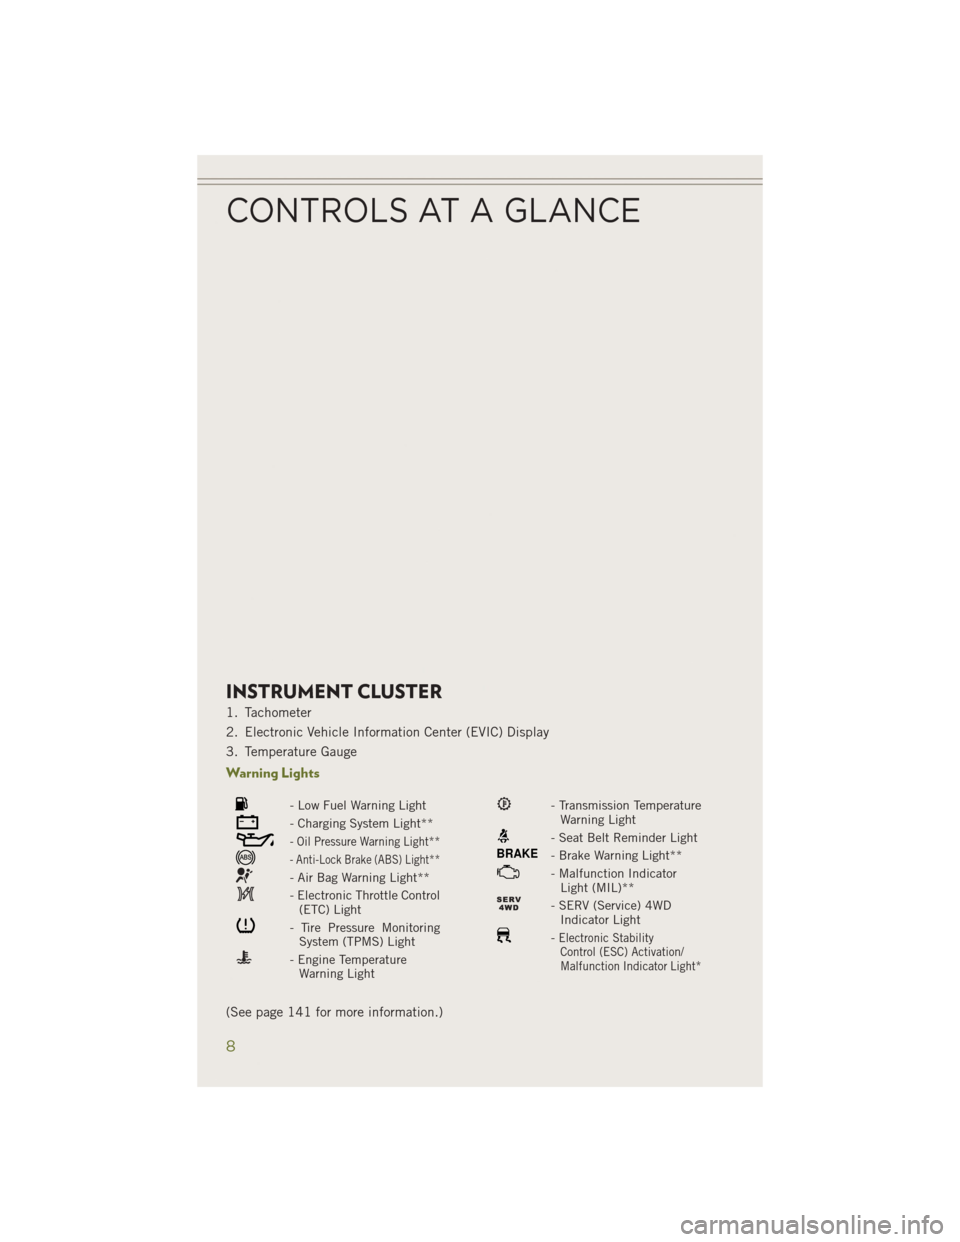
INSTRUMENT CLUSTER
1. Tachometer
2. Electronic Vehicle Information Center (EVIC) Display
3. Temperature Gauge
Warning Lights
- Low Fuel Warning Light
- Charging System Light**
- Oil Pressure Warning Light**
- Anti-Lock Brake (ABS) Light**
- Air Bag Warning Light**
- Electronic Throttle Control(ETC) Light
- Tire Pressure MonitoringSystem (TPMS) Light
- Engine TemperatureWarning Light
- Transmission TemperatureWarning Light
- Seat Belt Reminder Light
BRAKE- Brake Warning Light**
- Malfunction IndicatorLight (MIL)**
- SERV (Service) 4WDIndicator Light
-Electronic StabilityControl (ESC) Activation/
Malfunction Indicator Light*
(See page 141 for more information.)
CONTROLS AT A GLANCE
8
Page 89 of 204

NOTE:
• When connecting your iPod
®device for the first time, the system may take several
minutes to read your music, depending on the number of files. For example, the
system will take approximately five minutes for every 1000 songs loaded on the
device. Also during the reading process, the Shuffle and Browse functions will be
disabled. This process is needed to ensure the full use of your iPod
®features and
only happens the first time it is connected. After the first time, the reading process
of your iPod
®will take considerably less time unless changes are made or new
songs are added to the playlist.
•
The USB port supports certain Mini, Classic, Nano, Touch, and iPhone®devices. The
USB port also supports playing music from compatible external USB Mass Storage
Class memory devices. Some iPod
®software versions may not fully support the USB
port features. Please visit Apple’s website for iPod®software updates.
SD Card
• Play songs stored on an SD card inserted into the SD card slot.
• Song playback can be controlled using the radio or Steering Wheel Audio Controls to play, skip to the next or previous track, browse, and list the contents.
Audio Jack (AUX)
• The AUX allows a portable device, such as an MP3 player or an iPod
®,tobe
plugged into the radio and utilize the vehicle’s sound system, using a 3.5 mm
audio cable, to amplify the source and play through the vehicle speakers.
• Touching the “AUX” soft-key will change the mode to auxiliary device if the audio jack is connected, allowing the music from your portable device to be heard
through the vehicle's speakers. In order to activate the AUX, plug in the audio jack.
• The functions of the portable device are controlled using the device buttons. The volume may be controlled using the radio or portable device.
• To route the audio cable out of the center console, use the access cut out in the front of the console.
Bluetooth® Streaming Audio
•
If using a Bluetooth®- equipped device, you may also be able to stream music to your
vehicle's sound system. Your connected device must be Bluetooth-compatible, and
paired with your system (see Uconnect
®Phone for pairing instructions). You can access
the music from your connected Bluetooth®device by touching the “Bluetooth®”
soft-key while in Media mode.
Uconnect®
8.4A & 8.4AN Media Hub
(USB, AUX Ports) Media Hub
(SD, USB, AUX Ports) Remote USB
Port (Fully
Functional) Remote USB
Port (Charging Only)
-SSO
S = Standard Equipment
O = Optional Equipment
ELECTRONICS
87
Page 109 of 204

• To route the audio cable out of the center console, use the access cut out in thefront of the console.
Bluetooth® Streaming Audio
•
If using a Bluetooth®- equipped device, you may also be able to stream music to your
vehicle's sound system. Your connected device must be Bluetooth-compatible, and
paired with your system (see Uconnect
®Phone for pairing instructions). You can
access the music from your connected Bluetooth®device by touching the
“Bluetooth®” soft-key while in Media mode.
Uconnect®
8.4A & 8.4AN Media Hub
(USB, AUX Ports) Media Hub
(SD, USB, AUX Ports) Remote USB
Port (Fully
Functional) Remote USB
Port (Charging Only)
-SSO
S = Standard Equipment
O = Optional Equipment
iPod®/CD/AUX CONTROLS
• The iPod
®/CD/AUX controls are accessed by touching the desired soft-key dis-
played on the side of the screen and choose between Disc, AUX, iPod®, Bluetooth®
or SD Card.
NOTE:
Uconnect
®will usually automatically switch to the appropriate mode when some-
thing is first connected or inserted into the system.
ELECTRONICS
107
Page 130 of 204

WIRELESS CHARGING PAD
Wireless Charging Pad — If Equipped
• Your vehicle may be equipped with awireless charging pad located inside
the upper portion of the center con-
sole. This charging pad is designed to
wirelessly charge your Qi enabled mo-
bile phone. Qi is a standard that uses
magnetic induction to transfer power
to your mobile device.
•
Your mobile phone must be designed
for Qi wireless charging, be equipped
with an aftermarket sleeve or equipped
with a back plate from your mobile
phone provider, or an online or local
electronics retailer. The wireless charg-
ing pad is equipped with an anti-slip
mat, an adjustable cradle to hold your
mobile phone in place and an LED indicator light.
NOTE:
Visit www.UconnectPhone.com for supported mobile phones and compatible after-
market sleeves.
ELECTRONICS
128
Page 131 of 204

Wireless Charging Pad Operation
• To use the wireless charging pad, the coil in your mobile phone needs to align withthe coil in the charging pad, which is located directly under the Qi logo. Since each
mobile phone’s coil location is different, you may need a few attempts to locate the
correct spot for your mobile phone:
1. Place your mobile phone on the wireless charging pad, towards the Qi logo, so that the LED turns red. If the LED does not turn red, pick up the mobile phone
and change it’s location.
NOTE:
The mobile phone mustbe aligned around
the Qi logo for the LED to transition from
red to flashing green.
2. Once the LED transitions from redto flashing green, your mobile
phone is correctly placed and
charging.
3. If the LED does not transition from red to flashing green, and
just turns off, pick up your mobile
phone and reposition it on the
charging pad.
4. Use the adjustable cradle to hold the mobile phone in position. The cradle moves by pushing down on the finger tabs and moving the cradle in or out.
Mobile Phone Alignment
ELECTRONICS
129
Page 132 of 204

NOTE:
The initial adjustment will only need to be done once as long as only one mobile
phone is used. If a different mobile phone is used, the cradle will need to be
readjusted.
• The LED indicator will flash green while the mobile phone is charging. The Qienabled phone is able to function normally as it is charging.
CAUTION!
Do not place your vehicle Key Fob on the wireless charging pad, the Keyless
Enter-N-Go™ feature may not work properly while a mobile phone is being
charged.
WARNING!
Do not place metal object(s) between the mobile phone and wireless charging pad.
Metal object(s) such as coins, rings or keys will become very HOT. If metal
object(s) become lodged between the mobile phone and wireless charging pad,
carefully remove the mobile phone and allow the metal object(s) to cool before
removing. Failure to wait until the object(s) cool could result in personal injury,
including burns.
ELECTRONICS
130
Page 143 of 204

ROADSIDE ASSISTANCE
Dial toll-free 1-800-521-2779 for U.S. Residents or 1-800-363-4869 for Canadian
Residents.
• Provide your name, vehicle identification number, license plate number, and yourlocation, including the telephone number from which you are calling.
• Briefly describe the nature of the problem and answer a few simple questions.
• You will be given the name of the service provider and an estimated time of arrival. If you feel you are in an “unsafe situation”, please let us know. With your consent,
we will contact local police or safety authorities.
INSTRUMENT CLUSTER WARNING LIGHTS
- Charging System Light
This light shows the status of the electrical charging system. If the charging system
light remains on, it means that the vehicle is experiencing a problem with the
charging system.
We recommend you do not continue driving if the charging system light is on. Have
the vehicle serviced immediately.
- Oil Pressure Warning Light
This light indicates low engine oil pressure. If the light turns on while driving, stop
the vehicle and shut off the engine as soon as possible. A chime will sound for four
minutes when this light turns on.
We recommend you do not operate the vehicle or engine damage will occur. Have the
vehicle serviced immediately.
- Anti-Lock Brake (ABS) Light
This light monitors the Anti-Lock Brake System (ABS). The light will turn on when the
ignition switch is turned to the ON/RUN position and may stay on for as long as four
seconds.
If the ABS light remains on or turns on while driving, it indicates that the Anti-Lock
portion of the brake system is not functioning and that service is required. However,
the conventional brake system will continue to operate normally if the BRAKE
warning light is not on.
If the ABS light is on, the brake system should be serviced as soon as possible to
restore the benefits of Anti-Lock brakes. If the ABS light does not turn on when the
ignition switch is turned to the ON/RUN position, have the light inspected by an
authorized dealer.
WHAT TO DO IN EMERGENCIES
141