2014 INFINITI Q50 width
[x] Cancel search: widthPage 106 of 274

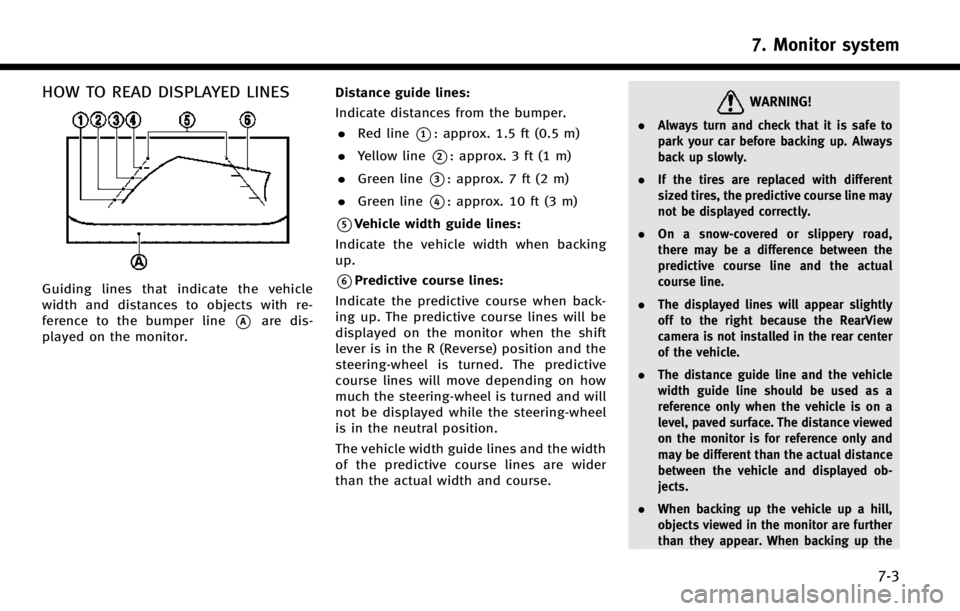
HOW TO READ DISPLAYED LINES
Guiding lines that indicate the vehicle
width and distances to objects with re-
ference to the bumper line
*Aare dis-
played on the monitor. Distance guide lines:
Indicate distances from the bumper.
. Red line
*1: approx. 1.5 ft (0.5 m)
. Yellow line
*2: approx. 3 ft (1 m)
. Green line
*3: approx. 7 ft (2 m)
. Green line
*4: approx. 10 ft (3 m)
*5Vehicle width guide lines:
Indicate the vehicle width when backing
up.
*6Predictive course lines:
Indicate the predictive course when back-
ing up. The predictive course lines will be
displayed on the monitor when the shift
lever is in the R (Reverse) position and the
steering-wheel is turned. The predictive
course lines will move depending on how
much the steering-wheel is turned and will
not be displayed while the steering-wheel
is in the neutral position.
The vehicle width guide lines and the width
of the predictive course lines are wider
than the actual width and course.
WARNING!
. Always turn and check that it is safe to
park your car before backing up. Always
back up slowly.
. If the tires are replaced with different
sized tires, the predictive course line may
not be displayed correctly.
. On a snow-covered or slippery road,
there may be a difference between the
predictive course line and the actual
course line.
. The displayed lines will appear slightly
off to the right because the RearView
camera is not installed in the rear center
of the vehicle.
. The distance guide line and the vehicle
width guide line should be used as a
reference only when the vehicle is on a
level, paved surface. The distance viewed
on the monitor is for reference only and
may be different than the actual distance
between the vehicle and displayed ob-
jects.
. When backing up the vehicle up a hill,
objects viewed in the monitor are further
than they appear. When backing up the
7. Monitor system
7-3
Page 107 of 274

7. Monitor system
7-4
vehicle down a hill, objects viewed in the
monitor are closer than they appear. Use
the inside mirror or glance over your
shoulder to properly judge distances to
other objects.
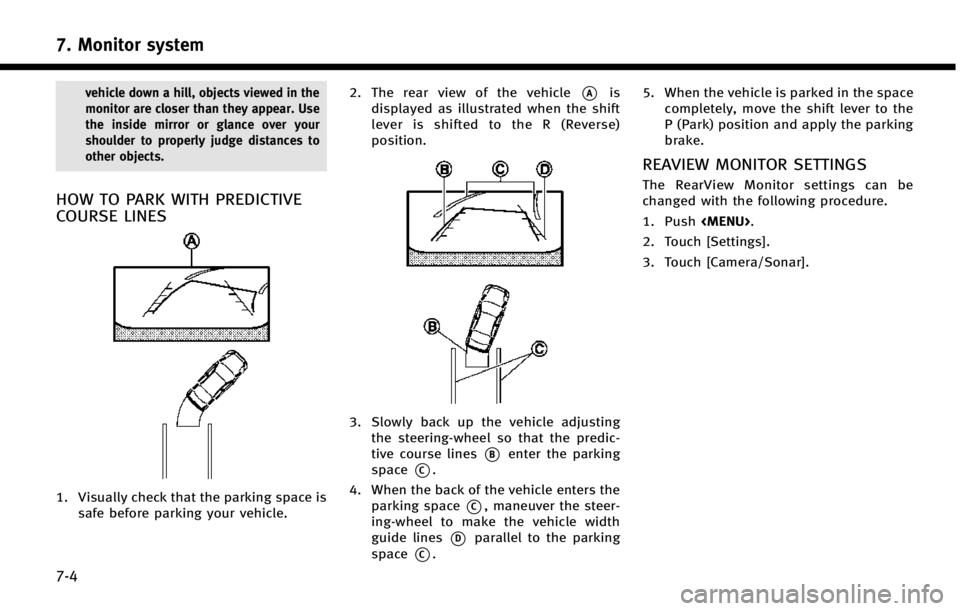
HOW TO PARK WITH PREDICTIVE
COURSE LINES
1. Visually check that the parking space issafe before parking your vehicle. 2. The rear view of the vehicle
*Ais
displayed as illustrated when the shift
lever is shifted to the R (Reverse)
position.
3. Slowly back up the vehicle adjusting the steering-wheel so that the predic-
tive course lines
*Benter the parking
space
*C.
4. When the back of the vehicle enters the parking space
*C, maneuver the steer-
ing-wheel to make the vehicle width
guide lines
*Dparallel to the parking
space
*C. 5. When the vehicle is parked in the space
completely, move the shift lever to the
P (Park) position and apply the parking
brake.
REAVIEW MONITOR SETTINGS
The RearView Monitor settings can be
changed with the following procedure.
1. Push
Page 111 of 274

7. Monitor system
7-8
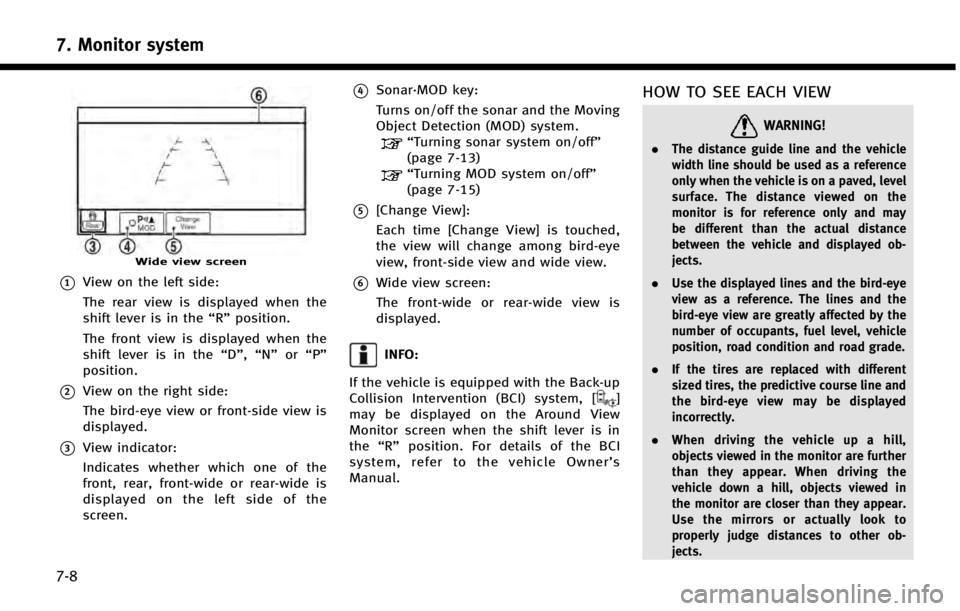
Wide view screen
*1View on the left side:
The rear view is displayed when the
shift lever is in the“R”position.
The front view is displayed when the
shift lever is in the “D”,“N”or“P”
position.
*2View on the right side:
The bird-eye view or front-side view is
displayed.
*3View indicator:
Indicates whether which one of the
front, rear, front-wide or rear-wide is
displayed on the left side of the
screen.
*4Sonar·MOD key:
Turns on/off the sonar and the Moving
Object Detection (MOD) system.
“Turning sonar system on/off”
(page 7-13)
“Turning MOD system on/off”
(page 7-15)
*5[Change View]:
Each time [Change View] is touched,
the view will change among bird-eye
view, front-side view and wide view.
*6Wide view screen:
The front-wide or rear-wide view is
displayed.
INFO:
If the vehicle is equipped with the Back-up
Collision Intervention (BCI) system, [
]
may be displayed on the Around View
Monitor screen when the shift lever is in
the “R” position. For details of the BCI
system, refer to the vehicle Owner’ s
Manual.
HOW TO SEE EACH VIEW
WARNING!
. The distance guide line and the vehicle
width line should be used as a reference
only when the vehicle is on a paved, level
surface. The distance viewed on the
monitor is for reference only and may
be different than the actual distance
between the vehicle and displayed ob-
jects.
. Use the displayed lines and the bird-eye
view as a reference. The lines and the
bird-eye view are greatly affected by the
number of occupants, fuel level, vehicle
position, road condition and road grade.
. If the tires are replaced with different
sized tires, the predictive course line and
the bird-eye view may be displayed
incorrectly.
. When driving the vehicle up a hill,
objects viewed in the monitor are further
than they appear. When driving the
vehicle down a hill, objects viewed in
the monitor are closer than they appear.
Use the mirrors or actually look to
properly judge distances to other ob-
jects.
Page 112 of 274

.The vehicle width and predictive course
lines are wider than the actual width and
course.
. The distance between objects viewed in
the rear view differs from actual distance
because a wide-angle lens is used.
Objects in the rear view will appear
visually opposite than when viewed in
the rear view and outside mirrors.
. On a snow-covered or slippery road,
there may be a difference between the
predictive course line and the actual
course line.
. The displayed lines on the rear view will
appear slightly off to the right because
the RearView camera is not installed in
the rear center of the vehicle.Front and rearview
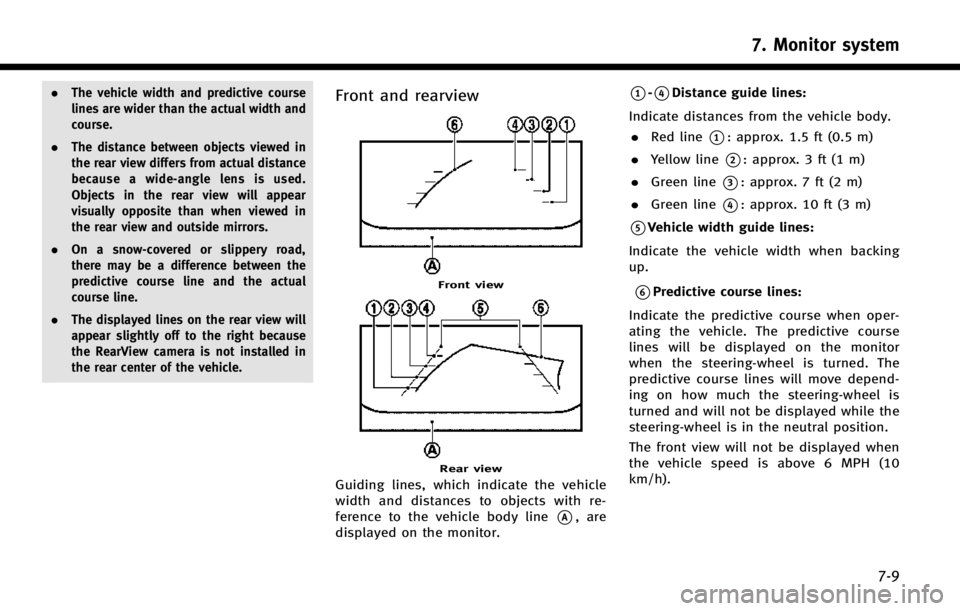
Front view
Rear view
Guiding lines, which indicate the vehicle
width and distances to objects with re-
ference to the vehicle body line
*A, are
displayed on the monitor.
*1-*4Distance guide lines:
Indicate distances from the vehicle body. . Red line
*1: approx. 1.5 ft (0.5 m)
. Yellow line
*2: approx. 3 ft (1 m)
. Green line
*3: approx. 7 ft (2 m)
. Green line
*4: approx. 10 ft (3 m)
*5Vehicle width guide lines:
Indicate the vehicle width when backing
up.
*6Predictive course lines:
Indicate the predictive course when oper-
ating the vehicle. The predictive course
lines will be displayed on the monitor
when the steering-wheel is turned. The
predictive course lines will move depend-
ing on how much the steering-wheel is
turned and will not be displayed while the
steering-wheel is in the neutral position.
The front view will not be displayed when
the vehicle speed is above 6 MPH (10
km/h).
7. Monitor system
7-9
Page 114 of 274

of the vehicle.
Front-side view
Guiding lines that indicate the width and
the front end of the vehicle are displayed
on the monitor.
*1Front-of-vehicle line:
Shows the front part of the vehicle.
*2Side-of-vehicle line:
Shows the vehicle width including the
outside mirror.
*3Extension lines:
Extensions of the front-of-vehicle line and
the side-of-vehicle line are displayed with
a green dotted line.
*4Sonar indicator:
Displayed when objects are detected.
The sonar indicator can be turned off.
“Around View Monitor settings”
(page 7-16).
CAUTION!
The turn signal light may look like the side-
of-vehicle line. This is not a malfunction.
Front-wide/rear-wide view
Front-wide view
Rear-wide view
The front-wide/rear-wide view shows a
wider area on the entire screen and allows
the checking of the blind corners on the
right and left sides. The front-wide/rear-
wide view displays an approximately 180-
degree area while the front view and the
rear view display an approximately 150-
degree area. The predictive course lines are
not displayed on the front-wide/rear-wide
view.
*1-*4Distance guide lines:
Indicates distances from the vehicle body. . Red line
*1: approx. 1.5 ft (0.5 m)
. Yellow line
*2: approx. 3 ft (1 m)
. Green line
*3: approx. 7 ft (2 m)
7. Monitor system
7-11
Page 115 of 274

7. Monitor system
7-12
.Green line*4: approx. 10 ft (3 m)
*5Vehicle width guide lines:
Indicates the vehicle width when backing
up.
*ASonar indicator:
Appears when the vehicle moves closer to
an object.
CAMERA AIDING SONAR FUNCTION
The sonar (parking sensor) sounds a tone
to inform the driver of obstacles near the
bumper.
WARNING!
. The sonar is a convenience feature. It is
not a substitute for proper parking.
. The driver is always responsible for
safety during parking and other maneu-
vers.
. Always look around and check that it is
safe to move before parking.
. Read and understand the limitations of
the sonar as contained in this section.
. The colors of the sonar indicators and the
distance guide lines in the front, front-
wide, rear and rear-wide views indicate different distances to the object.
. Inclement weather or ultrasonic sources
such as an automatic car wash, a truck’s
compressed-air brakes or a pneumatic
drill may affect the function of the
system; this may include reduced perfor-
mance or a false activation.
. This function is designed as an aid to the
driver in detecting large stationary ob-
jects to help avoid damaging the vehicle.
. The system is not designed to prevent
contact with small or moving objects.
. The system will not detect small objects
below the bumper, and may it not detect
objects close to the bumper or on the
ground.
. The system may not detect the following
objects:
— Fluffy objects such as snow, cloth,
cotton, glass or wool.
— Thin objects such as rope, wire or
chain.
— Wedge-shaped objects.
. If your vehicle sustains damage to the
bumper fascia, leaving it misaligned or
bent, the sensing zone may be altered causing inaccurate measurement of ob-
jects or false alarms.
CAUTION!
.
Excessive noise (such as audio system
volume or an open vehicle window) will
interfere with the tone and it may not be
heard.
. Keep the surface of the sonar sensors
(located on the front and rear bumper
fascia) free from accumulations of snow,
ice and dirt. Do not scratch the surface of
the sonar sensors when cleaning. If the
sensors are covered, the accuracy of the
sonar function will be diminished.
The system sounds the tone for front
objects when the shift lever is in the D
(Drive) position and both front and rear
objects when the shift lever is in the R
(Reverse) position.
When the camera image is shown on the
display, the system shows the sonar
indicator regardless of the shift lever
position.
The system is deactivated at speeds above
Page 122 of 274

DIFFERENCE BETWEEN PREDICTIVE AND
ACTUAL DISTANCES
BACKING UP ON A STEEP UPHILL
When backing up the vehicle up a hill, the
distance guide lines and the vehicle width
guide lines are shown closer than the
actual distance. For example, the display
shows 3 ft (1 m) to the place
*A, but the
actual 3 ft (1 m) distance on the hill is the
place
*B. Note that any object on the hill is
further than it appears on the monitor.
BACKING UP ON A STEEP DOWNHILL
When backing up the vehicle down a hill,
the distance guide lines and the vehicle
width guide lines are shown further than
the actual distance. For example, the
display shows 3 ft (1 m) to the place
*A,
but the actual 3 ft (1 m) distance on the hill
is the place
*B. Note that any object on
the hill is closer than it appears on the
monitor.
BACKING UP NEAR A PROJECTING
OBJECT
The predictive course lines*Ado not
touch the object in the display. However,
the vehicle may hit the object if it projects
over the actual backing up course.
7. Monitor system
7-19
Page 222 of 274

or route you into an area you consider
unsafe.
. The advice provided by the navigation
system is to be regarded only as a
suggestion. There may be situations
where the navigation system displays
the vehicle’s location incorrectly, fails to
suggest the shortest course, and/or fails
to direct you to your desired destination.
In such situations, rely on your own
driving judgement, talking into account
current driving conditions.
. Do not use the navigation system to
route you to emergency services. The
database does not contain a complete
listing of locations of emergency service
providers such as police, fire stations,
hospitals and clinics. Please use your
judgement and your ability to ask for
directions in these situations.
. As the driver you solely are responsible
for your driving safety.
— In order to avoid traffic accidents, do
not operate the system while driving.
— In order to avoid traffic accidents,
operate the system only when the
vehicle is stopped at a safe place and
the parking brake is set. —
In order to avoid traffic accidents or
traffic offence, remember that actual
road conditions and traffic regulations
take precedence over the information
contained on the navigation system.
— Accordingly, the Software may contain
inaccurate or incomplete information
due the passage of time, changing
circumstances, and due to the nature
of the sources used. Please observe
the actual traffic circumstances and
regulations at all times while driving.
— In a situation when actual road
conditions and traffic regulations differ
from the information contained on the
navigation system, then abide by
traffic rules.
— The navigation system does not pro-
vide, or account for in any way,
information regarding traffic and road
laws; speed restrictions; road condi-
tions including road slope, grade, and/
or surface conditions; obstruction in-
formation including bridge and tunnel
height and width, and/or other pre-
vailing driving and/or road conditions.
Always rely on your own driving judg-
ment, taking into account current driving conditions.
— Minimize the amount of time spent
viewing the screen while driving.
The marks of companies displayed by this
product to indicate business locations are
the marks of their respective owners. The
use of such marks in this product does not
imply any sponsorship, approval, or en-
dorsement by such companies of this
product.
End-user terms
The data (“Data”) is provided for your
personal, internal use only and not for
resale. It is protected by copyright, and is
subject to the following terms and condi-
tions which are agreed to by you, on the
one hand, and CLARION CO., LTD. (“CLAR-
ION”) and its licensors (including their
licensors and suppliers) on the other hand.
*
C2012 NAVTEQ. All rights reserved.
This data includes information taken with
permission from Canadian authorities, in-
cluding *
CHer Majesty, *CQueen’s Printer
for Ontario, *CCanada Post, GeoBase®,*C
Department of Natural Resources Canada.
All rights reserved.
9. Navigation (if so equipped)
9-67