2. Getting Started
2-16
.Registering cellular phones
. Making a call by dial number and
handset phonebook
. Setting phone, Infiniti Connection
TM
and Bluetooth®functions
These functions will become available
again when the vehicle speed is reduced
to 5 mph (8 km/h) or less.
Destination functions available while driv-
ing include: . Home
. Stored Location
. Previous Destinations
. Stored Routes
. Map input
ITEMS TO BE SET INITIALLY
The settings included in this section
should be performed before using the
system for the first time.
SCREEN SETTINGS
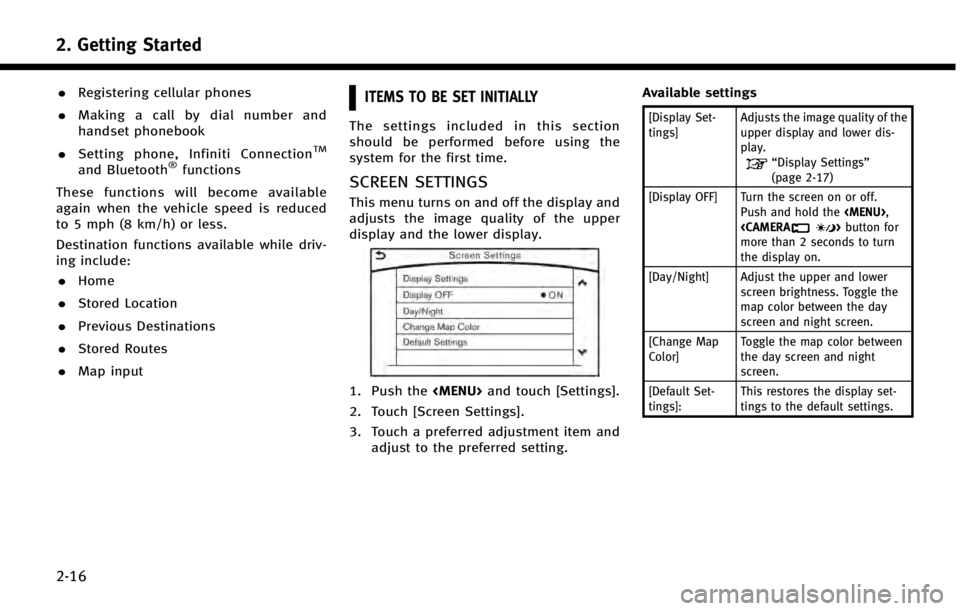
This menu turns on and off the display and
adjusts the image quality of the upper
display and the lower display.
1. Push the
Page 26 of 274
Display Settings
1. Push
Page 28 of 274
LANGUAGE AND UNIT SETTINGS
This changes the upper and lower display
language and measurement unit used in
the system.
Step 1Step 2Setting item Action
1. Push
Page 54 of 274
STEERING-WHEEL MOUNTED AUDIO
CONTROL BUTTONS
*1<> (BACK):
Push to go back to the previous screen
or cancel the selection if it is not
completed.
*2:
Tilting the switch up/down while the
audio system is turned on with the
map or display view screen displayed
on the upper touch screen display
(upper display) can operate the audio
system such as changing tracks and
radio stations.
Models with navigation system:
Push to select audio source or display
the audio list.
“ Shortcut menu (models with
navigation system)” (page 2-10)
*3<-+ > (Volume control):
Push the upper (+) or lower (−) side of
the switch to increase or decrease the
volume.
AUDIO OPERATIONS
AUDIO MAIN OPERATION
Turning audio system on/off
The ignition switch must be in the “ACC”or
“ON” position to turn on the audio system.
Push
>to turn on the last audio
source that was playing immediately be-
fore the system was turned off. To turn off
the audio system, push
>again.
Selecting audio source
1. Turn on the audio source menu screen
by pushing
Page 55 of 274
4. Audio system
4-12
INFO:
.
Pushing or can also
change the audio source.
“Audio main buttons” (page 4-10)
.If the audio system has been turned off
while the radio, CD, USB memory device or
Bluetooth
®Streaming Audio device was
playing, turning the audio system back on
will play the audio source that was playing
when the system was turned off.
.The audio source can also be changed with
the source bar (if so equipped) on top of the
audio screen. The source bar display can be
turned on/off.
.The audio system settings can be linked and
memorized for each of the Intelligent Keys.
“ Fully customizable digital environ-
ment” (page 8-28)
Audio source bar
It is possible to display the source select
bar on the audio screen The default setting of the audio source bar
display is ON.
Turning source bar on/off:
1. Touch [Source] on the upper left corner
of the audio screen.
2. Touch [Edit Shortcut].
3. Touch [Show Source Bar] to turn on/off the indicator.
Setting source bar:
The audio sources to be displayed on the
source bar can be set.
1. Touch [Source] on the upper left corner of the audio screen.
2. Touch [Edit Shortcut]. 3. Touch one of the keys on the source bar
and then touch one of the audio
sources from source list to register
the audio source in the source bar.
Page 73 of 274
4. Audio system
4-30
Register De-
viceTouch to connect a new Blue-
tooth®device.
Connect Device Touch to select a different Bluetooth
®device from a list of
registered Bluetooth®devices.“Bluetooth®settings”
(page 2-21)
AUXILIARY (AUX) DEVICES
Connecting auxiliary devices
The auxiliary input jack is located in the
center console box.
“Media Hub” (page 2-6)
The auxiliary input jack accepts any stan-
dard analog audio input such as from a
portable cassette player, CD player or MP3
player.
INFO:
Insert a 1/4 in (3.5 mm) stereo mini plug in the
audio input jack. If a cable with a mono plug is
used, the audio output may not function
normally.
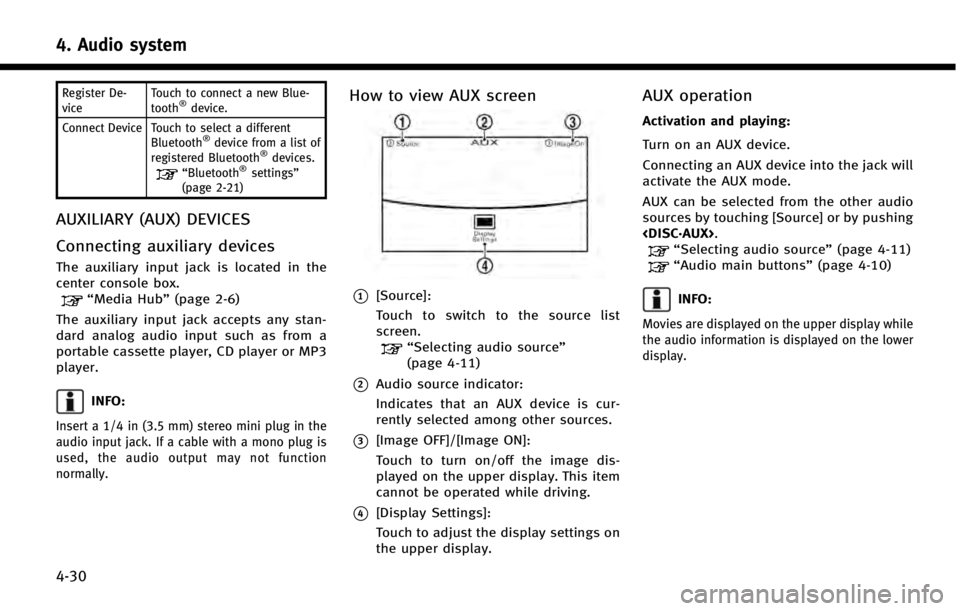
How to view AUX screen
*1[Source]:
Touch to switch to the source list
screen.
“Selecting audio source ”
(page 4-11)
*2Audio source indicator:
Indicates that an AUX device is cur-
rently selected among other sources.
*3[Image OFF]/[Image ON]:
Touch to turn on/off the image dis-
played on the upper display. This item
cannot be operated while driving.
*4[Display Settings]:
Touch to adjust the display settings on
the upper display.
AUX operation
Activation and playing:
Turn on an AUX device.
Connecting an AUX device into the jack will
activate the AUX mode.
AUX can be selected from the other audio
sources by touching [Source] or by pushing .
“Selecting audio source ”(page 4-11)“Audio main buttons” (page 4-10)
INFO:
Movies are displayed on the upper display while
the audio information is displayed on the lower
display.
Page 75 of 274
4. Audio system
4-32
Setting itemsAction
[Album Cover] Turn the item on to display image files from the media device. If the media device does not contain
images, no image will be displayed.
[Radio Settings] [HD Mode AM] When this item is turned on, the analog and digital reception switches automatically. When this
item is turned off, the reception is fixed in the analog mode.
[HD Mode FM]
[AUX Settings] [Image ON]/[Image OFF] The image display on the upper display can be turned on/off.
[AUX Image Display] The image display size setting can be selected from [Normal], [Wide] and [Cinema].
[Volume Setting] The volume setting can be selected from [Low], [Medium] and [High].
*: if so equipped
![INFINITI Q50 2014 Infiniti Intouch Display Settings
1. Push<MENU>and touch [Settings].
2. Touch [Screen Settings] and touch [Dis- play Settings].
3. Select the display to be changed.
: Set upper screen.
: Set lower screen.
Available se](/manual-img/42/34966/w960_34966-25.png "INFINITI Q50 2014 Infiniti Intouch Display Settings
1. Push<MENU>and touch [Settings].
2. Touch [Screen Settings] and touch [Dis- play Settings].
3. Select the display to be changed.
: Set upper screen.
: Set lower screen.
Available se")
![INFINITI Q50 2014 Infiniti Intouch LANGUAGE AND UNIT SETTINGS
This changes the upper and lower display
language and measurement unit used in
the system.
Step 1Step 2Setting item Action
1. Push <MENU> [Language & Units] [System Language](/manual-img/42/34966/w960_34966-27.png "INFINITI Q50 2014 Infiniti Intouch LANGUAGE AND UNIT SETTINGS
This changes the upper and lower display
language and measurement unit used in
the system.
Step 1Step 2Setting item Action
1. Push <MENU> [Language & Units] [System Language")


![INFINITI Q50 2014 Infiniti Intouch 4. Audio system
4-32
Setting itemsAction
[Album Cover] Turn the item on to display image files from the media device. If the media device does not contain
images, no image will be displayed.
[Radio Se](/manual-img/42/34966/w960_34966-74.png "INFINITI Q50 2014 Infiniti Intouch 4. Audio system
4-32
Setting itemsAction
[Album Cover] Turn the item on to display image files from the media device. If the media device does not contain
images, no image will be displayed.
[Radio Se")
![INFINITI Q50 2014 Infiniti Intouch 5. Hands-Free Phone
5-4
Making a call
1. Push<MENU>and touch [Phone].
2. Select one of the following methods and make a call.
Available methods
.[Favorites]:
Select a telephone number from a
list of p](/manual-img/42/34966/w960_34966-82.png "INFINITI Q50 2014 Infiniti Intouch 5. Hands-Free Phone
5-4
Making a call
1. Push<MENU>and touch [Phone].
2. Select one of the following methods and make a call.
Available methods
.[Favorites]:
Select a telephone number from a
list of p")