Page 565 of 711
615
What to do in an emergency
5.After the spare tire reaches the
ground, continue to turn the
wrench counterclockwise, and
draw the spare tire outside. Never
rotate the wrench excessively, oth-
erwise the spare tire carrier may be
damaged.
6.Remove the retainer (1) from the
center of the spare tire.To store the spare tire:
1.Lay the tire on the ground with the
valve stem facing up.
2.Place the wheel under the vehicle
and install the retainer (1) through
the wheel center.
3.Turn the wrench clockwise until it
clicks.
ODM062007ODM062006
WARNING
Ensure the spare tire retainer is
properly aligned with the center
of the spare tire to prevent the
spare tire from “rattling”.
Otherwise, it may cause the
spare tire to fall off the carrier
and lead to an accident.
Page 567 of 711
617
What to do in an emergency
6.Loosen the wheel lug nuts counter-
clockwise one turn each, but do
not remove any nut until the tire
has been raised off the ground.7.Place the jack at the front or rear
jacking position closest to the tire
you are changing. Place the jack at
the designated locations under the
frame. The jacking positions are
plates welded to the frame with two
tabs and a raised dot to index with
the jack.8.Insert the jack handle into the jack
and turn it clockwise, raising the
vehicle until the tire just clears the
ground. This measurement is
approximately 30 mm (1.2 in).
Before removing the wheel lug
nuts, make sure the vehicle is sta-
ble and that there is no chance for
movement or slippage.
WARNING- Jack
location
To reduce the possibility of
injury, be sure to use only the
jack provided with the vehicle
and in the correct jack position;
never use any other part of the
vehicle for jack support.
ODM062008ODM062009ODM062010
Page 568 of 711
What to do in an emergency
18 6
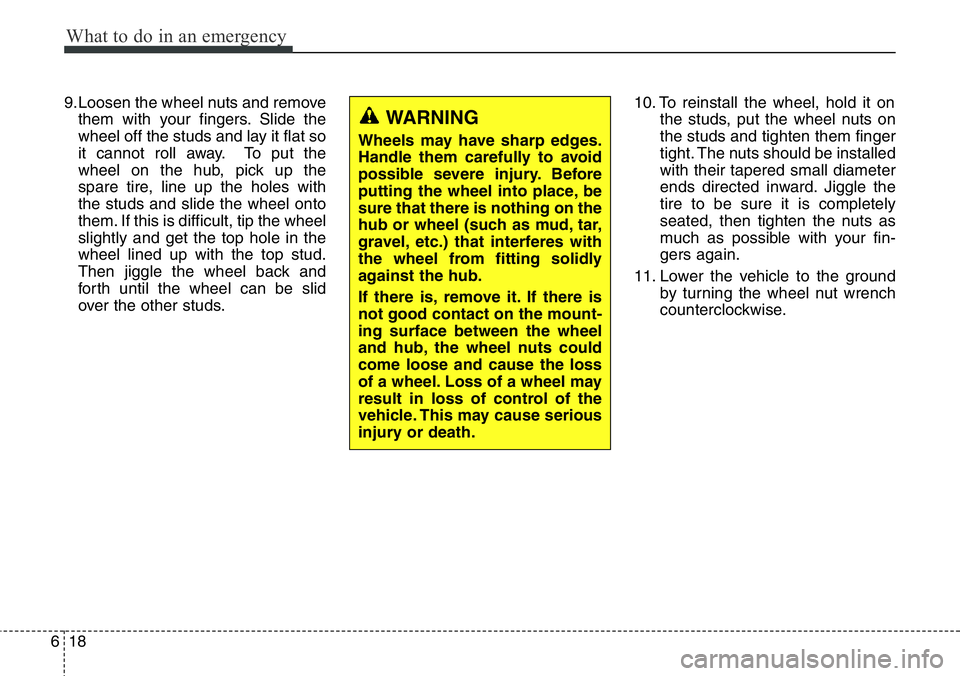
9.Loosen the wheel nuts and remove
them with your fingers. Slide the
wheel off the studs and lay it flat so
it cannot roll away. To put the
wheel on the hub, pick up the
spare tire, line up the holes with
the studs and slide the wheel onto
them. If this is difficult, tip the wheel
slightly and get the top hole in the
wheel lined up with the top stud.
Then jiggle the wheel back and
forth until the wheel can be slid
over the other studs.10. To reinstall the wheel, hold it on
the studs, put the wheel nuts on
the studs and tighten them finger
tight. The nuts should be installed
with their tapered small diameter
ends directed inward. Jiggle the
tire to be sure it is completely
seated, then tighten the nuts as
much as possible with your fin-
gers again.
11. Lower the vehicle to the ground
by turning the wheel nut wrench
counterclockwise.
WARNING
Wheels may have sharp edges.
Handle them carefully to avoid
possible severe injury. Before
putting the wheel into place, be
sure that there is nothing on the
hub or wheel (such as mud, tar,
gravel, etc.) that interferes with
the wheel from fitting solidly
against the hub.
If there is, remove it. If there is
not good contact on the mount-
ing surface between the wheel
and hub, the wheel nuts could
come loose and cause the loss
of a wheel. Loss of a wheel may
result in loss of control of the
vehicle. This may cause serious
injury or death.
Page 582 of 711
What to do in an emergency
32 6
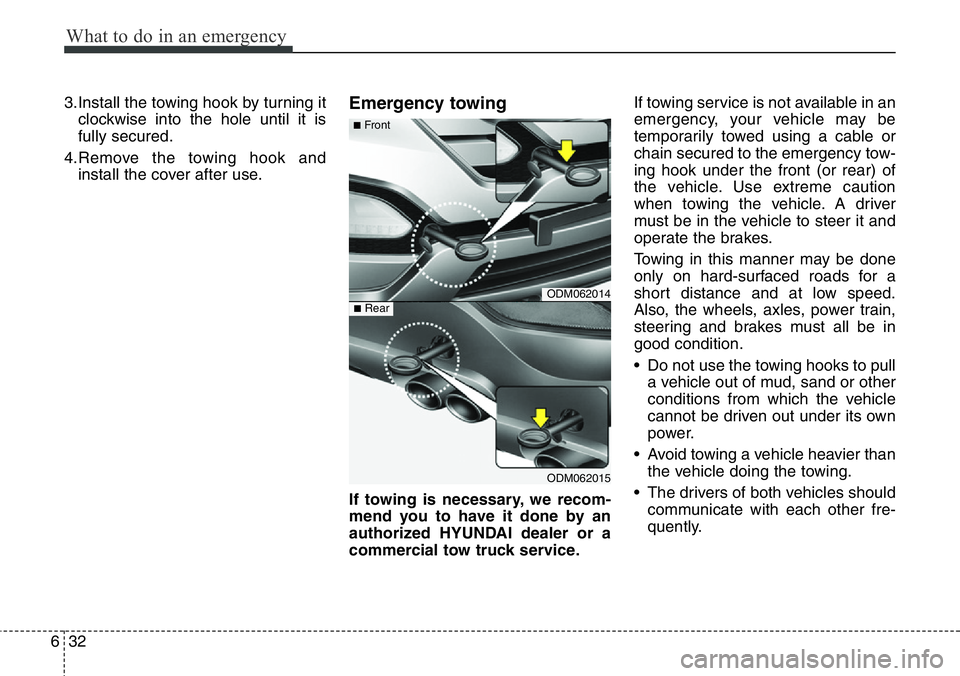
3.Install the towing hook by turning it
clockwise into the hole until it is
fully secured.
4.Remove the towing hook and
install the cover after use.Emergency towing
If towing is necessary, we recom-
mend you to have it done by an
authorized HYUNDAI dealer or a
commercial tow truck service.If towing service is not available in an
emergency, your vehicle may be
temporarily towed using a cable or
chain secured to the emergency tow-
ing hook under the front (or rear) of
the vehicle. Use extreme caution
when towing the vehicle. A driver
must be in the vehicle to steer it and
operate the brakes.
Towing in this manner may be done
only on hard-surfaced roads for a
short distance and at low speed.
Also, the wheels, axles, power train,
steering and brakes must all be in
good condition.
• Do not use the towing hooks to pull
a vehicle out of mud, sand or other
conditions from which the vehicle
cannot be driven out under its own
power.
• Avoid towing a vehicle heavier than
the vehicle doing the towing.
• The drivers of both vehicles should
communicate with each other fre-
quently.
ODM062014
ODM062015
■Front
■Rear
Page 625 of 711
Maintenance
40 7
ENGINE COOLANT
The high-pressure cooling system
has a reservoir filled with year-round
antifreeze coolant. The reservoir is
filled at the factory.
Check the antifreeze protection and
coolant concentration level at least
once a year, at the beginning of the
winter season, and before traveling
to a colder climate.Checking the coolant level
WARNING
Removing radiator
cap
• Never attempt to remove the
radiator cap while the engine
is operating or hot. Doing so
might lead to cooling system
and engine damage and could
result in serious personal
injury from escaping hot
coolant or steam.
• Turn the engine off and wait
until it cools down. Use
extreme care when removing
the radiator cap. Wrap a thick
towel around it, and turn it
counterclockwise slowly to
the first stop. Step back while
the pressure is released from
the cooling system.
(Continued)
(Continued)
When you are sure all the
pressure has been released,
press down on the cap, using
a thick towel, and continue
turning counterclockwise to
remove it.
• Even if the engine is not oper-
ating, do not remove the radi-
ator cap or the drain plug
while the engine and radiator
are hot. Hot coolant and
steam may still blow out
under pressure, causing seri-
ous injury.
CAUTION
• Do not drive with no engine
coolant. It may cause water
pump failure and engine
seizure, etc.
• When the engine overheats
from low engine coolant, sud-
denly adding engine coolant
may cause cracks in the
engine. To prevent damage,
add engine coolant slowly in
small quantities.
Page 642 of 711
757
Maintenance
Battery recharging
Your vehicle has a maintenance-free,
calcium-based battery.
• If the battery becomes discharged
in a short time (because, for exam-
ple, the headlights or interior lights
were left on while the vehicle was
not in use), recharge it by slow
charging (trickle) for 10 hours.
• If the battery gradually discharges
because of high electric load while
the vehicle is being used, recharge
it at 20-30A for two hours.
Reset items
Items should be reset after the bat-
tery has been discharged or the bat-
tery has been disconnected.
• Auto up/down window
(See section 4)
• Sunroof (See section 4)
• Trip computer (See section 4)
• Climate control system
(See section 4)
• Clock (See section 4)
• Audio (See section 4)
(Continued)
• Watch the battery during
charging, and stop or reduce
the charging rate if the battery
cells begin gassing (boiling)
violently or if the temperature
of the electrolyte of any cell
exceeds 49°C (120°F).
• Wear eye protection when
checking the battery during
charging.
• Disconnect the battery charg-
er in the following order.
1. Turn off the battery charger
main switch.
2. Unhook the negative clamp
from the negative battery
terminal.
3. Unhook the positive clamp
from the positive battery
terminal.
(Continued)
WARNING- Recharging
battery
When recharging the battery,
observe the following precau-
tions:
• The battery must be removed
from the vehicle and placed in
an area with good ventilation.
• Do not allow cigarettes,
sparks, or flame near the bat-
tery.
(Continued)
(Continued)
• Before performing mainte-
nance or recharging the bat-
tery, turn off all accessories
and stop the engine.
• The negative battery cable
must be removed first and
installed last when the battery
is disconnected.
Page 657 of 711
Maintenance
72 7
If the headlights or other electrical
components do not work and the
fuses are OK, check the fuse block in
the engine compartment. If a fuse is
blown, it must be replaced.Fuse switch
Always, put the Fuse switch at the
ON position.
If you move the switch to the OFF
position, some items such as audio
and digital clock must be reset and
transmitter (or smart key) may not
work properly.
Engine compartment panel fuse
replacement
1. Turn the ignition switch and all
other switches off.
2. Remove the fuse box cover by
pressing the tap and pulling up.
ODM072019
CAUTION
Always place the fuse switch in
the ON position while driving
the vehicle.
ODM072027
ODM072028
Diesel only
Page 661 of 711
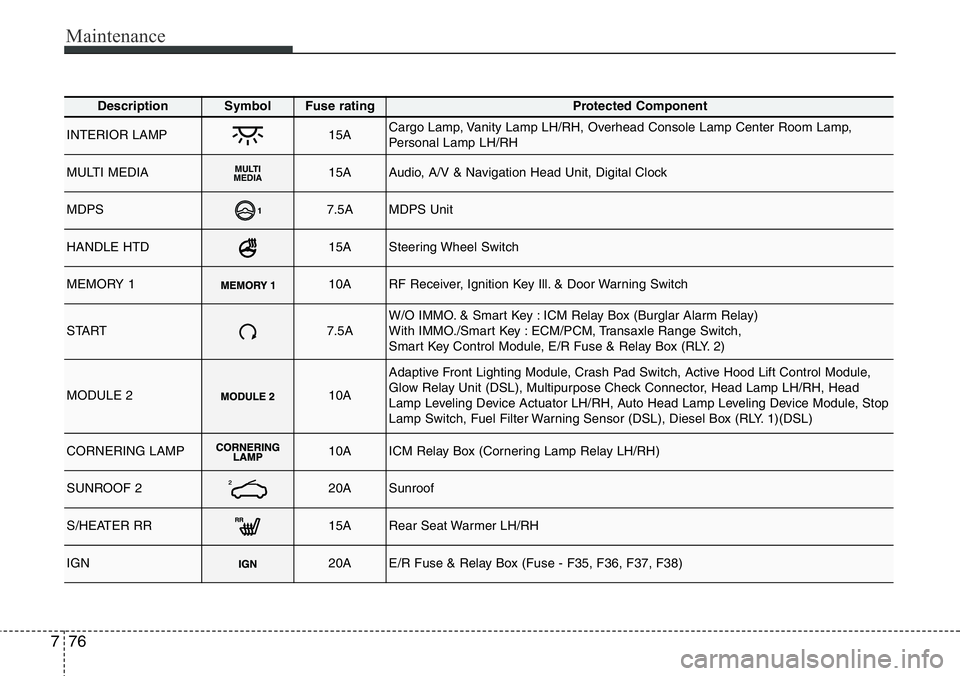
Maintenance
76 7
DescriptionSymbol Fuse ratingProtected Component
INTERIOR LAMP15ACargo Lamp, Vanity Lamp LH/RH, Overhead Console Lamp Center Room Lamp,
Personal Lamp LH/RH
MULTI MEDIAMULTI
MEDIA15AAudio, A/V & Navigation Head Unit, Digital Clock
MDPS7.5AMDPS Unit
HANDLE HTD15ASteering Wheel Switch
MEMORY 110ARF Receiver, Ignition Key Ill. & Door Warning Switch
START7.5AW/O IMMO. & Smart Key : ICM Relay Box (Burglar Alarm Relay)
With IMMO./Smart Key : ECM/PCM, Transaxle Range Switch,
Smart Key Control Module, E/R Fuse & Relay Box (RLY. 2)
MODULE 210A
Adaptive Front Lighting Module, Crash Pad Switch, Active Hood Lift Control Module,
Glow Relay Unit (DSL), Multipurpose Check Connector, Head Lamp LH/RH, Head
Lamp Leveling Device Actuator LH/RH, Auto Head Lamp Leveling Device Module, Stop
Lamp Switch, Fuel Filter Warning Sensor (DSL), Diesel Box (RLY. 1)(DSL)
CORNERING LAMP 10AICM Relay Box (Cornering Lamp Relay LH/RH)
SUNROOF 220ASunroof
S/HEATER RR15ARear Seat Warmer LH/RH
IGN20AE/R Fuse & Relay Box (Fuse - F35, F36, F37, F38)