Page 358 of 711
4257
Features of your vehicle
8.
• Turns the monitor display on/off.
9. CLOCK
Displays the time/date/day.10.
• Radio Mode :
- Short key : TA On/Off
- Long key : previews all receivable
broadcasts for 5 seconds each.
• Media (CD/USB/iPod/My Music)
modes : previews each song (file)
for 10 seconds each.
11.
Converts to Setup mode.
12. TUNE knob
• Radio mode : turn to change
broadcast frequencies.
• Media (CD/USB/iPod/My Music)
modes : turn to search tracks/chan-
nels/files.13. DISC-IN LED
• LED that indicates whether a disc is
inserted.
14. RESET
• Forced system termination and
system restart.
SETUP
TA/SCAN
Page 362 of 711
4261
Features of your vehicle
8.
• Turns the monitor display on/off.
9. CLOCK
Displays the time/date/day.
10.
• Radio Mode : previews all receiv-
able broadcasts for 5 seconds each
• Media (CD/USB/iPod/My Music)
modes : previews each song (file)
for 10 seconds each.11.
Converts to Setup mode.
12. TUNE knob
• Radio mode : turn to change broad-
cast frequencies.
• Media (CD/USB/iPod/My Music)
modes : turn to search tracks/chan-
nels/files.
13. DISC-IN LED
• LED that indicates whether a disc is
inserted.
14. RESET
• Forced system termination and
system restart.
Audio Head Unit
15.
• Converts to FM mode.
• Each time the key is pressed, the
mode changed in order of FM1 ➟
FM2.
16.
• Converts to AM mode.
17.
• Start Media mode
• Each time the key is pressed, the
mode is changed in order of CD,
USB(iPod), AUX, My Music.
MEDIA
AM
FM
SETUP
SCAN
DISP
Page 431 of 711

Features of your vehicle
330 4
SETUP
(for RDS,
Bluetooth®Wireless
Technologyequipped model)
- AM904DMEE, AM914DMEE
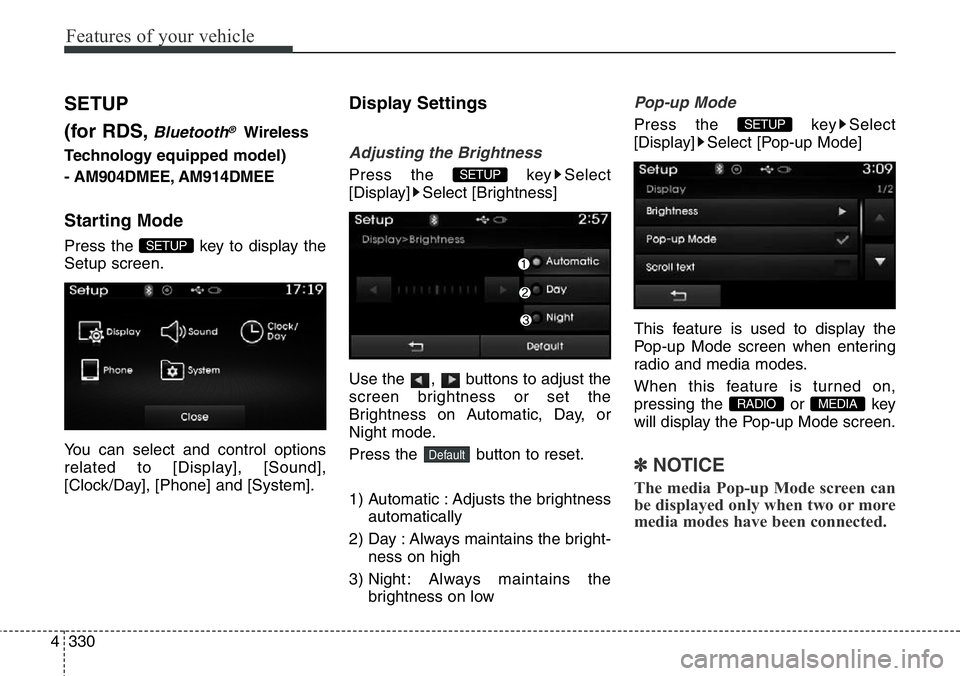
Starting Mode
Press the key to display the
Setup screen.
You can select and control options
related to [Display], [Sound],
[Clock/Day], [Phone] and [System].
Display Settings
Adjusting the Brightness
Press the key Select
[Display] Select [Brightness]
Use the , buttons to adjust the
screen brightness or set the
Brightness on Automatic, Day, or
Night mode.
Press the button to reset.
1) Automatic : Adjusts the brightness
automatically
2) Day : Always maintains the bright-
ness on high
3) Night : Always maintains the
brightness on low
Pop-up Mode
Press the key Select
[Display] Select [Pop-up Mode]
This feature is used to display the
Pop-up Mode screen when entering
radio and media modes.
When this feature is turned on,
pressing the or key
will display the Pop-up Mode screen.
✽NOTICE
The media Pop-up Mode screen can
be displayed only when two or more
media modes have been connected.
MEDIA RADIO
SETUP
Default
SETUP
SETUP
Page 434 of 711
4333
Features of your vehicle
SDVC (Speed Dependent Volume
Control)
Press the key Select
[Sound] Select [Speed Dependent
Vol.]
The volume level is controlled auto-
matically according to the vehicle
speed. SDVC can be set by selecting
from Off/Low/Mid/High.
Voice Recognition Setting
Press the key Select
[Sound] Select [Volume Dialogue]
Use the , buttons to adjust
the Volume Dialog.
Touch Screen Beep
Press the key Select
[Sound] Select [Touch Screen
Beep]
This feature is used to turn the touch
screen beep on/off.
Clock/Day Setting
Clock Setting
Press the key Select
[Clock/Day] Select [Clock Settings]
Use the , buttons to set the
Hour, Minutes and AM/PM setting.
✽NOTICE
Press and hold the key (over
0.8 seconds) to display the Clock/
Day screen.CLOCK
SETUP
SETUP
SETUP
SETUP
Page 435 of 711
Features of your vehicle
334 4
Calendar Setting
Press the key Select
[Clock/Day] Select [Day Settings]
Use the , buttons to set the
Day, Month and Year setting.
Time Format
Press the key Select
[Clock/Day] Select [Time Format]
This feature is used to change the
clock format between 12hr or 24hr.
Clock Display
Press the key Select
[Clock/Day] Select [Clock Display
(Power off)]
This feature is used to display a clock
on the screen when the audio sys-
tem is turned off.
Automatic RDS Time
Press the key Select
[Clock/Day] Select [Automatic RDS
Time]
This feature is used to set time auto-
matically by synchronizing with RDS.SETUP SETUP
SETUP
SETUP
Page 440 of 711

4339
Features of your vehicle
SETUP
(for
Bluetooth®Wireless
Technologyequipped model)
-AM900DMMG, AM910DMMG,
AM911DMMG, AM901DMGG,
AM910DMEE, AM911DMEE,
AM912DMEE, AM913DMEE,
AM910DMGL, AM911DMGL,
AM900DMMN, AM910DMMN
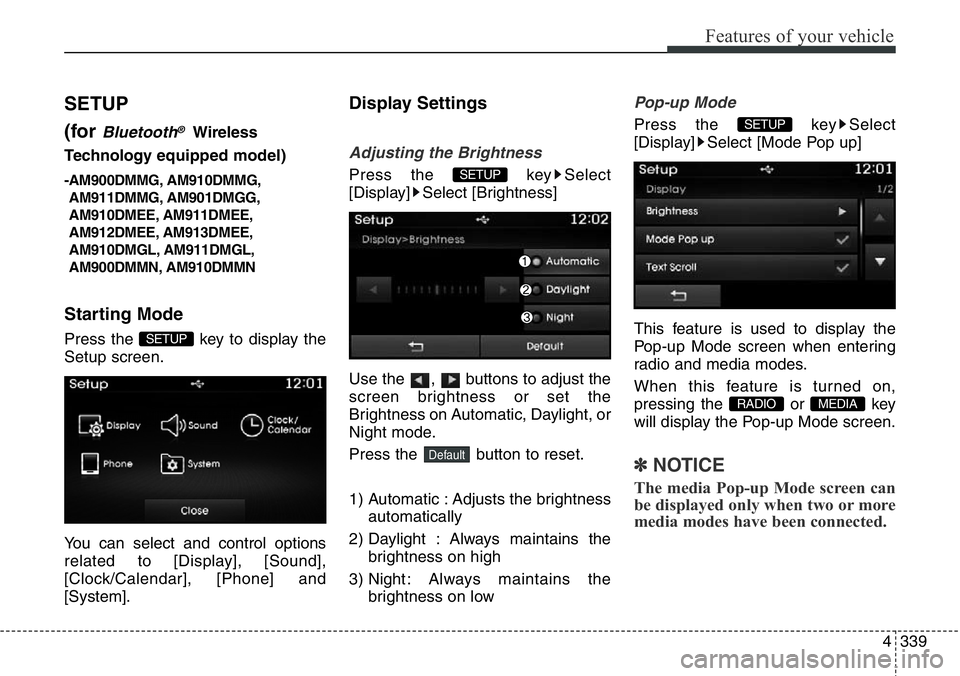
Starting Mode
Press the key to display the
Setup screen.
You can select and control options
related to [Display], [Sound],
[Clock/Calendar], [Phone] and
[System].
Display Settings
Adjusting the Brightness
Press the key Select
[Display] Select [Brightness]
Use the , buttons to adjust the
screen brightness or set the
Brightness on Automatic, Daylight, or
Night mode.
Press the button to reset.
1) Automatic : Adjusts the brightness
automatically
2) Daylight : Always maintains the
brightness on high
3) Night : Always maintains the
brightness on low
Pop-up Mode
Press the key Select
[Display] Select [Mode Pop up]
This feature is used to display the
Pop-up Mode screen when entering
radio and media modes.
When this feature is turned on,
pressing the or key
will display the Pop-up Mode screen.
✽NOTICE
The media Pop-up Mode screen can
be displayed only when two or more
media modes have been connected.
MEDIA RADIO
SETUP
Default
SETUP
SETUP
Page 443 of 711
Features of your vehicle
342 4
Clock/Calendar Setting
Clock Setting
Press the key Select
[Clock/Calendar] Select [Clock
Settings]
Use the , buttons to set the
Hour, Minutes and AM/PM setting.
✽NOTICE
Press and hold the key (over
0.8 seconds) to set the Clock/
Calendar screen.
Calendar Setting
Press the key Select
[Clock/Calendar] Select [Calendar
Settings]
Use the , buttons to set the
Day, Month and Year setting.
Clock Display
Press the key Select
[Clock/Calendar] Select [Clock
Display (Power off)]
This feature is used to display a clock
on the screen when the audio sys-
tem is turned off.SETUP SETUP
CLOCK
SETUP
Page 564 of 711
What to do in an emergency
14 6
Removing and storing the
spare tire
Your spare tire is stored underneath
your vehicle, directly below the cargo
area.
To remove the spare tire:
1.Open the tailgate.
2.Find the plastic hex bolt cover and
remove the cover with coin or flat -
blade screwdriver.3.Connect the socket and wheel lug
nut wrench.
4.Loosen the bolt enough to lower
the spare tire.
Turn the wrench counterclockwise
until the spare tire reaches the
ground.
ODM062004
(Continued)
• The vehicle can easily roll off
the jack causing serious
injury or death.
• Do not get under a vehicle
that is supported by a jack.
• Do not start or run the engine
while the vehicle is on the
jack.
• Do not allow anyone to remain
in the vehicle while it is on the
jack.
• Make sure any children pres-
ent are in a secure place away
from the road and from the
vehicle to be raised with the
jack.
ODM062005