Page 328 of 422
�Î
�Î
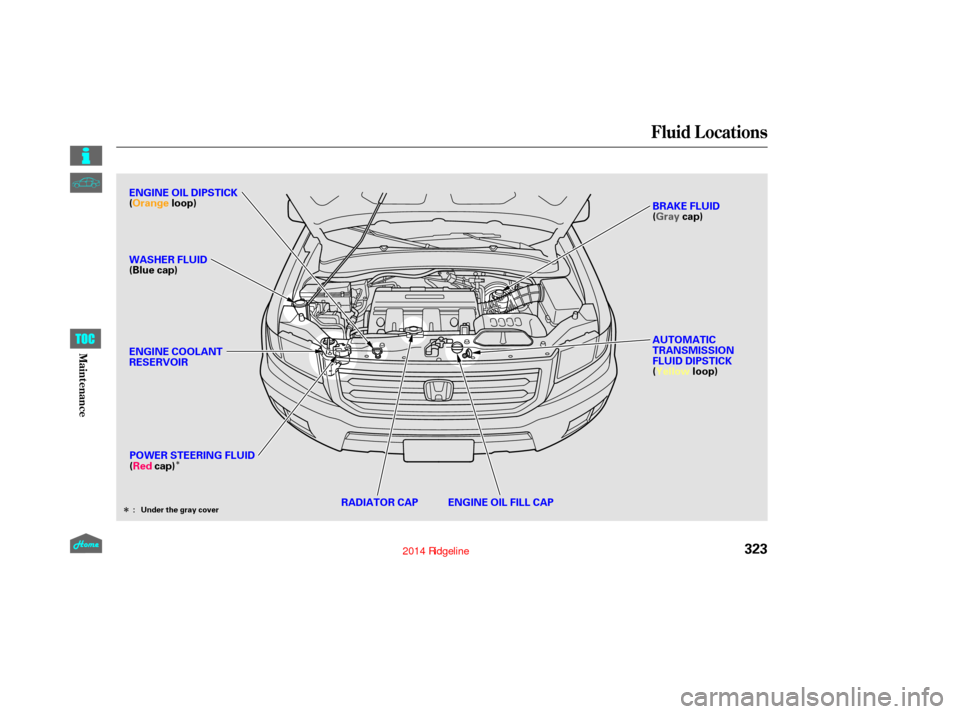
Fluid Locations
323
RADIATOR CAPENGINE OIL FILL CAP
POWER STEERING FLUID
(Red
cap) AUTOMATIC
TRANSMISSION
FLUID DIPSTICK
(Yellow
loop)
ENGINE COOLANT
RESERVOIR
ENGINE OIL DIPSTICK
(Orange
loop)
WASHER FLUID
(Blue cap) BRAKE FLUID
(Gray
cap)Under the gray cover
:
12/08/09 16:41:43 31SJC670_330
Maint enance
Page 336 of 422
The f luid level should be between
theMINandMAXmarksontheside
of the reservoir. If the level is at or
below the MIN mark, your brake
system needs attention. Have the
brake system inspected f or leaks or
worn brake pads.
Using any non-Honda brake f luid can
cause corrosion and decrease the lif e
of the system. Have the brake
system f lushed and ref illed with
Honda Heavy Duty Brake Fluid
DOT 3 as soon as possible.
Brake f luid marked DOT 5 is not
compatible with your vehicle’s
braking system and can cause
extensive damage.
Check the f luid level in the brake
f luid reservoir monthly.
Always use Honda Heavy Duty
Brake Fluid DOT 3. If it is not
available, you should use only
DOT 3 or DOT 4 fluid, from a
sealed container, as a
temporary replacement.
Independent of the maintenance
messages in the inf ormation display,
replace the brake f luid every 3 years.
Brake Fluid
331
MAX
MIN
12/08/09 16:42:48 31SJC670_338
Maint enance
Page 342 of 422
Remove the socket by turning it
one-quarter turn counterclockwise.
Remove the burned-out bulb by
pulling it straight out of the socket.
Drop open the tailgate.
Remove the two bolts, and remove
the rear light assembly f rom the
rear pillar.
Determine which of the three
bulbs is burned out: brake/
taillight, turn signal/hazard light,
or back-up light.
Install the new bulb into the hole
and turn it one-quarter turn
clockwise to lock it in place.
Push the electrical connector back
onto the bulb. Make sure it is on
all the way.
Turn on the lights to test the
new bulb.
Reinstall the inner f ender. Make
sure it is installed under the edge
of the f ront bumper.
Reinstall the holding clip, and push
in its head, then install the bolts
and tighten them securely.
1.
2.
3. 4.
5.
5.
6.
7.
8.
9.
CONT INUED
Replacing Rear Bulbs
Lights
337
BULB
SOCKET
12/08/09 16:43:37 31SJC670_344
Maint enance
Page 343 of 422
Remove the three mounting
screws f rom the light assembly.
Remove the lens from the
light assembly.
Pull the bulb straight out of its
socket. Push the new bulb straight
into the socket until it bottoms.
Place a cloth on the edge of the
lens segment to prevent scratches.
Remove each lens segment by
caref ully prying on its edge with a
small f lat-tip screwdriver.
Remove the screw under each lens.
Pull the high-mount brake light
assembly out of the vehicle.
Install the new bulb into
the socket.
Push the socket into the light
assembly, and turn it clockwise
until it locks.
Turn on the lights to make sure
the new bulb is working.
Install the rear light assembly in
the rear pillar. Tighten the two
bolts securely.
1.
2.
3. 4.
5.
6.
6.
7.
8.
9.
Replacing a High-mount Brake
Light Bulb
Lights
338
LENS SEGMENT
SCREW SCREW
BULB
12/08/09 16:43:48 31SJC670_345
Maint enance
Page 356 of 422

�Ì
�Î�Ì
�Ì
�ÎMount tire chains on your tires when
required by driving conditions or
local laws. Install them only on the
f ront tires.
Because your vehicle
has limited tire clearance, Honda
strongly recommends using the
chains listed below. When installing chains, follow the
manufacturer’s instructions and
mount them as tightly as you can.
Drive slowly with chains installed.
If you hear them contacting the
body or chassis, stop and
investigate. Make sure the
chains are installed tightly, and
that they are not contacting the
brake lines or suspension. Remove
the chains as soon as you start
driving on cleared roads.
This tire chain is available at many
auto supply stores. To f ind a local
storethatcarriesthechain,call
Quality Chain Corp at 1-800-843-8824.
To order the tire chain online, go to
, and enter your
vehicle inf ormation. When you install
the chains, f ollow the manuf acturer’s
instructions, and mount them as
tightly as you can. Drive slowly with
the chains installed.
Rubber chain adjusters, or tensioners,
must be used to prevent the chains from
contacting the body or the chassis.
:SCC Super Z-6 SZ-429 Premium Cobra Cable Chain
1046P with accessory adjusters
www.cha inquest.com
On RTL, Touring, and Sport models
OnRT,RTS,DX,andVPmodels OnRT,RTS,DX,andVPmodels
CONT INUED
Premium Cobra Cable Chain
1046P with accessory
adjusters
Tire Chains
Tires
351
12/08/09 16:45:40 31SJC670_358
Maint enance
Page 357 of 422
If you ever hear the chains
contacting the body or chassis, stop
and investigate. If the chains have
loosened, retighten them. Make sure
they do not contact the brake lines
or suspension.
Removethechainsassoonasyou
begin driving on cleared roads.
Tires
352
Using the wrong chains, or not
properly installing chains, can
damage the brake lines and
cause a crash in which you can
be seriously injured or killed.
Follow all instructions in this
owner’s manual regarding the
selection and use of tire chains.Traction devices that are the wrong
size or improperly installed can
damage your vehicle’s brake lines,
suspension, body, and wheels. Stop
driving if they are hitting any part of
the vehicle.
12/08/09 16:45:45 31SJC670_359
Maint enance
Page 359 of 422

Block the rear wheels.
If the vehicle is to be stored f or a
longer period, it should be
supported on jackstands so the
tires are of f the ground.
Leave one window open slightly (if
the vehicle is being stored
indoors).
Disconnect the battery.
Support the f ront wiper blade
arms with a f olded towel or rag so
they do not touch the windshield.
To minimize sticking, apply a
silicone spray lubricant to all door,
In-Bed Trunk lid, and tailgate seals.
Also, apply a vehicle body wax to
the painted surfaces that mate
with the door, In-Bed Trunk lid
and tailgate seals.
If your vehicle’s battery is
disconnected, or goes dead, the time
setting may be lost. To reset the time,
see page .
If your vehicle’s battery is
disconnected or goes dead, the audio
system may disable itself . The next
timeyouturnontheradioyouwill
see ‘‘CODE’’ in the f requency display.
Use the preset bars to enter the code
(see page ).
The navigation system will also
disableitself.Thenexttimeyouturn
on the ignition switch, the system
will require you to enter a PIN
bef ore it can be used. Ref er to the
navigation system manual.
If you need to park your vehicle f or
an extended period (more than 1
month), there are several things you
should do to prepare it f or storage.
Proper preparation helps prevent
deterioration and makes it easier to
get your vehicle back on the road. If
possible, store your vehicle indoors.
Leave the parking brake off. Put
the transmission in Park. Cleantheinterior.Makesurethe
carpeting, floor mats, etc., are
completely dry. Wash and dry the exterior
completely. Fill the f uel tank.
207
205On models without navigation system
On models with navigation systemVehicle Storage
Checking the Battery, Vehicle Storage
354
12/08/09 16:46:02 31SJC670_361
Maint enance
Page 362 of 422

This section covers the more
common problems that motorists
experience with their vehicles. It
gives you inf ormation about how to
safely evaluate the problem and what
to do to correct it. If the problem has
stranded you on the side of the road,
you may be able to get going again.
If not, you will also f ind instructions
on getting your vehicle towed.......................
Compact Spare Tire .358
....................
Changing a Flat Tire .359
.............
If the Engine Won’t Start . 367
................................
Jump Starting .368
..............
If the Engine Overheats . 370
.........
Low Oil Pressure Indicator . 372
..........
Charging System Indicator . 372
.......
Malf unction Indicator Lamp . 373
...............
Brake System Indicator . 374
..............................................
Fuses .376
..............................
Fuse Locations .379
......................
Emergency Towing .381
..........
If Your Vehicle Gets Stuck . 381
Taking Care of the Unexpected
357
12/08/09 16:46:12 31SJC670_364