Page 68 of 422
If this indicator comes on when the
engine is running, the battery is not
being charged. For more inf ormation,
see page .
The engine can be severely damaged
if this indicator f lashes or stays on
when the engine is running. For
more information, see page .
For more inf ormation, see page .
You will also see a ‘‘CHECK
EMISSION SYSTEM’’ message on
the multi-information display (see
page ). For more inf ormation, see
page .
You will also see a ‘‘CHECK
CHARGING SYSTEM’’ message on
the multi-information display (see
page ).
You will also see a ‘‘CHECK
ENGINE OIL LEVEL’’ message on
the multi-information display (see
page ).
90
9190
373
373 372
372
On models with navigation system
On models with navigation system On models with navigation system
Malf unction Charging
Low Oil
Instrument Panel Indicators
63
12/08/09 16:07:31 31SJC670_070
Indicator Lamp Pressure IndicatorSystem Indicator
Inst rument s and Cont rols
Page 84 of 422

�¶�¶�µ�µ
�µ�µ�µ
�µ�µ�µ
The odometer shows the total
distance your vehicle has been
driven. It measures miles in U.S.
models and kilometers in Canadian
models. It is illegal under U.S.
federal law and Canadian provincial/
territorial regulations to disconnect,
reset, or alter the odometer with the
intent to change the number of miles
or kilometers indicated.
Both trip meters will reset if the
vehicle’s battery goes dead or is
disconnected.
In certain weather conditions,
temperature readings near f reezing(32°F, 0°C) could mean that ice is
f orming on the road surf ace.
The temperature sensor is in the
f ront bumper. The temperature
reading can be affected by heat
ref lection f rom the road surf ace,
engine heat, and the exhaust f rom
surrounding traf f ic. This can cause
an incorrect temperature reading
when your vehicle speed is under
19 mph (30 km/h). When you start
your trip, the sensor is not f ully
acclimatized, theref ore it may take
several minutes until the proper
temperature is displayed. This shows the outside temperature
in Fahrenheit (U.S. models), or in
Celsius (Canadian models). If the outside temperature is
incorrectly displayed, you can adjust
it up to 5°F in U.S. models ( 3°C
in Canadian models) warmer or
cooler.
The temperature must be
stabilized bef ore doing this
procedure.
To adjust the outside temperature
indicator, press and hold the TRIP/
RESET button f or 10 seconds. The
f ollowing sequence will appear f or 1
secondeach:0,1,2,3,4,5, 5, 4, 3, 2, 1, 0 (U.S.) or 0, 1, 2, 3,
3, 2, 1, 0 (Canada).
When the temperature reaches the
desired value, release the TRIP/
RESET button. You should see the
new outside temperature displayed.
Each trip meter works independently,
so you can keep track of two
dif f erent distances. To reset a trip
meter, display it, and then press and
hold the TRIP/RESET button until
the number resets to ‘‘0.0’’. There are two trip meters: Trip A
and Trip B. Switch between these
displays by pressing the TRIP/
RESET button repeatedly. This meter shows the number of
miles (U.S.) or kilometers (Canada)
driven since you last reset it.
CONT INUED
Except RT and U.S. Sport models
Odomet er
Out side T emperat ure Indicat or
Trip Meter
Gauges
79
NOTE:
12/08/09 16:09:38 31SJC670_086
Inst rument s and Cont rols
Page 85 of 422
,")
This display shows the estimated
distance you can travel on the fuel
remaining in the tank.
This distance is estimated f rom the
f uel economy you have achieved
over the last f ew miles (kilometers),
so it will vary with changes in speed,
traffic condition, etc.
This display shows the instant f uel
economy you are getting.
It shows the number of mpg (U.S.)
or l/100 km (Canada).
When either of the trip meters (trip
A or B) is displayed, your vehicle’s
average f uel economy since you last
resetthattripmetercanbeshown
on the inf ormation display (mpg on
U.S. models and l/100 km on
Canadian models). This number is
updated once per 10 seconds. To see
the average f uel economy, press and
release the TRIP/RESET button
repeatedly.
The average f uel economy will be
reset when you reset the trip meter,
or if the vehicle’s battery goes dead
or is disconnected.
This indicator is displayed as the
system message on the multi-
inf ormation display (see page ). The appropriate tire indicator will
come on along with the low tire
pressure indicator if a tire is
signif icantly underinf lated or has
suddenly lost pressure. See
for what to
do if this indicator comes on.
280
On models with navigation system
Gauges
Range (Estimated Distance)
T ire Pressure Monitor
A verage Fuel Economy
Inst ant Fuel Economy
Low
Tire Pressure Indicator
80
TIRE PRESSURE MONITOR
12/08/09 16:09:48 31SJC670_087
Inst rument s and Cont rols
Page 105 of 422

These keys contain electronic
circuits that are activated by the
immobilizer system. They will not
work to start the engine if the
circuits are damaged.Protect the keys f rom direct
sunlight, high temperature, and
high humidity.
Donotdropthekeysorsetheavy
objects on them.
The master key fits all the locks on
your vehicle. The valet key works
only in the ignition and the driver’s
door lock. You can keep the glove
box locked when you leave your
vehicle and the valet key at a
parking facility.
You can also keep the In-Bed Trunk
locked by using the main switch in
theglovebox(seepage ). Youshouldhavereceivedakey
number tag with your keys. You will
need this key number if you ever
have to get a lost key replaced. Use
only Honda-approved key blanks.
Keep the keys away f rom liquids.
If they get wet, dry them
immediately with a sof t cloth.
The valet key does not contain a
battery. Do not try to take it apart.
118
Keys
100
VALET KEY
(LIGHT GRAY)
MASTER KEY
WITH REMOTE
TRANSMITTER
KEY
NUMBER
TAG
12/08/09 16:12:24 31SJC670_107
Inst rument s and Cont rols
Page 114 of 422
�µ
�µOr, until you hear two moreclicks (after about 10
seconds) to activate the
all doors unlock feature. Until you hear another click
(after about 5 seconds) to
activate the driver’s doorunlock feature.
Pushandholdtherearof the
master door lock switch on the
driver’s door. You will hear a click.
Continue to hold the switch:
Turn the ignition switch to the
LOCK (0) position.If your vehicle’s battery is removed
or goes dead, the auto door lock/
unlock setting is reset to the
deactivated mode.
Push and hold the brake pedal,
then move the shift lever out of
the Park (P) position.
Release the switch and, within 5
seconds, turn the ignition switch
to the ACCESSORY (I) position.
Move the shift lever to the Park
(P) position.
5.
4. 6.
3.
Door L ocks
109
12/08/09 16:13:43 31SJC670_116
Inst rument s and Cont rols
Page 116 of 422
Avoid dropping or throwing the
transmitter.
Protect the transmitter from
extreme temperatures.
Do not immerse the transmitter in
any liquid.
If you lose a transmitter, the
replacement needs to be
reprogrammed by your dealer.To replace the battery:
Remove the screw at the base of
the transmitter with a small
Phillips-head screwdriver.
If it takes several pushes on the
button to lock or unlock the doors,
replace the battery as soon as
possible.
Battery type: CR1616
Be caref ul when removing
this screw as the head of the screw
can strip out. 1.
CONT INUED
Remote Transmitter Care Replacing the
Transmitter Battery
Remote Transmitter
111
NOTE:
SCREW
12/08/09 16:14:00 31SJC670_118
Inst rument s and Cont rols
Page 117 of 422
�´
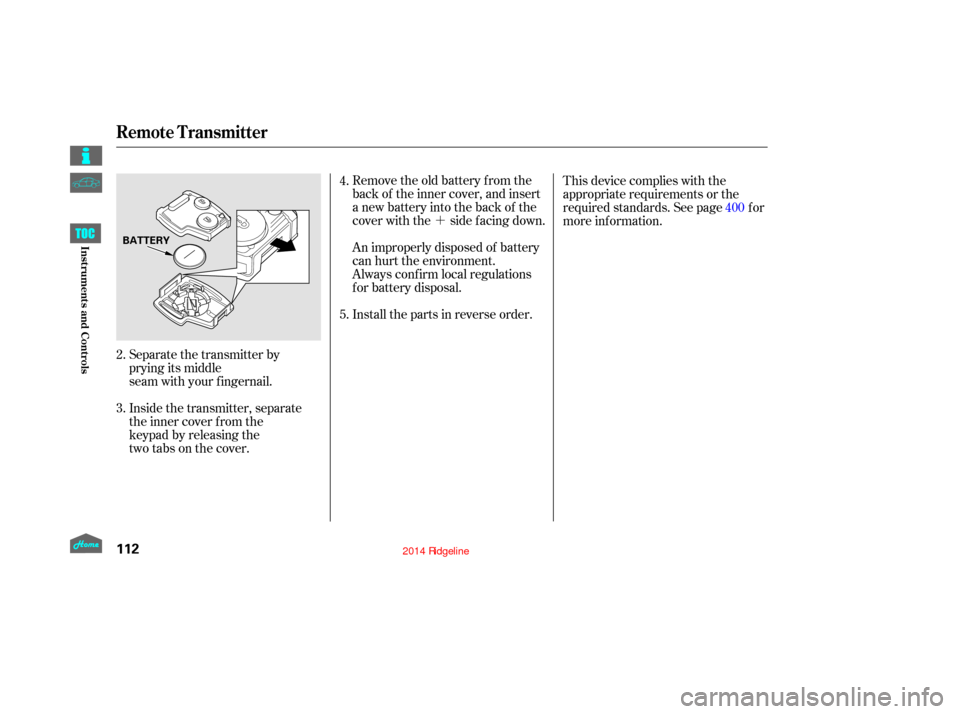
Remove the old battery from the
back of the inner cover, and insert
a new battery into the back of the
cover with the side f acing down.
An improperly disposed of battery
can hurt the environment.
Always conf irm local regulations
for battery disposal.
Install the parts in reverse order.
Separate the transmitter by
prying its middle
seam with your fingernail.
Inside the transmitter, separate
the inner cover from the
keypad by releasing the
two tabs on the cover. This device complies with the
appropriate requirements or the
required standards. See page f or
more inf ormation.
4.
5.
2.
3. 400
Remote Transmitter
112
BATTERY
12/08/09 16:14:07 31SJC670_119
Inst rument s and Cont rols
Page 121 of 422

YoucanopentheIn-BedTrunktwo
dif f erent ways:Push the release button on the
lower right side of the In-Bed
Trunk lid when the driver’s door
is unlocked. To close the In-Bed Trunk, lower
the lid, then press down on the
back edge. If your vehicle’s battery is
disconnected or goes dead, the
release button on the In-Bed Trunk
lid is disabled. To open the In-Bed
Trunk, use the master key.
Usethemasterkeytoopenthe
In-Bed Trunk when the driver’s
door is locked. Thebedlightscomeonwhenyou
open the In-Bed Trunk. You can also
turn the bed lights on or off by
pushing the bed light switch on the
dashboard (see page ).
You can store items in the In-Bed
Trunk up to 300 lbs (136 kg). Do not
exceed this weight limit, or you may
damage the In-Bed Trunk. See page
f or inf ormation on loading cargo
and weight limits.
To store items separately in the
In-Bed Trunk, optional divider
guides are available f rom your dealer.
When the In-Bed Trunk is closed
securely, it can be locked or
unlocked along with the power door
locks (see page ). 144
103 261
In-Bed Trunk
116
RELEASE
BUTTON
12/08/09 16:14:40 31SJC670_123
Inst rument s and Cont rols