Page 364 of 422
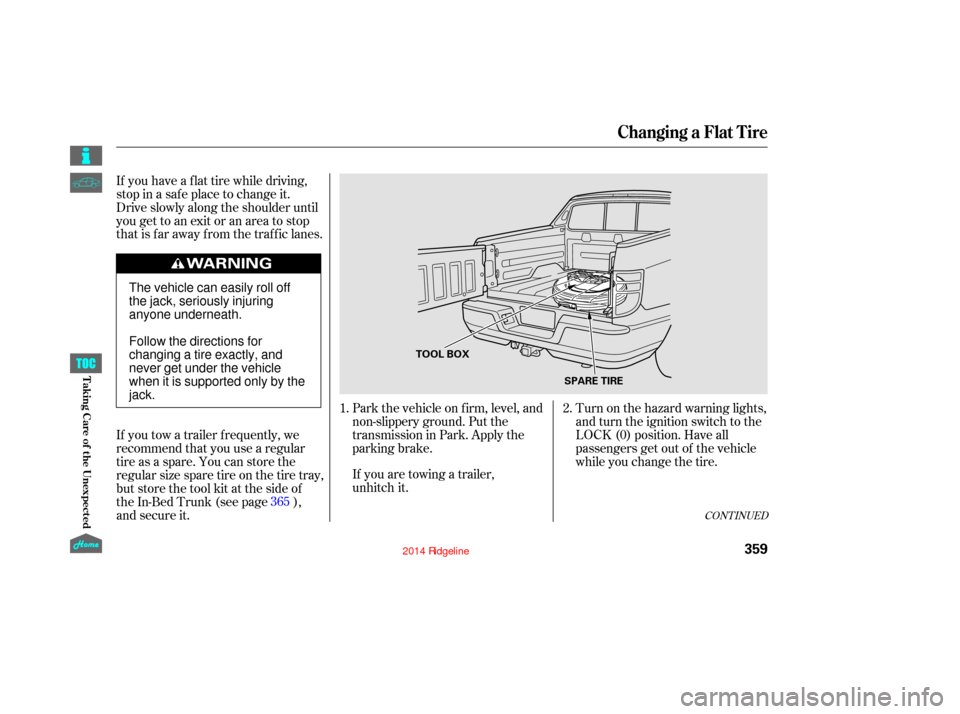
Turn on the hazard warning lights,
and turn the ignition switch to the
LOCK (0) position. Have all
passengers get out of the vehicle
while you change the tire.
Park the vehicle on f irm, level, and
non-slippery ground. Put the
transmission in Park. Apply the
parking brake.
If you are towing a trailer,
unhitch it.
If you have a f lat tire while driving,
stop in a saf e place to change it.
Drive slowly along the shoulder until
you get to an exit or an area to stop
that is far away from the traffic lanes.
If you tow a trailer f requently, we
recommend that you use a regular
tire as a spare. You can store the
regular size spare tire on the tire tray,
but store the tool kit at the side of
the In-Bed Trunk (see page ),
and secure it.
2.
1.
365
CONT INUED
Changing a Flat Tire
T aking Care of t he Unexpect ed
359
TOOL BOX SPARE TIRE
The vehicle can easily roll off
the jack, seriously injuring
anyone underneath.
Follow the directions for
changing a tire exactly, and
never get under the vehicle
when it is supported only by the
jack.
12/08/09 16:46:27 31SJC670_366
Page 368 of 422
CONT INUED
Put on the spare tire. Put the
wheel nuts back on f inger-tight,
then tighten them in a crisscross
pattern with the wheel nut wrench
until the wheel is f irmly against
the hub. Do not try to tighten the
wheel nuts f ully.
Lower the vehicle to the ground,
and remove the jack.
Before mounting the spare tire,
wipe any dirt off the mounting
surface of the wheel and hub
with a clean cloth. Wipe the
hub carefully; it may be hot
from driving.
The wheel cap cannot be
removed without first removing
the wheel nuts. Remove the wheel nuts and the
wheel cap (on RT and DX models)
then remove the f lat tire. Handle
the wheel nuts caref ully; they may
be hot from driving. Place the flat
tire on the ground with the outside
surface facing up.
14.
15.16.
17.
On RT and DX models
Changing a Flat Tire
363
BRAKE HUB
WHEEL CAP
RT/DX model is shown.
12/08/09 16:46:56 31SJC670_370
T aking Care of t he Unexpect ed
Page 373 of 422
Are you using the proper starting
procedure? Ref er toon page .
There may be an electrical
problem, such as no power to the
f uel pump. Check all the f uses
(see page ).
If youfindnothingwrong,youwill
need a qualif ied technician to f ind
the problem. See on page . Although this seems like a simple
procedure, you should take
several precautions.
You cannot start your vehicle by
pushing or pulling it.
Do you have f uel? Check the f uel
gauge; the low f uel indicator may
not be working.
Turn of f all electrical accessories:
heater, A/C, climate control, audio
system, lights, etc. Put the
transmission in Park, and set the
parking brake. Open the hood, and check the
physical condition of the battery.
In very cold weather, check the
condition of the electrolyte. If it
seems slushy or f rozen, do not try
jump starting until it thaws.
1.
2.
268
376 381 Starting the
Engine
Emergency
Towing Jump Starting
If the Engine Won’t Start, Jump Starting
To Jump Start Your Vehicle:
368
A battery can explode if you do
not follow the correct procedure,
seriously injuring anyone
nearby.
Keep all sparks, open flames,
and smoking materials away
from the battery.
If a battery sits in extreme cold, the
electrolyte inside can f reeze.
Attempting to jump start with a f rozen
battery can cause it to rupture.
12/08/09 16:47:36 31SJC670_375
T aking Care of t he Unexpect ed
Page 375 of 422
If you see steam and/or spray
coming f rom under the hood, turn
of f the engine. Wait until you see
no more signs of steam or spray,
then open the hood.
If you do not see steam or spray,
leave the engine running and
watch the temperature gauge. If
the high heat is due to overloading,
the engine should start to cool
down almost immediately. If it
does, wait until the temperature
gauge comes down to the midpoint,
then continue driving. Saf ely pull to the side of the road.
Put the transmission in Park, and
set the parking brake. Turn of f all
the accessories, and turn on the
hazard warning lights.
The pointer of your vehicle’s
temperature gauge should stay in
the midrange under most conditions.
If it climbs to the red mark, you
should determine the reason (hot
day, driving up a steep hill, etc.).
If the vehicle overheats, you should
take immediate action. The only
indication may be the temperature
gauge climbing to or above the red
mark. Or you may see steam or
spray coming f rom under the hood. 1.
2.
3.
If theEngineOverheats
370
Steam and spray from an
overheated engine can
seriously scald you.
Do not open the hood if steam
is coming out.
Driving with the temperature gauge
pointer at the red mark can cause
serious damage to the engine.
12/08/09 16:47:51 31SJC670_377
T aking Care of t he Unexpect ed
Page 379 of 422
Your vehicle has certain ‘‘readiness
codes’’ that are part of the on-board
diagnostics f or the emissions
systems. In some states, part of the
emissions testing is to make sure
these codes are set. If they are not
set, the test cannot be completed.
If the battery in your vehicle has
been disconnected or gone dead,
these codes may be erased. It can
take several days of driving
under various conditions to set
the codes again.To check if they are set, turn the
ignition switch to the ON (II)
position, without starting the engine.
The malf unction indicator lamp will
come on f or 20 seconds. If it then
goes of f , the readiness codes are set.
If it blinks f ive times, the readiness
codes are not set. If possible, do not
take your vehicle f or an emissions
test until the readiness codes are set.
Refer to
for
more information (see page ). If the brake system indicator comes
on while driving, the brake f luid level
is probably low. Press lightly on the
brake pedal to see if it f eels normal.
If it does, check the brake f luid level
thenexttimeyoustopataservice
station (see page ). The brake system indicator normally
comesonwhenyouturntheignition
switch to the ON (II) position, and as
a reminder to check the parking
brake. It will stay on if you do not
f ully release the parking brake.
398
331
Readiness Codes
Emissions T esting Brake System
Indicator
Malf unction Indicator L amp, Brake System Indicator
374
U.S. Canada
12/08/09 16:48:23 31SJC670_381
T aking Care of t he Unexpect ed
Page 380 of 422
However, if the brake pedal does
not feel normal, you should take
immediate action. A problem in one
part of the system’s dual circuit
design will still give you braking at
two wheels. You will feel the brake
pedal go down much farther before
the vehicle begins to slow down,
and you will have to press harder
on the pedal.
You will also see a ‘‘BRAKE FLUID
LOW’’ message on the multi-
inf ormation display (see page ).
If the f luid level is low, take your
vehicle to a dealer, and have the
brake system inspected f or leaks or
worn brake pads. Slow down by shif ting to a lower
gear, and pull to the side of the road
when it is saf e. Because of the long
distance needed to stop, it is
hazardous to drive the vehicle. You
should have it towed, and repaired as
soon as possible (see
on page ).
If you must drive the vehicle a short
distance in this condition, drive
slowly and caref ully.
If the ABS indicator and the VSA
system indicator come on with
the brake system indicator, have
your vehicle inspected by your
dealer immediately.
You will also see a ‘‘CHECK BRAKE
SYSTEM’’ message on the multi-
inf ormation display (see page ).
90
90381On models with navigation system
On models with navigation system
Emergency
Towing
Brake System Indicator
375
12/08/09 16:48:30 31SJC670_382
T aking Care of t he Unexpect ed
Page 381 of 422
The vehicle’s f uses are contained in
threefuseboxes.The primary under-hood f use box is
on the passenger’s side. The
secondary f use box is next to the
brake f luid reservoir. To open them,
pushthetabsasshown.
The interior f use box is on the
driver’s lower lef t side. To remove
the f use box lid, put your f inger in
the notch on the lid, and pull it
outward slightly, then pull it toward
you and take it out of its hinges. If something electrical in your
vehicle stops working, check f or a
blown f use f irst. Determine f rom the
chart on pages and , or the
diagram on the f use box lid, which
f use or f uses control that device.
Check those f uses f irst, but check all
the f uses bef ore deciding that a
blown f use is the cause. Replace any
blown f uses, and check if the device
works.
379 380
Checking and Replacing Fuses
Fuses
376
UNDER-HOOD (SECONDARY)
UNDER-HOOD (PRIMARY)
INTERIOR
NOTCH
12/08/09 16:48:37 31SJC670_383
T aking Care of t he Unexpect ed
Page 384 of 422

�Î�Î �Î
�Î �Î
�Î
�Î
�Î
�Î
�µ
�µ
�µ�´
�Î
�ΠIf equipped If equipped
1
2
3
4
5
6
7
8
9
10
11
12
1
2
3
4
5
6 Back Light
VSA FSR
VSA MTR
VTM-4
Front Accessory Sockets
Electric Brake 13
14
15
16
17
18
19
20
21
22
23
7
8
9
10
11
10 A
10 A
15 A
10 A
10 A
7.5 A 15 A
15 A
20 A
15 A
7.5 A
(7.5 A) 20 A
40 A
20 A
15 A
(20 A) (20 A)
(7.5 A) (20 A)7.5 A
(20 A) 20 A
20 A
40 A
15 A
40 A
20 A
30 A
30 A
40 A
40 A
120 A 60 A
50 A Horn, Stop
Defroster
Back Up, ACC
Hazard
Option 1
AC Inverter
Cooling Fan
Condenser Fan
Heater Motor
Seat
Battery
BIGIMain
Power Window
Spare Fuses
Small Lights
Stop/Turn Lights
Charge
TPMS
Moonroof
Left Headlight Low Beam
Not Used
Left Headlight High Beam
Small Lights
Right Headlight High Beam
Right Headlight Low Beam
Back Up
FI ECU (PCM)
DBW
Front Fog Lights
Heated Seats
MG Clutch
:
:
No.
No. Circuits Protected No.
No.
Amps.
Amps.
Amps.Amps. Circuits Protected
Circuits Protected
Circuits Protected
24 28
Fuse Locations
379
PRIMARY UNDER-HOOD FUSE BOX
SECONDARY UNDER-HOOD FUSE BOX
12/08/09 16:49:02 31SJC670_386
T aking Care of t he Unexpect ed