Page 259 of 488
258
uu Rear Entertainment System * u Operating the System
Features
Search:
You can search for a DVD segm ent from the following methods.
Title Search - Select the title you want to play.
Chapter Search - Select the chapter you want to play.
NumInput:
Enter a two digit number, if issued to the DV D, to find
the segment you want to start
to play.
1. Select Nu
mInput to go to the number input screen.
2. Use the 3, 4 , , and buttons to input numbers.
u If y
ou want to delete a number, select DEL.
3. The cursor automatically goes
to ENT after you input two digits. Press the ENT
button to enter.
Repeat:
Highlight this option and press the ENT
button to change the repeat mode from
chapter repeat and title repeat, to repeat off.
Page 260 of 488

Continued259
uu Rear Entertainment System * u Operating the System
Features
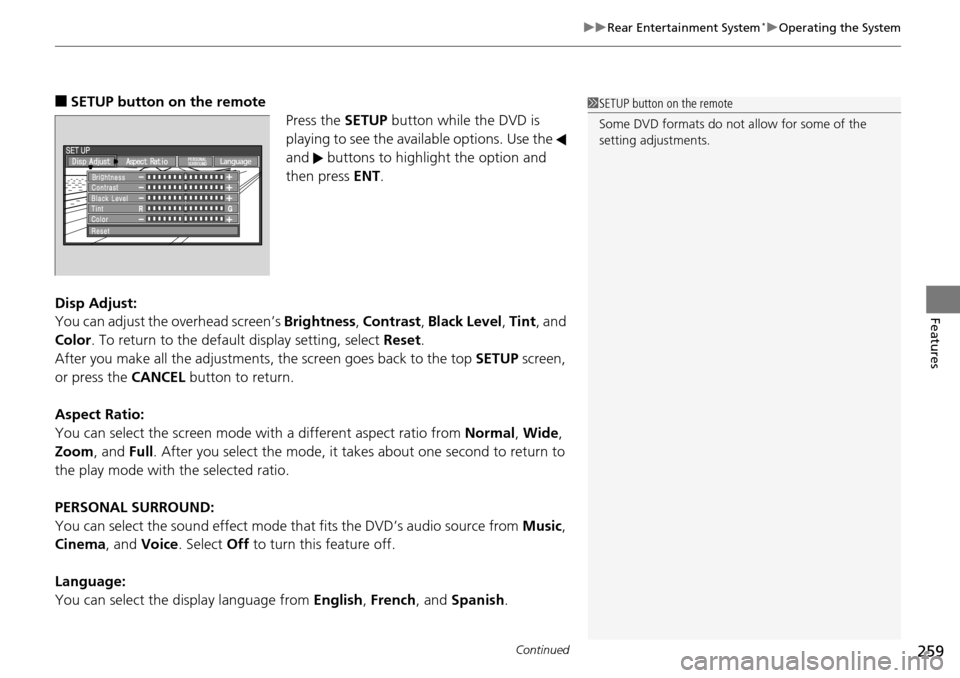
■SETUP button on the remote
Press the SE
TUP button while the DVD is
playing to see the avai lable options. Use the
and buttons to highlight the option and
then press ENT.
Disp Adjust:
You can adjust the overhe
ad screen’s Brightness , Contrast , Black Level , Tint , and
Color . To return to the default display setting, select Reset.
After you make all the adjustments, the screen goes back to the top SET
UP screen,
or press the CANCEL button to return.
Aspect Ratio:
You can select the screen mode wi th
a different aspect ratio from Normal, Wide ,
Zoom , and Full. After you select the mode, it t akes about one second to return to
the play mode with the selected ratio.
PERSONAL SURROUND:
You can select the sound effect mode th at
fits the DVD’s audio source from Music,
Cinema , and Voice . Select Off to turn this feature off.
Language:
You can select the display language from En
glish, French , and Spanish .
1SETUP button on the remote
Some DVD formats do not allow for some of the
setting adjustments.
Page 262 of 488

261
uu Rear Entertainment System * u Operating the System
Continued
Features
■System Controls and Menus for Audio
(Power) Button
Press to turn on the system.
AUX Button
Press to use a USB, iPod, auxiliary video (rear), or auxiliary audio (front). (Light) Button
Press to illuminate the buttons and bars for a few seconds.
SKIP Buttons
2 Audio System Basic Operation P. 175, 216
(Play/Pause) Button
Press to pause a playing CD.
SCROLL Button
Press to switch search mode on XM radio, and scroll titles on CD.
CANCEL Button
Press to go back to the previous
display or operation.
3
,4 , , and ENT Buttons
Use 3, 4 , , or to highlight a
menu item, and press the ENT Button
to make a selection.
CD/CDL Button *
Press to listen to a CD or CD library.
AM/FM Button
Press to listen to
AM or FM radio.
SETUP Button
2 SETUP button on the remote P. 259
XM Button
Press to listen
to XM radio.
MENU Button
Press to display audio menu for AM/FM radio, XM radio, or CD on the overhead screen.CD/HDD Button
*
Press to listen to a CD or hard disc drive.
Rewind Button
Press and hold to reverse the track.Fast-forward Button
Press and hold to fast-forward the track.
* Not available on all models
Page 275 of 488
uu General Information on the Audio System u Recommended CDs
274
Features
■Protecting CDs
Follow these precautions when handling or storing CDs:
• Store a
CD in its case when it is not being played.
•W
hen wiping a CD, use a soft clean cloth from the center to the outside edge.
•Handle
a CD by its edge. Never touch either surface.
•Never
insert foreign objects into the CD player.
•Keep C
Ds out of direct sunlight and extreme heat.
•Do not place
stabilizer rings or labels on the CD.
• Avoid fingerprints,
liquids, and felt-tip pens on the CD.
1Protecting CDs
NOTICE
Do not insert a damaged CD. It may be stuck inside
and damage the audio unit.
Examples:
●Damaged CDs Bubbled/
Wrinkled
With Label/
Sticker Using
Printer Label
Kit
Sealed With Plastic Ring●Poor quality
CDs
Chipped/
Cracked Warped Burrs
●Small CDs
3-inch
(8-cm)
CD
●Bubbled, wrinkled, labeled, and
excessively thick CDs
Page 277 of 488

276
Features
HomeLink® Universal Transceiver *
The HomeLink ® Universal Transceiver can be pr ogrammed to operate up to three
remote controlled devices around your home , such as garage doors, lighting, or
home security systems.
Refer to the safety information that comes wi th you
r garage door opener to test that
the safety features are functioning properly. If you do not have the safety
information, contac t the manufacturer.
Before programming HomeLink, make sure th at
people and objects are out of the
way of the garage or gate to prevent potential injury or damage.
When programming a garage door opener, park
just outside the garage door’s
path.
Training HomeLink
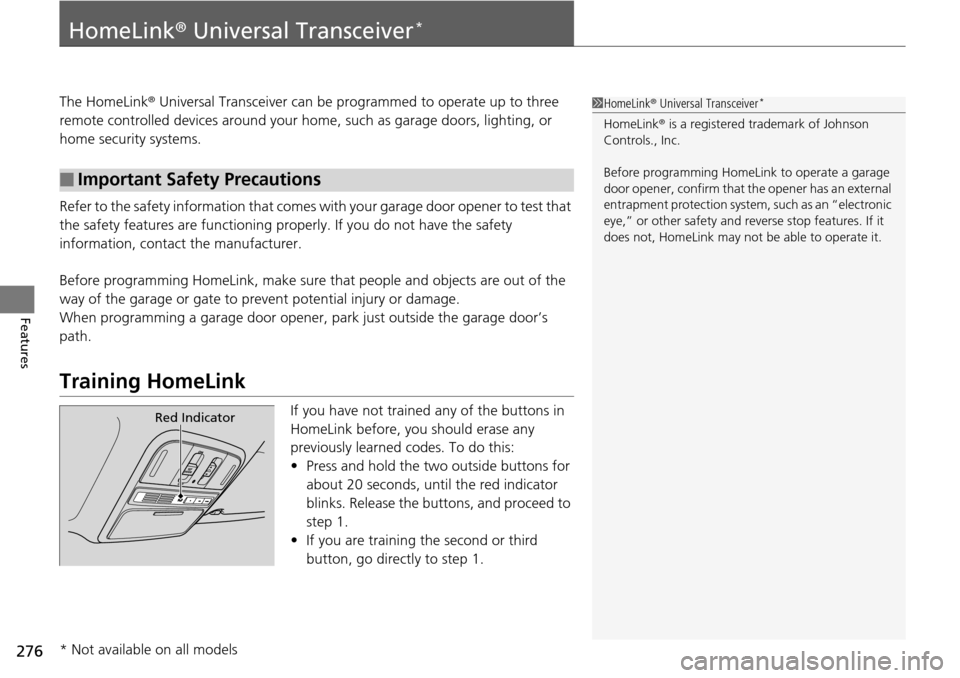
If you have not trained any of the buttons in
HomeLink before, you should erase any
previously learned codes. To do this:
• Press and
hold the two outside buttons for
about 20 seconds, until the red indicator
blinks. Release the bu ttons, and proceed to
step 1.
• If y
ou are training the second or third
button, go directly to step 1.
■Important Safety Precautions
1HomeLink ® Universal Transceiver *
HomeLink® is a registered tra demark of Johnson
Controls., Inc.
Before programming HomeLi nk to operate a garage
door opener, confirm that the opener has an external
entrapment protection system, such as an “electronic
eye,” or other safety and reverse stop features. If it
does not, HomeLink may not be able to operate it.
Red Indicator
* Not available on all models
Page 325 of 488

324
Driving
Before Driving
Driving Preparation
Check the following items before you start driving.
• Make sure there
are no obstructions on the windows, door mirrors, exterior
lights, or other parts of the vehicle.
u Remove
any frost, snow, or ice.
uRemove any sno
w on the roof, as this can slip down and obstruct your field of
vision while driving. If frozen solid , remove ice once it has softened.
u When r
emoving ice from around the wheels, be sure not to damage the wheel
or wheel components.
• Make sure the hood
is securely closed.
u If
the hood opens while driving, your front view will be blocked.
• Make sure the t
ires are in good condition.
u Check air
pressures, and check for damage and excessive wear.
2Checking and Maintaining Tires P. 414
• Make sure there are no people or ob jects behind or around the vehicle.
u There are blind
spots from the inside.
■Exterior Checks1Exterior Checks
NOTICE
When doors are frozen s hut, use warm water around
the door edges to melt any ice. Do not try to force
them open, as this can damage the rubber trim
around the doors. When done, wipe dry to avoid
further freezing.
Do not pour warm water into the key cylinder.
You will be unable to insert key if the water freezes in
the hole.
Heat from the engine and exhaust can ignite
flammable material s left under the hood, causing a
fire. If you've parked y our vehicle for an extended
period, inspect and remove any debris that may have
collected, such as dried grass and leaves that have
fallen or have been carried in for use as a nest by a
small animal. Also check under the hood for leftover
flammable materials after you or someone else has
performed maintenance on your vehicle.
Page 326 of 488

Continued325
uu Before Driving u Driving Preparation
Driving
• Store or secure all items on board properly.
u Carrying too much cargo, or improperly storing it, can affect your vehicle's
handling, stability, sto pping distance, and tires, and make it unsafe.
2Maximum Load Limit P. 327
• Do not pile items higher than the seat height.
u Th
ey can block your view and may be thrown forward in the event of sudden
braking.
• Do not pla
ce anything in the front seat footwells. Make sure to secure the floor
mat.
u An object or unsecured floor m
at can interfere with your brake and accelerator
pedal operation while driving.
• If yo
u have any animals on board, do not let them move around in the vehicle.
u Th
ey may interfere with driving and a crash could occur.
• Secure
ly close and lock al l doors and the tailgate.
2Locking/Unlocking the Doors from the Inside P. 103
• Adjust your seating position properly.
u Adjust the head re
straint, too.
2Adjusting the Seats P. 137
2 Adjusting the Head Restraints P. 141
•Adjust the mirrors and steering wh eel properly for your driving.
u Ad
just them while sitting in the proper driving position.
2 Adjusting the Steering Wheel P. 134
2 Adjusting the Mirrors P. 135
■Interior Checks1Interior Checks
The headlight aim is set by the factory, and does not
need to be adjusted. Howeve r, if you regularly carry
heavy items in the cargo area or tow a trailer, have
the aiming readjusted at a dealer or by a qualified
technician.
Page 334 of 488

Continued333
uu Towing a Trailer u Towing Preparation
Driving
Your vehicle has a class 3 trailer hitch as standard equipment.
The jumper harness and trailer brake fuse are stored in the glove box.
2Trailer brakes P. 334
2 Trailer light P. 335
Turn the knob one-quarter left to open the
cover.
u Th
e 7-Pin trailer connector and trailer
hitch are located.
■Towing Equipment and Accessories1Towing Equipment and Accessories
Make sure that all equipment is properly installed and
maintained, and that it meets federal, state, province/
territory, and lo cal regulations.
Consult your traile r sales or rental agency if any other
items are recommended or required for your towing
situation.
The lighting and wiring of tra ilers can vary by type
and brand. If a connector is required, it should only
be installed by a qua lified technician.
Trailer packages and products:
•Ball mount, hitch plug, hitch pin etc.
•Wiring harness kit•Trailer hitch kit (jum per harness included)
2 Trailer brakes P. 334
•Automatic transmission cooler kit
2Automatic transmission cooler P. 337
Are available at a dealer.
2WD models
Knob
7-Pin Trailer
Connector
Trailer Hitch