Page 409 of 573
408
uuCompass
*uCompass Zone Selection
Features
Compass Zone Selection
1.Turn the ignition switch to ON
(w*1.
2.On the top screen of any audio source,
press and hold for 5 seconds.
uThe display switches to the Compass
Settings screen.
3.Rotate to select Zone Adjust, then
press .
uThe display shows the current zone
number.
4.Rotate to select the zone number of
your area (See Zone Map), then press .
*1: Models with the smart entry system have an ENGINE START/STOP button instead of an
ignition switch.
2
3
4
5
6
78910111213 14 15
Zone Map
Guam Island: Zone 8
Puerto Rico: Zone 11
1Compass Zone Selection
The zone selection is done to compensate the
variation between magnetic north and true north.
If the calibration starts while the audio system is in
use, the display returns to normal after the calibration
is completed.
Page 445 of 573
444
uuWhen DrivinguLaneWatch
TM*
Driving
LaneWatch
TM
*
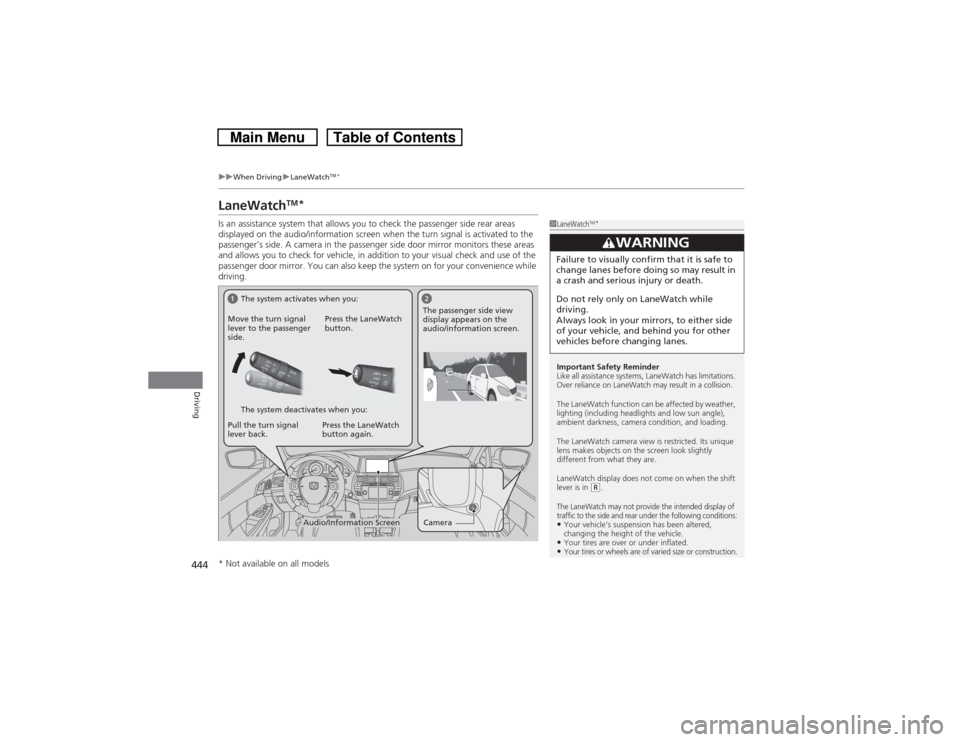
Is an assistance system that allows you to check the passenger side rear areas
displayed on the audio/information screen when the turn signal is activated to the
passenger’s side. A camera in the passenger side door mirror monitors these areas
and allows you to check for vehicle, in addition to your visual check and use of the
passenger door mirror. You can also keep the system on for your convenience while
driving.
1LaneWatch
TM*
Important Safety Reminder
Like all assistance systems, LaneWatch has limitations.
Over reliance on LaneWatch may result in a collision.
The LaneWatch function can be affected by weather,
lighting (including headlights and low sun angle),
ambient darkness, camera condition, and loading.
The LaneWatch camera view is restricted. Its unique
lens makes objects on the screen look slightly
different from what they are.
LaneWatch display does not come on when the shift
lever is in
(R.
The LaneWatch may not provide the intended display of
traffic to the side and rear under the following conditions:•Your vehicle’s suspension has been altered,
changing the height of the vehicle.•Your tires are over or under inflated.•Your tires or wheels are of varied size or construction.
3
WARNING
Failure to visually confirm that it is safe to
change lanes before doing so may result in
a crash and serious injury or death.
Do not rely only on LaneWatch while
driving.
Always look in your mirrors, to either side
of your vehicle, and behind you for other
vehicles before changing lanes.
Camera
Audio/Information Screen Move the turn signal
lever to the passenger
side.Press the LaneWatch
button.
Pull the turn signal
lever back.Press the LaneWatch
button again.The passenger side view
display appears on the
audio/information screen.
The system activates when you:
The system deactivates when you:
* Not available on all models
Page 446 of 573
445
uuWhen DrivinguLaneWatch
TM*
Driving
■Customizing the LaneWatch settings
You can customize the following items using the audio/information screen.
•Show with Turn Signal: Selects whether LaneWatch monitor comes on when
you operate the turn signal light lever.
•Reference Lines: Selects whether the reference lines appear on the LaneWatch
monitor.
•Next Maneuver Pop up
*: Selects whether a turn direction screen of the
navigation system interrupts the LaneWatch display.
•Display: Adjusts display settings.
2Customized Features
* P. 281
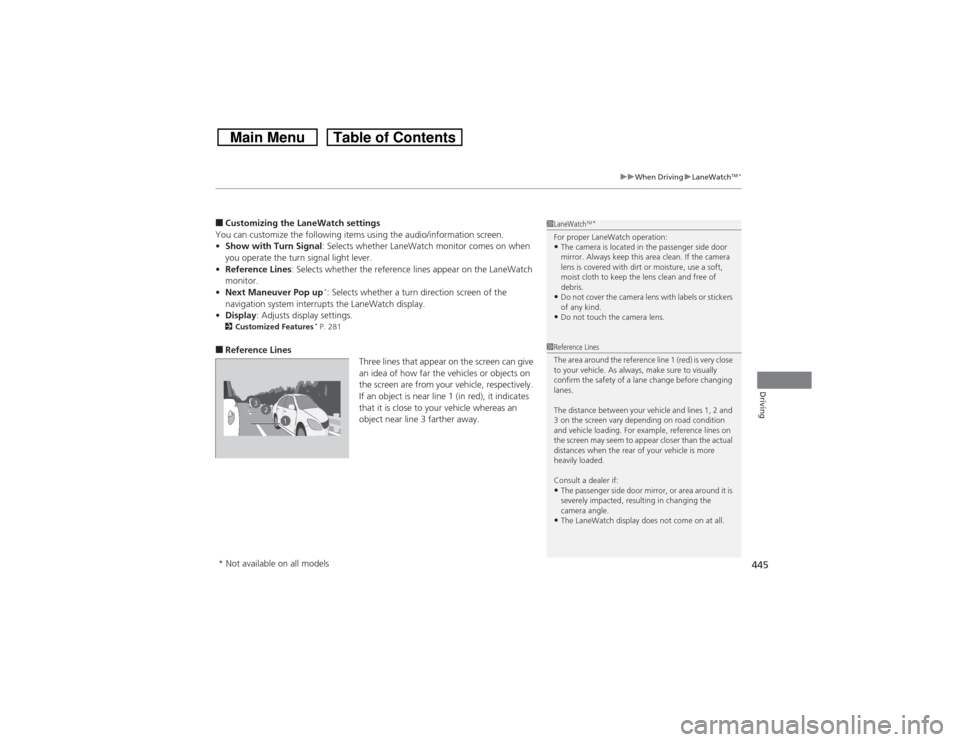
■Reference Lines
Three lines that appear on the screen can give
an idea of how far the vehicles or objects on
the screen are from your vehicle, respectively.
If an object is near line 1 (in red), it indicates
that it is close to your vehicle whereas an
object near line 3 farther away.
1LaneWatch
TM*
For proper LaneWatch operation:•The camera is located in the passenger side door
mirror. Always keep this area clean. If the camera
lens is covered with dirt or moisture, use a soft,
moist cloth to keep the lens clean and free of
debris.•Do not cover the camera lens with labels or stickers
of any kind.•Do not touch the camera lens.
23
1
1Reference Lines
The area around the reference line 1 (red) is very close
to your vehicle. As always, make sure to visually
confirm the safety of a lane change before changing
lanes.
The distance between your vehicle and lines 1, 2 and
3 on the screen vary depending on road condition
and vehicle loading. For example, reference lines on
the screen may seem to appear closer than the actual
distances when the rear of your vehicle is more
heavily loaded.
Consult a dealer if:•The passenger side door mirror, or area around it is
severely impacted, resulting in changing the
camera angle.•The LaneWatch display does not come on at all.
* Not available on all models
Page 456 of 573
455Driving
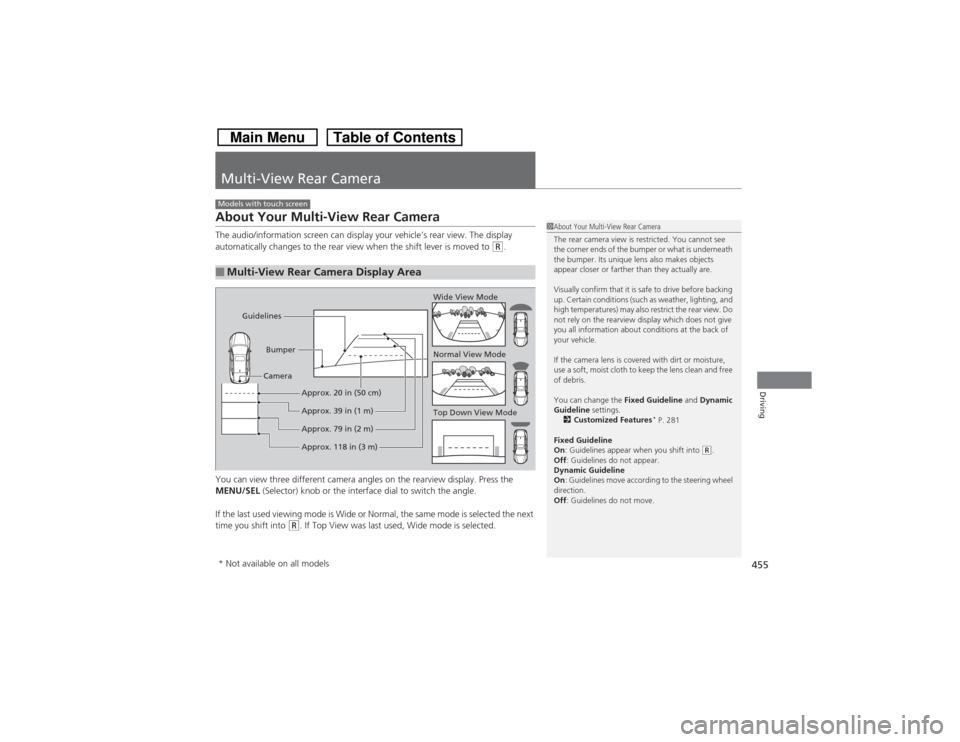
Multi-View Rear CameraAbout Your Multi-View Rear CameraThe audio/information screen can display your vehicle’s rear view. The display
automatically changes to the rear view when the shift lever is moved to
(R.
You can view three different camera angles on the rearview display. Press the
MENU/SEL (Selector) knob or the interface dial to switch the angle.
If the last used viewing mode is Wide or Normal, the same mode is selected the next
time you shift into
(R. If Top View was last used, Wide mode is selected.
■Multi-View Rear Camera Display AreaModels with touch screen
1About Your Multi-View Rear Camera
The rear camera view is restricted. You cannot see
the corner ends of the bumper or what is underneath
the bumper. Its unique lens also makes objects
appear closer or farther than they actually are.
Visually confirm that it is safe to drive before backing
up. Certain conditions (such as weather, lighting, and
high temperatures) may also restrict the rear view. Do
not rely on the rearview display which does not give
you all information about conditions at the back of
your vehicle.
If the camera lens is covered with dirt or moisture,
use a soft, moist cloth to keep the lens clean and free
of debris.
You can change the Fixed Guideline and Dynamic
Guideline settings.
2Customized Features
* P. 281
Fixed Guideline
On: Guidelines appear when you shift into
(R.
Off: Guidelines do not appear.
Dynamic Guideline
On: Guidelines move according to the steering wheel
direction.
Off: Guidelines do not move.
Top Down View Mode Normal View Mode Wide View Mode
Guidelines
Bumper
Camera
Approx. 118 in (3 m) Approx. 79 in (2 m)
Approx. 39 in (1 m)
Approx. 20 in (50 cm)
* Not available on all models
Page 469 of 573

uuMaintenance Minder
TMuTo Use Maintenance Minder
TM
468Maintenance
Reset the engine oil life display if you have performed the maintenance service.
1.Turn the ignition switch to ON
(w*1.
2.Display the engine oil life by repeatedly
pressing the (Select/Reset) knob.
3.Press and hold the knob for ten seconds
or more.
uThe engine oil life indicator and the
maintenance item codes blink.
4.Press the knob for five seconds or more.
uThe displayed maintenance items
disappear, and the engine oil life display
returns to 100%.
*1: Models with the smart entry system have an ENGINE START/STOP button instead of an
ignition switch.■Resetting the Display
1Resetting the DisplayNOTICEFailure to reset the engine oil life after a maintenance
service results in the system showing incorrect
maintenance intervals, which can lead to serious
mechanical problems.
The dealer will reset the engine oil life display after
completing the required maintenance service. If
someone other than a dealer performs maintenance
service, reset the engine oil life display yourself.
You can reset the engine oil life display using the
audio/information screen.
2Customized Features
* P. 281
Models with audio/information screen
* Not available on all models
Page 507 of 573
506Maintenance
BatteryChecking the BatteryCheck the battery condition monthly by inspecting the terminals and cable ends for
corrosion.
If your vehicle’s battery is disconnected or goes dead:
•The audio system is disabled.
2Reactivating the audio system P. 166
•The clock resets.
2Setting the Clock P. 88
•The navigation system
* is disabled.
2Refer to the navigation system manual
Charging the BatteryDisconnect both battery cables to prevent damaging your vehicle’s electrical system.
Always disconnect the negative (–) cable first, and reconnect it last.
1BatteryWARNING: Battery post, terminals,
and related accessories contain lead
and lead compounds.
Wash your hands after handling.When you find corrosion, clean the battery terminals
by applying a baking powder and water solution.
Clean the terminals with a damp towel. Cloth/towel
dry the battery. Coat the terminals with grease to
help prevent future corrosion.
When replacing the battery, the replacement must be
of the same specifications.
Please consult a dealer for more information.
3
WARNING
The battery gives off explosive hydrogen
gas during normal operation.
A spark or flame can cause the battery to
explode with enough force to kill or
seriously hurt you.
When conducting any battery
maintenance, wear protective clothing and
a face shield, or have a skilled technician do
it.
* Not available on all models
Page 511 of 573
510Maintenance
CleaningInterior CareUse a damp cloth with a mixture of mild detergent and warm water to remove dirt.
Use a clean cloth to remove detergent residue.
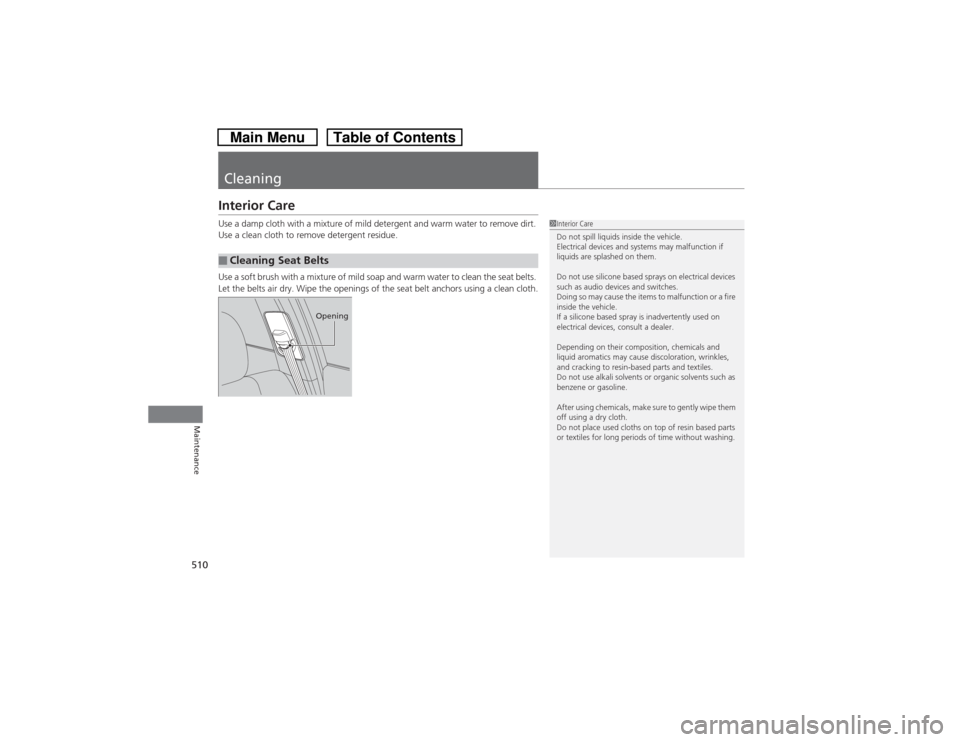
Use a soft brush with a mixture of mild soap and warm water to clean the seat belts.
Let the belts air dry. Wipe the openings of the seat belt anchors using a clean cloth.■Cleaning Seat Belts
1Interior Care
Do not spill liquids inside the vehicle.
Electrical devices and systems may malfunction if
liquids are splashed on them.
Do not use silicone based sprays on electrical devices
such as audio devices and switches.
Doing so may cause the items to malfunction or a fire
inside the vehicle.
If a silicone based spray is inadvertently used on
electrical devices, consult a dealer.
Depending on their composition, chemicals and
liquid aromatics may cause discoloration, wrinkles,
and cracking to resin-based parts and textiles.
Do not use alkali solvents or organic solvents such as
benzene or gasoline.
After using chemicals, make sure to gently wipe them
off using a dry cloth.
Do not place used cloths on top of resin based parts
or textiles for long periods of time without washing.
Opening
Page 529 of 573
528Handling the Unexpected
Jump StartingTurn off the power to electric devices, such as audio and lights. Turn off the engine,
then open the hood.
1.Connect the first jumper cable to your
vehicle’s battery + terminal.
2.Connect the other end of the first jumper
cable to the booster battery + terminal.
uUse a 12-volt booster battery only.
3.Connect the second jumper cable to the
booster battery - terminal.■Jump Starting Procedure
1Jump Starting
Securely attach the jumper cables clips so that they
do not come off when the engine vibrates. Also be
careful not to tangle the jumper cables or allow the
cable ends to touch each other while attaching or
detaching the jumper cables.
3
WARNING
A battery can explode if you do not follow
the correct procedure, seriously injuring
anyone nearby.
Keep all sparks, open flames, and smoking
materials away from the battery.
Booster Battery4-cylinder models6-cylinder modelsBooster Battery