Page 2 of 469

Contents
Child Safety P. 52Exhaust Gas Hazard P. 64Safety Labels P. 65Opening and Closing the Trunk P. 121 Security System P. 125 Opening and Closing the Windows P. 128
Operating the Switches Around the Steering Wheel P. 131 Adjusting the Mirrors P. 144
Interior Lights/Interior Convenience Items P. 154 Heating and Cooling
* P. 161
Audio Error Messages P. 224General Information on the Audio System P. 230When Driving P. 313 Braking P. 337Parking Your Vehicle P. 341
Accessories and Modifications P. 347Maintenance Under the Hood P. 361 Replacing Light Bulbs P. 376
Checking and Maintaining Tires P. 391 Battery P. 400 Remote Transmitter Care
* P. 401
Cleaning P. 404
Engine Does Not Start P. 426 Jump Starting P. 429Shift Lever Does Not Move P. 432
Fuses P. 439 Emergency Towing P. 442Devices that Emit Radio Waves P. 449 Reporting Safety Defects P. 450
Authorized Manuals P. 455 Customer Service Information P. 456
Quick Reference Guide
P. 2
Safe Driving
P. 27
Instrument Panel
P. 67
Controls
P. 103
Features
P. 169
Driving
P. 303
Maintenance
P. 349
Handling the Unexpected
P. 409
Information
P. 443
Index
P. 457
Page 20 of 469
19Quick Reference Guide
Maintenance
(P 349)
Under the Hood
(P 361)
● Check engine oil, engine coolant, and windshield washer
fluid. Add when necessary.
● Check brake fluid and clutch* fluid.
● Check the battery condition monthly.
a
Pull the hood release handle under the corner of the
dashboard.
b
Locate the hood latch lever, pull the lever up, and lift up
the hood.
c
When finished, close the hood and make sure it is firmly
locked in place.
Lights
(P 376)
● Inspect all lights regularly.
Wiper Blades
(P 389)
● Replace blades if they leave streaks
across the windshield.
Tires
(P 391)
● Inspect tires and wheels regularly.
● Check tire pressures regularly.
● Install snow tires for winter
driving.
* Not available on all models
Page 21 of 469
20Quick Reference Guide
Handling the Unexpected
(P 409)
Flat Tire
(P 411, 418)
● Park in a safe location and replace the
flat tire with the compact spare tire
* in
the trunk, or repair the flat tire using the
tire repair kit
*.
Indicators Come On (P 435)
● Identify the indicator and consult the
owner's manual.
Engine Won't Start (P 426)
● If the battery is dead, jump start using a
booster battery.Blown Fuse
(P 439)
● Check for a blown fuse if an electrical
device does not operate.
Overheating
(P 433)
● Park in a safe location. If you do not see
steam under the hood, open the hood,
and let the engine cool down.
Emergency Towing (P 442)
●Call a professional towing service if you
need to tow your vehicle.
Page 70 of 469

69
uuIndicators u
Continued
Instrument Panel
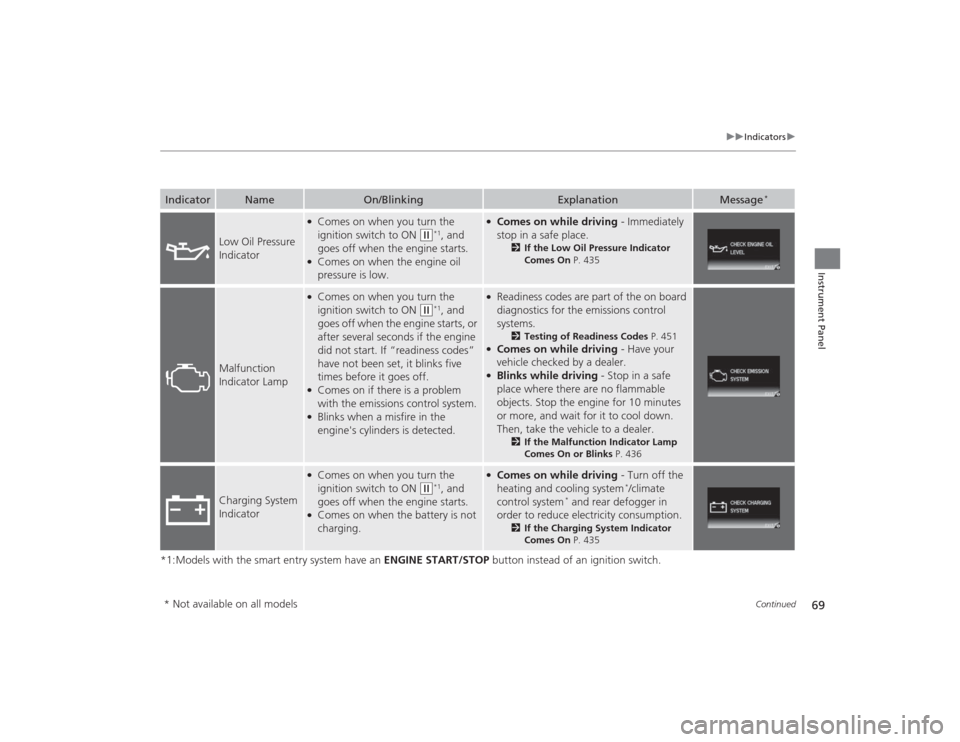
*1:Models with the smart entry system have an ENGINE START/STOP button instead of an ignition switch.Indicator
Name
On/Blinking
Explanation
Message
*
Low Oil Pressure
Indicator
●Comes on when you turn the
ignition switch to ON
(w
*1, and
goes off when the engine starts.
●Comes on when the engine oil
pressure is low.
●Comes on while driving - Immediately
stop in a safe place.
2 If the Low Oil Pressure Indicator
Comes On P. 435
Malfunction
Indicator Lamp
●Comes on when you turn the
ignition switch to ON
(w
*1, and
goes off when the engine starts, or
after several seconds if the engine
did not start. If “readiness codes”
have not been set, it blinks five
times before it goes off.
●Comes on if there is a problem
with the emissions control system.●Blinks when a misfire in the
engine's cylinders is detected.
●Readiness codes are part of the on board
diagnostics for the emissions control
systems.
2 Testing of Readiness Codes P. 451
●Comes on while driving - Have your
vehicle checked by a dealer.●Blinks while driving - Stop in a safe
place where there are no flammable
objects. Stop the engine for 10 minutes
or more, and wait for it to cool down.
Then, take the vehicle to a dealer.
2 If the Malfunction Indicator Lamp
Comes On or Blinks P. 436
Charging System
Indicator
●Comes on when you turn the
ignition switch to ON
(w
*1, and
goes off when the engine starts.
●Comes on when the battery is not
charging.
●Comes on while driving - Turn off the
heating and cooling system
*/climate
control system
* and rear defogger in
order to reduce electricity consumption.
2 If the Charging System Indicator
Comes On P. 435
* Not available on all models
Page 81 of 469

80
uuIndicators uintelligent Multi-Information Display (i -MID) Warning and Information Messages
*
Instrument Panel
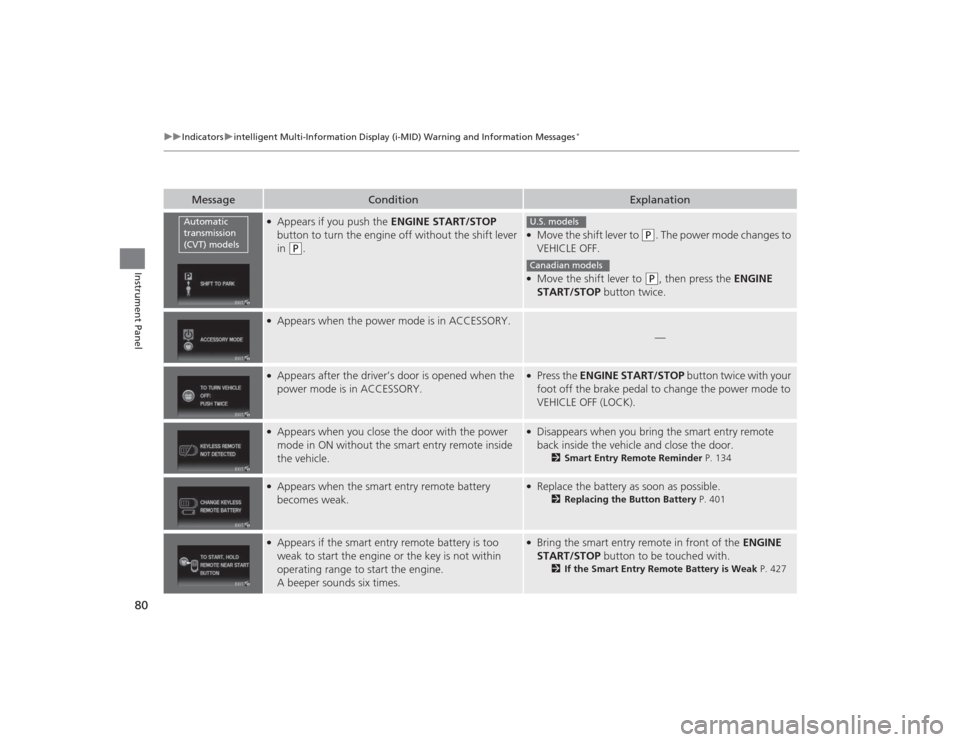
Message
Condition
Explanation
●Appears if you push the ENGINE START/STOP
button to turn the engine off without the shift lever
in
(P
.
●Move the shift lever to
(P
. The power mode changes to
VEHICLE OFF.
●Move the shift lever to
( P
, then press the ENGINE
START/STOP button twice.
●Appears when the power mode is in ACCESSORY.
—
●Appears after the driver’s door is opened when the
power mode is in ACCESSORY.
●Press the ENGINE START/STOP button twice with your
foot off the brake pedal to change the power mode to
VEHICLE OFF (LOCK).
●Appears when you close the door with the power
mode in ON without the smart entry remote inside
the vehicle.
●Disappears when you bring the smart entry remote
back inside the vehicle and close the door.
2 Smart Entry Remote Reminder P. 134
●Appears when the smart entry remote battery
becomes weak.
●Replace the battery as soon as possible.
2Replacing the Button Battery P. 401
●Appears if the smart entry remote battery is too
weak to start the engine or the key is not within
operating range to start the engine.
A beeper sounds six times.
●Bring the smart entry remote in front of the ENGINE
START/STOP button to be touched with.
2If the Smart Entry Remote Battery is Weak P. 427
Automatic
transmission
(CVT) models
U.S. modelsCanadian models
Page 107 of 469

106Controls
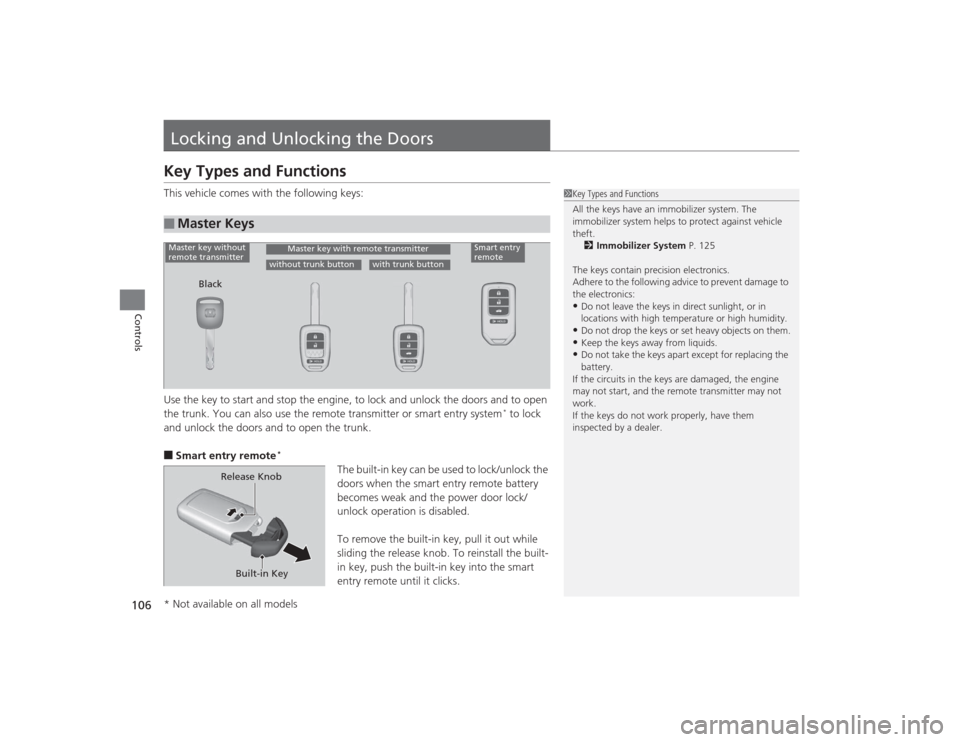
Locking and Unlocking the DoorsKey Types and FunctionsThis vehicle comes with the following keys:
Use the key to start and stop the engine, to lock and unlock the doors and to open
the trunk. You can also use the remote transmitter or smart entry system
* to lock
and unlock the doors and to open the trunk.
■Smart entry remote
*
The built-in key can be used to lock/unlock the
doors when the smart entry remote battery
becomes weak and the power door lock/
unlock operation is disabled.
To remove the built-in key, pull it out while
sliding the release knob. To reinstall the built-
in key, push the built-in key into the smart
entry remote until it clicks.
■
Master Keys
1 Key Types and Functions
All the keys have an immobilizer system. The
immobilizer system helps to protect against vehicle
theft.
2 Immobilizer System P. 125
The keys contain precision electronics.
Adhere to the following advice to prevent damage to
the electronics:•Do not leave the keys in direct sunlight, or in
locations with high temperature or high humidity.•Do not drop the keys or set heavy objects on them.•Keep the keys away from liquids.•Do not take the keys apa rt except for replacing the
battery.
If the circuits in the keys are damaged, the engine
may not start, and the re mote transmitter may not
work.
If the keys do not work properly, have them
inspected by a dealer.
Black
Master key without
remote transmitter
Master key with remote transmitter
without trunk button
with trunk button
Smart entry
remote
Built-in Key
Release Knob
* Not available on all models
Page 109 of 469

108
uuLocking and Unlocking the Doors uLow Smart Entry Remote Signal Strength
*
Controls
Low Smart Entry Remote Signal Strength
*
The vehicle transmits radio waves to locate the smart entry remote when locking/
unlocking the doors, opening the trunk, or to start the engine.
In the following cases, locking/unlocking the doors, opening the trunk, or starting
the engine may be inhibited or operation may be unstable:
• Strong radio waves are being transmitted by nearby equipment.
• You are carrying the smart entry remote together with telecommunications
equipment, laptop computers, cell phones, or wireless devices.
• A metallic object is touching or covering the smart entry remote.
1Low Smart Entry Remote Signal Strength
*
Communication between the smart entry remote and
the vehicle consumes the smart entry remote’s
battery.
Battery life is about two years, but this varies
depending on regularity of use.
The battery is consumed whenever the smart entry
remote is receiving strong radio waves. Avoid placing
it near electrica l appliances such as televisions and
personal computers.
* Not available on all models
Page 111 of 469
uuLocking and Unlocking the Doors uLocking/Unlocking the Doors from the Outside
110Controls
■Unlocking the doors
Press the unlock button.
Once: u Some exterior lights flash twice, and the driver's door unlocks.
Twice: u The remaining doors unlock.
1Using the Remote Transmitter
*
If the distance at which the remote transmitter works
varies, the battery is probably low.
If the LED does not come on when you press a
button, the battery is dead.
2 Replacing the Button Battery P. 401
You can customize the door unlock mode setting. 2 Customized Features P. 90
* Not available on all models