Page 144 of 469
143
uuOperating the Switches Around the Steering Wheel uAdjusting the Steering Wheel
Controls
Adjusting the Steering WheelThe steering wheel height and distance from your body can be adjusted so that you
can comfortably grip the steering wheel in an appropriate driving posture.
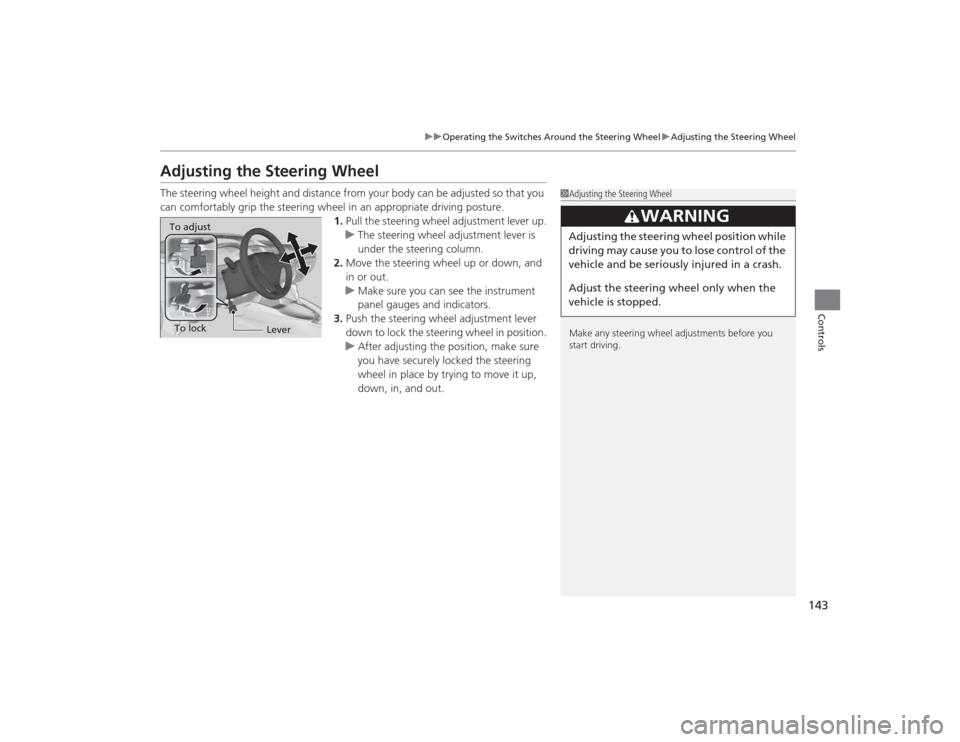
1.Pull the steering wheel adjustment lever up.
u The steering wheel adjustment lever is
under the steering column.
2. Move the steering wheel up or down, and
in or out.
u Make sure you can see the instrument
panel gauges and indicators.
3. Push the steering wheel adjustment lever
down to lock the steering wheel in position.
u After adjusting the position, make sure
you have securely locked the steering
wheel in place by trying to move it up,
down, in, and out.
1Adjusting the Steering Wheel
Make any steering wheel adjustments before you
start driving.
3
WARNING
Adjusting the steering wheel po sition while
driving may cause you to lose control of the
vehicle and be seriously injured in a crash.
Adjust the steering wheel only when the
vehicle is stopped.
To adjustTo lock
Lever
Page 145 of 469
144Controls
Adjusting the MirrorsInterior Rearview MirrorAdjust the angle of the rearview mirror when you are sitting in the correct driving
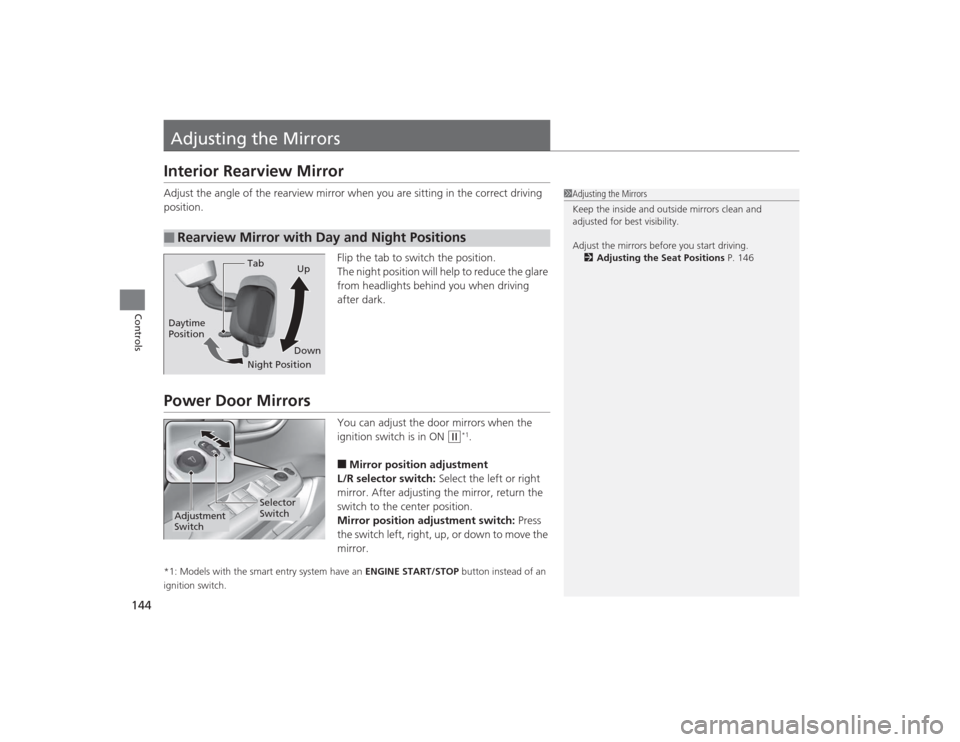
position.Flip the tab to switch the position.
The night position will help to reduce the glare
from headlights behind you when driving
after dark.Power Door Mirrors
You can adjust the door mirrors when the
ignition switch is in ON
(w
*1.
■Mirror position adjustment
L/R selector switch: Select the left or right
mirror. After adjusting the mirror, return the
switch to the center position.
Mirror position adjustment switch: Press
the switch left, right, up, or down to move the
mirror.
*1: Models with the smart entry system have an ENGINE START/STOP button instead of an
ignition switch.■
Rearview Mirror with Day and Night Positions
1 Adjusting the Mirrors
Keep the inside and outside mirrors clean and
adjusted for best visibility.
Adjust the mirrors before you start driving.
2 Adjusting the Seat Positions P. 146
Tab
Daytime
Position
Night PositionUp
Down
Selector
Switch
Adjustment
Switch
Page 155 of 469
154Controls
Interior Lights/Interior Convenience ItemsInterior Lights
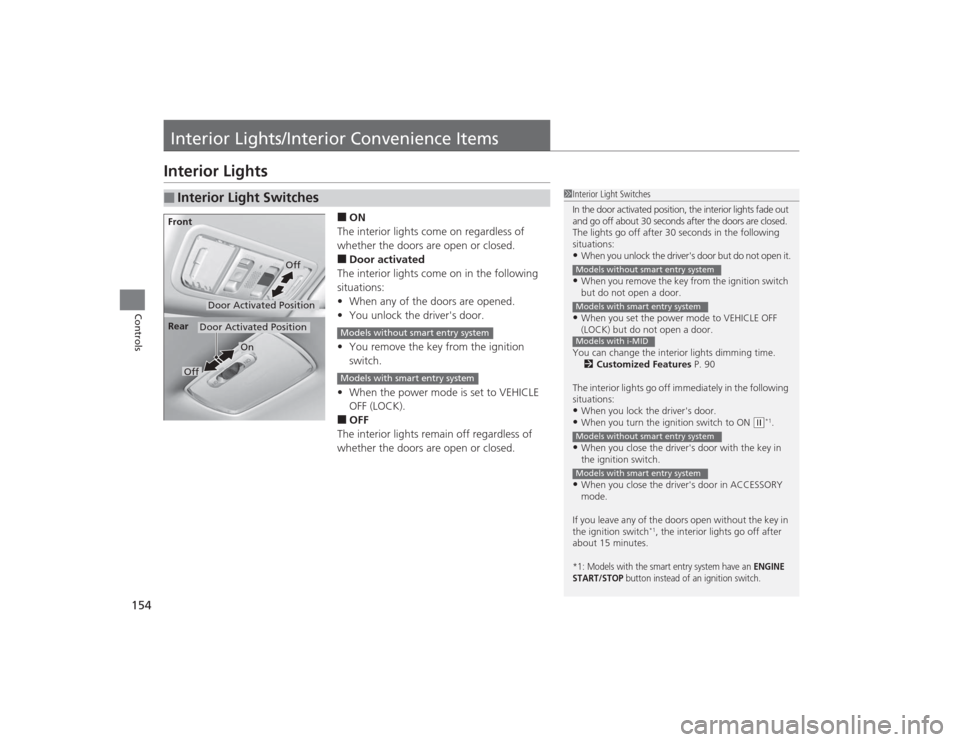
■ON
The interior lights come on regardless of
whether the doors are open or closed.■Door activated
The interior lights come on in the following
situations:
• When any of the doors are opened.
• You unlock the driver's door.
• You remove the key from the ignition
switch.
• When the power mode is set to VEHICLE
OFF (LOCK).■OFF
The interior lights remain off regardless of
whether the doors are open or closed.
■
Interior Light Switches
1 Interior Light Switches
In the door activated position, the interior lights fade out
and go off about 30 seconds after the doors are closed.
The lights go off after 30 seconds in the following
situations:•When you unlock the driver's door but do not open it.•When you remove the key from the ignition switch
but do not open a door.•When you set the power mode to VEHICLE OFF
(LOCK) but do not open a door.
You can change the interior lights dimming time. 2 Customized Features P. 90
The interior lights go off immediately in the following
situations:•When you lock the driver's door.•When you turn the ignition switch to ON
( w*1.
•When you close the driver's door with the key in
the ignition switch.•When you close the driver's door in ACCESSORY
mode.
If you leave any of the doors open without the key in
the ignition switch
*1, the interior lights go off after
about 15 minutes.
*1: Models with the smart entry system have an
ENGINE
START/STOP
button instead of an ignition switch.
Models without smart entry systemModels with smart entry systemModels with i-MIDModels without smart entry systemModels with smart entry system
Door Activated Position
Off
Front
Door Activated Position
On
Off
Rear
Models without smart entry systemModels with smart entry system
Page 160 of 469
Continued
159
uuInterior Lights/Interior Convenience Items uInterior Convenience Items
Controls
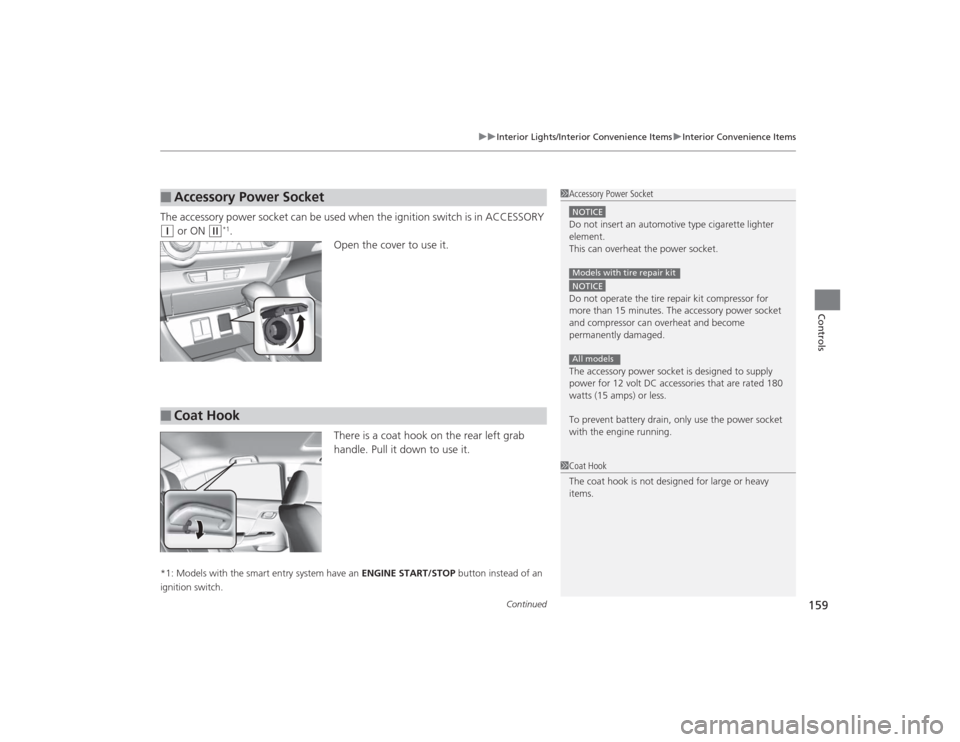
The accessory power socket can be used when the ignition switch is in ACCESSORY (q
or ON
(w
*1.
Open the cover to use it.
There is a coat hook on the rear left grab
handle. Pull it down to use it.
*1: Models with the smart entry system have an ENGINE START/STOP button instead of an
ignition switch.■
Accessory Power Socket
1 Accessory Power SocketNOTICEDo not insert an automotive type cigarette lighter
element.
This can overheat the power socket.NOTICEDo not operate the tire repair kit compressor for
more than 15 minutes. The accessory power socket
and compressor can overheat and become
permanently damaged.
The accessory power socket is designed to supply
power for 12 volt DC accessories that are rated 180
watts (15 amps) or less.
To prevent battery drain, only use the power socket
with the engine running.Models with tire repair kitAll models
■
Coat Hook
1Coat Hook
The coat hook is not designed for large or heavy
items.
Page 161 of 469
uuInterior Lights/Interior Convenience Items uInterior Convenience Items
160Controls
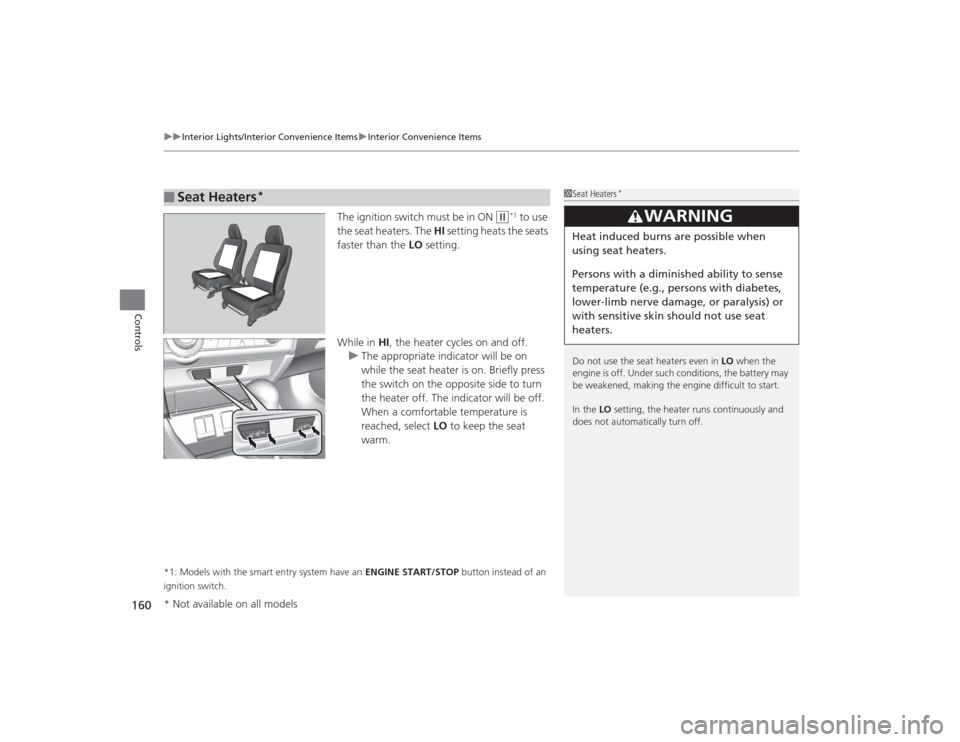
The ignition switch must be in ON
(w
*1 to use
the seat heaters. The HI setting heats the seats
faster than the LO setting.
While in HI, the heater cycles on and off.
u The appropriate indicator will be on
while the seat heater is on. Briefly press
the switch on the opposite side to turn
the heater off. The indicator will be off.
When a comfortable temperature is
reached, select LO to keep the seat
warm.
*1: Models with the smart entry system have an ENGINE START/STOP button instead of an
ignition switch.■
Seat Heaters
*
1 Seat Heaters
*
Do not use the seat heaters even in LO when the
engine is off. Under such conditions, the battery may
be weakened, making the engine difficult to start.
In the LO setting, the heater runs continuously and
does not automatically turn off.
3
WARNING
Heat induced burns are possible when
using seat heaters.
Persons with a diminished ability to sense
temperature (e.g., persons with diabetes,
lower-limb nerve damage, or paralysis) or
with sensitive skin should not use seat
heaters.
* Not available on all models
Page 174 of 469
173
uuAudio System uAudio System Theft Protection
*
Features
Audio System Theft Protection
*
The audio system is disabled when it is disconnected from the power source, such as
when the battery is disconnected or goes dead. In certain conditions, the system
may display ENTER CODE
*1/Enter Code
*2. If this occurs, reactivate the audio
system.
■Reactivating the audio system
1. Turn the ignition switch to ON
(w
*3.
2. Turn on the audio system.
3. Press and hold the audio system power button for more than two seconds.
u The audio system is reactivated when the audio control unit establishes a
connection with the vehicle control unit. If the control unit fails to recognize
the audio unit, you must go to a dealer and have the audio unit checked.
■Entering the audio security code
ENTER CODE appears on the display when the power is reconnected.
1. Turn on the audio system.
2. Enter the audio security code using the preset buttons. If you enter an incorrect
digit, continue to the last digit, then try again. If you do not enter the code
correctly after 10 tries, leave the system for one hour before trying again, or visit
a dealer to have the system reset.*1: Models with one display
*2: Models with the display audio system
*3: Models with the smart entry system have an ENGINE START/STOP button instead of an
ignition switch.Models with i-MIDModels with information display* Not available on all models
Page 180 of 469
179Features
Audio System Basic OperationTo use the audio system function, the ignition switch must be in ACCESSORY
(q
or
ON
(w
*1.
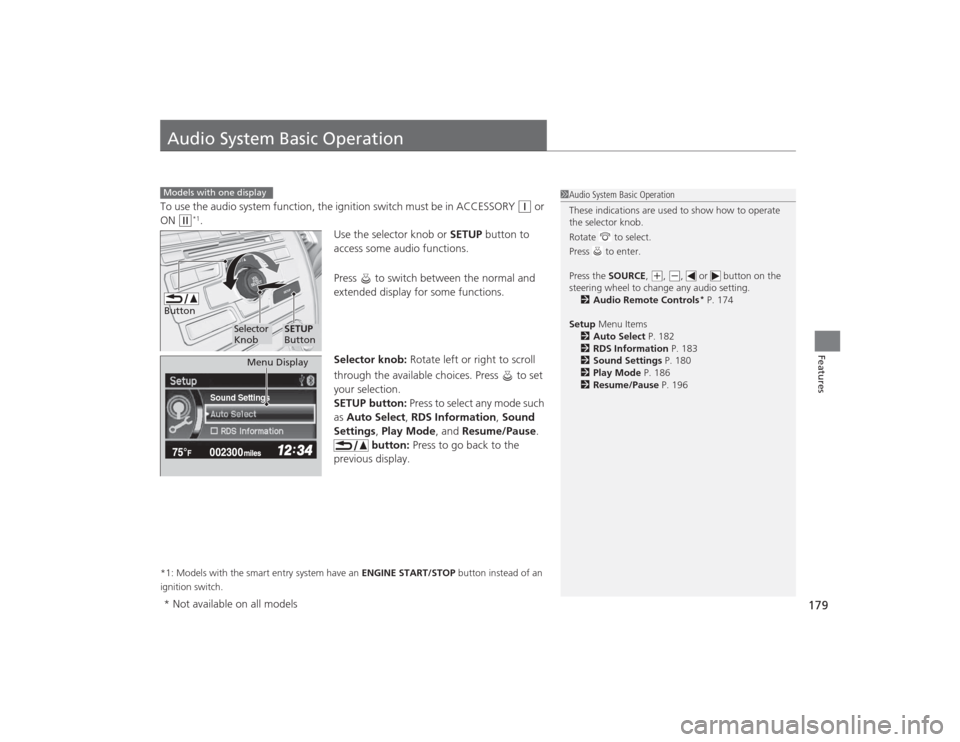
Use the selector knob or SETUP button to
access some audio functions.
Press to switch between the normal and
extended display for some functions.
Selector knob: Rotate left or right to scroll
through the available choices. Press to set
your selection.
SETUP button: Press to select any mode such
as Auto Select , RDS Information , Sound
Settings , Play Mode , and Resume/Pause.
button: Press to go back to the
previous display.
*1: Models with the smart entry system have an ENGINE START/STOP button instead of an
ignition switch.Models with one display
1 Audio System Basic Operation
These indications are used to show how to operate
the selector knob.
Rotate to select.
Press to enter.
Press the SOURCE ,
(+, (-, or button on the
steering wheel to change any audio setting. 2 Audio Remote Controls
* P. 174
Setup Menu Items
2 Auto Select P. 182
2 RDS Information P. 183
2 Sound Settings P. 180
2 Play Mode P. 186
2 Resume/Pause P. 196
Button
Selector
Knob
SETUP
Button
Sound Settings
Menu Display
* Not available on all models
Page 249 of 469
248
uuBluetooth ® HandsFreeLink ®
*uHFL Menus
Features
HFL MenusThe ignition switch must be in ACCESSORY
(q
or ON
(w
*1 to use HFL.
1HFL Menus
To use HFL, you must first pair your Bluetooth-
compatible cell phone to the system while the vehicle
is parked.
Some functions are limit ed while driving. A message
appears on the screen when the vehicle is moving
and the operation is canceled.
Display your speed dial entry lists.
(up to 15 entries per paired phone)
Display the last 20
outgoing calls.
Display the last 20
incoming calls.
Display the last 20
missed calls.
Display the paired phone’s phonebook.
Enter a phone number to dial.
Phone
Speed Dial
*2
Call History
*2
PHONE
or
Phonebook
*2
Dial
*2
Dialed CallsReceived CallsMissed Calls
*2: Appears only when a phone is connected to HFL. *1: Models with the smart entry system have an ENGINE START/STOP button
instead of an ignition switch.