2014 HONDA ACCORD HYBRID lights
[x] Cancel search: lightsPage 446 of 561
445
uuWhen DrivinguLaneWatchTM
Continued
Driving
LaneWatch TM
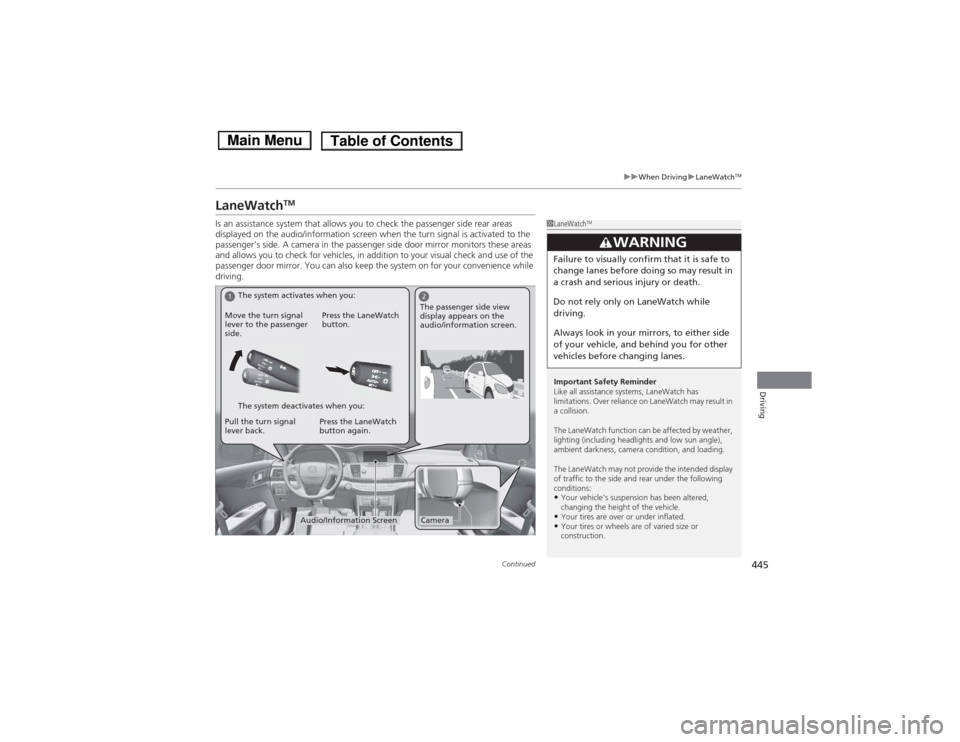
Is an assistance system that allows you to check the passenger side rear areas
displayed on the audio/information screen when the turn signal is activated to the
passenger’s side. A camera in the passenger side door mirror monitors these areas
and allows you to check for vehicles, in addition to your visual check and use of the
passenger door mirror. You can also keep the system on for your convenience while
driving.
1LaneWatch TM
Important Safety Reminder
Like all assistance systems, LaneWatch has
limitations. Over reliance on LaneWatch may result in a collision.
The LaneWatch function can be affected by weather,
lighting (including headlights and low sun angle),
ambient darkness, camera condition, and loading.
The LaneWatch may not provide the intended display
of traffic to the side and rear under the following
conditions: • Your vehicle’s suspension has been altered,
changing the height of the vehicle.
• Your tires are over or under inflated.
• Your tires or wheels are of varied size or
construction.
3WARNING
Failure to visually confirm that it is safe to
change lanes before doing so may result in
a crash and serious injury or death.
Do not rely only on LaneWatch while
driving.
Always look in your mirrors, to either side
of your vehicle, and behind you for other
vehicles before changing lanes.
12
CameraAudio/Information Screen
Move the turn signal
lever to the passenger
side.
Press the LaneWatch
button.
Pull the turn signal
lever back. Press the LaneWatch button again. The passenger side view
display appears on the
audio/information screen.
The system activates when you:
The system deactivates when you:
Main MenuTable of Contents
Page 465 of 561

464
Maintenance
Before Performing Maintenance
Inspection and Maintenance
For your safety, perform all listed inspections and maintenance to keep your vehicle
in good condition. If you become aware of any abnormality (noise, smell, insufficient
brake fluid, oil residue on the ground, etc.), have your vehicle inspected by a dealer.
(Note, however, that service at a dealer is not mandatory to keep your warranties in
effect.) Refer to the separate maintenance booklet for detailed maintenance and inspection information. ■Daily inspections
Perform inspections before long distance trips, when washing the vehicle, or when refueling. ■ Periodic inspections
• Check the brake fluid level monthly.
2 Brake Fluid P. 482
• Check the tire pressure monthly. Examine the tread for wear and foreign objects.
2 Checking and Maintaining Tires P. 493
• Check the operation of the exterior lights monthly.
2 Replacing Light Bulbs P. 484
• Check the condition of the wiper blades at least every six months.
2 Checking and Maintaining Wiper Blades P. 491
■Types of Inspection and Maintenance
1Inspection and Maintenance
Maintenance, replacement, or repair of
emissions control devices and systems may be
done by any automotive repair establishment or
individuals using parts that are “certified” to EPA standards.
According to state and federal regulations, failure to
perform maintenance on the maintenance main
items marked with # will not void your emissions
warranties. However, all maintenance services should
be performed in accordance with the intervals
indicated by the multi-information display.
2 Maintenance Service Items P. 469
If you want to perform complex maintenance tasks
that require more skills and tools, you can purchase a
subscription to the Service Express website at
www.techinfo.honda.com .
2 Authorized Manuals P. 547
If you want to perform maintenance yourself, make
sure that you have the necessary tools and skills first.
After performing maintenance, update the records in
the separate maintenance booklet.
U.S. models
Main MenuTable of Contents
Page 485 of 561
484
Maintenance
Replacing Light Bulbs
Headlight Bulbs
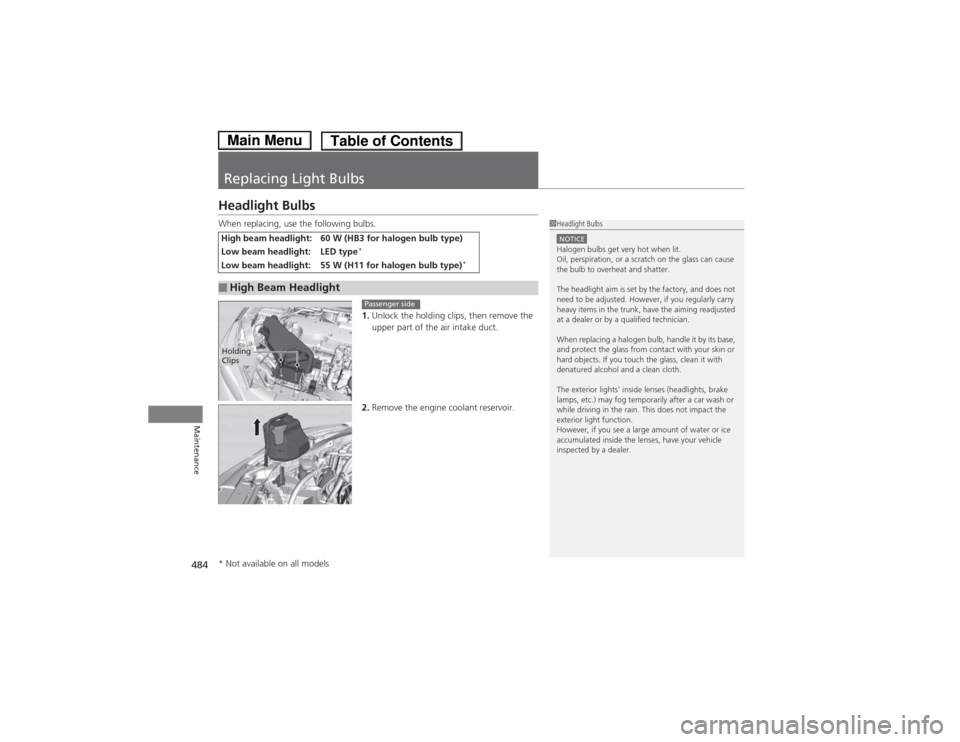
When replacing, use the following bulbs.1.Unlock the holding clips, then remove the
upper part of the air intake duct.
2. Remove the engine coolant reservoir.
High beam headlight: 60 W (HB3 for halogen bulb type)
Low beam headlight: LED type *
Low beam headlight: 55 W (H11 for halogen bulb type) *
■High Beam Headlight
1Headlight Bulbs
NOTICEHalogen bulbs get very hot when lit.
Oil, perspiration, or a scratch on the glass can cause
the bulb to overheat and shatter.
The headlight aim is set by the factory, and does not
need to be adjusted. However, if you regularly carry
heavy items in the trunk, have the aiming readjusted
at a dealer or by a qualified technician.
When replacing a halogen bulb, handle it by its base,
and protect the glass from contact with your skin or
hard objects. If you touch the glass, clean it with
denatured alcohol and a clean cloth.
The exterior lights' inside lenses (headlights, brake
lamps, etc.) may fog temporarily after a car wash or
while driving in the rain. This does not impact the
exterior light function.
However, if you see a large amount of water or ice
accumulated inside the lenses, have your vehicle
inspected by a dealer.
Holding
Clips
Passenger side
* Not available on all models
Main MenuTable of Contents
Page 487 of 561
uuReplacing Light BulbsuHeadlight Bulbs
486
Maintenance
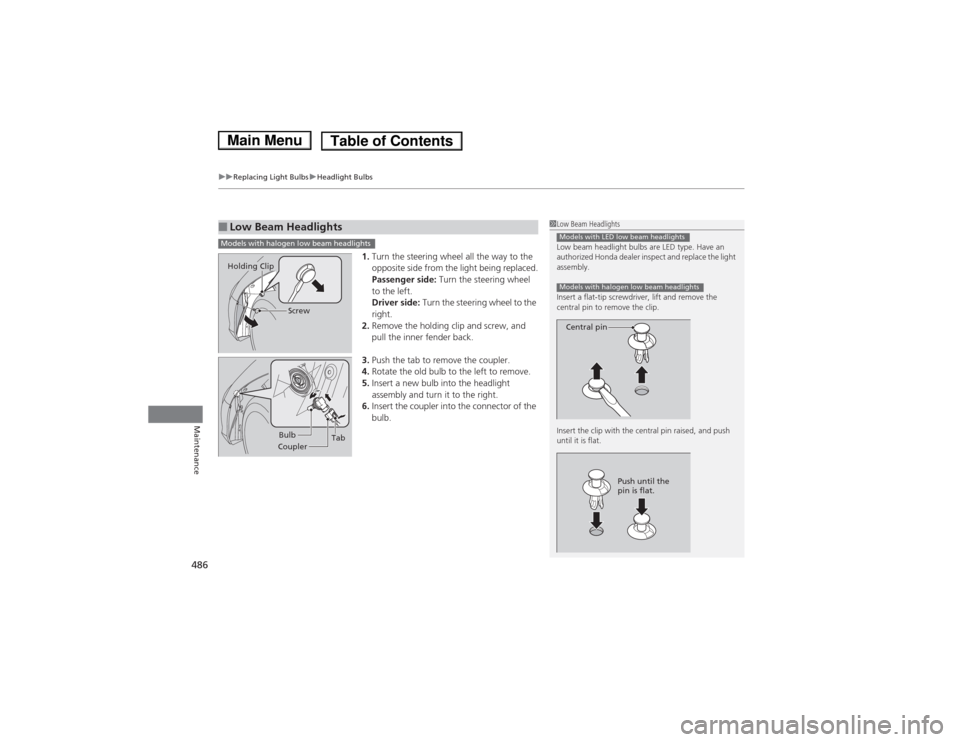
1. Turn the steering wheel all the way to the
opposite side from the light being replaced.
Passenger side: Turn the steering wheel
to the left.
Driver side: Turn the steering wheel to the
right.
2. Remove the holding clip and screw, and
pull the inner fender back.
3. Push the tab to remove the coupler.
4. Rotate the old bulb to the left to remove.
5. Insert a new bulb into the headlight
assembly and turn it to the right.
6. Insert the coupler into the connector of the
bulb.
■Low Beam Headlights1Low Beam Headlights
Low beam headlight bulbs are LED type. Have an
authorized Honda dealer inspect and replace the light
assembly.
Insert a flat-tip screwdriver, lift and remove the
central pin to remove the clip.
Insert the clip with the central pin raised, and push until it is flat.
Models with LED low beam headlights
Models with halogen low beam headlights
Central pin
Push until the
pin is flat.
Models with halogen low beam headlights
Screw
Holding Clip
Bulb
Coupler Tab
Main MenuTable of Contents
Page 488 of 561
487
uuReplacing Light BulbsuFront Turn Signal/Side Marker Light Bulbs
Maintenance
Front Turn Signal/Side Marker Light Bulbs
When replacing, use the following bulbs.
Turn the steering wheel and pull the inner fender back in the same way as when
replacing the halogen low beam headlight bulbs*
.
2 Low Beam Headlights P. 486
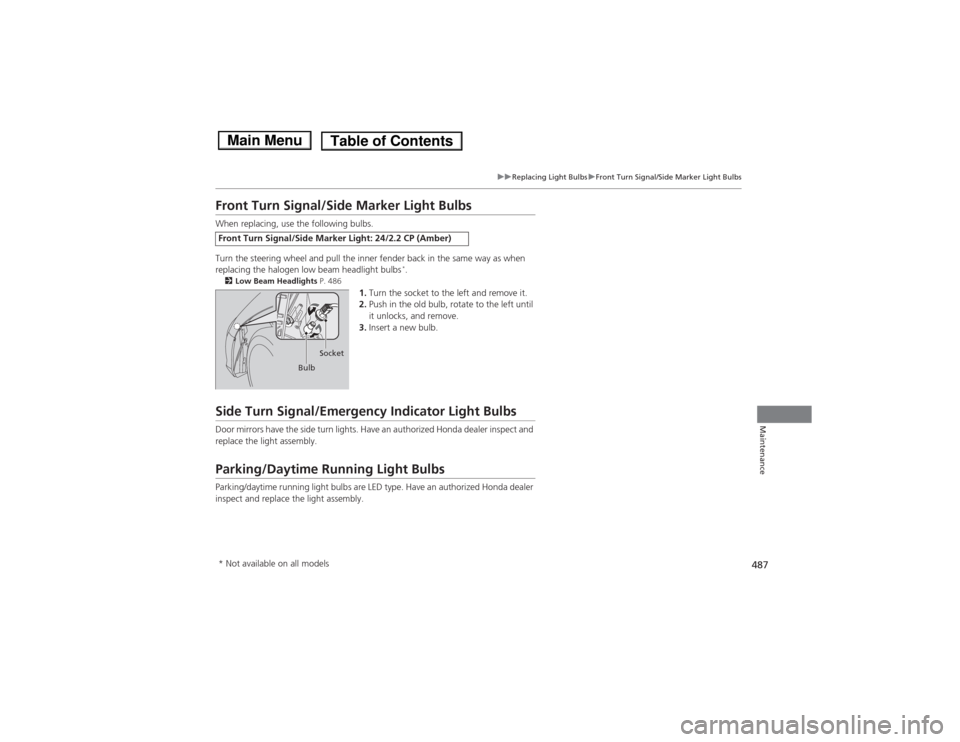
1.Turn the socket to the left and remove it.
2. Push in the old bulb, rotate to the left until
it unlocks, and remove.
3. Insert a new bulb.
Side Turn Signal/Emergency Indicator Light Bulbs
Door mirrors have the side turn lights. Have an authorized Honda dealer inspect and
replace the light assembly.
Parking/Daytime Running Light Bulbs
Parking/daytime running light bulbs are LED type. Have an authorized Honda dealer
inspect and replace the light assembly.
Front Turn Signal/Side Marker Light: 24/2.2 CP (Amber)
Bulb Socket
* Not available on all models
Main MenuTable of Contents
Page 511 of 561
510
Handling the Unexpected
If a Tire Goes Flat
Temporarily Repairing a Flat Tire
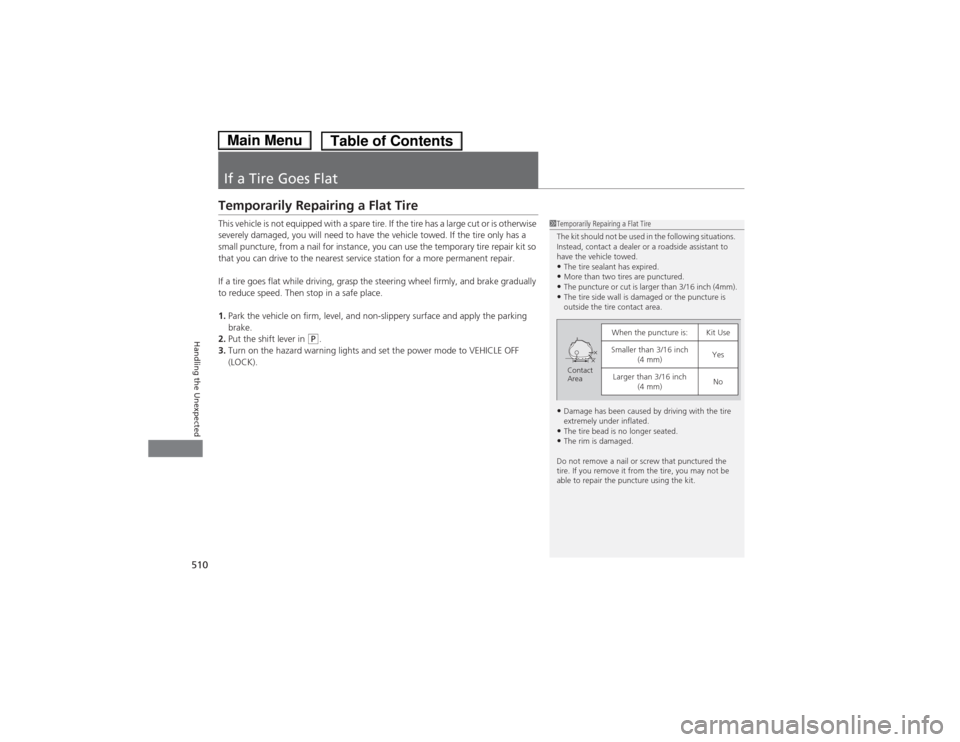
This vehicle is not equipped with a spare tire. If the tire has a large cut or is otherwise
severely damaged, you will need to have the vehicle towed. If the tire only has a
small puncture, from a nail for instance, you can use the temporary tire repair kit so
that you can drive to the nearest service station for a more permanent repair.
If a tire goes flat while driving, grasp the steering wheel firmly, and brake gradually
to reduce speed. Then stop in a safe place. 1.Park the vehicle on firm, level, and non-slippery surface and apply the parking brake.
2. Put the shift lever in
(P .
3. Turn on the hazard warning lights and set the power mode to VEHICLE OFF
(LOCK).
1Temporarily Repairing a Flat Tire
The kit should not be used in the following situations.
Instead, contact a dealer or a roadside assistant to
have the vehicle towed.•The tire sealant has expired.
• More than two tires are punctured.
• The puncture or cut is larger than 3/16 inch (4mm).
• The tire side wall is damaged or the puncture is
outside the tire contact area.
• Damage has been caused by driving with the tire
extremely under inflated.
• The tire bead is no longer seated.
• The rim is damaged.
Do not remove a nail or screw that punctured the
tire. If you remove it from the tire, you may not be
able to repair the puncture using the kit.
When the puncture is:Kit Use
Smaller than 3/16 inch (4 mm)Yes
Larger than 3/16 inch (4 mm)NoContact
Area
Main MenuTable of Contents
Page 520 of 561

519
Handling the Unexpected
Power System Won’t Start
Checking the Procedure When the READY indicator does not come on and the Ready to Drive message
does not appear on the multi-information display, check the following items and
take appropriate action.
ChecklistConditionWhat to DoCheck if the related
indicator or multi- information display
messages come on.The Temperature is Too Cold For Vehicle To Operate
message appears2 Multi-Information Display Warning and
Information Messages P. 84
The To Start, Hold Remote Near Start Button message
appears
uMake sure the smart entry remote is in its operating range. 2POWER Button Operating Range P. 1332If the Smart Entry Remote Battery is Weak
P. 520
The POWER SYSTEM indicator comes onHave your vehicle checked by a dealer.
Check the brightness
of the interior lights. The interior lights are dim or do not come on at all Have the 12-volt battery checked by a dealer.
The interior lights come on normally Check all fuses, or have your vehicle checked by
a dealer.2Inspecting and Changing Fuses P. 534
Check the shift lever
position.The shift lever is not in (P or (NMove the shift lever to the (P position.
Check the
immobilizer system indicator. When the immobilizer system indicator is blinking, the power
system cannot be turned on.
2
Immobilizer System Indicator P. 80
1Checking the Procedure
If you must start the vehicle immediately, use an
assisting vehicle to jump start it.
2 Jump Starting P. 522
Main MenuTable of Contents
Page 523 of 561

522
Handling the Unexpected
Jump Starting
Turn off the power to electric devices, such as audio and lights. Turn off the power
system, then open the hood.1.Connect the first jumper cable to your vehicle's 12-volt battery + terminal.
2. Connect the other end of the first jumper
cable to the booster battery + terminal.
uUse a 12-volt booster battery only.
3. Connect the second jumper cable to the
booster battery - terminal.
4. Connect the other end of the second
jumper cable to the engine mounting bolt
as shown. Do not connect this jumper cable
to any other part.
5. If your vehicle is connected to another
vehicle, start the assisting vehicle's engine
and increase its rpm slightly.
6. Attempt to start your vehicle's engine. If it
turns over slowly, check that the jumper
cables have good metal-to-metal contact.
■Jump Starting Procedure1Jump Starting
Securely attach the jumper cables clips so that they
do not come off when the engine vibrates. Also be
careful not to tangle the jumper cables or allow the
cable ends to touch each other while attaching or
detaching the jumper cables.
12-volt battery performance degrades in cold
conditions and may prevent the engine from starting.
3WARNING
A 12-volt battery can explode if you do not
follow the correct procedure, seriously
injuring anyone nearby.
Keep all sparks, open flames, and smoking
materials away from the 12-volt battery.
Booster Battery
Main MenuTable of Contents