Page 410 of 561
409
Driving
This chapter discusses driving, refueling, and information on items such as accessories.
Before Driving Driving Preparation .......................... 410
Maximum Load Limit........................ 413
Towing a Trailer Towing Your Vehicle ........................ 415
When Driving Turning on the Power ...................... 416
Precautions While Driving................. 419
Transmission .................................... 419
Shifting ............................................ 420
ECON Button ................................... 422
Acoustic Vehicle Alerting System ...... 423
Cruise Control *
................................ 424 Adaptive Cruise Control (ACC)
*
....... 427
Forward Collision Warning (FCW) *
.. 435
Lane Departure Warning (LDW) *
..... 439
Vehicle Stability Assist (VSA®), aka Electronic
Stability Control (ESC), System ............... 443
LaneWatchTM....................................... 445Tire Pressure Monitoring System (TPMS) ... 447Tire Pressure Monitoring System (TPMS) -
Required Federal Explanation ......... 449
High Voltage Battery ........................ 451
Braking
Brake System ................................... 452
Anti-lock Brake System (ABS) ........... 454 Brake Assist System ......................... 455
Parking Your Vehicle
When Stopped ................................ 456
Multi-View Rear Camera .................. 457
Rearview Camera ............................. 458
Refueling Fuel Information .............................. 459
How to Refuel ................................. 460
Fuel Economy Improving Fuel Economy .................. 461
Accessories and Modifications ........ 462
* Not available on all models
Main Menu
Page 414 of 561
413
uuBefore DrivinguMaximum Load Limit
Continued
Driving
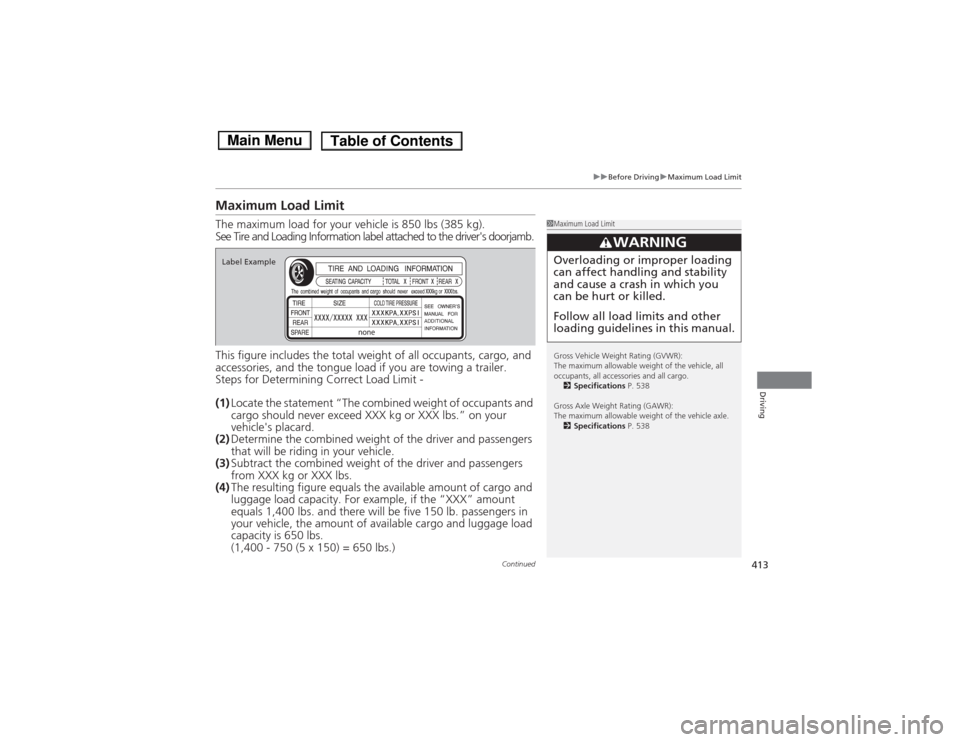
Maximum Load Limit The maximum load for your vehicle is 850 lbs (385 kg).
See Tire and Loading Information label attached to the driver's doorjamb.
This figure includ es the total weight of all occupants, cargo, and
accessories, and the tongue load if you are towing a trailer.
Steps for Determining Correct Load Limit - (1) Locate the statement “The combined weight of occupants and
cargo should never exceed XXX kg or XXX lbs.” on your
vehicle's placard.
(2) Determine the combined weight of the driver and passengers
that will be riding in your vehicle.
(3) Subtract the combined weight of the driver and passengers
from XXX kg or XXX lbs.
(4) The resulting figure equals the ava ilable amount of cargo and
luggage load capacity. For example, if the “XXX” amount
equals 1,400 lbs. and there will be five 150 lb. passengers in
your vehicle, the amount of av ailable cargo and luggage load
capacity is 650 lbs.(1,400 - 750 (5 x 150) = 650 lbs.)
1Maximum Load Limit
Gross Vehicle Weight Rating (GVWR):
The maximum allowable weight of the vehicle, all
occupants, all accessories and all cargo. 2 Specifications P. 538
Gross Axle Weight Rating (GAWR):
The maximum allowable weight of the vehicle axle. 2 Specifications P. 538
3WARNING
Overloading or improper loading can affect handling and stability
and cause a crash in which you
can be hurt or killed.
Follow all load limits and other loading guidelines in this manual.Label Example
Main MenuTable of Contents
Page 415 of 561
414
uuBefore DrivinguMaximum Load Limit
Driving
(5)Determine the combin ed weight of luggage and cargo being
loaded on the vehicle. That weight may not safely exceed the
available cargo and luggage load capacity calculated in step 4.
(6) If your vehicle will be towing a trailer, load from your trailer will
be transferred to your vehicle. Consult this manual to
determine how this reduces the available cargo and luggage
load capacity of your vehicle.
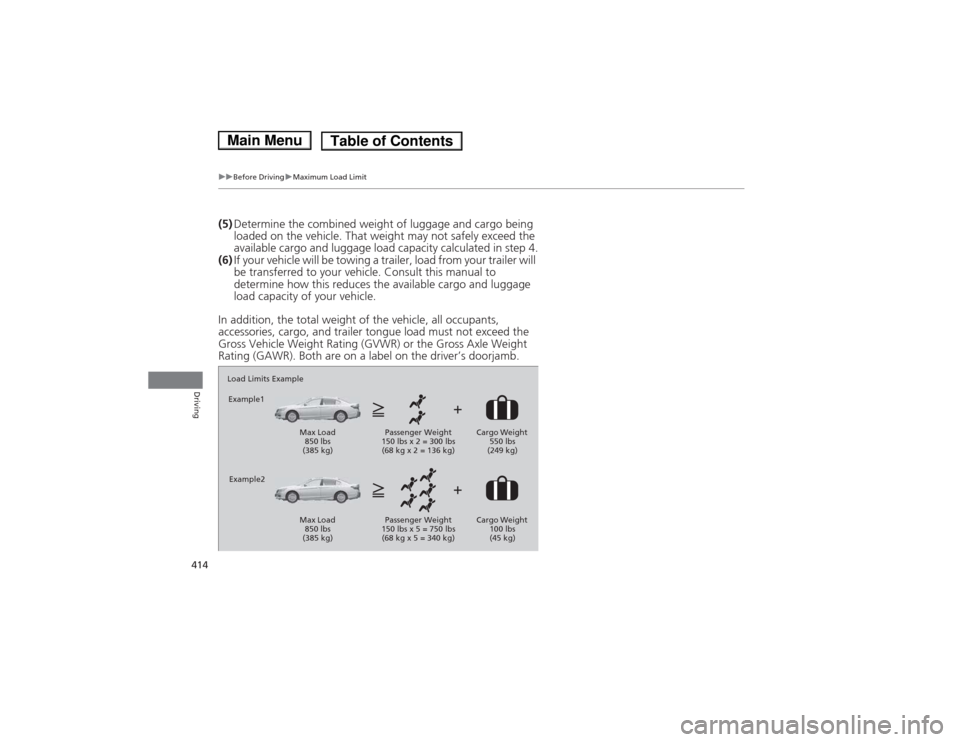
In addition, the total weight of the vehicle, all occupants,
accessories, cargo, and trailer tongue load must not exceed the
Gross Vehicle Weight Rating (GVWR) or the Gross Axle Weight
Rating (GAWR). Both are on a label on the driver’s doorjamb.
Load Limits Example
Example1
Max Load 850 lbs
(385 kg) Passenger Weight
150 lbs x 2 = 300 lbs (68 kg x 2 = 136 kg) Cargo Weight
550 lbs
(249 kg)
Example2
Max Load 850 lbs
(385 kg) Passenger Weight
150 lbs x 5 = 750 lbs (68 kg x 5 = 340 kg) Cargo Weight
100 lbs
(45 kg)
Main MenuTable of Contents
Page 416 of 561
415
Driving
Towing a Trailer
Your vehicle is not designed to tow a trailer. Attempting to do so can void your
warranties.
Towing Your Vehicle
Your vehicle is not designed to be towed behind a motor home. If your vehicle needs
to be towed in an emergency, refer to the emergency towing information.2 Emergency Towing P. 535
Main MenuTable of Contents
Page 466 of 561
465
uuBefore Performing MaintenanceuSafety When Performing Maintenance
Maintenance
Safety When Performing Maintenance
Some of the most important safety precautions are given here.
However, we cannot warn you of every conceivable hazard that can arise in
performing maintenance. Only you can decide whether or not you should perform
a given task. • To reduce the possibility of fire or explosion, keep cigarettes, sparks, and flames
away from the 12-volt battery and all fuel related parts.
• Never leave rags, towels, or other flammable objects under the hood.
uHeat from the engine and exhaust can ignite them causing a fire.
• To clean parts, use a commercially available degreaser or parts cleaner, not
gasoline.
• Wear eye protection and protective clothing wh en working with the 12-volt
battery or compressed air.
• Engine exhaust contains carbon monoxide, which is poisonous and can kill you.
uOnly operate the engine if there is sufficient ventilation.
• The vehicle must be in a stationary condition.
uMake sure your vehicle is parked on level ground, the parking brake is set, and
the power system is turned off.
• Be aware that hot parts can burn you.
uMake sure to let the power system including the engine and exhaust system
cool thoroughly before touching vehicle parts.
• Be aware that moving parts can injure you.
uDo not activate the power system unless instructed, and keep your hands and
limbs away from moving parts. When the power mode is on, the engine can
automatically start, or the radiator fan may start operating without the engine
running.
■Maintenance Safety
■Vehicle Safety
1Safety When Performing Maintenance
3WARNING
Improperly maintaining this vehicle or
failing to correct a problem before driving
can cause a crash in which you can be
seriously hurt or killed.
Always follow the inspection and
maintenance recommendations according
to the schedules in this owner's manual.
3WARNING
Failure to properly follow maintenance
instructions and precautions can cause you
to be seriously hurt or killed.
Always follow the procedures and
precautions in this owner's manual.
Main MenuTable of Contents
Page 473 of 561
472
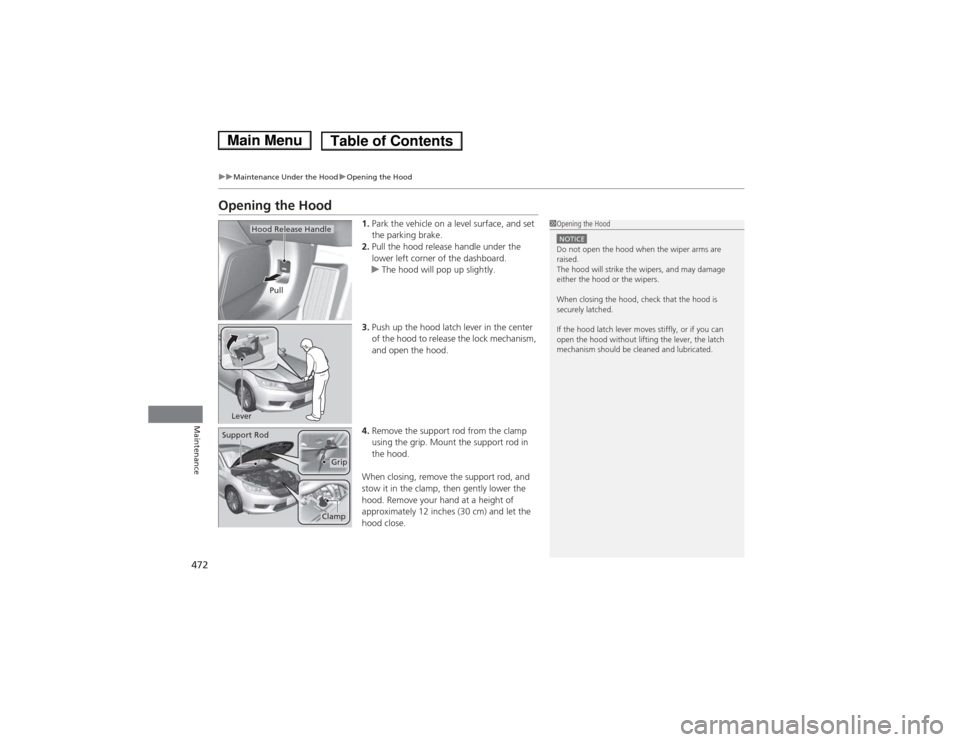
uuMaintenance Under the HooduOpening the Hood
Maintenance
Opening the Hood1.Park the vehicle on a level surface, and set
the parking brake.
2. Pull the hood release handle under the
lower left corner of the dashboard.
uThe hood will pop up slightly.
3. Push up the hood latch lever in the center
of the hood to release the lock mechanism,
and open the hood.
4. Remove the support rod from the clamp
using the grip. Mount the support rod in
the hood.
When closing, remove the support rod, and
stow it in the clamp, then gently lower the
hood. Remove your hand at a height of
approximately 12 inches (30 cm) and let the
hood close.
1Opening the Hood
NOTICEDo not open the hood when the wiper arms are raised.
The hood will strike the wipers, and may damage
either the hood or the wipers.
When closing the hood, check that the hood is
securely latched.
If the hood latch lever moves stiffly, or if you can
open the hood without lifting the lever, the latch
mechanism should be cleaned and lubricated.
Hood Release Handle
Pull
Lever
Support Rod
Grip
Clamp
Main MenuTable of Contents
Page 475 of 561
474
uuMaintenance Under the HooduOil Check
Maintenance
Oil Check
We recommend that you check the engine oil level every time you refuel.
Park the vehicle on level ground.
Turn off the power system. You can check the oil level without the engine having
run beforehand. If the engine has been running, wait approximately three minutes
before you check the oil.1.Remove the dipstick (orange handle).
2. Wipe the dipstick with a clean cloth or
paper towel.
3. Insert the dipstick back all the way into its
hole.
4. Remove the dipstick again, and check the
level. It should be between the upper and
lower marks. Add oil if necessary.
1Oil Check
If the oil level is near or below the lower mark, slowly
add oil being careful not to overfill.
Upper Mark
Lower Mark
Main MenuTable of Contents
Page 491 of 561
490
uuReplacing Light BulbsuRear License Plate Light Bulbs
Maintenance
Rear License Plate Light Bulbs
When replacing, use the following bulbs.1.Remove the license plate light assembly by
pushing the left edge of the lens toward the
right and pulling the assembly out.
2. Remove the lens by pushing the tabs.
3. Remove the old bulb and insert a new bulb.
High-Mount Brake Light Bulbs
High-mount brake light bulbs are the LED type. Have an authorized Honda dealer
inspect and replace the light assembly.
Rear License Plate Light: 5 W
Bulb
Tab
Lens
Main MenuTable of Contents