Page 327 of 593

326
uuCustomized Features u
Features
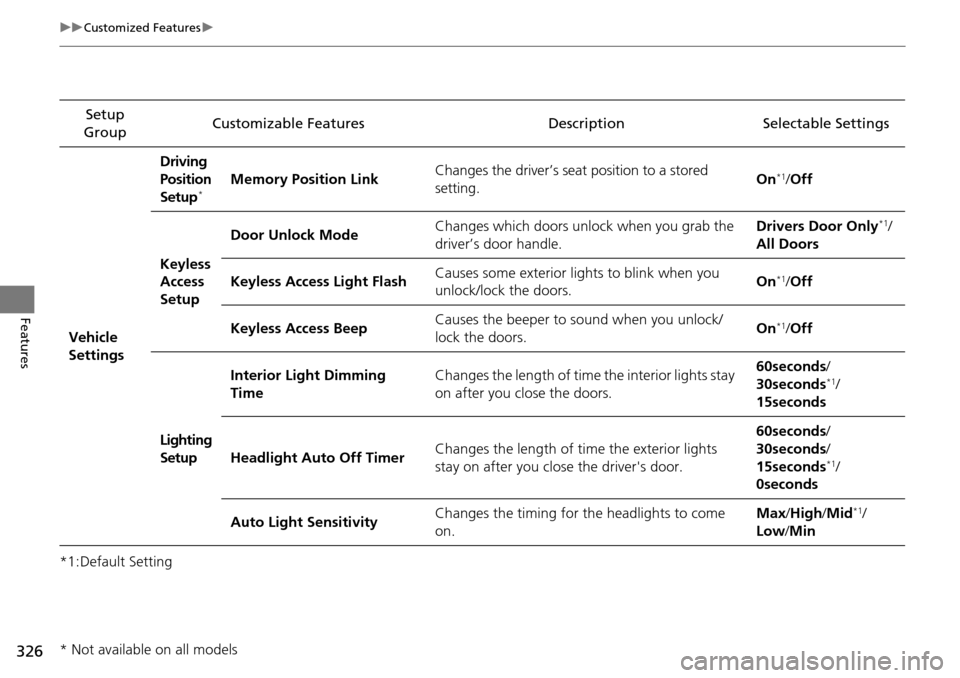
*1:Default SettingSetup
Group Customizable Features Descri
ption Selectable Settings
Vehicle
Settings Driving
Position
Setup
*Memory Position Link
Changes the driver’s seat position to a stored
setting. On*1/
Off
Keyless
Access
Setup Door Unlock Mode
Changes which doors unlock when you grab the
driver’s door handle. Drivers Door Only
*1/
All Doors
Keyless Access Light Flash Causes some exterior lig
hts to blink when you
unlock/lock the doors. On
*1/
Off
Keyless Access Beep Causes the beeper to sound when you unlock/
lock the doors.
On
*1/
Off
Lighting
Setup Interior Light Dimming
Time
Changes the length of time the interior lights stay
on after you close the doors. 60seconds/
30seconds
*1/
15seconds
Headlight Auto Off Timer Changes the length of time the exterior lights
stay on after you close the driver's door. 60seconds/
30seconds/
15seconds
*1/
0seconds
Auto Light Sensitivity Changes the timing for the headlights to come
on. Max
/High /Mid
*1/
Low /Min
* Not available on all models
Page 328 of 593

327
uuCustomized Features u
Continued
Features
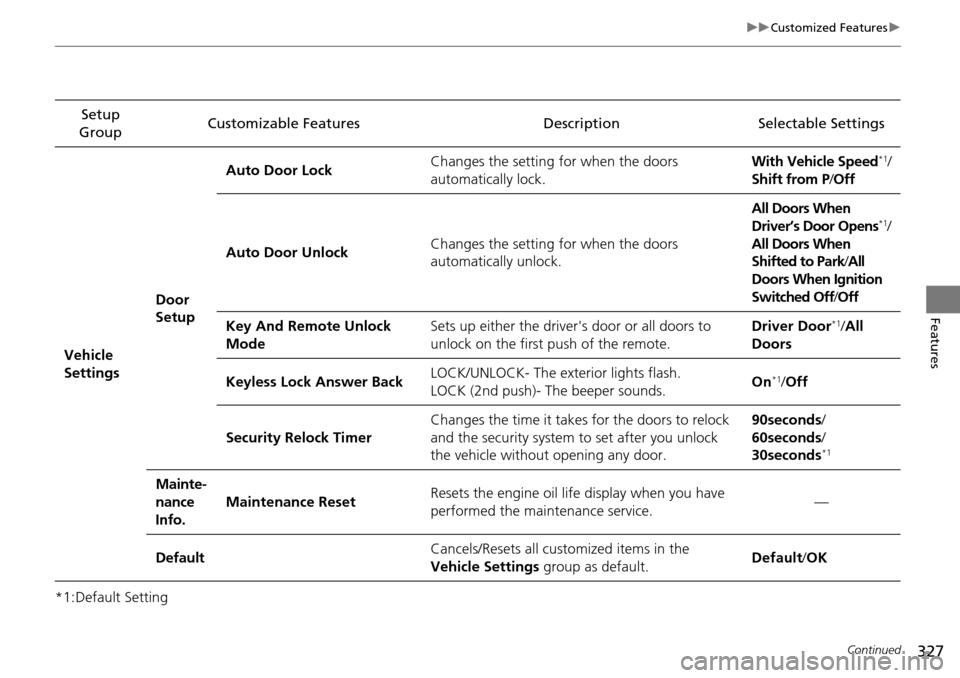
*1:Default SettingSetup
Group Customizable Features Description Selectable Settings
Vehicle
Settings Door
SetupAuto Door Lock
Changes the setting
for when the doors
automatically lock. With Vehicle Speed
*1/
Shift from P /Off
Auto Door Unlock Changes the setting
for when the doors
automatically unlock. All Doors When
Driver’s Door Opens
*1/
All Doors When
Shifted to Park /All
Doors When Ignition
Switched Off /Off
Key And Remote Unlock
Mode Sets up either the driver's door or all doors to
unlock on the first push of the remote. Driver Door
*1/
All
Doors
Keyless Lock Answer Back LOCK/UNLOCK- The exterior lights flash.
LOCK (2nd push)- The beeper sounds.
On
*1/
Off
Security Relock Timer Changes the time it takes for the doors to relock
and the security system to set after you unlock
the vehicle without opening any door. 90seconds
/
60seconds /
30seconds
*1
Mainte-
nance
Info. Maintenance Reset
Resets the engine oil life display when you have
performed the maintenance service. —
Default Cancels/Resets all customized items in the
Vehicle Settings
group as default. Default/
OK
Page 330 of 593

329
uuCustomized Features u
Continued
Features
*1:Default SettingSetup
Group Customizable Features Description Selectable Settings
Audio
Settings Sound
Adjusts the settings of the audio speaker’s sound.
2
Adjusting the Sound P. 242
-6 ~ C*1 ~ +6 (Bass,
Treble and SUBW), -9
~ C
*1 ~ +9 (Fader and
Balance ), Off/Low /
Mid
*1/ High (SVC)
Source Select Popup Selects whether the list of selectable audio
sources comes on when the
AUDIO button is
pressed. On
/Off
*1
Cover Art Turns on and off the cover art display.
On
*1/Off
Connect Bluetooth Audio Device Connects, disconnects or pairs a
Bluetooth®
Audio device to HFL. —
Bluetooth Device List Edits or deletes a
Bluetooth® Audio device paired
to HFL. —
Recording from CD Selects whether the songs on music CDs are
automatically recorded to the HDD.
Auto
/Manual
*1
Recording Quality Selects the quality of the music files recorded to
the HDD.
Standard*1/
High
CD (MP3/WMA/AAC), iPod, USB, Pandora ®*
or AhaTM mode
Bluetooth ® Audio, Pandora ®* or AhaTM mode
Bluetooth® Audio, Pandora ®* or AhaTM mode
CD mode
CD mode
* Not available on all models
Page 337 of 593

336
Features
HomeLink® Universal Transceiver*
The HomeLink ® Universal Transceiver can be pr ogrammed to operate up to three
remote controlled devices around your home , such as garage doors, lighting, or
home security systems.
Refer to the safety information that comes wi th your garage door opener to test that
the safety features are functioning properly. If you do not have the safety
information, contac t the manufacturer.
Before programming HomeLink, make sure th at people and objects are out of the
way of the garage or gate to prevent potential injury or damage.
When programming a garage door opener, park just outside the garage door’s
path.
Training HomeLink
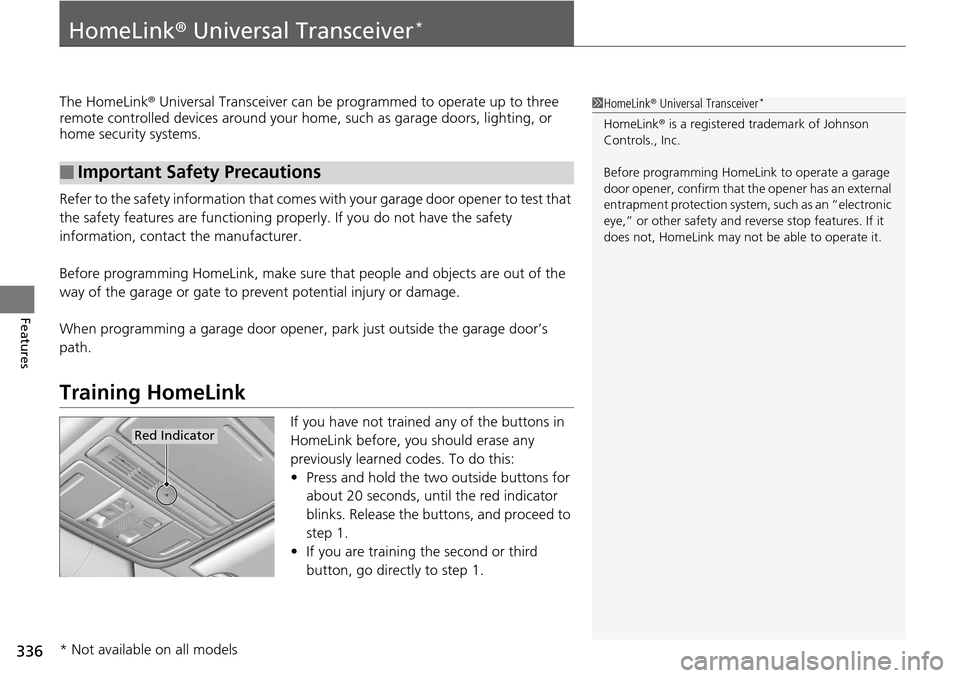
If you have not trained any of the buttons in
HomeLink before, you should erase any
previously learned codes. To do this:
• Press and hold the two outside buttons for
about 20 seconds, until the red indicator
blinks. Release the bu ttons, and proceed to
step 1.
• If you are training the second or third
button, go directly to step 1.
■Important Safety Precautions
1HomeLink ® Universal Transceiver*
HomeLink® is a registered tra demark of Johnson
Controls., Inc.
Before programming HomeLi nk to operate a garage
door opener, confirm that the opener has an external
entrapment protection system, such as an “electronic
eye,” or other safety and reverse stop features. If it
does not, HomeLink may not be able to operate it.
Red Indicator
* Not available on all models
Page 343 of 593

342
uuBluetooth ® HandsFreeLink ®u HFL Menus
Features
Select a phone number from the call
history to store as a speed dial number.
Manual Input
New Entry Import from
Call History
Import from Phonebook
Enter a phone number to store as a
speed dial number.
Delete all of the previously stored speed dial number.
*2: Models with two displays
Select a phone number from the
phonebook to store as a speed dial number.
EditEdit a previously stored speed dial number.●Change a number.●Create or delete a voice tag.
DeleteDelete a previously stored speed dial
number.
(Existing
entry list)
Delete All
Edit Speed Dial*1
Set calls to automatically transfer from your phone to HFL when you enter the
vehicle.Auto Transfer
Auto Answer
Ring Tone
Set whether to automatically answer an incoming call after about four
seconds.
Select the ring tone.
Automatic Phone Sync*1
Use Contact Photo*2
Set phonebook data to be automatically imported when a phone is paired to
HFL.
Display a caller’s picture on an incoming call screen.
Phone
*1: Appears only when a phone is connected to HFL.
Page 376 of 593

375Continued
Features
Bluetooth® HandsFreeLink ®
Bluetooth® HandsFreeLink ® (HFL) allows you to place and receive phone calls using
your vehicle’s navigation system, without handling your cell phone.
Using HFL
(Pick-up) button: Press to go to the Phone Call screen or to answer an
incoming call.
(Hang-up/back) button: Press to end a call or to cancel a command.
(Talk) button: Press to give HFL voice commands.
PHONE button: Press to go directly to the Phone screen.
Interface dial: Rotate to select an item on the screen, then press . Move ,
, or to select secondary menu.
■HFL Buttons
1 Bluetooth ® HandsFreeLink ®
To use HFL, you need a Bluetooth-compatible cell
phone. For a list of compatible phones, pairing
procedures, and special feature capabilities:
•U.S.: Visit www.handsfreelink.honda.com , or call
1-888-528-7876.
•Canada: Visit www.handsfreelink.ca , or call 1-888-
528 -7876.
To use HFL, the Bluetooth Status setting must be On.
2 Customized Features P. 298
Voice control tips
•Aim the vents away from the ceiling and close the
windows, as noise coming fr om them may interfere
with the microphone.
•Press and release the but ton when you want to
call a number using a stored voice tag, a
phonebook name, or a numbe r. Speak clearly and
naturally after a beep.
•If the microphone picks up vo ices other than yours,
the command may be misinterpreted.
•To change the volume level, use the audio system's
volume knob or the remote audio controls on the
steering wheel.
State or local laws may prohibit the operation of
handheld electronic devices while operating a vehicle.
If you receive a call while using the audio system, the
system resumes its operati on after ending the call.
Models with navigation system
Talk Button
Volume up
Microphone
Hang-up/Back Button
Pick-up
Button
Volume down
Interface
DialPHONE
Button
Page 414 of 593

413
Features
Compass*
When you set the power mode to ON, the compass self-calibrates, and the compass
display appears.
Compass Calibration
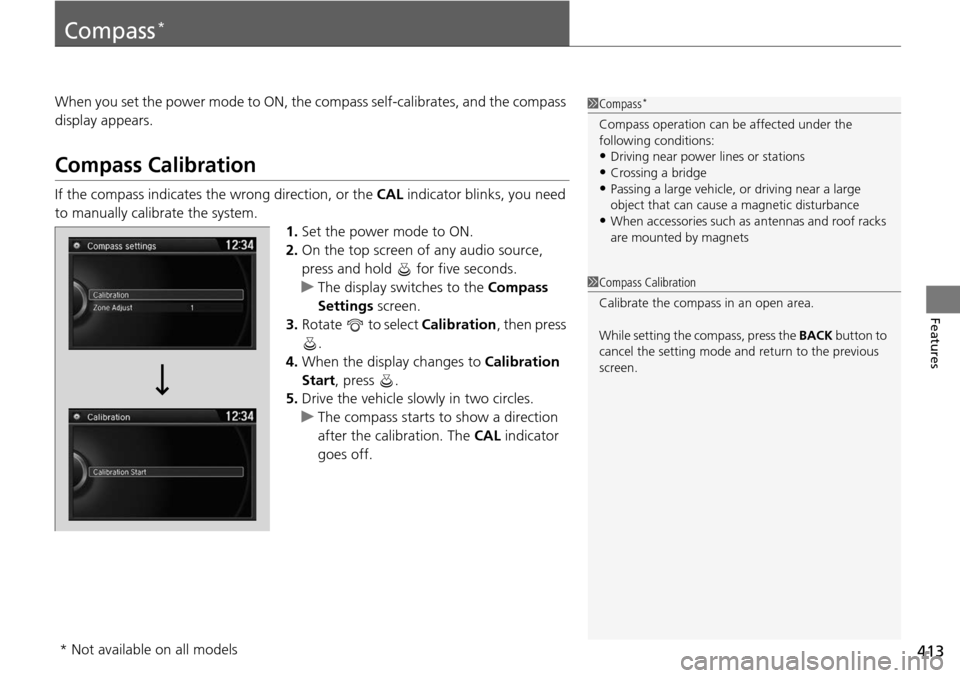
If the compass indicates the wrong direction, or the CAL indicator blinks, you need
to manually calibrate the system.
1.Set the power mode to ON.
2. On the top screen of any audio source,
press and hold for five seconds.
u The display swit ches to the Compass
Settings screen.
3. Rotate to select Calibration, then press
.
4. When the display changes to Calibration
Start, press .
5. Drive the vehicle slow ly in two circles.
u The compass starts to show a direction
after the calibration. The CAL indicator
goes off.
1 Compass*
Compass operation can be affected under the
following conditions:
•Driving near power lines or stations•Crossing a bridge
•Passing a large vehicle, or driving near a large
object that can cause a magnetic disturbance
•When accessories such as antennas and roof racks
are mounted by magnets
1 Compass Calibration
Calibrate the compass in an open area.
While setting the compass, press the BACK button to
cancel the setting mode a nd return to the previous
screen.
* Not available on all models
Page 415 of 593
414
uuCompass*uCompass Zone Selection
Features
Compass Zone Selection
1. Set the power mode to ON.
2. On the top screen of any audio source,
press and hold for five seconds.
u The display switches to the Compass
Settings screen.
3. Rotate to select Zone Adjust, then
press .
u The display shows the current zone
number.
4. Rotate to select the zone number of
your area (See Zone Map), then press .
2
3
4 5678910
111213
14
15Zone Map
Guam Island: Zone 8
Puerto Rico: Zone 11
1 Compass Zone Selection
The zone selection is done to compensate the
variation between magneti c north and true north.
If the calibration starts while the audio system is in
use, the display returns to normal after the calibration
is completed.