2014 HONDA ACCORD COUPE ECO mode
[x] Cancel search: ECO modePage 485 of 593

484
Maintenance
Before Performing Maintenance
Inspection and Maintenance
For your safety, perform all listed inspections and maintenance to keep your vehicle
in good condition. If you become aware of any abnormality (noise, smell, insufficient
brake fluid, oil residue on the ground, etc.), have your vehicle inspected by a dealer.
(Note, however, that service at a dealer is not mandatory to keep your warranties in
effect.) Refer to the separate maintena nce booklet for detailed maintenance and
inspection information.
■Daily inspections
Perform inspections before long distance tri ps, when washing the vehicle, or when
refueling.
■Periodic inspections
• Check the brake fluid level monthly.
2 Brake/Clutch Fluid P. 509
•Check the tire pressure monthly. Examin e the tread for wear and foreign objects.
2Checking and Maintaining Tires P. 523
•Check the operation of the exterior lights monthly.
2 Replacing Light Bulbs P. 511
•Check the condition of the wiper bl ades at least every six months.
2Checking and Maintaining Wiper Blades P. 521
■Types of Inspection and Maintenance
1Inspection and Maintenance
Maintenance, replacement, or repair of
emissions control devices and systems may be
done by any automotive repair establishment or
individuals using parts that are “certified” to
EPA standards.
According to state and fede ral regulations, failure to
perform maintenance on the maintenance main
items marked with # will not void your emissions
warranties. However, all ma intenance services should
be performed in accordan ce with the intervals
indicated by the information display
*/multi-
information display*.
2 Maintenance Service Items P. 489, 493
If you want to perform complex maintenance tasks
that require more skills a nd tools, you can purchase a
subscription to the Service Express website at
www.techinfo.honda.com .
2 Authorized Manuals P. 579
If you want to perform ma intenance yourself, make
sure that you have the necessary tools and skills first.
After performing ma intenance, update the records in
the separate maintenance booklet.
U.S. models
* Not available on all models
Page 488 of 593

487Continued
Maintenance
Maintenance MinderTM
If the engine oil life is less than 15%, you will see the Maintenance Minder messages
appear on the information display* or the multi-information display* every time you
turn the ignition switch to ON
(w*1. The messages notify you when to change the
engine oil, or when to bring your vehi cle to a dealer for indicated maintenance
services.
To Use Maintenance MinderTM
1. Turn the ignition switch to ON (w*1.
2. Press the (Select/Reset) knob repeatedly
until the engine oil life appears on the
information display.
The Maintenance Minder indicator ( ) stays
on in the instrument panel after the engine oil
life becomes 0% . Have the indicated
maintenance done by a dealer immediately.
*1: Models with the smart entry system have an ENGINE START/STOP button instead of an
ignition switch.
■Displaying the Engine Oil Life
Models with info rmation display
1Displaying the Engine Oil Life
Based on the engine ope rating conditions, the
remaining engine oi l life is calculated and displayed
as a percentage.
Displayed Engine Oil Life (%)Calculated Engine Oil Life (%)
100 100 to 91
9090 to 81
80 80 to 71
7070 to 61
60 60 to 51
5050 to 41
40 40 to 31
3030 to 21
20 20 to 16
1515 to 11
10 10 to 6
55 to 1
0 0
* Not available on all models
Page 489 of 593

488
uuMaintenance MinderTMuTo Use Maintenance MinderTM
Maintenance
To switch the display, pres s the (Select/Reset) knob.
■Maintenance Minder Messages on the Information Display
Oil Life DisplayExplanationInformationMaintenance Minder Indicator
The engine oil life indicator starts
to appear along with other due
soon maintenance item codes
when the remaining oil life
becomes 15 percent.The engine oil is approaching the
end of its service life.
Starts to come on when the
remaining engine oil life becomes
15 percent.
It goes off when the display is
switched.
The SERVICE message also starts
to appear along with the engine oil
life indicator and the maintenance
item codes.The engine oil has almost reached
the end of its service life, and the
maintenance items should be
inspected and serviced as soon as
possible.
The remaining engine oil life has
passed its service life, and a
negative distance appears after
driving over 10 miles (U.S. models)
or 10 km (Canadian models). The
negative distance on the display
blinks.The engine oil life has passed.
The maintenance items must be
inspected and serviced
immediately.
Stays on as a reminder even when
the display is switched.
Page 490 of 593

489
uuMaintenance MinderTMuTo Use Maintenance MinderTM
Continued
Maintenance
■Maintenance Service Items1Maintenance Service Items
•Independent of the Maintenance Minder
information, replace the brake fluid every 3 years.
•Inspect idle speed every 160,000 miles (256,000
km).
•Adjust the valves during services A, B, 1, 2, or 3 if
they are noisy.
Maintenance Minder
Message
Maintenance
Minder Indicator
Sub Items
Main Item
*1: If a message SERVICE does not appear more than 12 months after the display is reset, change the
engine oil every year.
# : See information on maintenance and emissions warranty.
CODEMaintenance Main Items
A
●Replace engine oil*1
B●Replace engine oil*1 and oil filter●Inspect front and rear bra kes/service as necessary●Check parking brake adjustment●Inspect tie rod ends, steering gearbox, and boots●Inspect suspension components●Inspect driveshaft boots●Inspect brake hoses and li nes (Including ABS/VSA)●Inspect all fluid levels and condition of fluids●Inspect exhaust system#
●Inspect fuel lines and connections#*2: If you drive in dusty conditions, replace the air cleaner element every 15,000 miles (24,000 km).
*3: If you drive primarily in urban areas that have high concentrations of soot in the air from industry and
from diesel-powered vehicles, replace the dust and pollen filter every 15,000 miles (24,000 km).
*4: Automatic transmission (CVT) models
*5: Driving in mountainous areas at very low vehicle speeds or trailer towing results in higher transmission temperatures. This requires transmission fluid changes more frequently than recommended by the
Maintenance Minder. If you regularly drive your vehicle under these conditions, have the transmission
fluid changed every 25,000 miles (40,000 km).
*6: 6-cylinder models
*7: If you drive regularly in very high temperatures (over 110 °F, 43 °C), in very low temperatures (under - 20 °F, -29 °C), or tow a trailer, replace every 60,000 miles/100,000 km.
CODEMaintenance Sub Items
1
●Rotate tires
2●Replace air cleaner element*2
●Replace dust and pollen filter*3
●Inspect drive belt
3
●Replace transmission fluid*4,*5
4●Replace spark plugs●Replace timing belt and inspect water pump*6,*7
●Inspect valve clearance
5
●Replace engine coolant
Page 491 of 593

uuMaintenance MinderTMuTo Use Maintenance MinderTM
490
Maintenance
Reset the engine oil life display if yo u have performed the maintenance service.
1. Turn the ignition switch to ON
(w*1.
2. Display the engine oil life by repeatedly
pressing the ( Select/Reset) knob.
3. Press and hold the knob for ten seconds
or more.
u The engine oil life indicator and the
maintenance item codes blink.
4. Press the knob for five seconds or more.
u The displayed maintenance items
disappear, and the engine oil life display
returns to 100%.
*1: Models with the smart entry system have an ENGINE START/STOP button instead of an
ignition switch.
■Resetting the Display1 Resetting the Display
NOTICE
Failure to reset the engine oil life after a maintenance
service results in the sy stem showing incorrect
maintenance intervals, which can lead to serious
mechanical problems.
The dealer will reset the en gine oil life display after
completing the required ma intenance service. If
someone other than a deal er performs maintenance
service, reset the engine oil life display yourself.
You can reset the engine oi l life display using the
audio/information screen. 2 Customized Features P. 298
Page 501 of 593

500
uuMaintenance Under the Hood uOil Check
Maintenance
Oil Check
We recommend that you check the engi ne oil level every time you refuel.
Park the vehicle on level ground.
Wait approximately three minutes after turn ing the engine off before you check the
oil. 1.Remove the dipstick (orange handle).
2. Wipe the dipstick with a clean cloth or
paper towel.
3. Insert the dipstick back all the way into its
hole.1Oil Check
If the oil level is near or below the lower mark, slowly
add oil being careful not to overfill.
4-cylinder models
6-cylinder models
Page 505 of 593

uuMaintenance Under the Hood uChanging the Engine Oil and Oil Filter
504
Maintenance
4. Remove the oil filter and dispose of the
remaining oil.
5. Check that the filter ga sket is not stuck to
the engine contact surface.
u If it is stuck, you must detach it.
6. Wipe away dirt and dust adhering to the
contact surface of the engine block, and
install a new oil filter.
u Apply a light coat of new engine oil to
the oil gasket.
7. Put a new washer on the drain bolt, then
reinstall the drain bolt.
u Tightening torque:
30 lbf∙ft (40 N∙m, 4.0 kgf∙m)
29 lbf∙ft (39 N∙m, 4.0 kgf∙m)
8.Pour the recommended engine oil into the engine.uEngine oil change capacity (including
filter):
4.4 US qt (4.2 L)
4.5 US qt (4.3 L)
9. Reinstall the engine oil fill cap securely and
start the engine.
10. Run the engine for a few minutes, and
then check that there is no leak from the
drain bolt or oil filter.
11. Stop the engine, wait for three minutes,
and then check the oil level on the dipstick.
u If necessary, add more engine oil.
1Changing the Engine Oil and Oil Filter
You will need a special wrench to replace the oil
filter. You can buy this wrench from a dealer.
When installing the new oil filter, follow the
instructions supplied with the oil filter.
Reinstall the engine oil fill cap. Start the engine. The
low oil pressure indicator should go off within five
seconds. If it does not, turn off the engine, and check
your work.4-cylinder models
6-cylinder models
Oil Filter
Oil Filter
4-cylinder models
6-cylinder models
4-cylinder models
6-cylinder models
Page 529 of 593

528
uuChecking and Maintaining Tires uWear Indicators
Maintenance
Wear Indicators
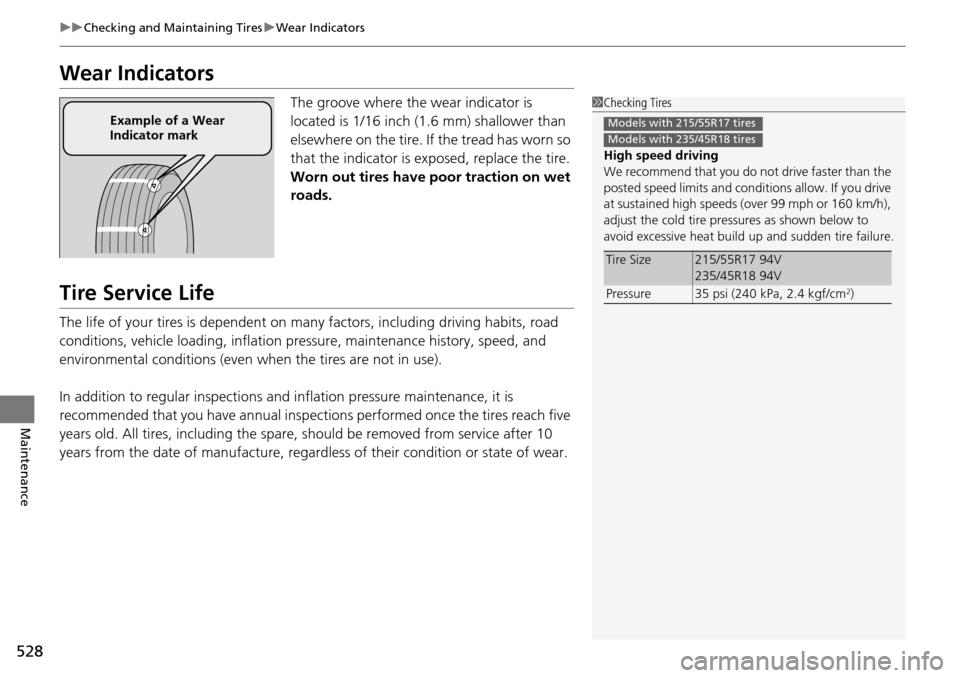
The groove where the wear indicator is
located is 1/16 inch (1.6 mm) shallower than
elsewhere on the tire. If the tread has worn so
that the indicator is ex posed, replace the tire.
Worn out tires have poor traction on wet
roads.
Tire Service Life
The life of your tires is dependent on many factors, including driving habits, road
conditions, vehicle loading, inflation pre ssure, maintenance history, speed, and
environmental conditions (even when the tires are not in use).
In addition to regular inspections and inflation pressure maintenance, it is
recommended that you have annual inspections performed once the tires reach five
years old. All tires, including the spare, should be removed from service after 10
years from the date of manufacture, regard less of their condition or state of wear.
1Checking Tires
High speed driving
We recommend that you do not drive faster than the
posted speed limits and condi tions allow. If you drive
at sustained high speeds (over 99 mph or 160 km/h),
adjust the cold tire pressures as shown below to
avoid excessive heat build up and sudden tire failure.
Tire Size215/55R17 94V
235/45R18 94V
Pressure 35 psi (240 kPa, 2.4 kgf/cm
2)
Models with 215/55R17 tires
Models with 235/45R18 tires
Example of a Wear
Indicator mark