2014 GMC ACADIA ECU
[x] Cancel search: ECUPage 230 of 414

Black plate (14,1)GMC Acadia/Acadia Denali Owner Manual (GMNA-Localizing-U.S./Canada/
Mexico-6014315) - 2014 - crc - 8/15/13
9-14 Driving and Operating
Warning (Continued)
.Do not leave an
unsecured child restraint
in the vehicle.
.When you carry something
inside the vehicle, secure
it whenever you can.
.Do not leave a seat folded
down unless you need to.
Starting and
Operating
New Vehicle Break-In
{Caution
The vehicle does not need an
elaborate break-in. But it will
perform better in the long run if
you follow these guidelines:
.Do not drive at any one
constant speed, fast or slow,
for the first 805 km (500 mi).
Do not make full-throttle
starts. Avoid downshifting to
brake or slow the vehicle.
.Avoid making hard stops for
the first 322 km (200 mi) or
so. During this time the new
brake linings are not yet
broken in. Hard stops with
new linings can mean
premature wear and earlier
replacement. Follow this(Continued)
Caution (Continued)
breaking-in guideline every
time you get new brake
linings.
Following break-in, engine speed
and load can be gradually
increased.
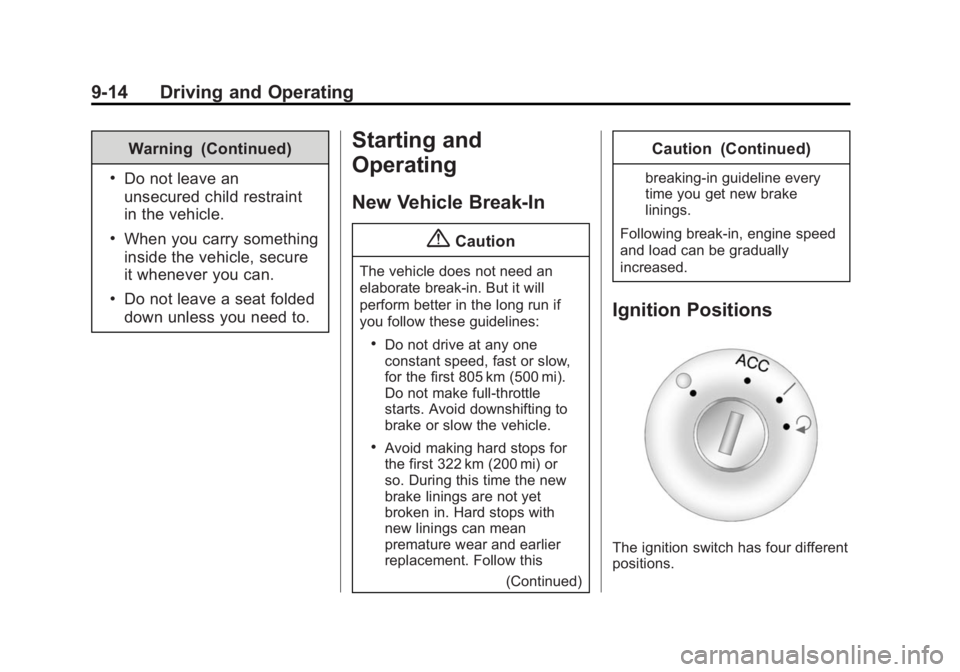
Ignition Positions
The ignition switch has four different
positions.
Page 263 of 414

Black plate (47,1)GMC Acadia/Acadia Denali Owner Manual (GMNA-Localizing-U.S./Canada/
Mexico-6014315) - 2014 - crc - 8/15/13
Driving and Operating 9-47
Before starting, check all trailer hitch
parts and attachments, safety
chains, electrical connectors, lamps,
tires and mirrors. If the trailer has
electric brakes, start the
combination moving and then apply
the trailer brake controller by hand
to be sure the brakes work.
During the trip, check occasionally
to be sure that the load is secure
and the lamps and any trailer
brakes still work.
Towing with a Stability Control
System
When towing, the sound of the
stability control system might be
heard. The system is reacting to the
vehicle movement caused by the
trailer, which mainly occurs during
cornering. This is normal when
towing heavier trailers.
Following Distance
Stay at least twice as far behind the
vehicle ahead as you would when
driving the vehicle without a trailer.
This can help to avoid situations
that require heavy braking and
sudden turns.
Passing
More passing distance is needed
when towing a trailer. Because the
rig is longer, it is necessary to go
farther beyond the passed vehicle
before returning to the lane.
Backing Up
Hold the bottom of the steering
wheel with one hand. To move the
trailer to the left, move your hand to
the left. To move the trailer to the
right, move your hand to the right.
Always back up slowly and,
if possible, have someone
guide you.
Making Turns
{Caution
Making very sharp turns while
trailering could cause the trailer to
come in contact with the vehicle.
The vehicle could be damaged.
Avoid making very sharp turns
while trailering.
When turning with a trailer, make
wider turns than normal so the
trailer will not strike soft shoulders,
curbs, road signs, trees or other
objects. Use the turn signal well in
advance and avoid jerky or sudden
maneuvers.
Turn Signals When Towing a
Trailer
The turn signal indicators on the
instrument cluster flash whenever
signaling a turn or lane change.
Properly hooked up, the trailer
Page 286 of 414

Black plate (16,1)GMC Acadia/Acadia Denali Owner Manual (GMNA-Localizing-U.S./Canada/
Mexico-6014315) - 2014 - crc - 8/15/13
10-16 Vehicle Care
6. Reinstall the cap on the coolantrecovery tank but leave the
radiator pressure cap off.
7. Start the engine and let it run until the upper radiator hose
feels warm. Any time during this
procedure, watch out for the
engine cooling fans.
8. If the coolant level inside the radiator filler neck is low, add
more of the proper DEX-COOL
coolant mixture through the filler
neck until the level is back up to
the base of the filler neck.
9. Replace the pressure cap tightly. At any time during this
procedure if coolant begins to
flow out of the filler neck,
reinstall the pressure cap.{Caution
If the pressure cap is not tightly
installed, coolant loss and
possible engine damage may
occur. Be sure the cap is properly
and tightly secured.
Engine Overheating
The vehicle has several indicators
to warn of engine overheating.
There is an engine coolant
temperature gauge on the
instrument panel cluster. See
Engine Coolant Temperature Gauge
on page 5-12.
The vehicle may also display an
ENGINE OVERHEATED IDLE
ENGINE and ENGINE
OVERHEATED STOP ENGINE
message in the Driver Information
Center (DIC). See Engine Cooling
System Messages on page 5-34. You may decide not to lift the hood
when this warning appears, but
instead get service help right away.
See
Roadside Assistance Program
on page 13-5.
If you do decide to lift the hood,
make sure the vehicle is parked on
a level surface.
Then check to see if the engine
cooling fans are running. If the
engine is overheating, both fans
should be running. If they are not,
do not continue to run the engine
and have the vehicle serviced.
{Caution
Running the engine without
coolant may cause damage or a
fire. Vehicle damage would not be
covered by the vehicle warranty.
See Overheated Engine
Protection Operating Mode on
page 10-18 for information on
driving to a safe place in an
emergency.
Page 295 of 414

Black plate (25,1)GMC Acadia/Acadia Denali Owner Manual (GMNA-Localizing-U.S./Canada/
Mexico-6014315) - 2014 - crc - 8/15/13
Vehicle Care 10-25
3. Install the new blade onto thearm connector and make sure
the tabs are fully set in the
locked position.
Allowing the wiper blade arm to
touch the windshield when no
wiper blade is installed could
damage the windshield. Any
damage that occurs would not
be covered by your warranty. Do
not allow the wiper blade arm to
touch the windshield.
4. Repeat the steps for the other blade.
Rear Wiper Blade
To replace the rear wiper blade:
1. Pull the wiper blade assemblyaway from the backglass.
The rear wiper blade will not lock
in a vertical position so care
should be used when pulling it
away from the vehicle.
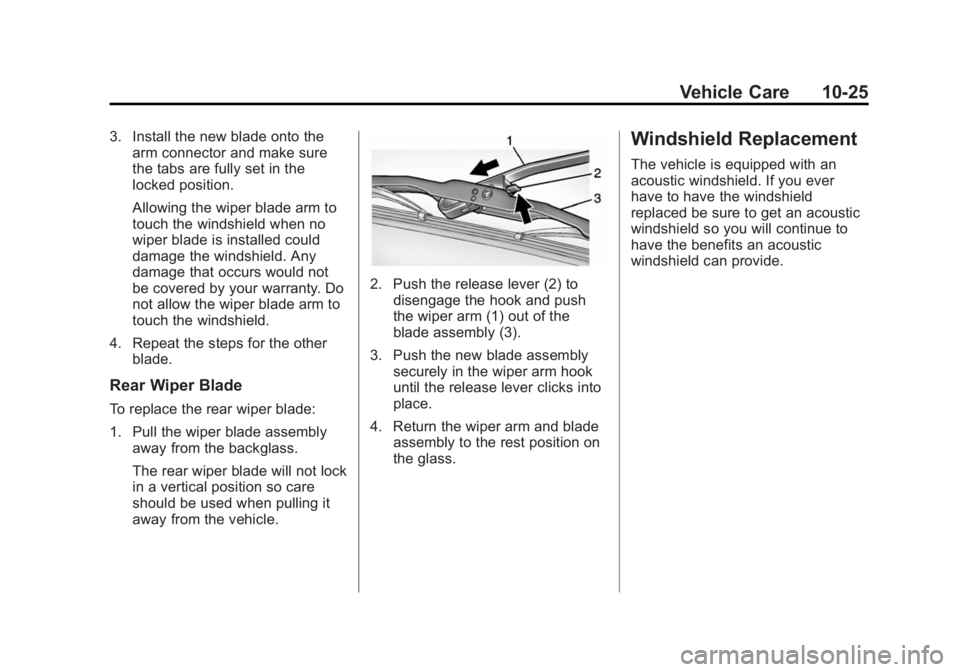
2. Push the release lever (2) todisengage the hook and push
the wiper arm (1) out of the
blade assembly (3).
3. Push the new blade assembly securely in the wiper arm hook
until the release lever clicks into
place.
4. Return the wiper arm and blade assembly to the rest position on
the glass.
Windshield Replacement
The vehicle is equipped with an
acoustic windshield. If you ever
have to have the windshield
replaced be sure to get an acoustic
windshield so you will continue to
have the benefits an acoustic
windshield can provide.
Page 331 of 414

Black plate (61,1)GMC Acadia/Acadia Denali Owner Manual (GMNA-Localizing-U.S./Canada/
Mexico-6014315) - 2014 - crc - 8/15/13
Vehicle Care 10-61
2. If the vehicle has a wheel cover,loosen the plastic nut caps with
the wheel wrench. They will not
come off. Then, using the flat
end of the wheel wrench, pry
along the edge of the cover until
it comes off. Be careful; the
edges may be sharp. Do not try
to remove the cover with your
bare hands.
Store the wheel cover securely
in the rear of the vehicle until
you have the flat tire repaired or
replaced.
If the vehicle has aluminum
wheels, remove the wheel nut
caps using the wheel wrench.
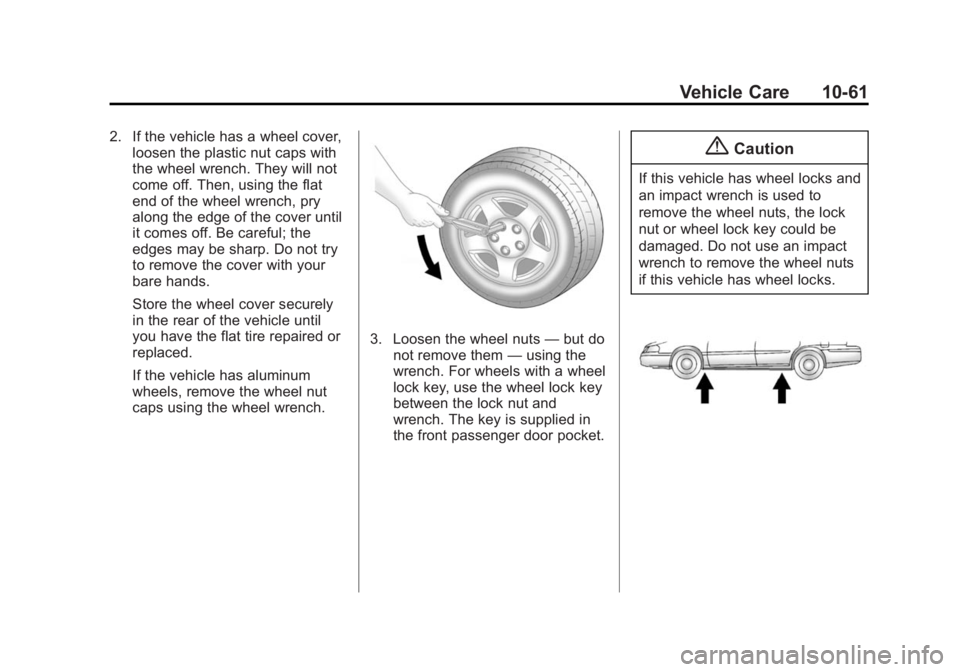
3. Loosen the wheel nuts —but do
not remove them —using the
wrench. For wheels with a wheel
lock key, use the wheel lock key
between the lock nut and
wrench. The key is supplied in
the front passenger door pocket.
{Caution
If this vehicle has wheel locks and
an impact wrench is used to
remove the wheel nuts, the lock
nut or wheel lock key could be
damaged. Do not use an impact
wrench to remove the wheel nuts
if this vehicle has wheel locks.
Page 335 of 414

Black plate (65,1)GMC Acadia/Acadia Denali Owner Manual (GMNA-Localizing-U.S./Canada/
Mexico-6014315) - 2014 - crc - 8/15/13
Vehicle Care 10-65
To store the spare tire:
1. Lay the compact spare tire nearthe rear of the vehicle with the
valve stem down.
2. Reinstall the plastic spare tire heat shield on the compact
spare tire.
3. Slide the cable retainer through the center of the wheel and start
to raise the compact spare tire.
Make sure the retainer is fully
seated across the underside of
the wheel.
4. When the compact spare tire is almost in the stored position,
turn the tire so the valve is
toward the rear of the vehicle.
This position helps when
checking the air pressure in the
compact spare tire.
5. Raise the tire fully against the underside of the vehicle.
Continue turning the wrench until
you feel more than two clicks.
This indicates that the compact spare tire is secure and the
cable is tight. The spare tire
hoist cannot be overtightened.
6. Make sure the tire is stored
securely. Push, pull, and then try
to turn the tire. If the tire moves,
use the wrench to tighten the
cable.
Storing the Flat Tire
1. Cable
2. Liftgate Hinges
3. Spare Tire Heat Shield
4. Center of the Wheel
5. Door Striker
1. Remove the cable package fromthe jack storage area.
2. Remove the small center cap by tapping the back of the cap with
the extension of the shaft, if the
vehicle has aluminum wheels.
Page 336 of 414

Black plate (66,1)GMC Acadia/Acadia Denali Owner Manual (GMNA-Localizing-U.S./Canada/
Mexico-6014315) - 2014 - crc - 8/15/13
10-66 Vehicle Care
3. Put the flat tire in the rearstorage area with the valve stem
pointing toward the rear of the
vehicle.
4. Pull the cable (1) through the door striker (5), the center of the
wheel (4), and the plastic spare
tire heat shield (3), as shown.
5. Hook the cable onto the outside
portion of the liftgate hinges (2).
6. Hook the other end of the cable onto the outside portion of the
liftgate hinge on the other side of
the vehicle. 7. Pull on the cable to make sure it
is secure.
8. Make sure the metal tube iscentered at the striker. Push the
tube toward the front of the
vehicle.
9. Close the liftgate and make sure it is latched properly.
Storing the Tools
1. Tool Bag
2. Wing Bolt
3. Jack
Put back all tools as they were
stored in the jack storage
compartment and put the
compartment cover back on.
1. Ensure that the bottom of thejack is facing toward you.
2. Replace the tool bag (1).
Page 342 of 414

Black plate (72,1)GMC Acadia/Acadia Denali Owner Manual (GMNA-Localizing-U.S./Canada/
Mexico-6014315) - 2014 - crc - 8/15/13
10-72 Vehicle Care
Towing the Vehicle
{Caution
Incorrectly towing a disabled
vehicle may cause damage. The
damage would not be covered by
the vehicle warranty. Do not lash
or hook to the chassis
components—including the front
and rear subframes, suspension
control arms, and links —during
towing and recovery of a disabled
vehicle, or when securing the
vehicle. Use the proper nylon
strap harnesses around the tires
to secure the vehicle.
Have the vehicle towed on a flatbed
car carrier or a wheel lift tow truck.
If a wheel lift tow truck is used, the
drive wheels cannot contact the
road while the vehicle is being
towed. A wheel dolly must be used
to lift all drive wheels off the ground. Consult your dealer or a
professional towing service if the
disabled vehicle must be towed.
To tow the vehicle behind another
vehicle for recreational purposes,
such as behind a motor home, see
“Recreational Vehicle Towing”
following.
Recreational Vehicle
Towing
Recreational vehicle towing means
towing the vehicle behind another
vehicle
–such as behind a motor
home. The two most common types
of recreational vehicle towing are
known as dinghy towing and dolly
towing. Dinghy towing is towing the
vehicle with all four wheels on the
ground. Dolly towing is towing the
vehicle with two wheels on the
ground and two wheels up on a
device known as a dolly. Here are some important things to
consider before recreational vehicle
towing:
.The towing capacity of the
towing vehicle. Be sure to read
the tow vehicle manufacturer's
recommendations.
.How far the vehicle will be
towed. Some vehicles have
restrictions on how far and how
long they can be towed.
.The proper towing equipment.
See your dealer or trailering
professional for additional advice
and equipment
recommendations.
.If the vehicle is ready to be
towed. Just as preparing the
vehicle for a long trip, make sure
the vehicle is prepared to be
towed.