2014 GMC ACADIA ECU
[x] Cancel search: ECUPage 107 of 414

Black plate (55,1)GMC Acadia/Acadia Denali Owner Manual (GMNA-Localizing-U.S./Canada/
Mexico-6014315) - 2014 - crc - 8/15/13
Seats and Restraints 3-55
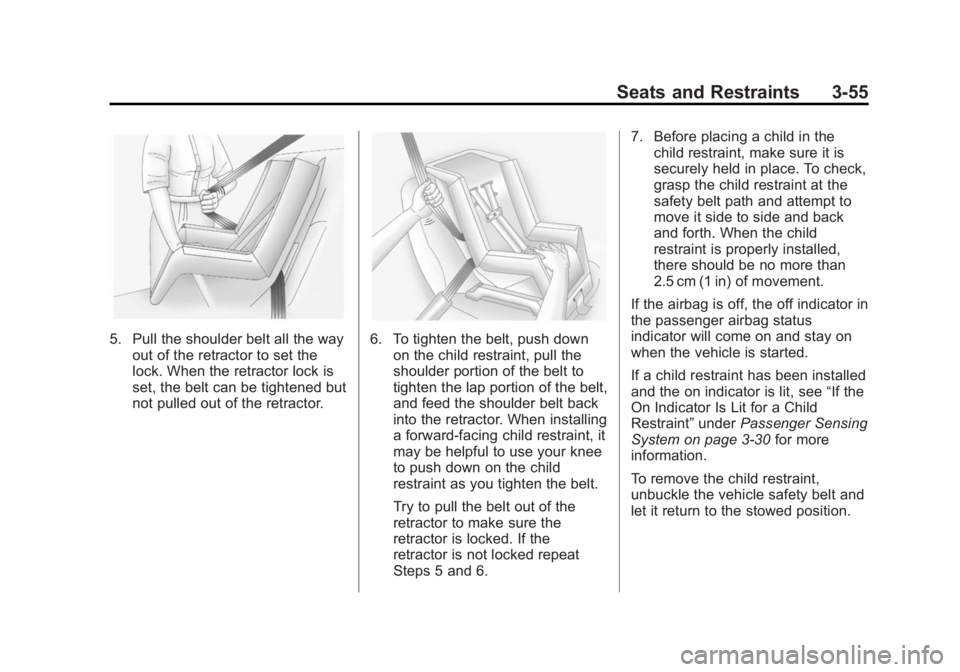
5. Pull the shoulder belt all the wayout of the retractor to set the
lock. When the retractor lock is
set, the belt can be tightened but
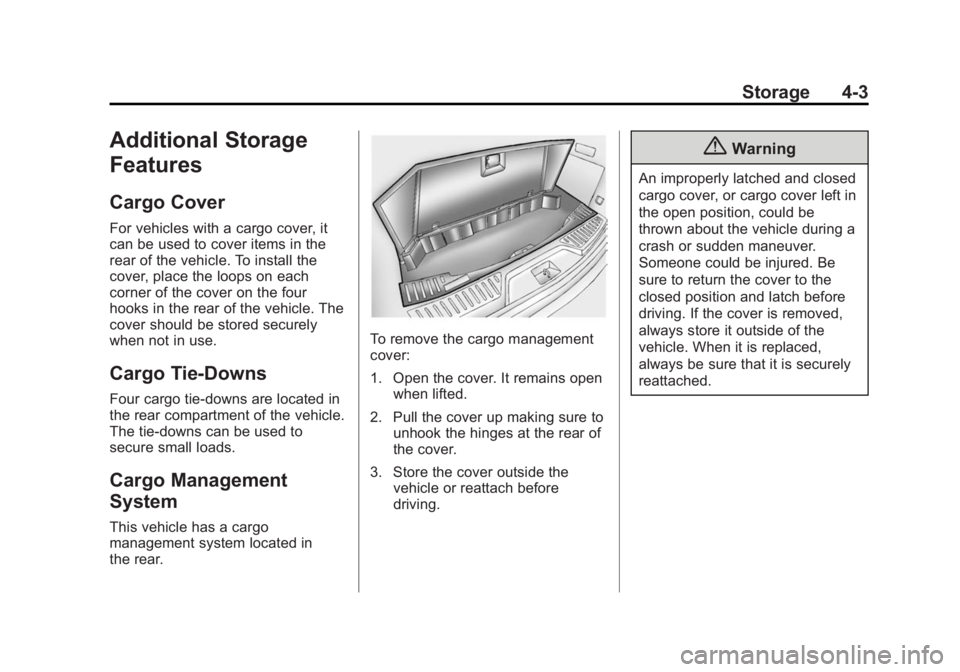
not pulled out of the retractor.6. To tighten the belt, push downon the child restraint, pull the
shoulder portion of the belt to
tighten the lap portion of the belt,
and feed the shoulder belt back
into the retractor. When installing
a forward-facing child restraint, it
may be helpful to use your knee
to push down on the child
restraint as you tighten the belt.
Try to pull the belt out of the
retractor to make sure the
retractor is locked. If the
retractor is not locked repeat
Steps 5 and 6. 7. Before placing a child in the
child restraint, make sure it is
securely held in place. To check,
grasp the child restraint at the
safety belt path and attempt to
move it side to side and back
and forth. When the child
restraint is properly installed,
there should be no more than
2.5 cm (1 in) of movement.
If the airbag is off, the off indicator in
the passenger airbag status
indicator will come on and stay on
when the vehicle is started.
If a child restraint has been installed
and the on indicator is lit, see “If the
On Indicator Is Lit for a Child
Restraint” underPassenger Sensing
System on page 3-30 for more
information.
To remove the child restraint,
unbuckle the vehicle safety belt and
let it return to the stowed position.
Page 111 of 414

Black plate (3,1)GMC Acadia/Acadia Denali Owner Manual (GMNA-Localizing-U.S./Canada/
Mexico-6014315) - 2014 - crc - 8/15/13
Storage 4-3
Additional Storage
Features
Cargo Cover
For vehicles with a cargo cover, it
can be used to cover items in the
rear of the vehicle. To install the
cover, place the loops on each
corner of the cover on the four
hooks in the rear of the vehicle. The
cover should be stored securely
when not in use.
Cargo Tie-Downs
Four cargo tie‐downs are located in
the rear compartment of the vehicle.
The tie-downs can be used to
secure small loads.
Cargo Management
System
This vehicle has a cargo
management system located in
the rear.
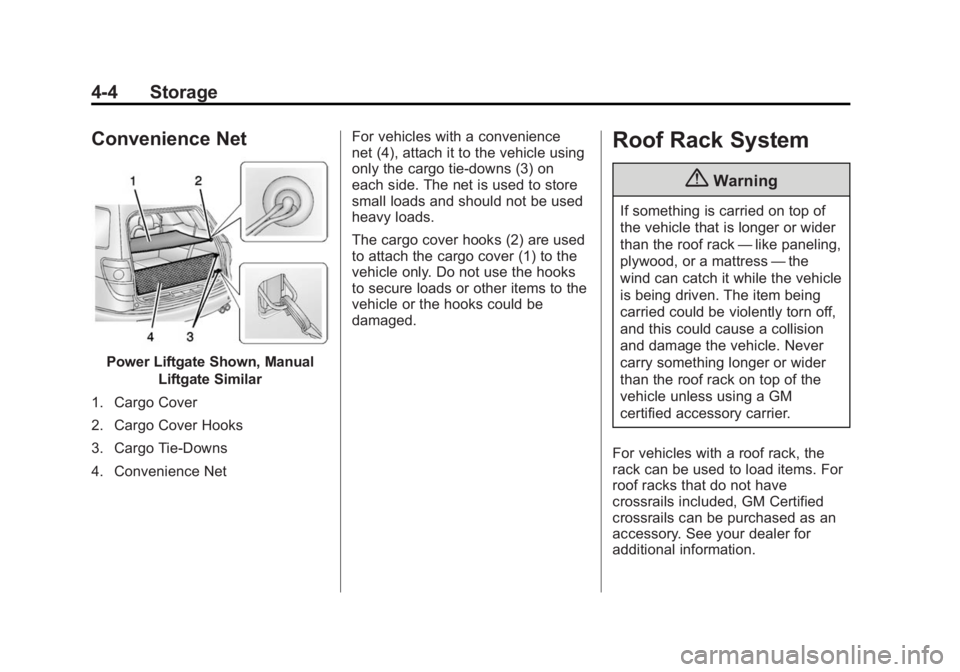
To remove the cargo management
cover:
1. Open the cover. It remains openwhen lifted.
2. Pull the cover up making sure to unhook the hinges at the rear of
the cover.
3. Store the cover outside the vehicle or reattach before
driving.
{Warning
An improperly latched and closed
cargo cover, or cargo cover left in
the open position, could be
thrown about the vehicle during a
crash or sudden maneuver.
Someone could be injured. Be
sure to return the cover to the
closed position and latch before
driving. If the cover is removed,
always store it outside of the
vehicle. When it is replaced,
always be sure that it is securely
reattached.
Page 112 of 414

Black plate (4,1)GMC Acadia/Acadia Denali Owner Manual (GMNA-Localizing-U.S./Canada/
Mexico-6014315) - 2014 - crc - 8/15/13
4-4 Storage
Convenience Net
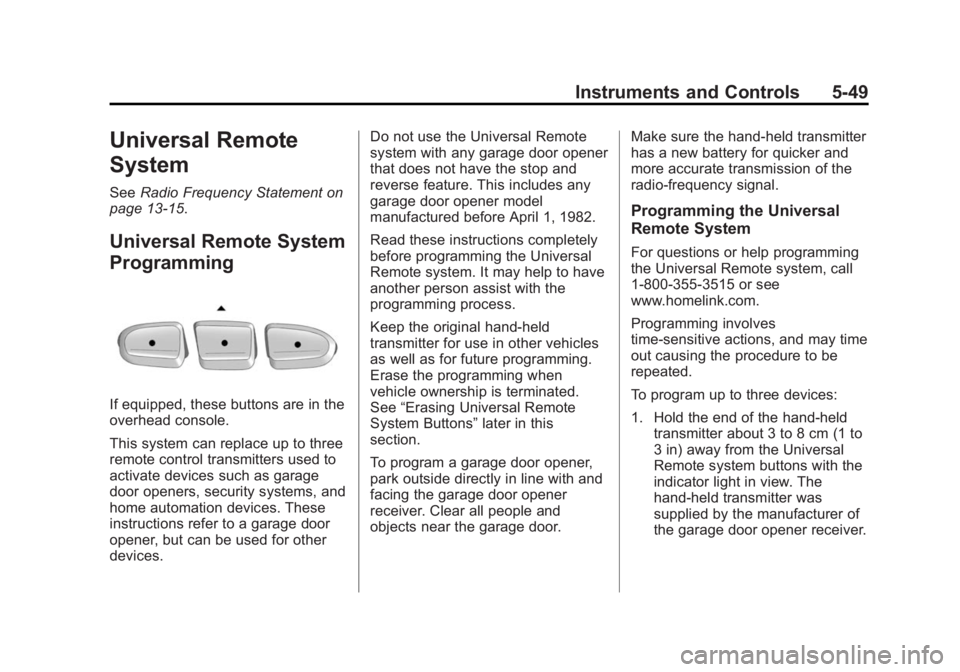
Power Liftgate Shown, ManualLiftgate Similar
1. Cargo Cover
2. Cargo Cover Hooks
3. Cargo Tie-Downs
4. Convenience Net For vehicles with a convenience
net (4), attach it to the vehicle using
only the cargo tie-downs (3) on
each side. The net is used to store
small loads and should not be used
heavy loads.
The cargo cover hooks (2) are used
to attach the cargo cover (1) to the
vehicle only. Do not use the hooks
to secure loads or other items to the
vehicle or the hooks could be
damaged.
Roof Rack System
{Warning
If something is carried on top of
the vehicle that is longer or wider
than the roof rack
—like paneling,
plywood, or a mattress —the
wind can catch it while the vehicle
is being driven. The item being
carried could be violently torn off,
and this could cause a collision
and damage the vehicle. Never
carry something longer or wider
than the roof rack on top of the
vehicle unless using a GM
certified accessory carrier.
For vehicles with a roof rack, the
rack can be used to load items. For
roof racks that do not have
crossrails included, GM Certified
crossrails can be purchased as an
accessory. See your dealer for
additional information.
Page 113 of 414

Black plate (5,1)GMC Acadia/Acadia Denali Owner Manual (GMNA-Localizing-U.S./Canada/
Mexico-6014315) - 2014 - crc - 8/15/13
Storage 4-5
{Caution
Loading cargo on the roof rack
that weighs more than 91 kg
(200 lb) or hangs over the rear or
sides of the vehicle may damage
the vehicle. Load cargo so that it
rests evenly between the
crossrails and fasten cargo
securely.To prevent damage or loss of cargo
when driving, check to make sure
crossrails and cargo are securely
fastened. Loading cargo on the roof
rack will make the vehicle’
s center
of gravity higher. Avoid high speeds,
sudden starts, sharp turns, sudden
braking, or abrupt maneuvers;
otherwise it may result in loss of
control. If driving for a long distance,
on rough roads, or at high speeds,
occasionally stop the vehicle to
make sure the cargo remains in its
place. Do not exceed the maximum
vehicle capacity when loading the
vehicle.
See Vehicle Load Limits on
page 9-10.
Page 115 of 414

Black plate (1,1)GMC Acadia/Acadia Denali Owner Manual (GMNA-Localizing-U.S./Canada/
Mexico-6014315) - 2014 - crc - 8/15/13
Instruments and Controls 5-1
Instruments and
Controls
Controls
Steering Wheel Adjustment . . . 5-2
Steering Wheel Controls . . . . . . 5-2
Horn . . . . . . . . . . . . . . . . . . . . . . . . . . 5-3
Windshield Wiper/Washer . . . . . 5-3
Rear Window Wiper/Washer . . . . . . . . . . . . . . . . . . . . . . 5-4
Compass . . . . . . . . . . . . . . . . . . . . . 5-4
Clock . . . . . . . . . . . . . . . . . . . . . . . . . 5-6
Power Outlets . . . . . . . . . . . . . . . . . 5-7
Warning Lights, Gauges, and
Indicators
Warning Lights, Gauges, and Indicators . . . . . . . . . . . . . . . . . . . . 5-9
Instrument Cluster . . . . . . . . . . . 5-10
Speedometer . . . . . . . . . . . . . . . . 5-11
Odometer . . . . . . . . . . . . . . . . . . . . 5-11
Tachometer . . . . . . . . . . . . . . . . . . 5-11
Fuel Gauge . . . . . . . . . . . . . . . . . . 5-11
Engine Coolant Temperature Gauge . . . . . . . . . . . . . . . . . . . . . . 5-12
Voltmeter Gauge . . . . . . . . . . . . . 5-13
Safety Belt Reminders . . . . . . . 5-13 Airbag Readiness Light . . . . . . 5-14
Passenger Airbag Status
Indicator . . . . . . . . . . . . . . . . . . . . 5-15
Charging System Light . . . . . . 5-15
Malfunction Indicator Lamp . . . . . . . . . . . . . 5-16
Brake System Warning Light . . . . . . . . . . . . . . . . . . . . . . . 5-18
Antilock Brake System (ABS) Warning Light . . . . . . . . . . . . . . 5-19
Tow/Haul Mode Light . . . . . . . . 5-20
Lane Departure Warning (LDW) Light . . . . . . . . . . . . . . . . 5-20
Vehicle Ahead Indicator . . . . . . 5-20
StabiliTrak
®Indicator Light . . . 5-20
Engine Coolant Temperature Warning Light . . . . . . . . . . . . . . 5-21
Tire Pressure Light . . . . . . . . . . 5-21
Engine Oil Pressure Light . . . . 5-21
Security Light . . . . . . . . . . . . . . . . 5-22
High-Beam On Light . . . . . . . . . 5-22
Front Fog Lamp Light . . . . . . . . 5-22
Cruise Control Light . . . . . . . . . 5-23
Information Displays
Driver Information Center (DIC) . . . . . . . . . . . . . . . 5-23
Head-Up Display (HUD) . . . . . 5-28
Vehicle Messages
Vehicle Messages . . . . . . . . . . . 5-32
Battery Voltage and Charging Messages . . . . . . . . . . . . . . . . . . 5-32
Brake System Messages . . . . 5-33
Cruise Control Messages . . . . 5-33
Door Ajar Messages . . . . . . . . . 5-33
Engine Cooling System Messages . . . . . . . . . . . . . . . . . . 5-34
Engine Oil Messages . . . . . . . . 5-35
Engine Power Messages . . . . 5-35
Fuel System Messages . . . . . . 5-35
Key and Lock Messages . . . . . 5-36
Lamp Messages . . . . . . . . . . . . . 5-36
Object Detection System Messages . . . . . . . . . . . . . . . . . . 5-36
Ride Control System Messages . . . . . . . . . . . . . . . . . . 5-38
Airbag System Messages . . . . 5-38
Security Messages . . . . . . . . . . 5-39
Service Vehicle Messages . . . 5-39
Tire Messages . . . . . . . . . . . . . . . 5-39
Transmission Messages . . . . . 5-40
Vehicle Reminder Messages . . . . . . . . . . . . . . . . . . 5-41
Vehicle Speed Messages . . . . 5-41
Washer Fluid Messages . . . . . 5-41
Page 136 of 414

Black plate (22,1)GMC Acadia/Acadia Denali Owner Manual (GMNA-Localizing-U.S./Canada/
Mexico-6014315) - 2014 - crc - 8/15/13
5-22 Instruments and Controls
This light should come on briefly as
the engine is started. If it does not
come on, have the vehicle serviced
by your dealer.
If the light comes on and stays on, it
means that oil is not flowing through
the engine properly. The vehicle
could be low on oil and might have
some other system problem. See
your dealer.
Security Light
The security light should come on
briefly as the engine is started. If the
system is working normally, the
indicator light turns off. If it does not
come on, have the vehicle serviced
by your dealer.
If the light stays on and the engine
does not start, there could be a
problem with the theft-deterrent
system.
This light is also used to indicate the
status of the anti-theft alarm system
when the ignition is turned off. The
light will flash rapidly if the alarm
system is arming and one or more
of the monitored entry points is not
closed. The light will stay on if the
alarm is arming and all entry points
are closed.
For information regarding this light
and the vehicle's security system,
seeVehicle Alarm System on
page 2-11.High-Beam On Light
The high-beam on light comes on
when the high-beam headlamps are
in use.
See Headlamp High/Low-Beam
Changer on page 6-2 for more
information.
Front Fog Lamp Light
The fog lamp light comes on when
the fog lamps are in use.
Page 153 of 414

Black plate (39,1)GMC Acadia/Acadia Denali Owner Manual (GMNA-Localizing-U.S./Canada/
Mexico-6014315) - 2014 - crc - 8/15/13
Instruments and Controls 5-39
Security Messages
SERVICE THEFT DETERRENT
SYSTEM
This message displays when there
is a problem with the theft-deterrent
system. The vehicle may or may not
restart so you may want to take the
vehicle to your dealer before turning
off the engine. SeeImmobilizer
Operation on page 2-13 for more
information.
THEFT ATTEMPTED
This message displays if the content
theft-deterrent system has detected
a break-in attempt while you were
away from your vehicle. See Vehicle
Alarm System on page 2-11 for
more information.
Service Vehicle Messages
SERVICE A/C (Air
Conditioning) SYSTEM
This message displays when the
electronic sensors that control the
air conditioning and heating systems are no longer working.
Have the climate control system
serviced by your dealer if you notice
a drop in heating and air
conditioning efficiency.
SERVICE POWER STEERING
This message displays when a
problem is detected with the power
steering system. When this
message is displayed, you may
notice that the effort required to
steer the vehicle increases or feels
heavier, but you will still be able to
steer the vehicle. Have your vehicle
serviced by your dealer immediately.
SERVICE VEHICLE SOON
This message displays when a
non-emissions related malfunction
occurs. Have the vehicle serviced
by your dealer as soon as possible.
STARTING DISABLED
SERVICE THROTTLE
This message displays when your
vehicle's throttle system is not
functioning properly. Have your
vehicle serviced by your dealer.
Tire Messages
TIRE LOW ADD AIR TO TIRE
On vehicles with the Tire Pressure
Monitor System (TPMS), this
message displays when the
pressure in one or more of the
vehicle's tires is low.
This message also displays LEFT
FRT (left front), RIGHT FRT (right
front), LEFT RR (left rear),
or RIGHT RR (right rear) to indicate
the location of the low tire.
The low tire pressure warning light
will also come on. See
Tire
Pressure Light on page 5-21.
If a tire pressure message appears
on the DIC, stop as soon as you
can. Inflate the tires by adding air
Page 163 of 414

Black plate (49,1)GMC Acadia/Acadia Denali Owner Manual (GMNA-Localizing-U.S./Canada/
Mexico-6014315) - 2014 - crc - 8/15/13
Instruments and Controls 5-49
Universal Remote
System
SeeRadio Frequency Statement on
page 13-15.
Universal Remote System
Programming
If equipped, these buttons are in the
overhead console.
This system can replace up to three
remote control transmitters used to
activate devices such as garage
door openers, security systems, and
home automation devices. These
instructions refer to a garage door
opener, but can be used for other
devices. Do not use the Universal Remote
system with any garage door opener
that does not have the stop and
reverse feature. This includes any
garage door opener model
manufactured before April 1, 1982.
Read these instructions completely
before programming the Universal
Remote system. It may help to have
another person assist with the
programming process.
Keep the original hand-held
transmitter for use in other vehicles
as well as for future programming.
Erase the programming when
vehicle ownership is terminated.
See
“Erasing Universal Remote
System Buttons” later in this
section.
To program a garage door opener,
park outside directly in line with and
facing the garage door opener
receiver. Clear all people and
objects near the garage door. Make sure the hand-held transmitter
has a new battery for quicker and
more accurate transmission of the
radio-frequency signal.
Programming the Universal
Remote System
For questions or help programming
the Universal Remote system, call
1-800-355-3515 or see
www.homelink.com.
Programming involves
time-sensitive actions, and may time
out causing the procedure to be
repeated.
To program up to three devices:
1. Hold the end of the hand-held
transmitter about 3 to 8 cm (1 to
3 in) away from the Universal
Remote system buttons with the
indicator light in view. The
hand-held transmitter was
supplied by the manufacturer of
the garage door opener receiver.