Page 205 of 458
•
If you are driving more than 14.91 mi
(24 km) at temperatures above
freezing, angle the plow blade either
full left or full right to provide
maximum airflow to the radiator.
• If you are driving less than
14.91 mi
(24 km) at speeds up to 44.7 mph
(72 km/h) in cold weather, you will not
need to worry about blade position to
provide maximum airflow.
Transmission operation while
plowing WARNING
Do not spin the wheels at over
34.2 mph (55 km/h)
. The tires may
fail and injure a passenger or
bystander. •
Shift transfer case to
4L (4WD Low)
when plowing in small areas at speeds
below 5 mph (8 km/h).
• Shift transfer case to
4H (4WD High)
when plowing larger areas or light snow
at higher speeds. Do not exceed 15 mph
(24 km/h).
• Do not shift the transmission from a
forward gear to
R (Reverse) until the
engine is at idle and the wheels are
stopped.
• Do not shift the transmission from a
forward gear to
R (Reverse) until the
engine is at idle and the wheels are
stopped.
202
Super Duty (TFA) Driving Hints
Page 207 of 458
HAZARD WARNING FLASHERS
Note:
The hazard warning flashers will
operate when the ignition is in any position
or if the key is not in the ignition. If used
when the engine is not running, the battery
will lose charge. As a result, there may be
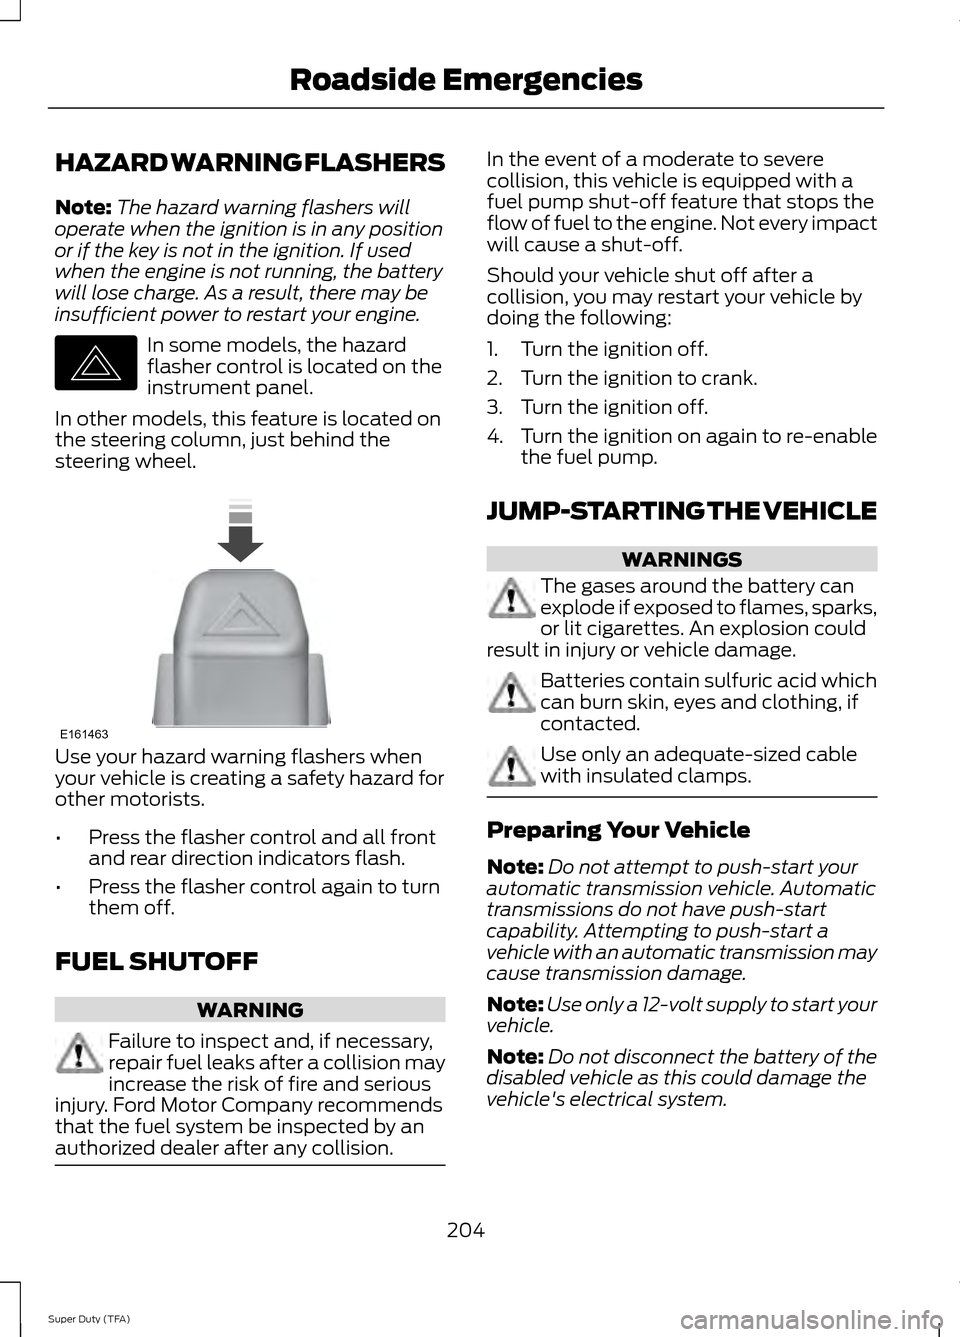
insufficient power to restart your engine. In some models, the hazard
flasher control is located on the
instrument panel.
In other models, this feature is located on
the steering column, just behind the
steering wheel. Use your hazard warning flashers when
your vehicle is creating a safety hazard for
other motorists.
•
Press the flasher control and all front
and rear direction indicators flash.
• Press the flasher control again to turn
them off.
FUEL SHUTOFF WARNING
Failure to inspect and, if necessary,
repair fuel leaks after a collision may
increase the risk of fire and serious
injury. Ford Motor Company recommends
that the fuel system be inspected by an
authorized dealer after any collision. In the event of a moderate to severe
collision, this vehicle is equipped with a
fuel pump shut-off feature that stops the
flow of fuel to the engine. Not every impact
will cause a shut-off.
Should your vehicle shut off after a
collision, you may restart your vehicle by
doing the following:
1. Turn the ignition off.
2. Turn the ignition to crank.
3. Turn the ignition off.
4.
Turn the ignition on again to re-enable
the fuel pump.
JUMP-STARTING THE VEHICLE WARNINGS
The gases around the battery can
explode if exposed to flames, sparks,
or lit cigarettes. An explosion could
result in injury or vehicle damage. Batteries contain sulfuric acid which
can burn skin, eyes and clothing, if
contacted.
Use only an adequate-sized cable
with insulated clamps.
Preparing Your Vehicle
Note:
Do not attempt to push-start your
automatic transmission vehicle. Automatic
transmissions do not have push-start
capability. Attempting to push-start a
vehicle with an automatic transmission may
cause transmission damage.
Note: Use only a 12-volt supply to start your
vehicle.
Note: Do not disconnect the battery of the
disabled vehicle as this could damage the
vehicle's electrical system.
204
Super Duty (TFA) Roadside EmergenciesE142663 E161463
Page 219 of 458
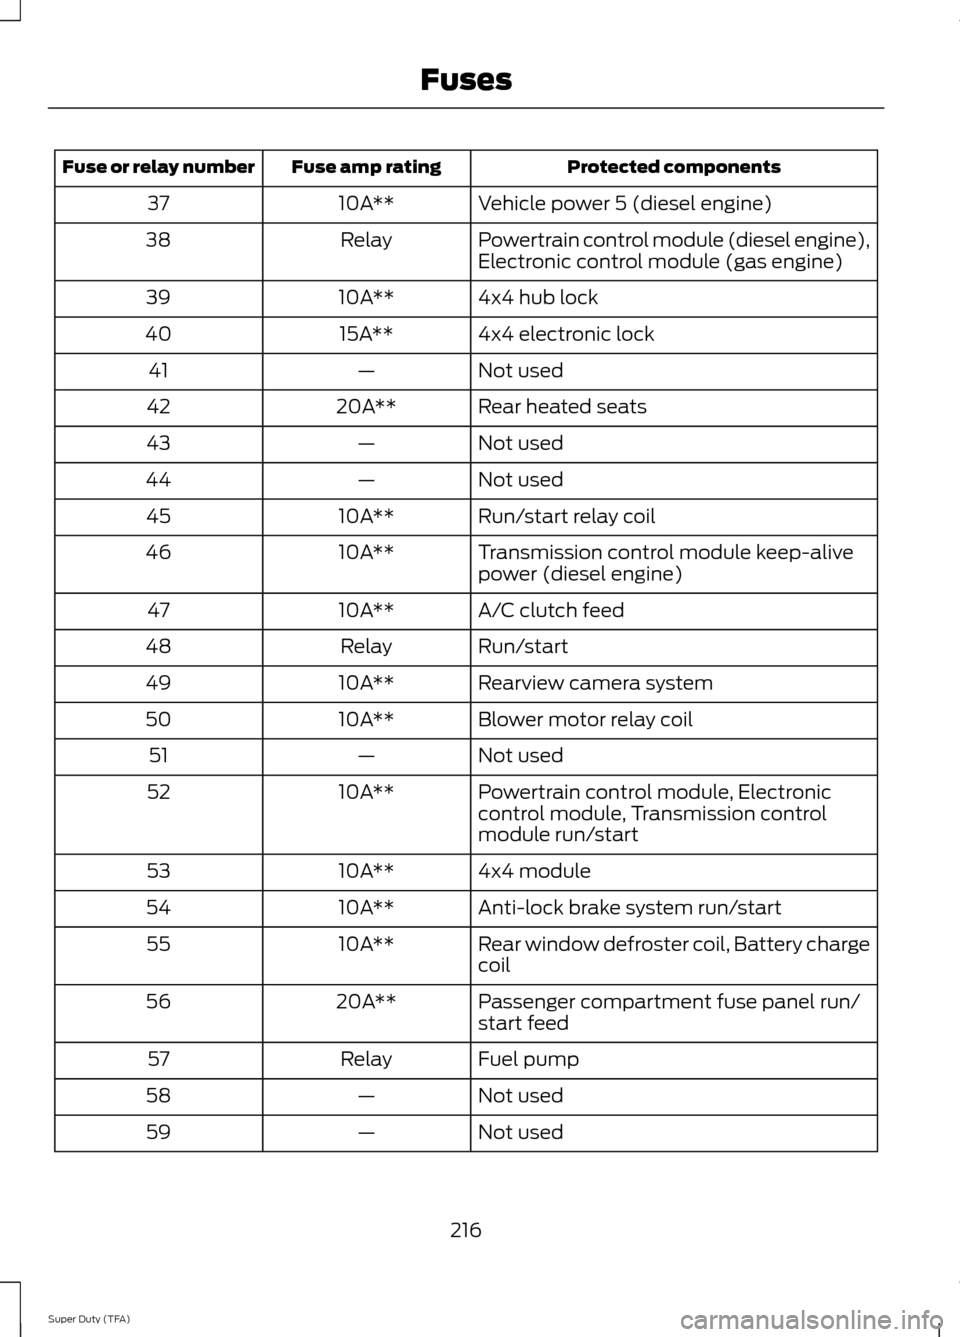
Protected components
Fuse amp rating
Fuse or relay number
Vehicle power 5 (diesel engine)
10A**
37
Powertrain control module (diesel engine),
Electronic control module (gas engine)
Relay
38
4x4 hub lock
10A**
39
4x4 electronic lock
15A**
40
Not used
—
41
Rear heated seats
20A**
42
Not used
—
43
Not used
—
44
Run/start relay coil
10A**
45
Transmission control module keep-alive
power (diesel engine)
10A**
46
A/C clutch feed
10A**
47
Run/start
Relay
48
Rearview camera system
10A**
49
Blower motor relay coil
10A**
50
Not used
—
51
Powertrain control module, Electronic
control module, Transmission control
module run/start
10A**
52
4x4 module
10A**
53
Anti-lock brake system run/start
10A**
54
Rear window defroster coil, Battery charge
coil
10A**
55
Passenger compartment fuse panel run/
start feed
20A**
56
Fuel pump
Relay
57
Not used
—
58
Not used
—
59
216
Super Duty (TFA) Fuses
Page 226 of 458
2. Go to the front of the vehicle and
locate the secondary release lever,
which is located under the front of the
hood, to your right of the center of the
vehicle (driver's side), toward the
headlight.
3. Release the hood latch by pushing the secondary release lever to your left,
toward the center of the vehicle.
4. Raise the hood. 5.
To close the hood, lower the hood and
allow it to drop the last 8 to 11 inches
(20 to 30 centimeters).
Note: Make sure that the hood is closed
properly.
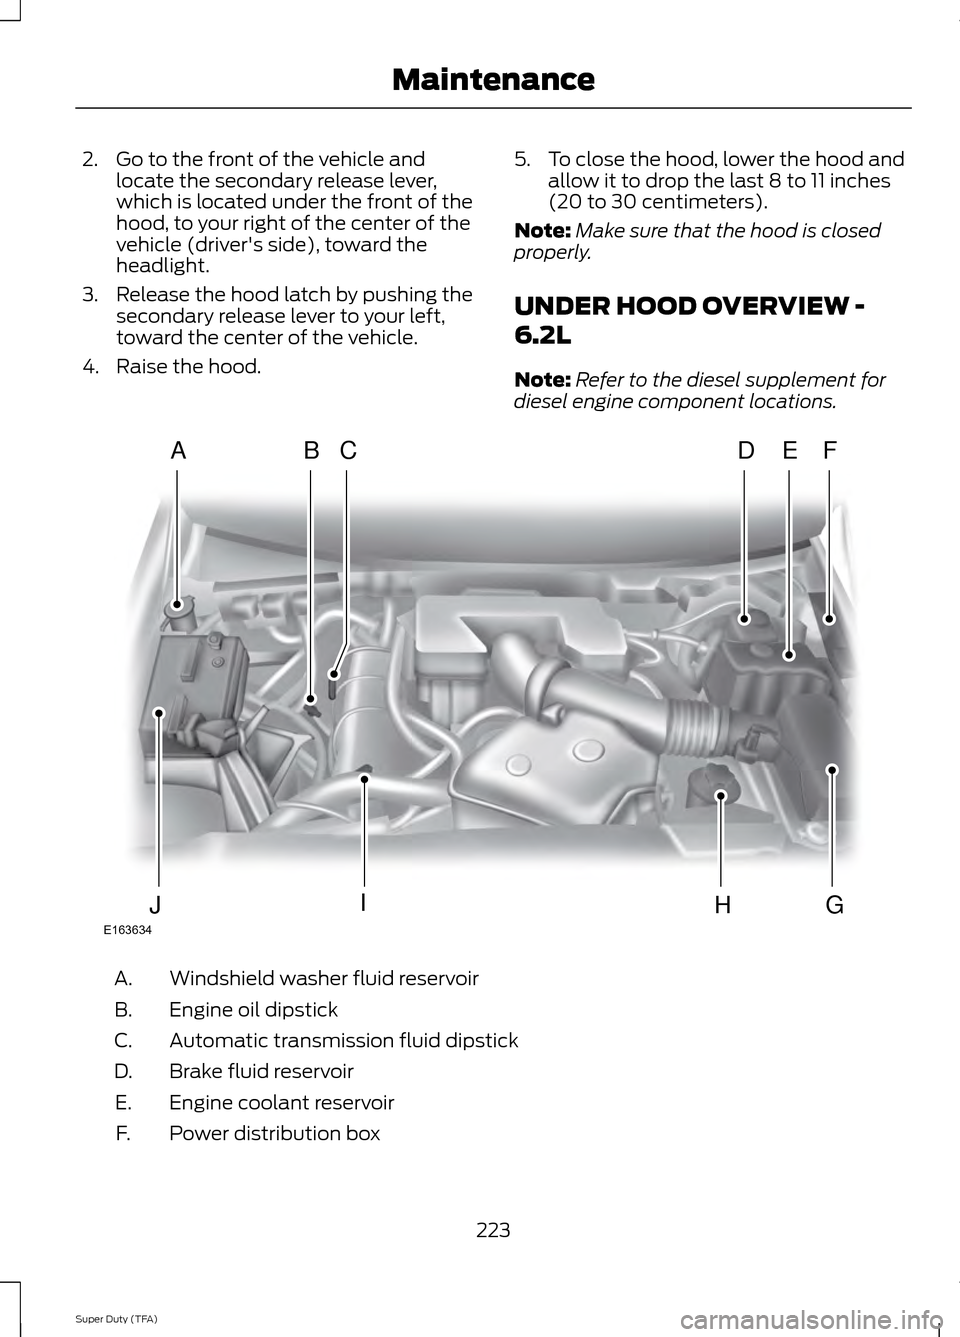
UNDER HOOD OVERVIEW -
6.2L
Note: Refer to the diesel supplement for
diesel engine component locations. Windshield washer fluid reservoir
A.
Engine oil dipstick
B.
Automatic transmission fluid dipstick
C.
Brake fluid reservoir
D.
Engine coolant reservoir
E.
Power distribution box
F.
223
Super Duty (TFA) MaintenanceE163634
ADFEBC
GHIJ
Page 227 of 458
Air filter assembly
G.
Power steering fluid reservoir
H.
Engine oil filler cap
I.
Battery
J.
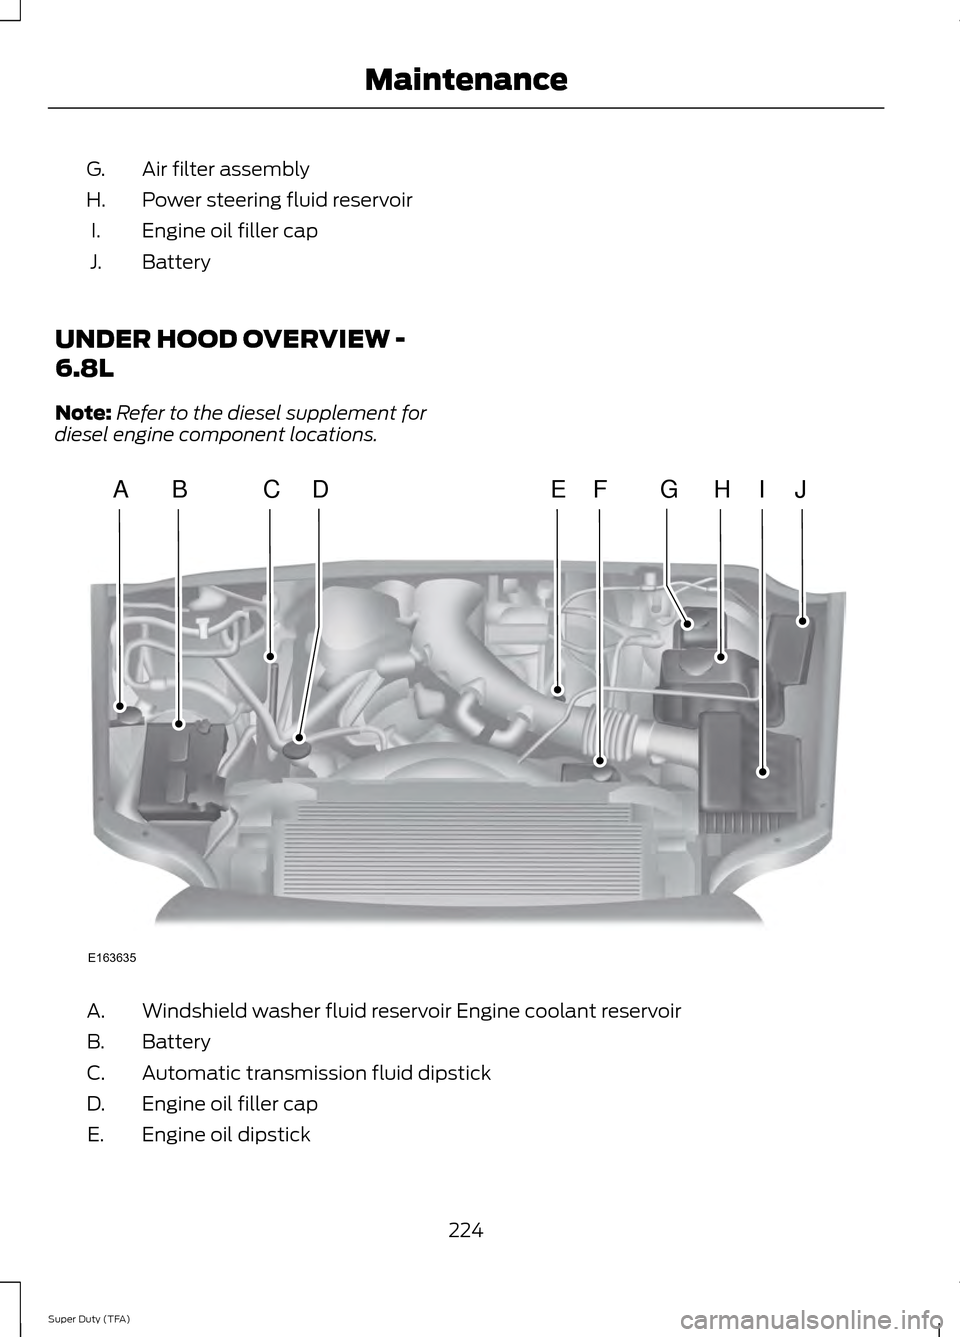
UNDER HOOD OVERVIEW -
6.8L
Note: Refer to the diesel supplement for
diesel engine component locations. Windshield washer fluid reservoir Engine coolant reservoir
A.
Battery
B.
Automatic transmission fluid dipstick
C.
Engine oil filler cap
D.
Engine oil dipstick
E.
224
Super Duty (TFA) MaintenanceE163635
ABCEHIJFDG
Page 233 of 458
•
the engine coolant temperature gauge
moves fully into the red (hot) area
• the coolant temperature warning light
illuminates
• the service engine soon indicator
illuminates. WARNING
Never remove the coolant reservoir
cap while the engine is running or hot.
1. Pull off the road as soon as safely
possible and place the vehicle in P
(Park).
2. Leave the engine running until the coolant temperature gauge needle
moves away from the H range. After
several minutes, if this does not
happen, follow the remaining steps.
3. Turn the engine off and wait for it to cool before checking the coolant level.
4. If the coolant level is normal, you may restart your engine and continue on.
5. If the coolant is low, add coolant, restart the engine and take your vehicle
to an authorized dealer. See Adding
engine coolant in this chapter for more
information. Refer to fail-safe cooling
for additional information.
AUTOMATIC TRANSMISSION
FLUID CHECK
Have an authorized dealer check and
change the transmission fluid and filter at
the correct service interval. See
Scheduled Maintenance (page 428).
Do not use supplemental transmission
fluid additives, treatments or cleaning
agents. The use of these materials may
affect transmission operation and result
in damage to internal transmission
components. Checking Automatic Transmission
Fluid (If Equipped)
For scheduled intervals of the fluid checks
and changes, See
Scheduled
Maintenance (page 428). Your
transmission does not consume fluid.
However, the fluid level should be checked
if the transmission is not working properly,
i.e., if the transmission slips or shifts slowly
or if you notice some sign of fluid leakage.
Automatic transmission fluid expands
when warmed. To obtain an accurate fluid
check, drive the vehicle until it is at normal
operating temperature (approximately
19 mi (30 km)
). Verify that the
transmission fluid temperature gauge,
located on the instrument cluster, is within
normal range.
1. Drive the vehicle
19 mi (30 km)until it
reaches normal operating temperature.
2. Park the vehicle on a level surface and
engage the parking brake.
3. With the engine running, parking brake
engaged and your foot on the brake
pedal, move the gearshift lever through
all of the gear ranges. Allow sufficient
time for each gear to engage.
4. Latch the gearshift lever in P and leave
the engine running.
5. Remove the dipstick, wiping it clean with a clean, dry lint free rag. If
necessary, refer to the Under Hood
Overview in this chapter for the
location of the dipstick.
6. Install the dipstick making sure it is fully
seated in the filler tube.
7. Remove the dipstick and inspect the fluid level. The fluid should be in the
designated area for normal operating
temperature or ambient temperature.
Low Fluid Level
Type A
230
Super Duty (TFA) Maintenance
Page 234 of 458
Type B
Do not drive the vehicle if there is no
indication of fluid on the dipstick and the
ambient temperature is above 50°F
(10°C).
Correct Fluid Level
Type A Type B For vehicles equipped with 5-speed
transmissions, check the fluid at the
normal operating temperature of
151°F
(66°C) to 170°F (77°C) on a level surface.
For vehicles equipped with 6-speed
transmissions, check the fluid at the
normal operating temperature of
196°F
(91°C) to 215°F (102°C) on a level surface.
The normal operating temperature can be
reached after approximately
19 mi
(30 km).
High Fluid Level
Type A Type B
231
Super Duty (TFA) MaintenanceE163739 E163740 E163741 E163742 E163743
Page 235 of 458
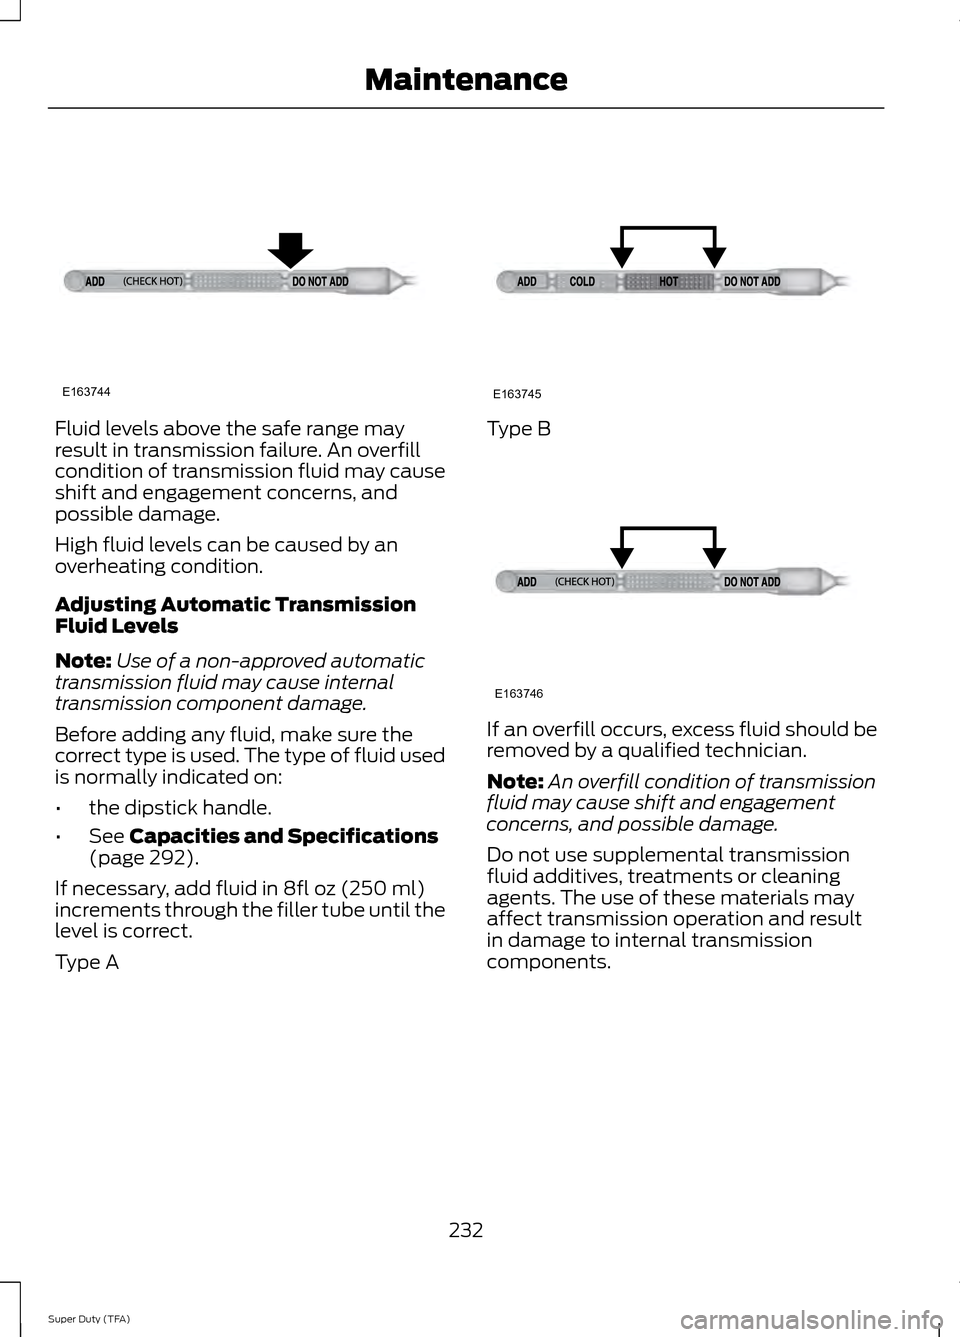
Fluid levels above the safe range may
result in transmission failure. An overfill
condition of transmission fluid may cause
shift and engagement concerns, and
possible damage.
High fluid levels can be caused by an
overheating condition.
Adjusting Automatic Transmission
Fluid Levels
Note:
Use of a non-approved automatic
transmission fluid may cause internal
transmission component damage.
Before adding any fluid, make sure the
correct type is used. The type of fluid used
is normally indicated on:
• the dipstick handle.
• See Capacities and Specifications
(page 292).
If necessary, add fluid in
8fl oz (250 ml)
increments through the filler tube until the
level is correct.
Type A Type B
If an overfill occurs, excess fluid should be
removed by a qualified technician.
Note:
An overfill condition of transmission
fluid may cause shift and engagement
concerns, and possible damage.
Do not use supplemental transmission
fluid additives, treatments or cleaning
agents. The use of these materials may
affect transmission operation and result
in damage to internal transmission
components.
232
Super Duty (TFA) MaintenanceE163744 E163745 E163746