2014 FORD SUPER DUTY horn
[x] Cancel search: hornPage 49 of 458

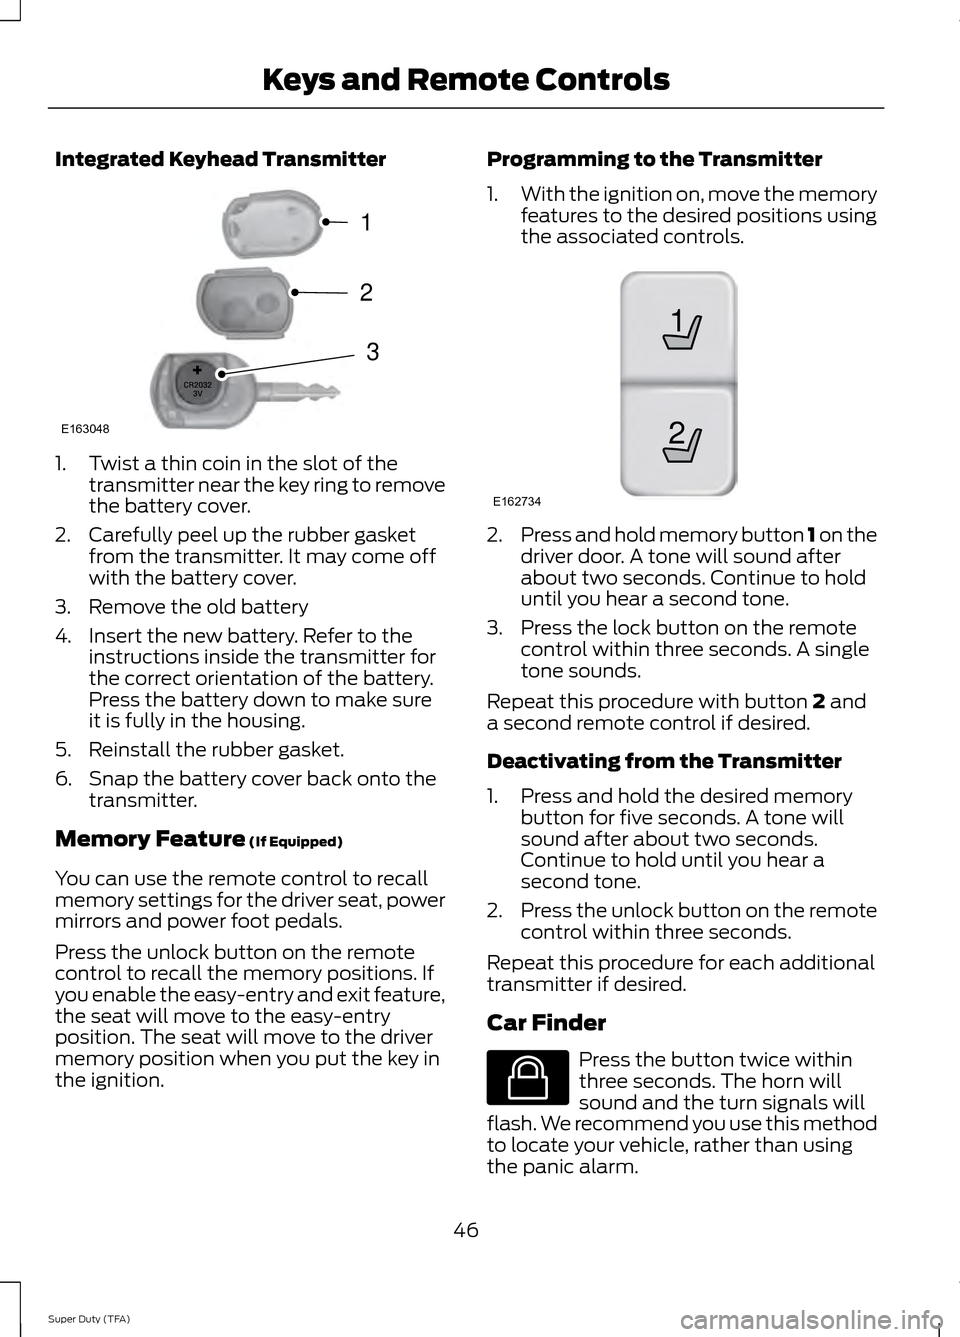
Integrated Keyhead Transmitter
1. Twist a thin coin in the slot of the
transmitter near the key ring to remove
the battery cover.
2. Carefully peel up the rubber gasket from the transmitter. It may come off
with the battery cover.
3. Remove the old battery
4. Insert the new battery. Refer to the instructions inside the transmitter for
the correct orientation of the battery.
Press the battery down to make sure
it is fully in the housing.
5. Reinstall the rubber gasket.
6. Snap the battery cover back onto the transmitter.
Memory Feature (If Equipped)
You can use the remote control to recall
memory settings for the driver seat, power
mirrors and power foot pedals.
Press the unlock button on the remote
control to recall the memory positions. If
you enable the easy-entry and exit feature,
the seat will move to the easy-entry
position. The seat will move to the driver
memory position when you put the key in
the ignition. Programming to the Transmitter
1.
With the ignition on, move the memory
features to the desired positions using
the associated controls. 2.
Press and hold memory button 1 on the
driver door. A tone will sound after
about two seconds. Continue to hold
until you hear a second tone.
3. Press the lock button on the remote control within three seconds. A single
tone sounds.
Repeat this procedure with button
2 and
a second remote control if desired.
Deactivating from the Transmitter
1. Press and hold the desired memory button for five seconds. A tone will
sound after about two seconds.
Continue to hold until you hear a
second tone.
2. Press the unlock button on the remote
control within three seconds.
Repeat this procedure for each additional
transmitter if desired.
Car Finder Press the button twice within
three seconds. The horn will
sound and the turn signals will
flash. We recommend you use this method
to locate your vehicle, rather than using
the panic alarm.
46
Super Duty (TFA) Keys and Remote ControlsE163048
3
2
1 21
E162734 E138623
Page 50 of 458

Sounding a Panic Alarm
Note:
The panic alarm will only operate
when the ignition is off. Press the button to activate the
alarm. Press the button again or
turn the ignition on to deactivate
it.
Remote Start (If Equipped) WARNING
To avoid exhaust fumes, do not use
remote start if your vehicle is parked
indoors or areas that are not well
ventilated. Note:
Do not use remote start if your vehicle
is low on fuel. The remote start button is on the
transmitter.
This feature allows you to start your
vehicle from outside the vehicle. The
transmitter has an extended operating
range.
Vehicles with automatic climate control
can be set to operate when you remote
start the vehicle. See
Climate Control
(page 102). A manual climate control
system will run at the setting it was set to
when you switch the vehicle off.
Many states and provinces have
restrictions for the use of remote start.
Check your local and state or provincial
laws for specific requirements regarding
remote start systems.
The remote start system will not work if:
• the ignition is on
• the alarm system is triggered
• you disable the feature
• the hood is open
• the transmission is not in
P •
the vehicle battery voltage is too low
• the service engine soon indicator is on.
Remote Starting the Vehicle
Note: You must press each button within
three seconds of each other. Your vehicle
will not remote start and the horn will not
sound if you do not follow this sequence. The label on your transmitter details the
starting procedure.
To remote start your vehicle:
1. Press the lock button to lock all the
doors.
2. Press the remote start button twice. The exterior lamps will flash twice.
The horn will sound if the system fails to
start.
Note: If you remote start your vehicle with
an integrated keyhead transmitter, you must
switch the ignition on before driving your
vehicle. If you remote start your vehicle with
an intelligent access transmitter, you must
press the
START/STOP button on the
instrument panel once while applying the
brake pedal before driving your vehicle.
The power windows will not work during
the remote start and the radio will not turn
on automatically.
The parking lamps will remain on and the
vehicle will run for 5, 10, or 15 minutes,
depending on the setting.
47
Super Duty (TFA) Keys and Remote ControlsE138624 E138625 E138626
Page 56 of 458

LOCKING AND UNLOCKING
You can use the power door lock control
or the remote control to lock and unlock
your vehicle.
Power Door Locks (If Equipped)
The power door lock control is on the driver
and front passenger door panels. Unlock
A
Lock
B
Remote Control
(If Equipped)
You can use the remote control at any time
your vehicle is not running.
Unlocking the Doors (Two-Stage
Unlock) Press the button to unlock the
driver door.
Press the button again within
three seconds to unlock all doors. The turn
signals will flash.
Press and hold both the lock and unlock
buttons on the remote control for four
seconds to disable or enable two-stage
unlocking. Disabling two-stage unlocking
allows all vehicle doors to unlock with one
press of the button. The turn signals will
flash twice to indicate a change to the
unlocking mode. The unlocking mode
applies to the remote control and keyless
entry keypad. Locking the Doors Press the button to lock all the
doors. The turn signals will
illuminate.
Press the button again within three
seconds to confirm that all the doors are
closed. The doors will lock again, the horn
will sound and the turn signals will
illuminate if all the doors are closed.
Mislock
If any door is open or if the hood is open on
vehicles with an anti-theft alarm or remote
start, the horn will sound twice and the
lamps will not flash.
Smart Unlocks
(If Equipped)
This feature helps to prevent you from
locking yourself out of your vehicle if your
key is still in the ignition.
When you open the driver door and lock
your vehicle with the power door lock
control, all the doors will lock then unlock
if your key is still in the ignition.
Your can still lock your vehicle with the key
in the ignition by:
• using the manual lock on the door
• locking the driver door with a key
• using the keyless entry keypad
• using the lock button on the remote
control
Autolock and Autounlock
(If Equipped)
The autolock feature will lock all the doors
when:
• all doors are closed, and
• the ignition is on, and
• you shift into any gear putting your
vehicle in motion, and
• your vehicle attains a speed greater
than 12 mph (20 km/h).
53
Super Duty (TFA) LocksABE163049 E138629 E138623
Page 61 of 458

1.
Insert the first previously programmed
coded key into the ignition.
2. Switch the ignition from off to on. Keep
the ignition on for at least three
seconds, but no more than 10 seconds.
3. Switch the ignition off and remove the
first coded key from the ignition.
4. After three seconds but within 10 seconds of switching the ignition off,
insert the second previously coded key
into the ignition.
5. Switch the ignition from off to on. Keep
the ignition on for at least three
seconds, but no more than 10 seconds.
6. Switch the ignition off and remove the
second previously programmed coded
key from the ignition.
7. After three seconds but within 10 seconds of switching the ignition off
and removing the previously
programmed coded key, insert the new
unprogrammed key into the ignition.
8. Switch the ignition from off to on. Keep
the ignition on for at least six seconds
until you hear the door locks cycle.
9. Remove the newly programmed coded
key from the ignition.
The key will start the engine if
programming is successful. You can
operate the remote entry system if the new
key is an integrated keyhead transmitter.
If programming was not successful, wait
20 seconds and repeat Steps 1 through 8.
If you are still unsuccessful, take your
vehicle to an authorized dealer.
ANTI-THEFT ALARM (IF EQUIPPED)
The system warns you of an unauthorized
entry to your vehicle. It triggers if any door
or the hood opens without using the key,
remote control or keyless entry keypad. The direction indicators flash and the horn
sounds if the system triggers while the
alarm is armed.
Take all remote controls to an authorized
dealer if there is any potential alarm
problem with your vehicle.
Arming the Alarm
The alarm is ready to arm when there is
not a key in the ignition. Electronically lock
the vehicle to arm the alarm.
The direction indicators flash once after
you lock the vehicle. This indicates the
alarm is in the pre-armed mode. It will fully
arm in 20 seconds.
Disarming the Alarm
Disarm the alarm by any of the following
actions:
•
Press the power door unlock button
within the 20-second pre-armed mode.
• Unlock the doors with the remote
control or keyless entry keypad.
• Switch the ignition on or start the
vehicle.
• Use a key in the driver door to unlock
the vehicle, then switch the ignition on
within 12 seconds.
Note: Pressing the panic button on the
remote control will stop the horn and signal
indicators, but will not disarm the system.
58
Super Duty (TFA) Security
Page 209 of 458

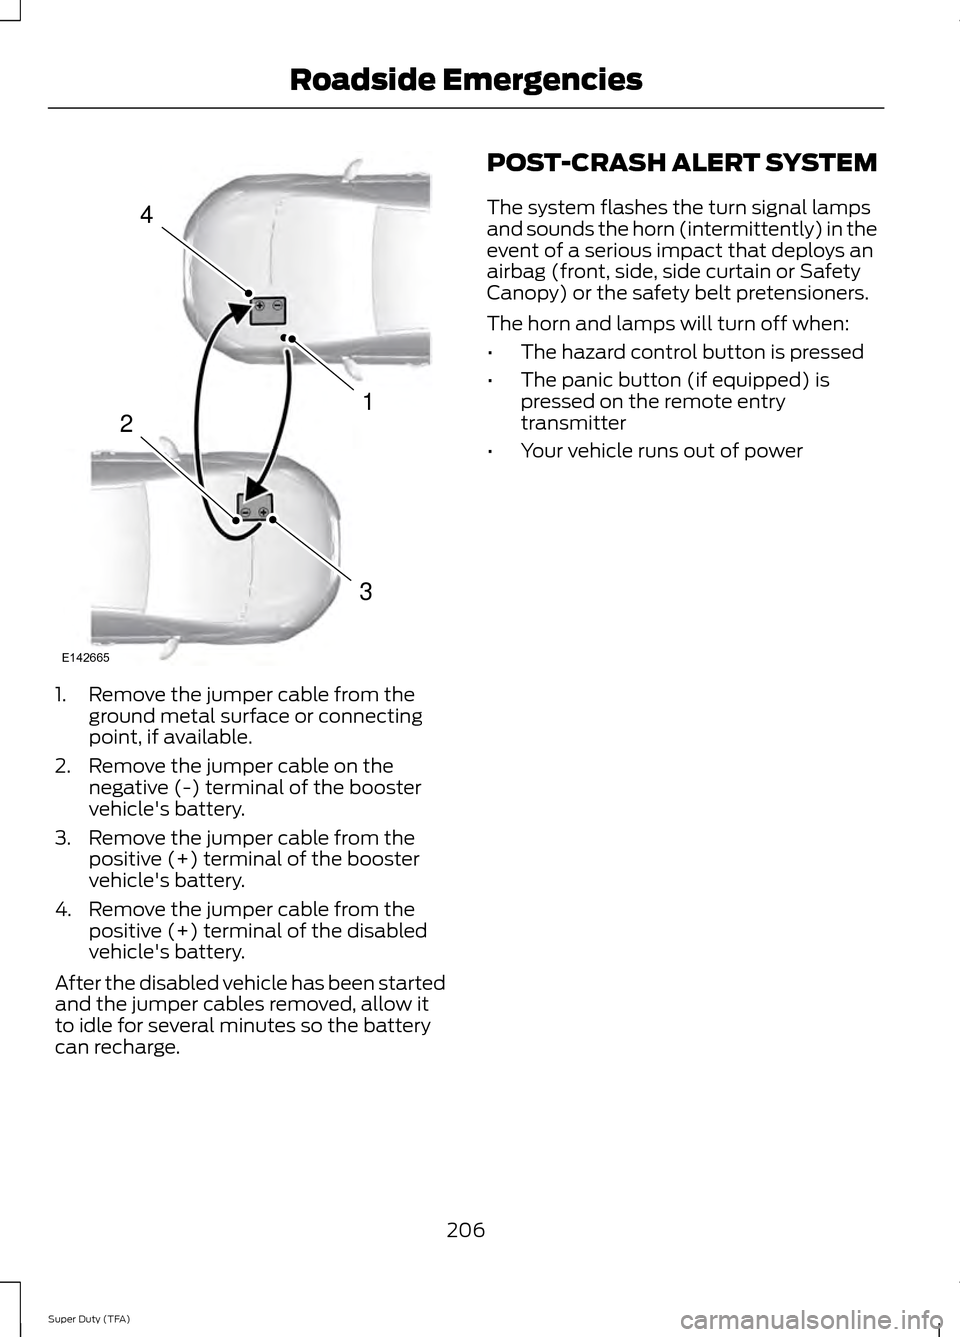
1. Remove the jumper cable from the
ground metal surface or connecting
point, if available.
2. Remove the jumper cable on the negative (-) terminal of the booster
vehicle's battery.
3. Remove the jumper cable from the positive (+) terminal of the booster
vehicle's battery.
4. Remove the jumper cable from the positive (+) terminal of the disabled
vehicle's battery.
After the disabled vehicle has been started
and the jumper cables removed, allow it
to idle for several minutes so the battery
can recharge. POST-CRASH ALERT SYSTEM
The system flashes the turn signal lamps
and sounds the horn (intermittently) in the
event of a serious impact that deploys an
airbag (front, side, side curtain or Safety
Canopy) or the safety belt pretensioners.
The horn and lamps will turn off when:
•
The hazard control button is pressed
• The panic button (if equipped) is
pressed on the remote entry
transmitter
• Your vehicle runs out of power
206
Super Duty (TFA) Roadside Emergencies4
1
3
2
E142665
Page 223 of 458

Protected components
Fuse amp rating
Fuse or relay number
Auxiliary switch relay #3
10A
9
Run/accessory relay, Customer access
feed
10A
10
Instrument cluster
10A
11
Interior lighting, Lighted running board
lamps
15A
12
Right turn signals and brake lamps, Right
trailer tow stop turn relay
15A
13
Left turn signals and brake lamps, Left
trailer tow stop turn relay
15A
14
High-mounted stop lamps, Backup lamps,
Trailer tow backup relay, Reverse signal
interior mirror
15A
15
Right low beam headlamp
10A
16
Left low beam headlamp
10A
17
Keypad illumination, Passive anti-theft
transceiver, Powertrain control module,
Brake shift interlock
10A
18
Subwoofer, Amplifier
20A
19
Power door locks
20A
20
Brake on/off switch
10A
21
Horn
20A
22
Not used (spare)
15A
23
Steering wheel control module, Diagnostic
connector, Power fold mirror relay, Remote
keyless entry, Electronic finish panel
15A
24
Not used (spare)
15A
25
Steering wheel control module
5A
26
Not used (spare)
20A
27
Ignition switch
15A
28
SYNC, GPS module, Radio faceplate
20A
29
220
Super Duty (TFA) Fuses
Page 281 of 458

•
To reduce the chances of interference
from another vehicle, perform the
system reset procedure at least three
feet (one meter) away from another
Ford Motor Company vehicle
undergoing the system reset procedure
at the same time.
• Do not wait more than two minutes
between resetting each tire sensor or
the system will time-out and the entire
procedure will have to be repeated on
all four wheels.
• A double horn will sound indicating the
need to repeat the procedure.
Performing the System Reset Procedure
Read the entire procedure before
attempting.
1. Drive the vehicle above 20 mph (32 km/h) for at least two minutes, then
park in a safe location where you can
easily get to all four tires and have
access to an air pump.
2. Place the ignition in the off position and
keep the key in the ignition.
3. Cycle the ignition to the on position with the engine off.
4. Turn the hazard flashers on then off three times. You must accomplish this
within 10 seconds. If the reset mode
has been entered successfully, the horn
will sound once, the system indicator
will flash and a message is shown in
the information display. If this does not
occur, please try again starting at Step
2. If after repeated attempts to enter
the reset mode, the horn does not
sound, the system indicator does not
flash and no message is shown in the
information display, seek service from
your authorized dealer. 5. Train the tire pressure monitoring
system sensors in the tires using the
following system reset sequence
starting with the left front tire in the
following clockwise order: Left front
(driver's side front tire), Right front
(passenger's side front tire), Right rear
(passenger's side rear tire), Left rear
(driver's side rear tire)
6. Remove the valve cap from the valve stem on the left front tire. Decrease the
air pressure until the horn sounds.
Note: The single horn chirp confirms
that the sensor identification code has
been learned by the module for this
position. If a double horn is heard, the
reset procedure was unsuccessful, and
you must repeat it.
7. Remove the valve cap from the valve stem on the right front tire. Decrease
the air pressure until the horn sounds.
8. Remove the valve cap from the valve stem on the right rear tire. Decrease the
air pressure until the horn sounds.
9. Remove the valve cap from the valve stem on the left rear tire. Decrease the
air pressure until the horn sounds.
Training is complete after the horn
sounds for the last tire trained (driver's
side rear tire), the system indicator
stops flashing, and a message is shown
in the information display.
10. Turn the ignition off. If two short horn
beeps are heard, the reset procedure
was unsuccessful and you must
repeat it. If after repeating the
procedure and two short beeps are
heard when the ignition is turned to
off, seek assistance from your
authorized dealer.
278
Super Duty (TFA) Wheels and Tires
Page 433 of 458

Check every six months
Hinges, latches and outside locks for proper operation. Lubricate if necessary. Parking brake for proper operation.
Safety belts and seat latches for wear and function.
Safety warning lamps (brake, ABS, airbag and safety belt) for operation.
Washer spray and wiper operation. Clean or replace blades as necessary.
Multi-point Inspection
In order to keep your vehicle running right,
it is important to have the systems on your
vehicle checked regularly. This can help
identify potential issues and prevent major
problems. We recommend having the
following multi-point inspection performed
at every scheduled maintenance interval
to help make sure your vehicle keeps
running great. Multi-point inspection
Horn operation
Accessory drive belt(s)
Radiator, cooler, heater and A/C hoses
Battery performance
Suspension component for leaks ordamage
Engine air filter
Steering and linkage
Exhaust system
Tires (including spare) for wear and properpressure**
Exterior lamps and hazard warning system
operation
Windshield for cracks, chips or pits
Fluid levels *
; fill if necessary
Washer spray and wiper operation
For oil and fluid leaks
* Brake, coolant recovery reservoir, automatic transmission, power steering and window
washer.
** If your vehicle is equipped with a temporary mobility kit, check the tire sealant expiration
Use By date on the canister. Replace as needed.
430
Super Duty (TFA) Scheduled Maintenance