2014 FORD SUPER DUTY light
[x] Cancel search: lightPage 203 of 458

WARNINGS
Never place floor mats or any other
covering on top of already installed
floor mats. Floor mats should always
rest on top of vehicle carpeting surface and
not another floor mat or other covering.
Additional floor mats or any other covering
will reduce the pedal clearance and
potentially interfere with pedal operation. Check attachment of floor mats on
a regular basis. Always properly
reinstall and secure floor mats that
have been removed for cleaning or
replacement. Always make sure that objects
cannot fall into the driver foot well
while the vehicle is moving. Objects
that are loose can become trapped under
the pedals causing a loss of vehicle control. Failure to properly follow floor mat
installation or attachment
instructions can potentially cause
interference with pedal operation causing
loss of control of vehicle. To install floor mats, position the
floor mat so that the eyelet is over
the retention post and press down
to lock in. To remove the floor mat, reverse the
installation procedure.
SNOWPLOWING
Ford recommends that the Super Duty
F-Series used for snow removal includes
the snow plow package option.
Installing the Snowplow
Weight limits and guidelines for selecting
and installing the snowplow can be found
in the Ford Truck Body Builders Layout
Book, snowplow section, found at
www.fleet.ford.com/truckbbas. A typical
installation affects the following: •
Certification to government safety laws
such as occupant protection and airbag
deployment, braking, and lighting. Look
for an Alterer ’s Label on the vehicle
from the snowplow installer certifying
that the installation meets all
applicable Federal Motor Vehicle
Safety Standards (FMVSS).
• The Total Accessory Reserve Capacity
(TARC) is shown on the lower right side
of the vehicle ’s Safety Compliance
Certification Label. This applies to
Ford-completed vehicles of 10,000
pounds (4,536 kilograms) GVWR or
less. This is the weight of
permanently-attached auxiliary
equipment, such as snowplow
frame-mounting hardware, that can
be added to the vehicle and satisfy
Ford compliance certification to
FMVSS. Exceeding this weight may
require the auxiliary equipment installer
additional safety certification
responsibility. The Front Accessory
Reserve Capacity (FARC) is added for
customer convenience.
• Rear ballast weight behind the rear
axle may be required to prevent
exceeding the FGAWR, and provide
front-to-rear weight balance for proper
braking and steering.
• Front wheel toe may require
re-adjustment to prevent premature
uneven tire wear. Specifications are
found in the Ford Workshop Manual.
• Headlight aim may require
re-adjustment.
200
Super Duty (TFA) Driving Hints
Page 205 of 458
•
If you are driving more than 14.91 mi
(24 km) at temperatures above
freezing, angle the plow blade either
full left or full right to provide
maximum airflow to the radiator.
• If you are driving less than
14.91 mi
(24 km) at speeds up to 44.7 mph
(72 km/h) in cold weather, you will not
need to worry about blade position to
provide maximum airflow.
Transmission operation while
plowing WARNING
Do not spin the wheels at over
34.2 mph (55 km/h)
. The tires may
fail and injure a passenger or
bystander. •
Shift transfer case to
4L (4WD Low)
when plowing in small areas at speeds
below 5 mph (8 km/h).
• Shift transfer case to
4H (4WD High)
when plowing larger areas or light snow
at higher speeds. Do not exceed 15 mph
(24 km/h).
• Do not shift the transmission from a
forward gear to
R (Reverse) until the
engine is at idle and the wheels are
stopped.
• Do not shift the transmission from a
forward gear to
R (Reverse) until the
engine is at idle and the wheels are
stopped.
202
Super Duty (TFA) Driving Hints
Page 222 of 458
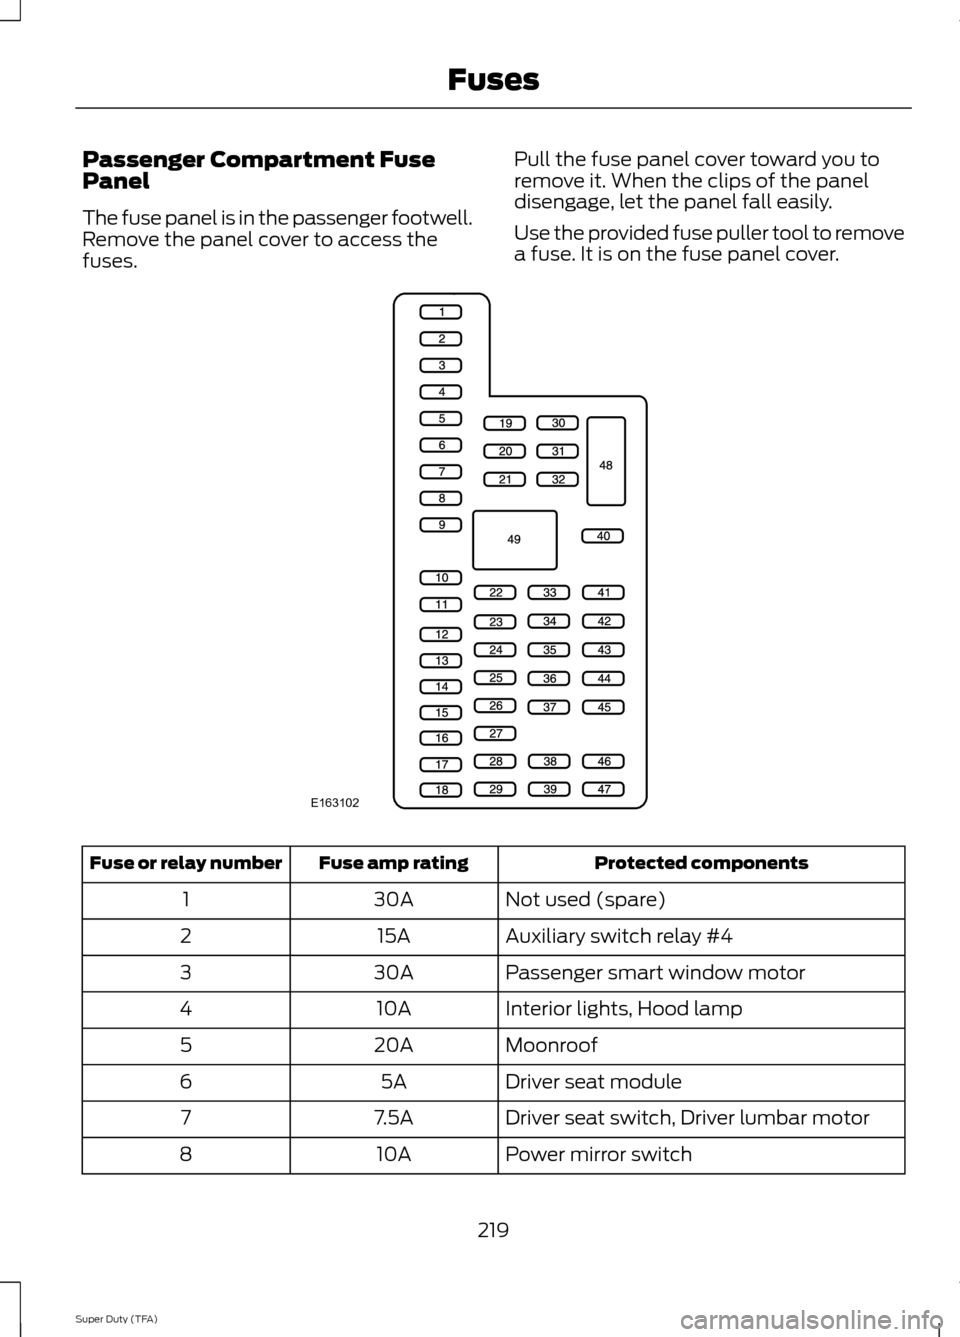
Passenger Compartment Fuse
Panel
The fuse panel is in the passenger footwell.
Remove the panel cover to access the
fuses.
Pull the fuse panel cover toward you to
remove it. When the clips of the panel
disengage, let the panel fall easily.
Use the provided fuse puller tool to remove
a fuse. It is on the fuse panel cover. Protected components
Fuse amp rating
Fuse or relay number
Not used (spare)
30A
1
Auxiliary switch relay #4
15A
2
Passenger smart window motor
30A
3
Interior lights, Hood lamp
10A
4
Moonroof
20A
5
Driver seat module
5A
6
Driver seat switch, Driver lumbar motor
7.5A
7
Power mirror switch
10A
8
219
Super Duty (TFA) FusesE163102
Page 223 of 458

Protected components
Fuse amp rating
Fuse or relay number
Auxiliary switch relay #3
10A
9
Run/accessory relay, Customer access
feed
10A
10
Instrument cluster
10A
11
Interior lighting, Lighted running board
lamps
15A
12
Right turn signals and brake lamps, Right
trailer tow stop turn relay
15A
13
Left turn signals and brake lamps, Left
trailer tow stop turn relay
15A
14
High-mounted stop lamps, Backup lamps,
Trailer tow backup relay, Reverse signal
interior mirror
15A
15
Right low beam headlamp
10A
16
Left low beam headlamp
10A
17
Keypad illumination, Passive anti-theft
transceiver, Powertrain control module,
Brake shift interlock
10A
18
Subwoofer, Amplifier
20A
19
Power door locks
20A
20
Brake on/off switch
10A
21
Horn
20A
22
Not used (spare)
15A
23
Steering wheel control module, Diagnostic
connector, Power fold mirror relay, Remote
keyless entry, Electronic finish panel
15A
24
Not used (spare)
15A
25
Steering wheel control module
5A
26
Not used (spare)
20A
27
Ignition switch
15A
28
SYNC, GPS module, Radio faceplate
20A
29
220
Super Duty (TFA) Fuses
Page 226 of 458
2. Go to the front of the vehicle and
locate the secondary release lever,
which is located under the front of the
hood, to your right of the center of the
vehicle (driver's side), toward the
headlight.
3. Release the hood latch by pushing the secondary release lever to your left,
toward the center of the vehicle.
4. Raise the hood. 5.
To close the hood, lower the hood and
allow it to drop the last 8 to 11 inches
(20 to 30 centimeters).
Note: Make sure that the hood is closed
properly.
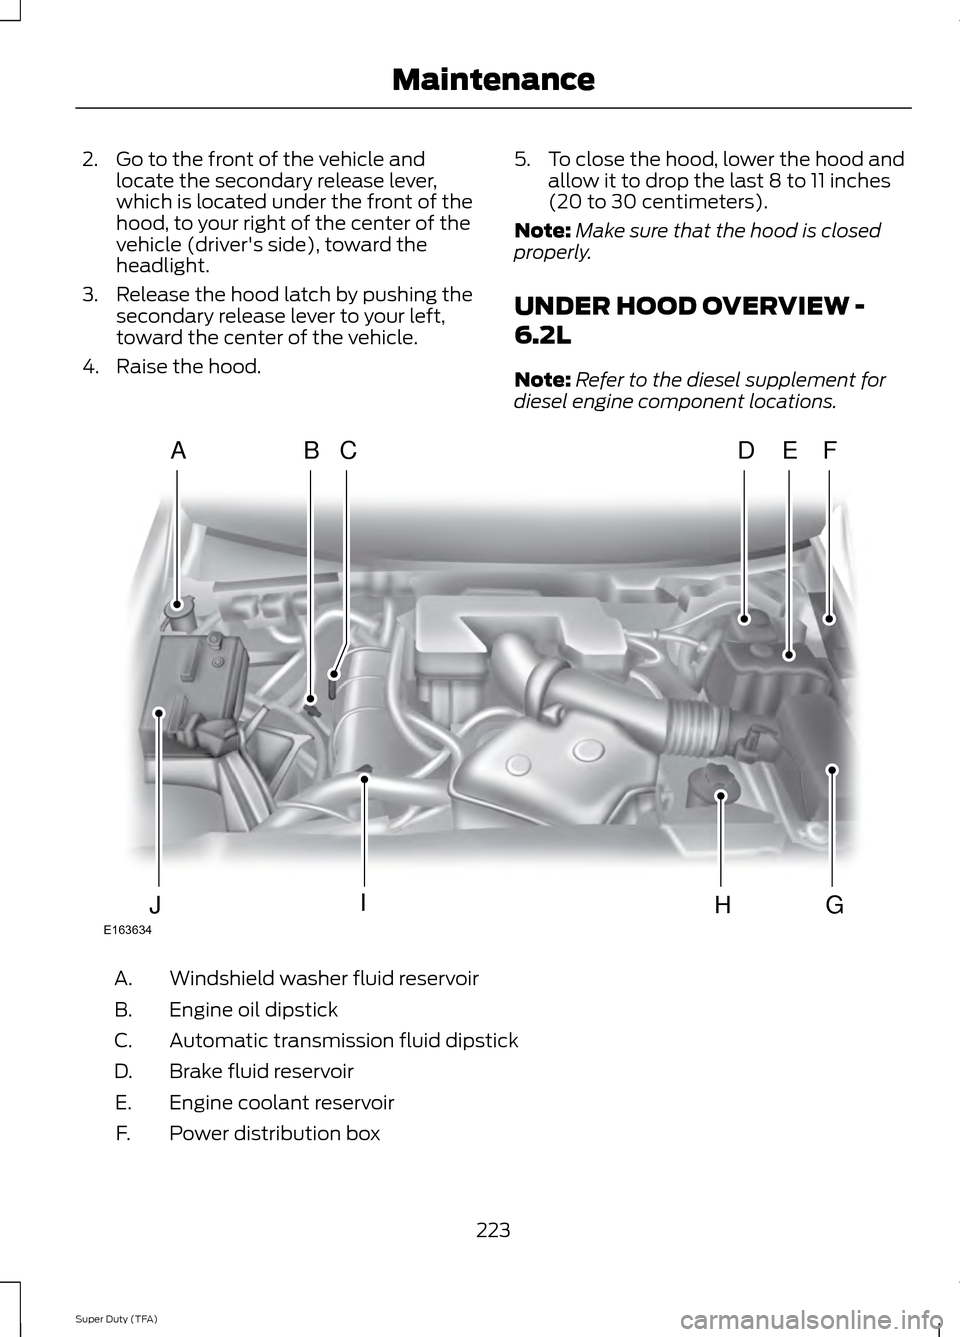
UNDER HOOD OVERVIEW -
6.2L
Note: Refer to the diesel supplement for
diesel engine component locations. Windshield washer fluid reservoir
A.
Engine oil dipstick
B.
Automatic transmission fluid dipstick
C.
Brake fluid reservoir
D.
Engine coolant reservoir
E.
Power distribution box
F.
223
Super Duty (TFA) MaintenanceE163634
ADFEBC
GHIJ
Page 230 of 458
Adding Engine Coolant
WARNINGS
Do not add engine coolant when the
engine is hot. Steam and scalding
liquids released from a hot cooling
system can burn you badly. Also, you can
be burned if you spill coolant on hot engine
parts. Do not put engine coolant in the
windshield washer fluid container. If
sprayed on the windshield, engine
coolant could make it difficult to see
through the windshield. To reduce the risk of personal injury,
make sure the engine is cool before
unscrewing the coolant pressure
relief cap. The cooling system is under
pressure; steam and hot liquid can come
out forcefully when the cap is loosened
slightly. Do not add coolant further than the
MAX mark.
Note:
Do not use stop leak pellets, cooling
system sealants, or additives as they can
cause damage to the engine cooling or
heating systems. This damage would not
be covered under your vehicle ’s warranty.
Note: During normal vehicle operation, the
engine coolant may change color from
orange to pink or light red. As long as the
engine coolant is clear and uncontaminated,
this color change does not indicate the
engine coolant has degraded nor does it
require the engine coolant to be drained, the
system to be flushed, or the engine coolant
to be replaced. •
Do not mix different colors or types of
coolant in your vehicle. Make sure the
correct coolant is used. Mixing of
engine coolants may harm your
engine ’s cooling system. The use of an
improper coolant may harm engine and
cooling system components and may
void the warranty. Use prediluted
engine coolant meeting the Ford
specification. See Capacities and
Specifications (page 292).
• In case of emergency, a large amount
of water without engine coolant may
be added in order to reach a vehicle
service location. In this instance, the
cooling system must be drained,
chemically cleaned with Motorcraft®
Premium Cooling System Flush, and
refilled with engine coolant as soon as
possible. Water alone (without engine
coolant) can cause engine damage
from corrosion, overheating or freezing.
• Do not use alcohol, methanol, brine or
any engine coolants mixed with alcohol
or methanol antifreeze (coolant).
Alcohol and other liquids can cause
engine damage from overheating or
freezing.
• Do not add extra inhibitors or additives
to the coolant. These can be harmful
and compromise the corrosion
protection of the engine coolant.
Unscrew the cap slowly. Any pressure will
escape as you unscrew the cap.
Add prediluted engine coolant meeting the
Ford specification. See
Capacities and
Specifications (page 292).
Whenever coolant has been added, the
coolant level in the coolant reservoir
should be checked the next few times you
drive the vehicle. If necessary, add enough
prediluted engine coolant to bring the
coolant level to the proper level.
227
Super Duty (TFA) Maintenance
Page 231 of 458
Recycled Engine Coolant
Ford Motor Company does not recommend
the use of recycled engine coolant since a
Ford-approved recycling process is not yet
available.
Used engine coolant should be disposed
of in an appropriate manner. Follow your
community
’s regulations and standards
for recycling and disposing of automotive
fluids.
Severe Climates
If you drive in extremely cold climates:
• It may be necessary to have a Ford
authorized dealer increase the coolant
concentration above 50%.
• A coolant concentration of 60% will
provide improved freeze point
protection. Engine coolant
concentrations above 60% will
decrease the overheat protection
characteristics of the engine coolant
and may cause engine damage.
If you drive in extremely hot climates:
• It may be necessary to have a Ford
authorized dealer decrease the coolant
concentration to 40%.
• A coolant concentration of 40% will
provide improved overheat protection.
Engine coolant concentrations below
40% will decrease the corrosion/freeze
protection characteristics of the engine
coolant and may cause engine
damage.
Vehicles driven year-round in non-extreme
climates should use prediluted engine
coolant for optimum cooling system and
engine protection. What You Should Know About Fail-
Safe Cooling
If the engine coolant supply is depleted,
this feature allows the vehicle to be driven
temporarily before incremental component
damage is incurred. The
“fail-safe”
distance depends on ambient
temperatures, vehicle load and terrain.
How Fail-Safe Cooling Works
If the engine begins to overheat, the engine
coolant temperature gauge will move to
the red (hot) area and: The coolant temperature
warning light will illuminate.
The service engine soon
indicator will illuminate.
If the engine reaches a preset
over-temperature condition, the engine
will automatically switch to alternating
cylinder operation. Each disabled cylinder
acts as an air pump and cools the engine.
When this occurs the vehicle will still
operate. However:
• The engine power will be limited.
• The air conditioning system will be
disabled.
Continued operation will increase the
engine temperature and the engine will
completely shut down, causing steering
and braking effort to increase.
Once the engine temperature cools, the
engine can be re-started. Take your vehicle
to an authorized dealer as soon as possible
to minimize engine damage.
228
Super Duty (TFA) Maintenance
Page 233 of 458
•
the engine coolant temperature gauge
moves fully into the red (hot) area
• the coolant temperature warning light
illuminates
• the service engine soon indicator
illuminates. WARNING
Never remove the coolant reservoir
cap while the engine is running or hot.
1. Pull off the road as soon as safely
possible and place the vehicle in P
(Park).
2. Leave the engine running until the coolant temperature gauge needle
moves away from the H range. After
several minutes, if this does not
happen, follow the remaining steps.
3. Turn the engine off and wait for it to cool before checking the coolant level.
4. If the coolant level is normal, you may restart your engine and continue on.
5. If the coolant is low, add coolant, restart the engine and take your vehicle
to an authorized dealer. See Adding
engine coolant in this chapter for more
information. Refer to fail-safe cooling
for additional information.
AUTOMATIC TRANSMISSION
FLUID CHECK
Have an authorized dealer check and
change the transmission fluid and filter at
the correct service interval. See
Scheduled Maintenance (page 428).
Do not use supplemental transmission
fluid additives, treatments or cleaning
agents. The use of these materials may
affect transmission operation and result
in damage to internal transmission
components. Checking Automatic Transmission
Fluid (If Equipped)
For scheduled intervals of the fluid checks
and changes, See
Scheduled
Maintenance (page 428). Your
transmission does not consume fluid.
However, the fluid level should be checked
if the transmission is not working properly,
i.e., if the transmission slips or shifts slowly
or if you notice some sign of fluid leakage.
Automatic transmission fluid expands
when warmed. To obtain an accurate fluid
check, drive the vehicle until it is at normal
operating temperature (approximately
19 mi (30 km)
). Verify that the
transmission fluid temperature gauge,
located on the instrument cluster, is within
normal range.
1. Drive the vehicle
19 mi (30 km)until it
reaches normal operating temperature.
2. Park the vehicle on a level surface and
engage the parking brake.
3. With the engine running, parking brake
engaged and your foot on the brake
pedal, move the gearshift lever through
all of the gear ranges. Allow sufficient
time for each gear to engage.
4. Latch the gearshift lever in P and leave
the engine running.
5. Remove the dipstick, wiping it clean with a clean, dry lint free rag. If
necessary, refer to the Under Hood
Overview in this chapter for the
location of the dipstick.
6. Install the dipstick making sure it is fully
seated in the filler tube.
7. Remove the dipstick and inspect the fluid level. The fluid should be in the
designated area for normal operating
temperature or ambient temperature.
Low Fluid Level
Type A
230
Super Duty (TFA) Maintenance