Page 41 of 82

FUEL SHUTOFF
In the event of a moderate to severe
collision, this vehicle is equipped with a
fuel pump shut-off feature that stops the
flow of fuel to the engine. Not every impact
will cause a shut-off.
After an accident, if the engine cranks but
does not start, this switch may have been
activated.
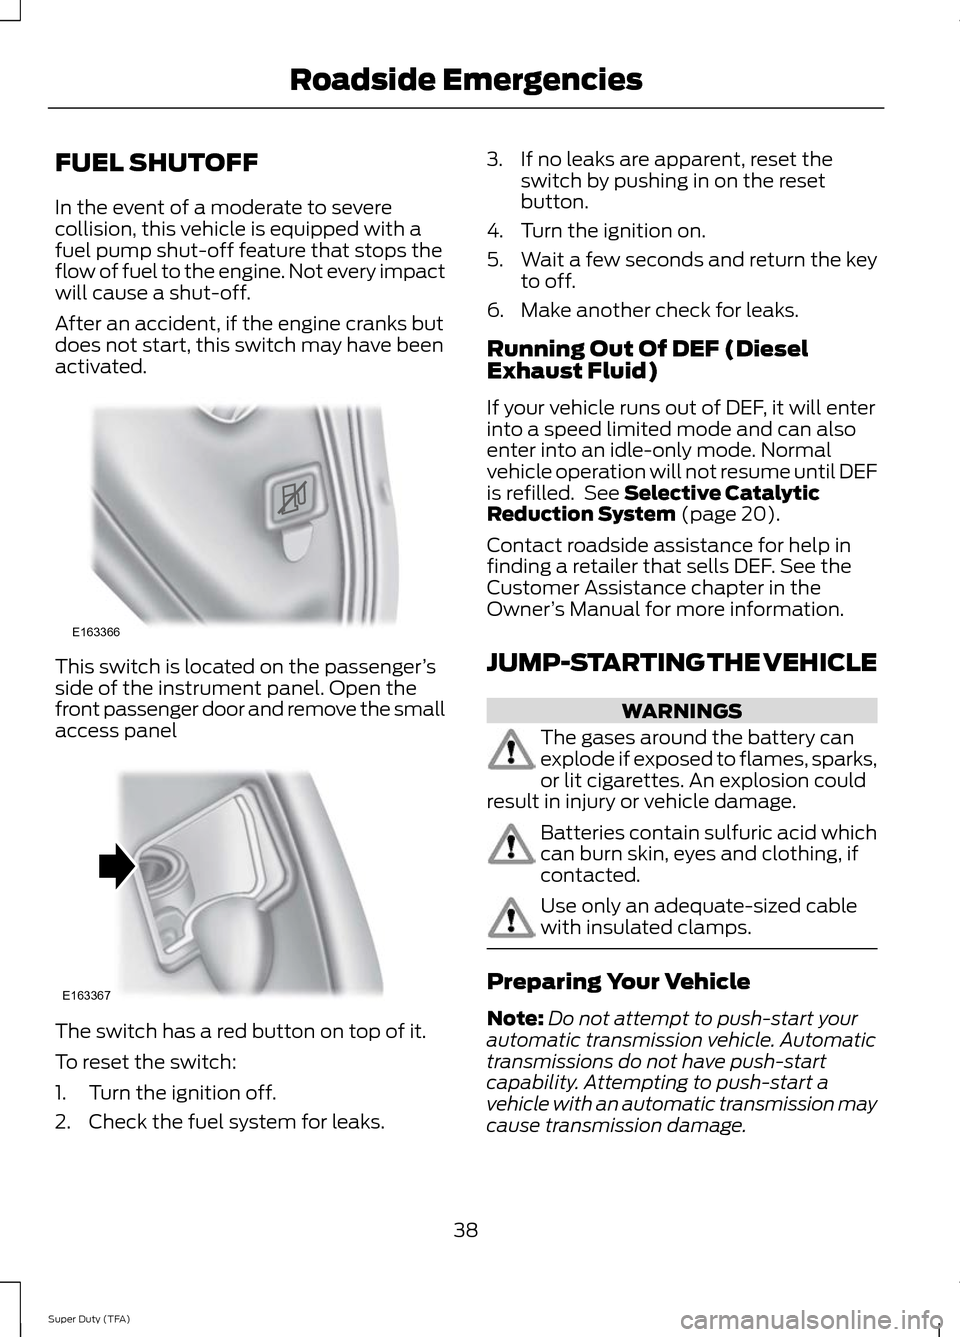
This switch is located on the passenger
’s
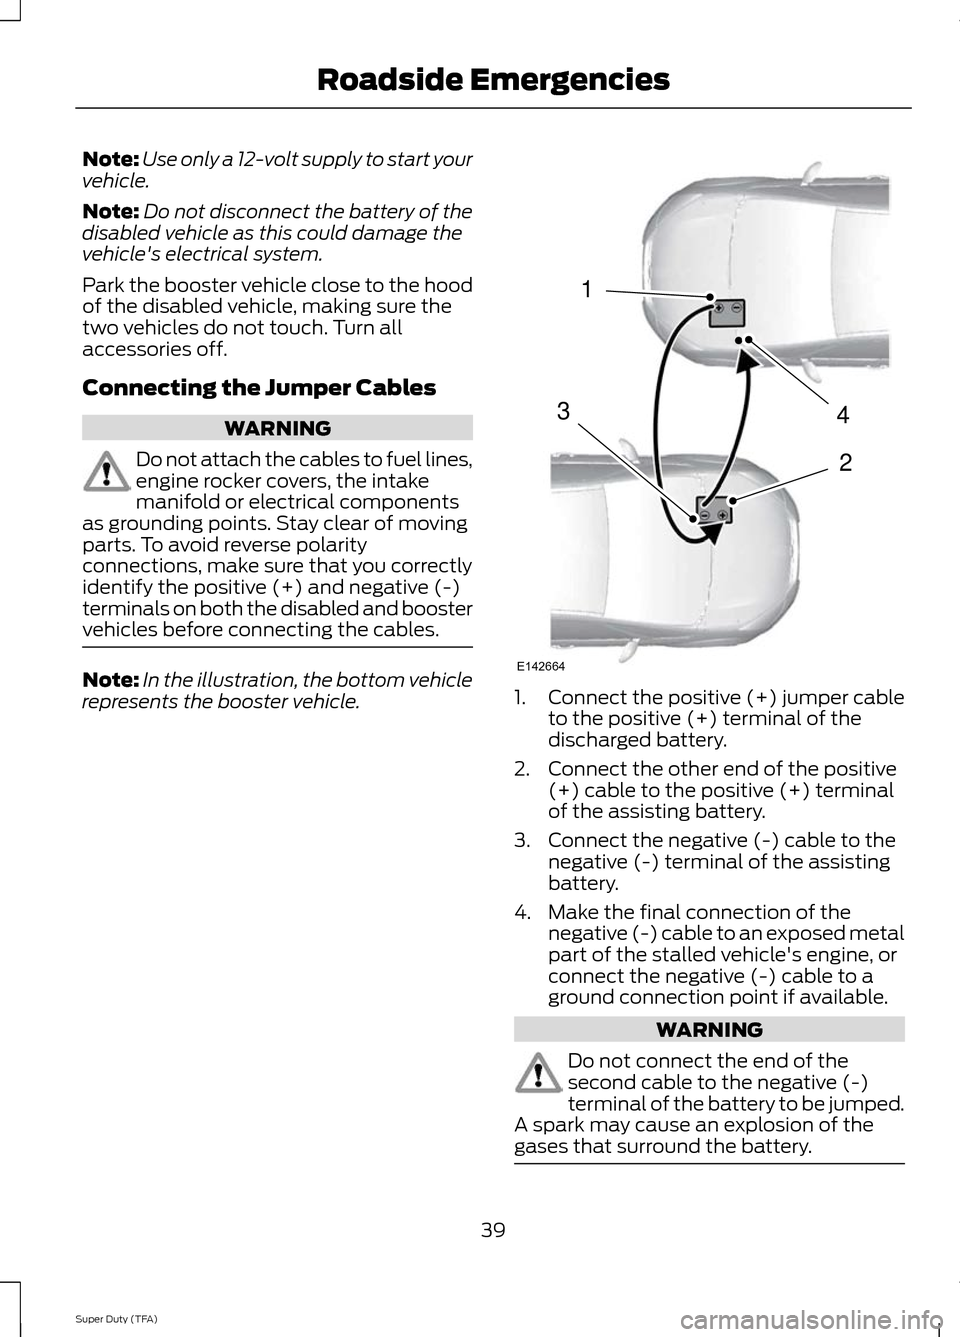
side of the instrument panel. Open the
front passenger door and remove the small
access panel The switch has a red button on top of it.
To reset the switch:
1. Turn the ignition off.
2. Check the fuel system for leaks. 3. If no leaks are apparent, reset the
switch by pushing in on the reset
button.
4. Turn the ignition on.
5. Wait a few seconds and return the key
to off.
6. Make another check for leaks.
Running Out Of DEF (Diesel
Exhaust Fluid)
If your vehicle runs out of DEF, it will enter
into a speed limited mode and can also
enter into an idle-only mode. Normal
vehicle operation will not resume until DEF
is refilled. See Selective Catalytic
Reduction System (page 20).
Contact roadside assistance for help in
finding a retailer that sells DEF. See the
Customer Assistance chapter in the
Owner ’s Manual for more information.
JUMP-STARTING THE VEHICLE WARNINGS
The gases around the battery can
explode if exposed to flames, sparks,
or lit cigarettes. An explosion could
result in injury or vehicle damage. Batteries contain sulfuric acid which
can burn skin, eyes and clothing, if
contacted.
Use only an adequate-sized cable
with insulated clamps.
Preparing Your Vehicle
Note:
Do not attempt to push-start your
automatic transmission vehicle. Automatic
transmissions do not have push-start
capability. Attempting to push-start a
vehicle with an automatic transmission may
cause transmission damage.
38
Super Duty (TFA) Roadside EmergenciesE163366 E163367
Page 42 of 82

Note:
Use only a 12-volt supply to start your
vehicle.
Note: Do not disconnect the battery of the
disabled vehicle as this could damage the
vehicle's electrical system.
Park the booster vehicle close to the hood
of the disabled vehicle, making sure the
two vehicles do not touch. Turn all
accessories off.
Connecting the Jumper Cables WARNING
Do not attach the cables to fuel lines,
engine rocker covers, the intake
manifold or electrical components
as grounding points. Stay clear of moving
parts. To avoid reverse polarity
connections, make sure that you correctly
identify the positive (+) and negative (-)
terminals on both the disabled and booster
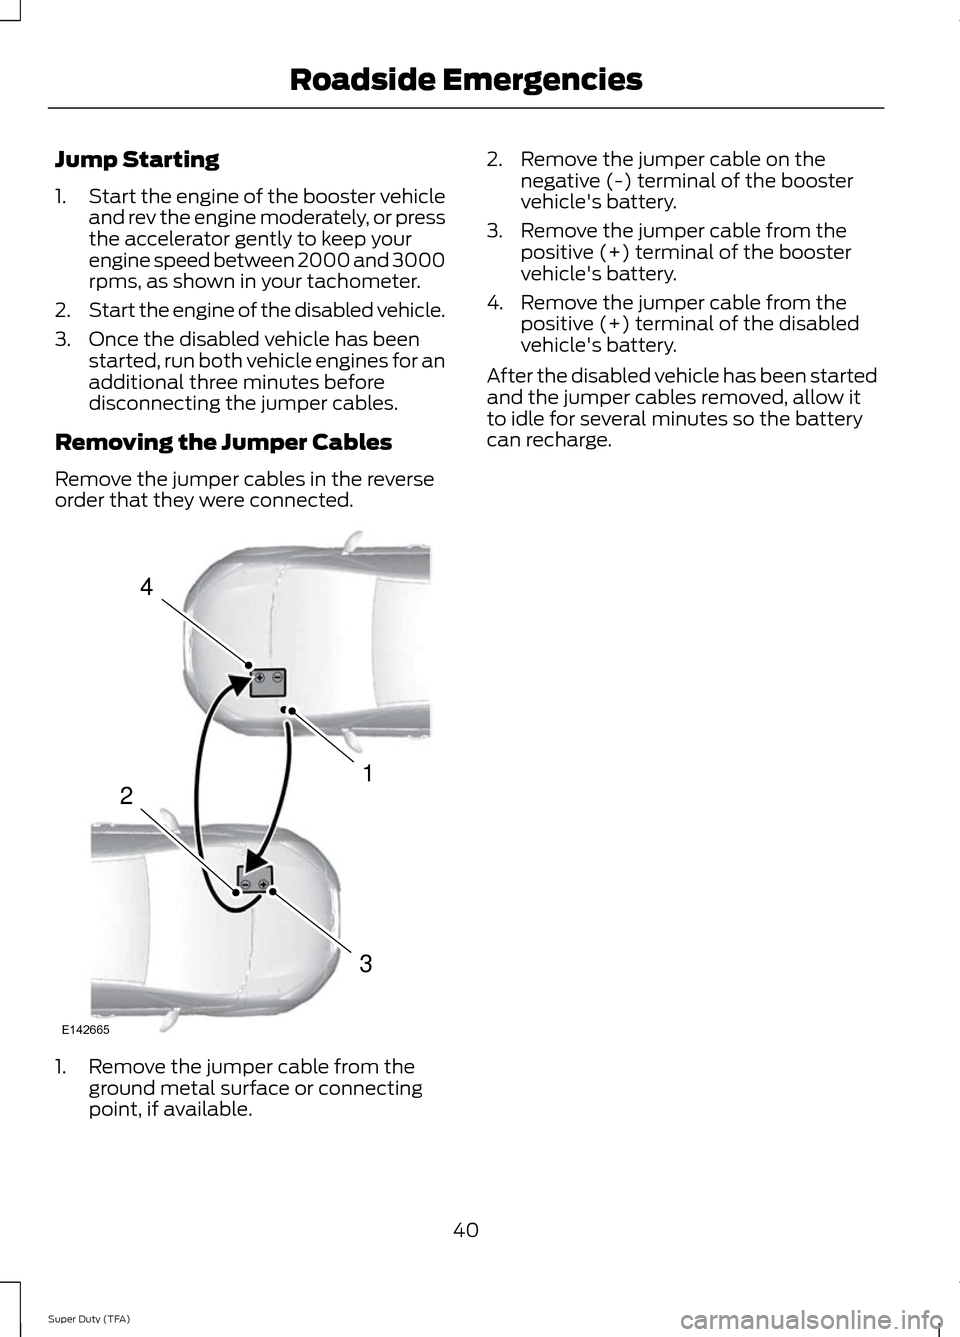
vehicles before connecting the cables. Note:
In the illustration, the bottom vehicle
represents the booster vehicle. 1.
Connect the positive (+) jumper cable
to the positive (+) terminal of the
discharged battery.
2. Connect the other end of the positive (+) cable to the positive (+) terminal
of the assisting battery.
3. Connect the negative (-) cable to the negative (-) terminal of the assisting
battery.
4. Make the final connection of the negative (-) cable to an exposed metal
part of the stalled vehicle's engine, or
connect the negative (-) cable to a
ground connection point if available. WARNING
Do not connect the end of the
second cable to the negative (-)
terminal of the battery to be jumped.
A spark may cause an explosion of the
gases that surround the battery. 39
Super Duty (TFA) Roadside Emergencies4
2
1
3
E142664
Page 43 of 82

Jump Starting
1.
Start the engine of the booster vehicle
and rev the engine moderately, or press
the accelerator gently to keep your
engine speed between 2000 and 3000
rpms, as shown in your tachometer.
2. Start the engine of the disabled vehicle.
3. Once the disabled vehicle has been started, run both vehicle engines for an
additional three minutes before
disconnecting the jumper cables.
Removing the Jumper Cables
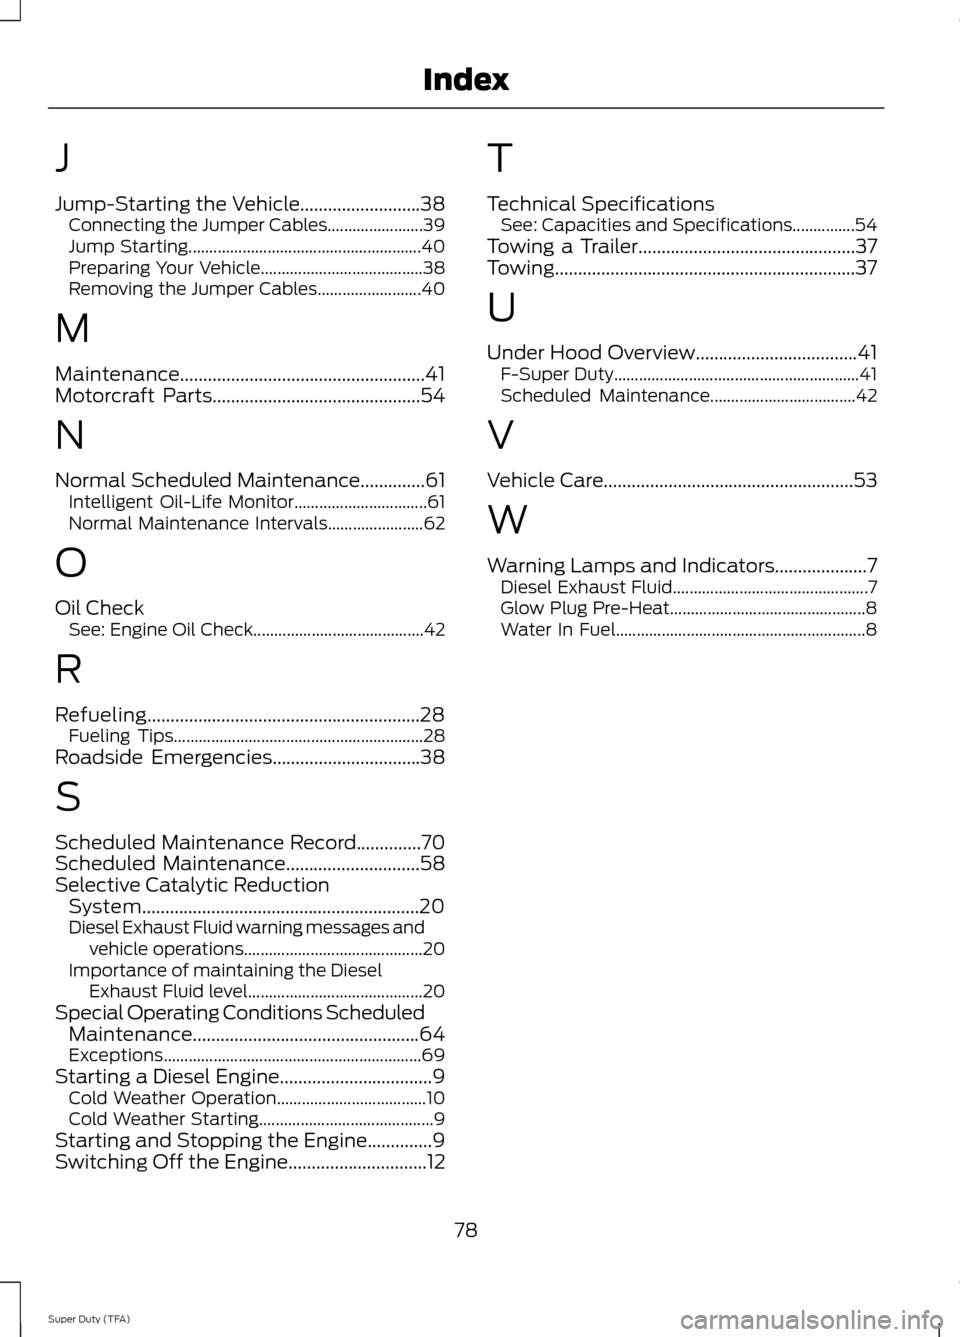
Remove the jumper cables in the reverse
order that they were connected. 1. Remove the jumper cable from the
ground metal surface or connecting
point, if available. 2. Remove the jumper cable on the
negative (-) terminal of the booster
vehicle's battery.
3. Remove the jumper cable from the positive (+) terminal of the booster
vehicle's battery.
4. Remove the jumper cable from the positive (+) terminal of the disabled
vehicle's battery.
After the disabled vehicle has been started
and the jumper cables removed, allow it
to idle for several minutes so the battery
can recharge.
40
Super Duty (TFA) Roadside Emergencies4
1
3
2
E142665
Page 81 of 82

J
Jump-Starting the Vehicle..........................38
Connecting the Jumper Cables....................... 39
Jump Starting........................................................ 40
Preparing Your Vehicle....................................... 38
Removing the Jumper Cables......................... 40
M
Maintenance.....................................................41
Motorcraft Parts.............................................54
N
Normal Scheduled Maintenance..............61 Intelligent Oil-Life Monitor................................ 61
Normal Maintenance Intervals....................... 62
O
Oil Check See: Engine Oil Check......................................... 42
R
Refueling...........................................................28 Fueling Tips............................................................ 28
Roadside Emergencies................................38
S
Scheduled Maintenance Record..............70
Scheduled Maintenance
.............................58
Selective Catalytic Reduction System............................................................20
Diesel Exhaust Fluid warning messages and vehicle operations........................................... 20
Importance of maintaining the Diesel Exhaust Fluid level.......................................... 20
Special Operating Conditions Scheduled Maintenance.................................................64
Exceptions.............................................................. 69
Starting a Diesel Engine.................................9 Cold Weather Operation.................................... 10
Cold Weather Starting.......................................... 9
Starting and Stopping the Engine..............9
Switching Off the Engine..............................12 T
Technical Specifications
See: Capacities and Specifications...............54
Towing a Trailer...............................................37
Towing.................................................................37
U
Under Hood Overview
...................................41
F-Super Duty........................................................... 41
Scheduled Maintenance................................... 42
V
Vehicle Care
......................................................53
W
Warning Lamps and Indicators
....................7
Diesel Exhaust Fluid............................................... 7
Glow Plug Pre-Heat............................................... 8
Water In Fuel............................................................ 8
78
Super Duty (TFA) Index