2014 FORD SUPER DUTY battery
[x] Cancel search: batteryPage 8 of 82
The powertrain and glow plug control
modules electronically control the glow
plug system. After you switch the ignition
on the glow plug control module
immediately energizes the glow plugs. The
glow plug control module using the engine
coolant temperature, barometric pressure
sensor and environmental temperature
sensor will determine how long the glow
plugs stay energized. The required time for
the glow plugs to be energized decreases
as the coolant temperature, barometric
pressure and environmental temperature
increase.
Glow Plug
Engine and secondary cooling system
The cooling system contains a primary
cooling loop to cool the engine and
exhaust gases and a secondary cooling
loop to cool the transmission, exhaust
gases, charge air, and fuel. The coolant
serves three primary purposes: to provide
heat transfer, freeze point protection, and
corrosion protection using additives.
Vehicles with diesel engines typically are
used to carry heavy loads and accumulate
mileage rapidly. These two factors may
cause the additives in the coolant to wear
out in a shorter time. For more information
about coolant additives and coolant
change intervals See General
Maintenance Information (page 58). .
Operating the engine with insufficient
coolant or coolant additive can cause
severe engine damage
Selective catalytic reduction system
Your vehicle is equipped with a selective
catalytic reduction system designed to
reduce emission levels of nitrogen oxides
from the exhaust of your diesel engine. This
system relies on the use of diesel exhaust
fluid that you must replenish at certain intervals. Failure to maintain proper diesel
exhaust fluid levels or if the diesel exhaust
fluid becomes contaminated will result in
vehicle speed limitations or result in your
vehicle entering an idle-only mode. See
Selective Catalytic Reduction System
(page
20).
Speed control
If your vehicle speed goes outside a
predetermined range from the set speed,
the RSM (Resume) function will not reset
your vehicle speed. You will need to reset
your vehicle speed with the SET+ or SET-
button after reaching the desired speed
using the accelerator pedal.
Minor Troubleshooting Guide
If the engine won ’t crank WARNING
Battery posts, terminals and related
accessories contain lead and lead
compounds. Wash hands after
handling. Turn on the headlights. If the lights are dim,
do not go on at all or when the ignition is
turned to START the lights become dim or
go out, the battery connections may be
loose or corroded, or the battery may be
discharged. If there is a clicking or
stuttering sound coming from the engine
compartment when you turn the key to
START, this may also indicate a loose or
corroded battery connection.
Check the battery connections at the
battery posts, cable connection to the
engine grounding point and at the starter
connection.
If you suspect a discharged battery, have
it checked and corrected.
5
Super Duty (TFA) Introduction
Page 41 of 82
FUEL SHUTOFF
In the event of a moderate to severe
collision, this vehicle is equipped with a
fuel pump shut-off feature that stops the
flow of fuel to the engine. Not every impact
will cause a shut-off.
After an accident, if the engine cranks but
does not start, this switch may have been
activated.
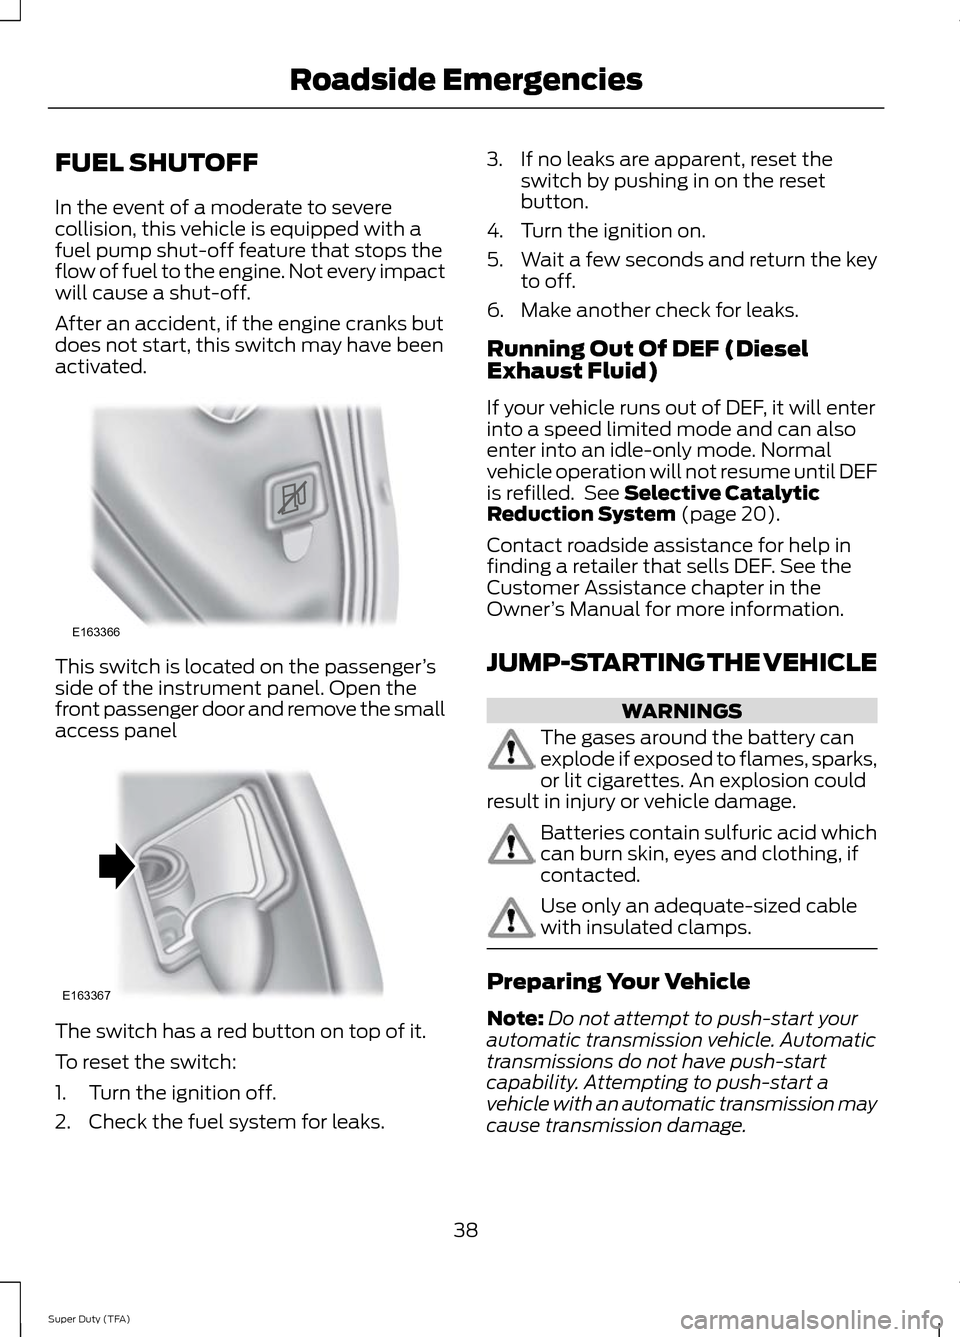
This switch is located on the passenger
’s
side of the instrument panel. Open the
front passenger door and remove the small
access panel The switch has a red button on top of it.
To reset the switch:
1. Turn the ignition off.
2. Check the fuel system for leaks. 3. If no leaks are apparent, reset the
switch by pushing in on the reset
button.
4. Turn the ignition on.
5. Wait a few seconds and return the key
to off.
6. Make another check for leaks.
Running Out Of DEF (Diesel
Exhaust Fluid)
If your vehicle runs out of DEF, it will enter
into a speed limited mode and can also
enter into an idle-only mode. Normal
vehicle operation will not resume until DEF
is refilled. See Selective Catalytic
Reduction System (page 20).
Contact roadside assistance for help in
finding a retailer that sells DEF. See the
Customer Assistance chapter in the
Owner ’s Manual for more information.
JUMP-STARTING THE VEHICLE WARNINGS
The gases around the battery can
explode if exposed to flames, sparks,
or lit cigarettes. An explosion could
result in injury or vehicle damage. Batteries contain sulfuric acid which
can burn skin, eyes and clothing, if
contacted.
Use only an adequate-sized cable
with insulated clamps.
Preparing Your Vehicle
Note:
Do not attempt to push-start your
automatic transmission vehicle. Automatic
transmissions do not have push-start
capability. Attempting to push-start a
vehicle with an automatic transmission may
cause transmission damage.
38
Super Duty (TFA) Roadside EmergenciesE163366 E163367
Page 42 of 82
Note:
Use only a 12-volt supply to start your
vehicle.
Note: Do not disconnect the battery of the
disabled vehicle as this could damage the
vehicle's electrical system.
Park the booster vehicle close to the hood
of the disabled vehicle, making sure the
two vehicles do not touch. Turn all
accessories off.
Connecting the Jumper Cables WARNING
Do not attach the cables to fuel lines,
engine rocker covers, the intake
manifold or electrical components
as grounding points. Stay clear of moving
parts. To avoid reverse polarity
connections, make sure that you correctly
identify the positive (+) and negative (-)
terminals on both the disabled and booster
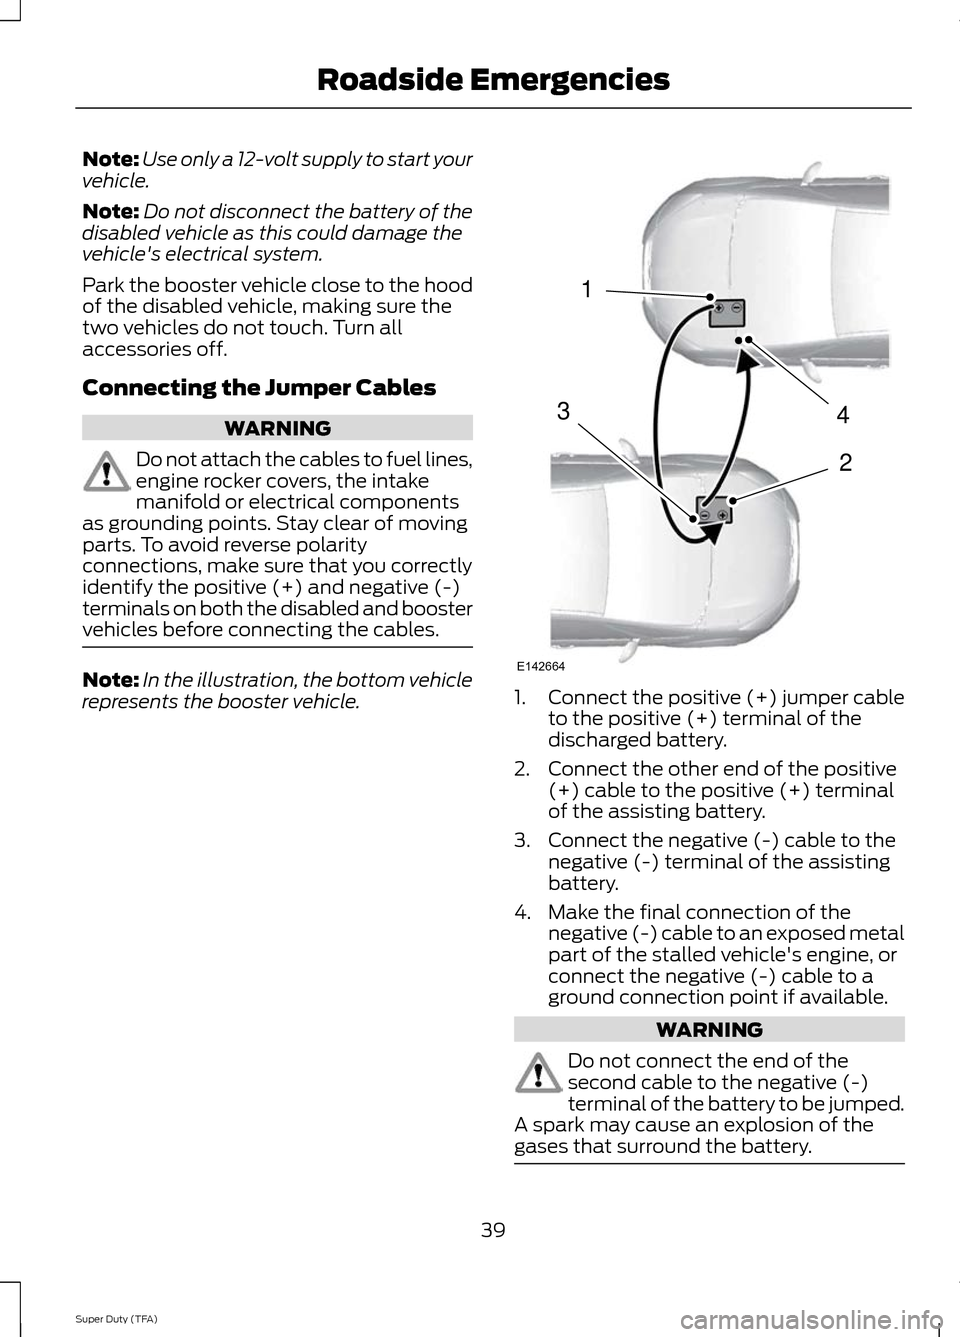
vehicles before connecting the cables. Note:
In the illustration, the bottom vehicle
represents the booster vehicle. 1.
Connect the positive (+) jumper cable
to the positive (+) terminal of the
discharged battery.
2. Connect the other end of the positive (+) cable to the positive (+) terminal
of the assisting battery.
3. Connect the negative (-) cable to the negative (-) terminal of the assisting
battery.
4. Make the final connection of the negative (-) cable to an exposed metal
part of the stalled vehicle's engine, or
connect the negative (-) cable to a
ground connection point if available. WARNING
Do not connect the end of the
second cable to the negative (-)
terminal of the battery to be jumped.
A spark may cause an explosion of the
gases that surround the battery. 39
Super Duty (TFA) Roadside Emergencies4
2
1
3
E142664
Page 43 of 82
Jump Starting
1.
Start the engine of the booster vehicle
and rev the engine moderately, or press
the accelerator gently to keep your
engine speed between 2000 and 3000
rpms, as shown in your tachometer.
2. Start the engine of the disabled vehicle.
3. Once the disabled vehicle has been started, run both vehicle engines for an
additional three minutes before
disconnecting the jumper cables.
Removing the Jumper Cables
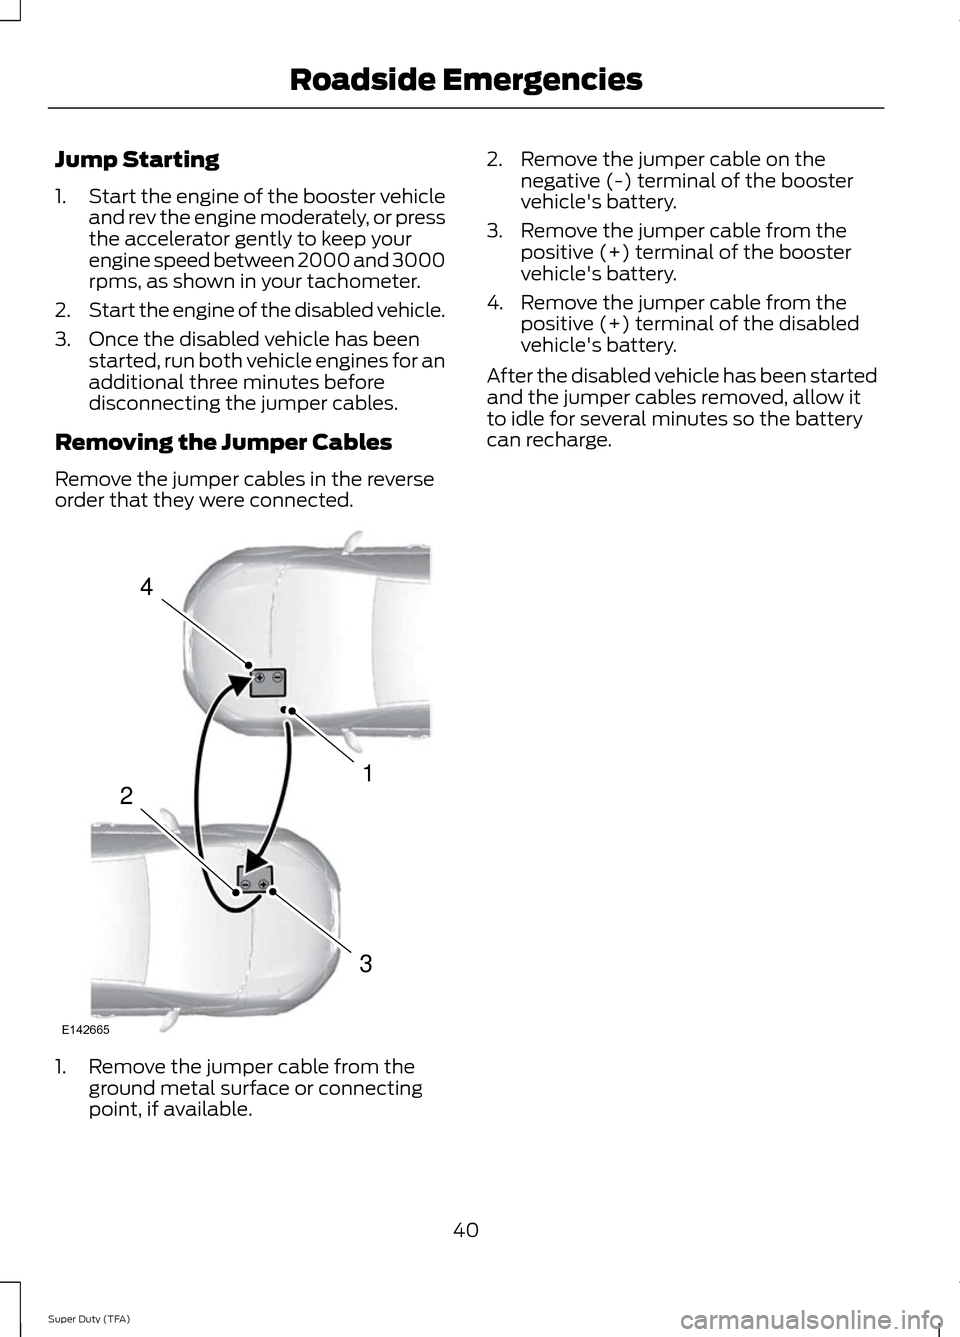
Remove the jumper cables in the reverse
order that they were connected. 1. Remove the jumper cable from the
ground metal surface or connecting
point, if available. 2. Remove the jumper cable on the
negative (-) terminal of the booster
vehicle's battery.
3. Remove the jumper cable from the positive (+) terminal of the booster
vehicle's battery.
4. Remove the jumper cable from the positive (+) terminal of the disabled
vehicle's battery.
After the disabled vehicle has been started
and the jumper cables removed, allow it
to idle for several minutes so the battery
can recharge.
40
Super Duty (TFA) Roadside Emergencies4
1
3
2
E142665
Page 56 of 82
CLEANING THE ENGINE
Engines are more efficient when they are
clean because grease and dirt buildup keep
the engine warmer than normal.
When washing:
•
Take care when using a power washer
to clean the engine. The high-pressure
fluid could penetrate the sealed parts
and cause damage.
• Do not spray a hot engine with cold
water to avoid cracking the engine
block or other engine components.
• Spray Motorcraft Engine Shampoo and
Degreaser on all parts that require
cleaning and pressure rinse clean. In
Canada, use Motorcraft Engine
Shampoo.
• Never wash or rinse the engine while it
is hot or running; water in the running
engine may cause internal damage.
• Never wash or rinse any ignition coil,
spark plug wire or spark plug well, or
the area in and around these locations.
• Cover the battery, power distribution
box, and air filter assembly to prevent
water damage when cleaning the
engine.
CLEANING THE EXHAUST WARNINGS
Failure to maintain the functional
holes, in the tailpipe section of the
exhaust, clean and free of debris or
foreign material may result in the holes
becoming blocked or plugged. Do not
modify or remove the tail-pipe section.
Blocked or plugged holes or
removal/modification of the system could
result in elevated exhaust gas
temperatures which may result in
vehicle/property damage or personal
injury. WARNINGS
The normal operating temperature
of the exhaust system is very high.
Never work around or attempt to
repair any part of the exhaust system until
it has cooled. Use special care when
working around the diesel oxidation
catalytic converter and/or the diesel
particulate filter (DPF). The diesel
oxidation catalytic converter and/or the
DPF heats up to a high temperature after
only a short period of engine operation and
can stay hot even after the engine is turned
off. Failure to follow these instructions may
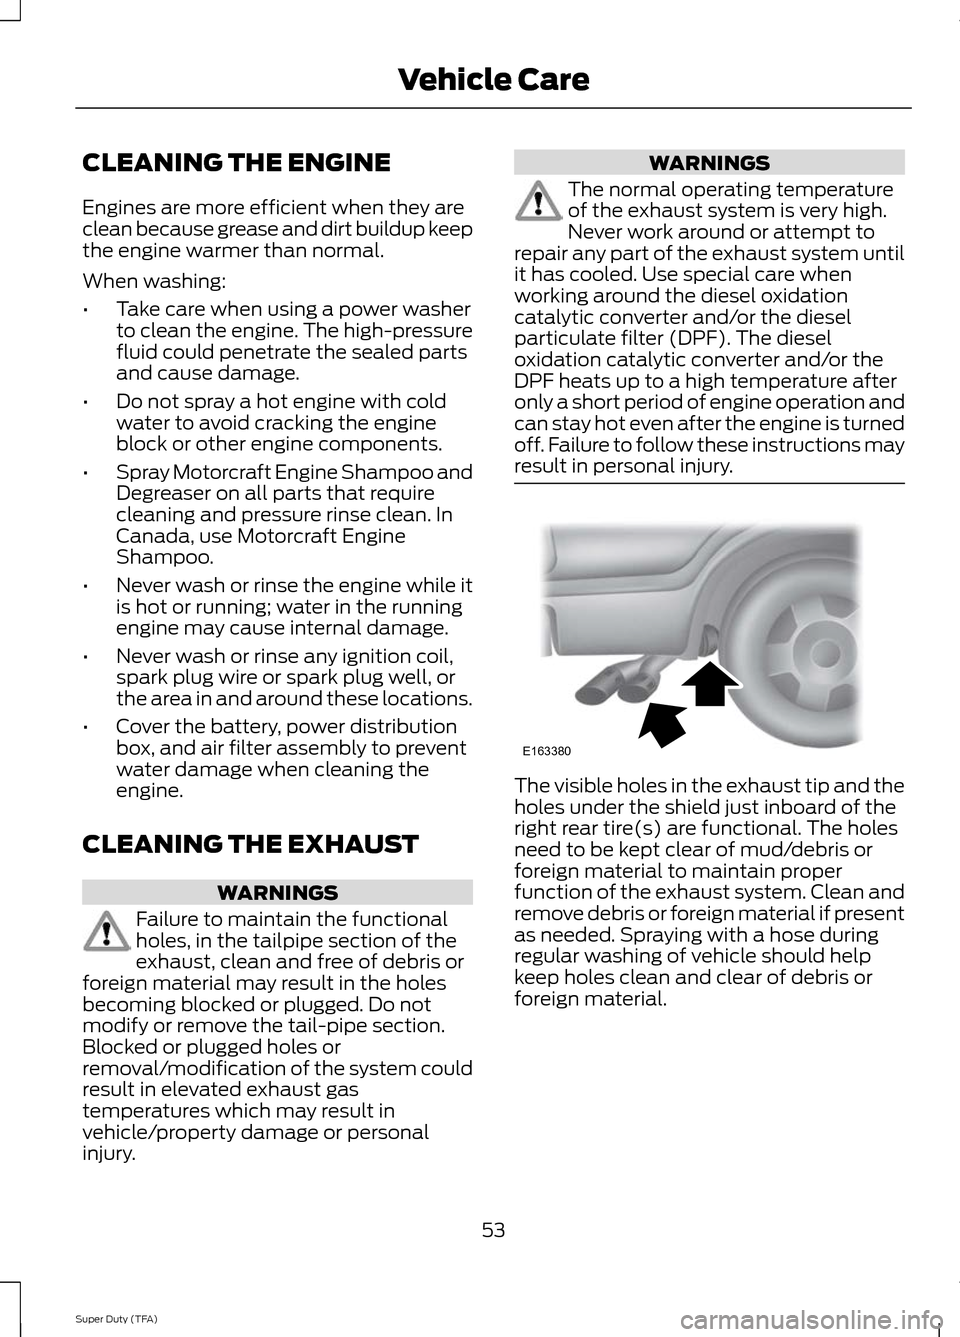
result in personal injury. The visible holes in the exhaust tip and the
holes under the shield just inboard of the
right rear tire(s) are functional. The holes
need to be kept clear of mud/debris or
foreign material to maintain proper
function of the exhaust system. Clean and
remove debris or foreign material if present
as needed. Spraying with a hose during
regular washing of vehicle should help
keep holes clean and clear of debris or
foreign material.
53
Super Duty (TFA) Vehicle CareE163380
Page 58 of 82
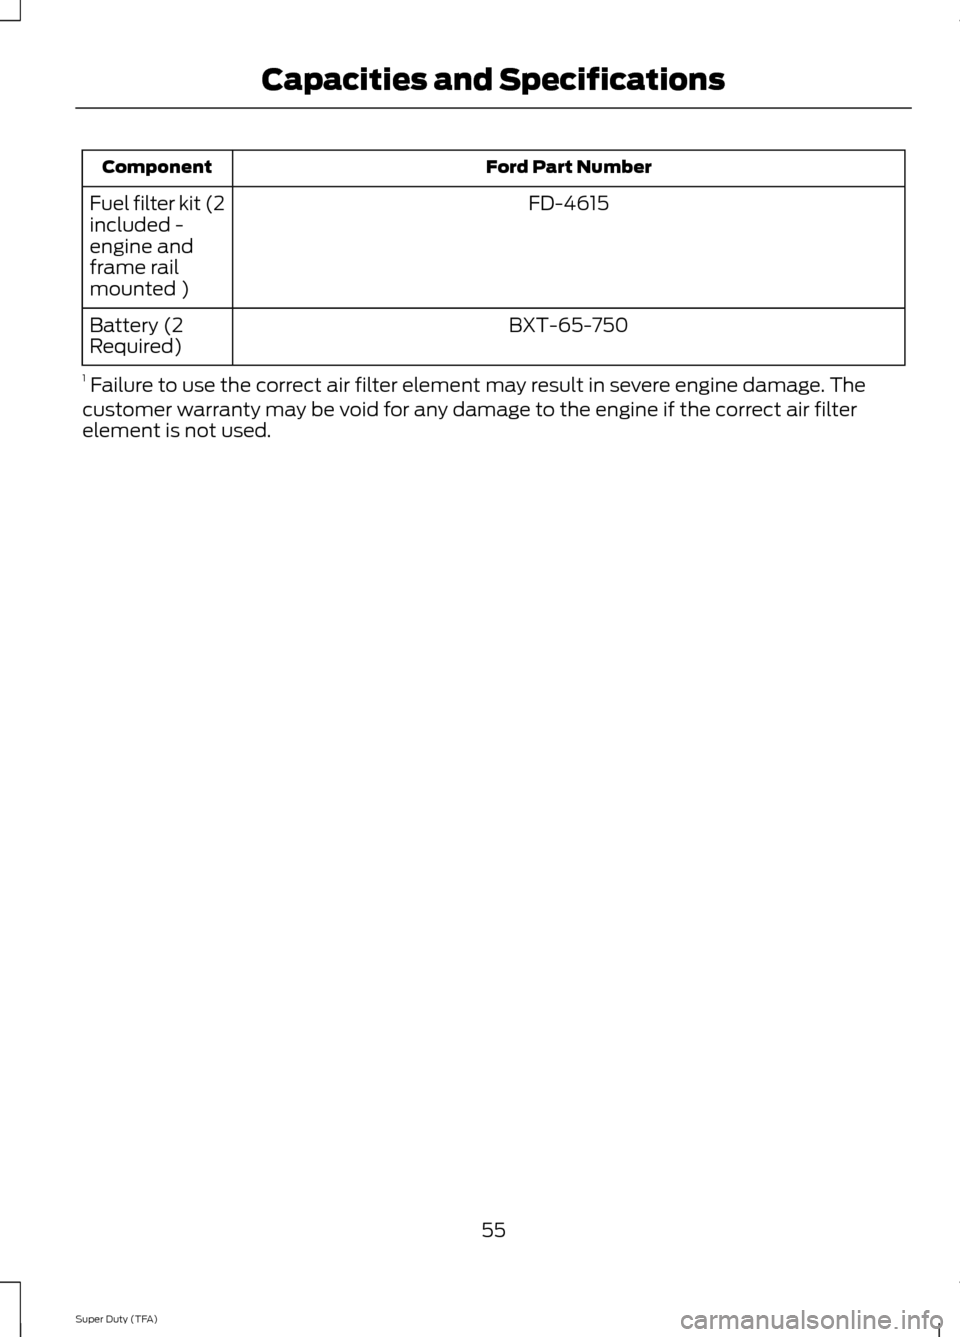
Ford Part Number
Component
FD-4615
Fuel filter kit (2
included -
engine and
frame rail
mounted )
BXT-65-750
Battery (2
Required)
1 Failure to use the correct air filter element may result in severe engine damage. The
customer warranty may be void for any damage to the engine if the correct air filter
element is not used.
55
Super Duty (TFA) Capacities and Specifications
Page 63 of 82
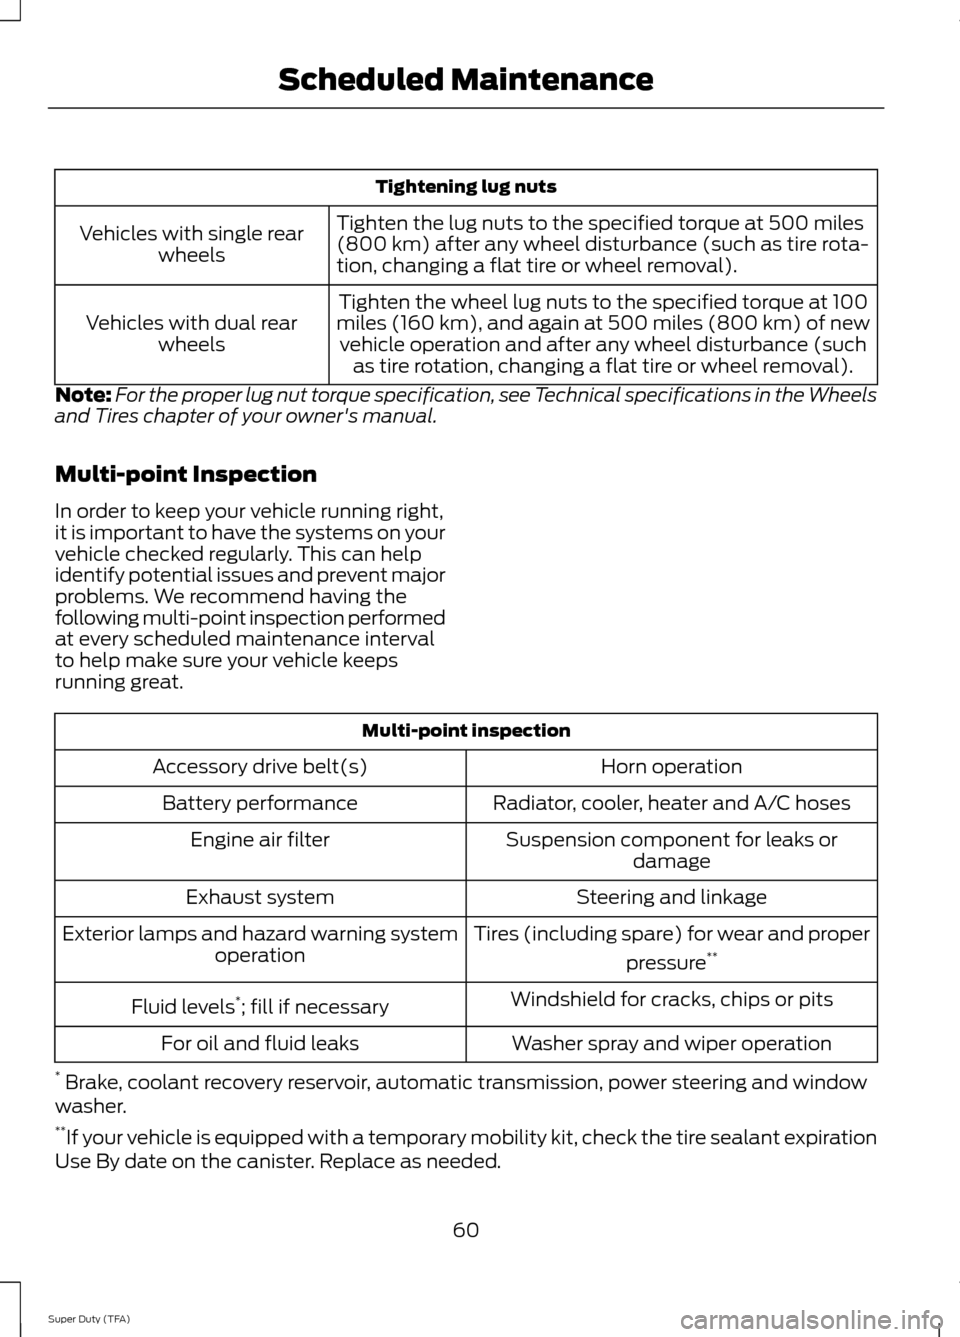
Tightening lug nuts
Tighten the lug nuts to the specified torque at 500 miles
(800 km) after any wheel disturbance (such as tire rota-
tion, changing a flat tire or wheel removal).
Vehicles with single rear
wheels
Tighten the wheel lug nuts to the specified torque at 100
miles (160 km), and again at 500 miles (800 km) of new vehicle operation and after any wheel disturbance (such as tire rotation, changing a flat tire or wheel removal).
Vehicles with dual rear
wheels
Note: For the proper lug nut torque specification, see Technical specifications in the Wheels
and Tires chapter of your owner's manual.
Multi-point Inspection
In order to keep your vehicle running right,
it is important to have the systems on your
vehicle checked regularly. This can help
identify potential issues and prevent major
problems. We recommend having the
following multi-point inspection performed
at every scheduled maintenance interval
to help make sure your vehicle keeps
running great. Multi-point inspection
Horn operation
Accessory drive belt(s)
Radiator, cooler, heater and A/C hoses
Battery performance
Suspension component for leaks ordamage
Engine air filter
Steering and linkage
Exhaust system
Tires (including spare) for wear and properpressure**
Exterior lamps and hazard warning system
operation
Windshield for cracks, chips or pits
Fluid levels *
; fill if necessary
Washer spray and wiper operation
For oil and fluid leaks
* Brake, coolant recovery reservoir, automatic transmission, power steering and window
washer.
** If your vehicle is equipped with a temporary mobility kit, check the tire sealant expiration
Use By date on the canister. Replace as needed.
60
Super Duty (TFA) Scheduled Maintenance