2014 FORD SUPER DUTY maintenance
[x] Cancel search: maintenancePage 4 of 82
Introduction
About This Supplement.................................3
Instrument Cluster
Gauges..................................................................7
Warning Lamps and Indicators
....................7
Starting and Stopping the Engine
Starting a Diesel Engine.................................9
Switching Off the Engine..............................12
Engine Idle Shutdown....................................12
Engine Block Heater.......................................13
Fuel and Refueling
Fuel Quality
.......................................................14
Selective Catalytic Reduction System...........................................................20
Refueling...........................................................28
Emission Control System............................29
Fuel Tank Selector Switch..........................35
Brakes
General Information
......................................36
Towing
Towing a Trailer...............................................37
Roadside Emergencies
Fuel Shutoff
.....................................................38
Jump-Starting the Vehicle..........................38
Maintenance
Under Hood Overview
...................................41
Engine Oil Check.............................................42
Engine Coolant Check..................................44
Changing the Engine Air Filter...................49 Vehicle Care
Cleaning the Engine......................................53
Cleaning the Exhaust
....................................53
Capacities and Specific- ations
Engine Specifications
...................................54
Motorcraft Parts
.............................................54
Technical Specifications
.............................56
Scheduled Maintenance
General Maintenance Information..........58
Normal Scheduled Maintenance
..............61
Special Operating Conditions Scheduled Maintenance................................................64
Scheduled Maintenance Record
..............70
1
Super Duty (TFA) Table of Contents
Page 7 of 82
•
A high-pressure fuel rail for each
cylinder bank (2 total)
• Numerous high-pressure pipes from
the high-pressure pump to the rails,
and rails to the injectors
The fuel and water separator removes
both water and impurities from the fuel.
The engine mounted filter filters finer
impurities from the diesel fuel. The
engine-mounted fuel filter and the fuel and
water separator filter should be changed
at the recommended service interval or
when indicated by the information display
LOW FUEL PRESSURE message. Refer to
the scheduled maintenance information
in this supplement for more information.
The fuel and water separator should be
drained at regular intervals (recommended
at every oil change) or when indicated by
the information display and water in fuel
indicator light. See Fuel Quality (page
14).
Proper fuel filter maintenance and prompt
water draining when the water in fuel light
illuminates is essential to prevent injection
equipment damage. Ignoring the water in
fuel light can cause your vehicle to go into
a reduced power mode.
A frame-mounted electric fuel pump
located inside the fuel and water separator
draws fuel from the fuel tank to provide
pressurized fuel to the engine. The fuel
pump contains a pressure relief valve for
overpressure protection in the event of
restricted flow.
The fuel injection system is controlled
through the powertrain control module. Engine protection mode
Ford diesel engines are equipped with
engine protection and emission control
systems. These systems monitor critical
temperatures and pressures, and modify
engine operation accordingly. These
modified engine performance
characteristics are normal.
If these modified engine performance
characteristics persist for an extended
period and either the service engine soon
or powertrain malfunction,reduced power,
electronic throttle control light is
illuminated, have the system checked by
an authorized dealer.
Service engine soon
Powertrain malfunction, reduced
power, electronic throttle control
Lubrication system
It is important to change the engine oil at
the recommended service intervals to
maintain oil viscosity. Extending the oil and
filter change interval beyond the
recommended interval can negatively
affect engine performance, fuel economy
and engine life. See
Engine Oil Check
(page 42).
Fast start glow plug system
The diesel engine glow system consists of:
• Eight glow plugs (one per cylinder)
• Glow Plug Control Module
• Engine Coolant Temperature sensor
• Barometric pressure sensor
• Environmental temperature sensor
4
Super Duty (TFA) Introduction
Page 8 of 82
The powertrain and glow plug control
modules electronically control the glow
plug system. After you switch the ignition
on the glow plug control module
immediately energizes the glow plugs. The
glow plug control module using the engine
coolant temperature, barometric pressure
sensor and environmental temperature
sensor will determine how long the glow
plugs stay energized. The required time for
the glow plugs to be energized decreases
as the coolant temperature, barometric
pressure and environmental temperature
increase.
Glow Plug
Engine and secondary cooling system
The cooling system contains a primary
cooling loop to cool the engine and
exhaust gases and a secondary cooling
loop to cool the transmission, exhaust
gases, charge air, and fuel. The coolant
serves three primary purposes: to provide
heat transfer, freeze point protection, and
corrosion protection using additives.
Vehicles with diesel engines typically are
used to carry heavy loads and accumulate
mileage rapidly. These two factors may
cause the additives in the coolant to wear
out in a shorter time. For more information
about coolant additives and coolant
change intervals See General
Maintenance Information (page 58). .
Operating the engine with insufficient
coolant or coolant additive can cause
severe engine damage
Selective catalytic reduction system
Your vehicle is equipped with a selective
catalytic reduction system designed to
reduce emission levels of nitrogen oxides
from the exhaust of your diesel engine. This
system relies on the use of diesel exhaust
fluid that you must replenish at certain intervals. Failure to maintain proper diesel
exhaust fluid levels or if the diesel exhaust
fluid becomes contaminated will result in
vehicle speed limitations or result in your
vehicle entering an idle-only mode. See
Selective Catalytic Reduction System
(page
20).
Speed control
If your vehicle speed goes outside a
predetermined range from the set speed,
the RSM (Resume) function will not reset
your vehicle speed. You will need to reset
your vehicle speed with the SET+ or SET-
button after reaching the desired speed
using the accelerator pedal.
Minor Troubleshooting Guide
If the engine won ’t crank WARNING
Battery posts, terminals and related
accessories contain lead and lead
compounds. Wash hands after
handling. Turn on the headlights. If the lights are dim,
do not go on at all or when the ignition is
turned to START the lights become dim or
go out, the battery connections may be
loose or corroded, or the battery may be
discharged. If there is a clicking or
stuttering sound coming from the engine
compartment when you turn the key to
START, this may also indicate a loose or
corroded battery connection.
Check the battery connections at the
battery posts, cable connection to the
engine grounding point and at the starter
connection.
If you suspect a discharged battery, have
it checked and corrected.
5
Super Duty (TFA) Introduction
Page 14 of 82
In order to operate the engine in
temperatures of 32°F (0°C) or lower, read
the following instructions:
•
Make sure that the batteries are of
sufficient size and are fully charged.
Check other electrical components to
make sure they are in optimum
condition
• Use the proper coolant solution at the
concentration recommended
protecting the engine against damage
from freezing
• Try to keep the fuel tank full as much
as possible at the end of operation to
prevent condensation in the fuel
system
• Make sure you use proper cold weather
engine oil and that it is at its proper
level. Also, if necessary, make sure to
follow the engine oil and filter change
schedule found under the Special
operating conditions section listed in
the scheduled maintenance
information
• At temperatures of -10°F (-23°C) or
below, it is recommended that you use
an engine block heater to improve cold
engine starting
• If operating in arctic temperatures of
-20°F (-29°C) or lower, consult your
truck dealer for information about
special cold weather equipment and
precautions
The following cold weather idling
guidelines are recommended:
• You can use Motorcraft® cetane
improvers or non-alcohol-based
cetane improvers from a reputable
manufacturer as needed.
• Maintain the engine cooling system
properly. •
Avoid shutting the engine down after
an extensive idling period. Drive your
vehicle for several miles with the
engine at normal operating
temperatures under a moderate load.
• Consider using an engine block heater.
• For extended idle times use an
approved idle speed increase device.
Winter Operating Tips for Arctic
Operation -20°F (-29°C) and Below
The following information is a guideline
only and is no to be the only source of
possible solutions in resolving extreme
cold temperature issues.
Starting Aids WARNING
Do not use starting fluid, such as
ether, in the air intake system (see
air filter decal). Such fluid could
cause immediate explosive damage to the
engine and possible personal injury. The use of the factory engine block heater
assists in engine starting in extreme cold
ambient temperatures. Refer to Engine
block heater in the Starting and Stopping
the Engine chapter of your Owner
’s
Manual.
Idle Control
Your vehicle may have a factory option for
a stationary elevated idle control through
dash-mounted upfitter switches that
allows the operator to elevate the idle rpm
for extended idle periods, as well as
aftermarket equipment such as PTO
operation. You must configure this feature
even if ordered from the factory. See your
authorized dealer for required upfitting.
11
Super Duty (TFA) Starting and Stopping the Engine
Page 15 of 82
Operation in Snow and Rain
Vehicle operation in heavy snowfall or
extreme rain conditions may feed
excessive amounts of snow or water into
the air intake system. This could plug the
air filter with snow and may cause the
engine to lose power and possibly shut
down.
We recommend the following actions after
operating your vehicle up to 200 miles
(320 kilometers) in snowfall or extreme
rain:
•
Snow: At the earliest opportunity, open
the hood and clear all the snow and ice
from the air filter housing inlet (do not
remove the foam filter) and reset the
air filter restriction gauge.
Note: Removal of the foam filter degrades
your vehicle performance during snow and
hot weather conditions.
• Extreme rain: The air filter dries after
about 15– 30 minutes at highway
speeds. At the earliest opportunity,
open the hood and reset the air filter
restriction gauge.
Refer to Air filter and restriction gauge in
the Maintenance chapter for more
information. See Changing the Engine
Air Filter (page 49).
Operation in Standing Water
Ingestion of water into the diesel engine
can result in immediate and severe
damage to the engine. If driving through
water, slow down to avoid splashing water
into the intake. If the engine stalls, and you
suspect ingestion of water into the engine,
do not try to restart the engine. Consult
your dealer for service immediately. Your fuel tank vents to the atmosphere by
valves on top of the tank and through the
fuel cap. If water reaches the top of the
tank, the valves may pull water into the
fuel tank. Water in the fuel can cause
performance issues and damage the fuel
injection system.
SWITCHING OFF THE ENGINE
Turn the ignition to the off position.
To prolong engine life (especially after
extended high speed, high ambient
temperature, or high GVW/GCW operation,
such as heavy loads or heavy trailers), it is
recommended that a hot engine be idled
for 3-5 minutes. This allows the
turbocharged engine to cool down. For
more information on GVW/GCW, see the
Load Carrying chapter in your Owner
’s
Manual.
ENGINE IDLE SHUTDOWN
Your vehicle may be equipped with an
engine idle shutdown system. This system
automatically shuts down your engine
when it has been idling in
P (Park) or N
(Neutral) for five minutes (parking brake
set) or 15 minutes (parking brake not set).
When the engine idle shutdown process
has started:
• A chime sounds and the information
display will show ENGINE TURNS OFF
IN 30 (seconds) and start counting
down
• You can restart the five or 15-minute
timer by changing the position of the
accelerator pedal, brake pedal or the
park brake within the final 30 seconds
• When the timer reaches zero, the
engine shuts down and this message
will appear in your information display
ENGINE TURNED OFF
12
Super Duty (TFA) Starting and Stopping the Engine
Page 18 of 82
Biodiesel
WARNING
Do not use home heating oil,
agricultural fuel, raw fats and oils,
waste cooking greases, biodiesel
fuels greater than 20% or any diesel fuel
not intended for highway use. Damage to
the fuel injection system, engine and
exhaust catalyst can occur if an improper
fuel is used. Do not add gasoline, gasohol
or alcohol to diesel fuel. This practice
creates a serious fire hazard and engine
performance problems. You may operate your vehicle on diesel
fuels containing up to 20% biodiesel, also
known as B20.
Biodiesel fuel is a chemically converted
product from renewable fuel sources, such
as vegetable oils, animal fats and waste
cooking greases.
To help achieve acceptable engine
performance and durability when using
biodiesel in your vehicle:
•
Confirm the biodiesel content of the
fuel to be B20 (20% biodiesel) or less
• Only use biodiesel fuel of good quality
that complies with industry standards
• Follow the recommended service
maintenance intervals. See General
Maintenance Information (page 58).
• Do not store biodiesel fuel in the fuel
tank for more than 1 month
• Consider changing brands or reducing
biodiesel content if you have cold
temperature fuel gelling issues or a
frequent LOW FUEL PRESSURE
message appearing
• Do NOT use raw oils, fats or waste
cooking greases Use of biodiesel in concentrations greater
than 20% may cause damage to your
vehicle, including engine and/or exhaust
after-treatment hardware (exhaust
catalyst and particulate filter) failures.
Concentrations greater than 20% can also
cause fuel filter restrictions that may result
in a lack of power or damage to fuel
system components, including fuel pump
and fuel injector failures.
SAE 5W-40 or SAE 15W-40 oil is
recommended for fuels with greater than
5% biodiesel (B5). Refer to the Special
operating conditions section under the
Schedule Maintenance chapter for more
information about oil change intervals and
other maintenance when operating on
biodiesel.
Look for a label on the fuel pump to
confirm the amount of biodiesel contained
in a diesel fuel. Biodiesel content is often
indicated with the letter B followed by the
percent of biodiesel in the fuel. For
example, B20 indicates a fuel containing
20% biodiesel. Ask the service station
attendant to confirm the biodiesel content
of a diesel fuel if you do not see a label on
the fuel pump.
Biodiesel fuels degrade more easily than
diesel fuels not containing biodiesel and
should not be stored in the fuel tank for
more than 1 month. If you plan to park or
store your vehicle for more than 1 month,
then you should empty your vehicle fuel
tank of biodiesel fuel. You should fill the
tank with a pure petroleum-based diesel
fuel and run your vehicle for a minimum of
30 minutes.
Note:
Degraded or oxidized biodiesel can
damage fuel system seals and plastics and
corrode steel parts.
During cold weather, if you have problems
operating on biodiesel, you may need to
use a diesel fuel with lower biodiesel
content, try another brand, or discontinue
the use of biodiesel.
15
Super Duty (TFA) Fuel and Refueling
Page 20 of 82
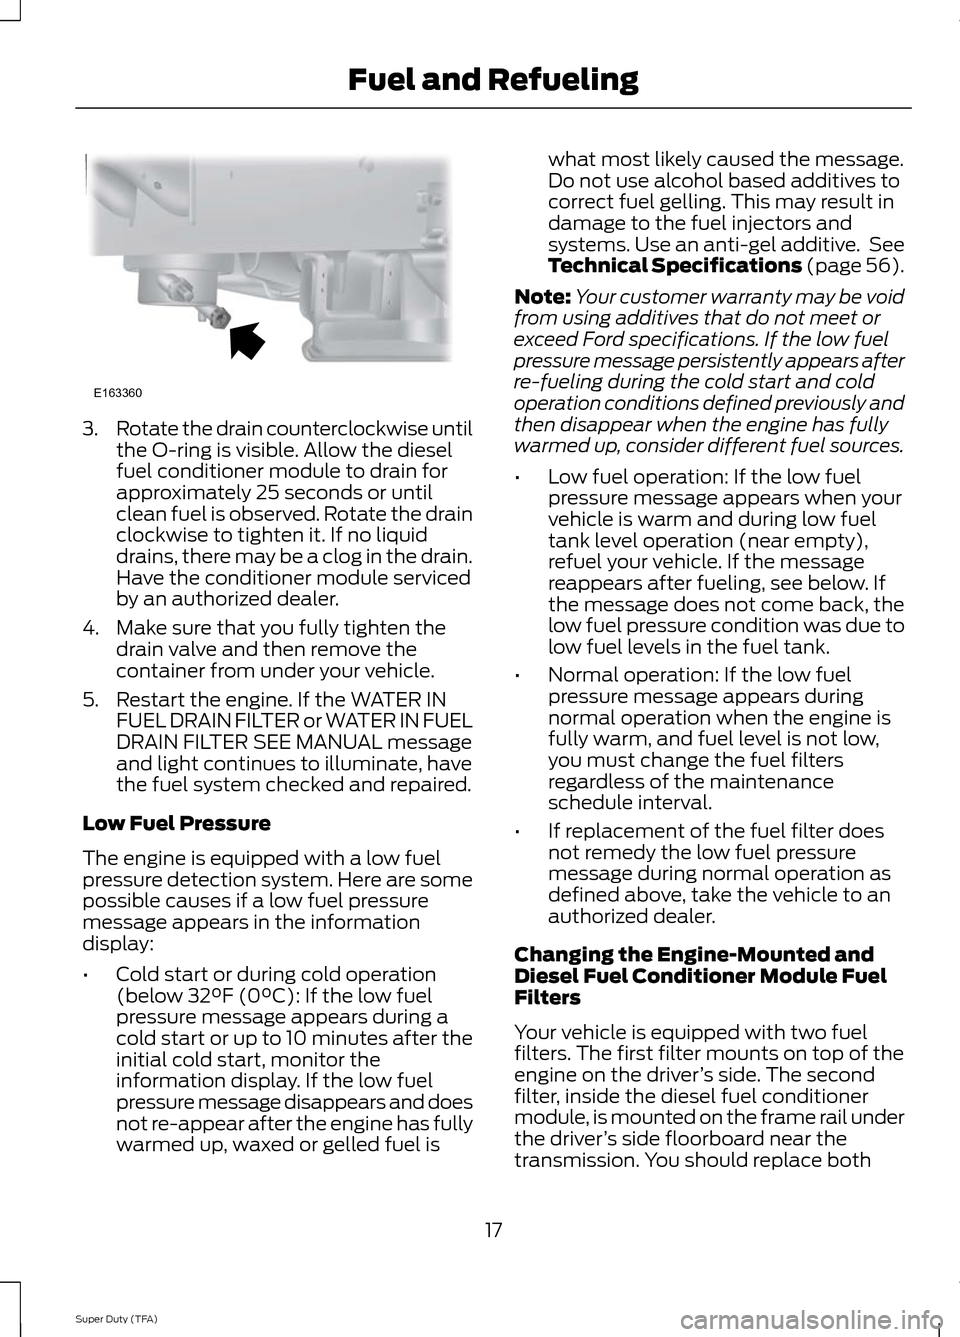
3.
Rotate the drain counterclockwise until
the O-ring is visible. Allow the diesel
fuel conditioner module to drain for
approximately 25 seconds or until
clean fuel is observed. Rotate the drain
clockwise to tighten it. If no liquid
drains, there may be a clog in the drain.
Have the conditioner module serviced
by an authorized dealer.
4. Make sure that you fully tighten the drain valve and then remove the
container from under your vehicle.
5. Restart the engine. If the WATER IN FUEL DRAIN FILTER or WATER IN FUEL
DRAIN FILTER SEE MANUAL message
and light continues to illuminate, have
the fuel system checked and repaired.
Low Fuel Pressure
The engine is equipped with a low fuel
pressure detection system. Here are some
possible causes if a low fuel pressure
message appears in the information
display:
• Cold start or during cold operation
(below 32°F (0°C): If the low fuel
pressure message appears during a
cold start or up to 10 minutes after the
initial cold start, monitor the
information display. If the low fuel
pressure message disappears and does
not re-appear after the engine has fully
warmed up, waxed or gelled fuel is what most likely caused the message.
Do not use alcohol based additives to
correct fuel gelling. This may result in
damage to the fuel injectors and
systems. Use an anti-gel additive. See
Technical Specifications (page 56).
Note: Your customer warranty may be void
from using additives that do not meet or
exceed Ford specifications. If the low fuel
pressure message persistently appears after
re-fueling during the cold start and cold
operation conditions defined previously and
then disappear when the engine has fully
warmed up, consider different fuel sources.
• Low fuel operation: If the low fuel
pressure message appears when your
vehicle is warm and during low fuel
tank level operation (near empty),
refuel your vehicle. If the message
reappears after fueling, see below. If
the message does not come back, the
low fuel pressure condition was due to
low fuel levels in the fuel tank.
• Normal operation: If the low fuel
pressure message appears during
normal operation when the engine is
fully warm, and fuel level is not low,
you must change the fuel filters
regardless of the maintenance
schedule interval.
• If replacement of the fuel filter does
not remedy the low fuel pressure
message during normal operation as
defined above, take the vehicle to an
authorized dealer.
Changing the Engine-Mounted and
Diesel Fuel Conditioner Module Fuel
Filters
Your vehicle is equipped with two fuel
filters. The first filter mounts on top of the
engine on the driver ’s side. The second
filter, inside the diesel fuel conditioner
module, is mounted on the frame rail under
the driver ’s side floorboard near the
transmission. You should replace both
17
Super Duty (TFA) Fuel and RefuelingE163360
Page 21 of 82
filters at the same time. Regular fuel filter
changes are an important part of engine
maintenance; failing to keep with the
scheduled maintenance could lead to
engine performance issues and fuel
injection system damage. Refer to the
scheduled maintenance information of this
supplement for more information. See
General Maintenance Information
(page 58).
Refer to Motorcraft part numbers in the
Capacities and Specifications chapter for
the fuel filter replacement part number.
See Motorcraft Parts (page 54). This part
number includes filters and seals for both
the engine-mounted and frame-mounted
filters.
Removal - Diesel Fuel Conditioner
Module filter
The diesel fuel conditioner module filter is
located in the lower portion of the housing.
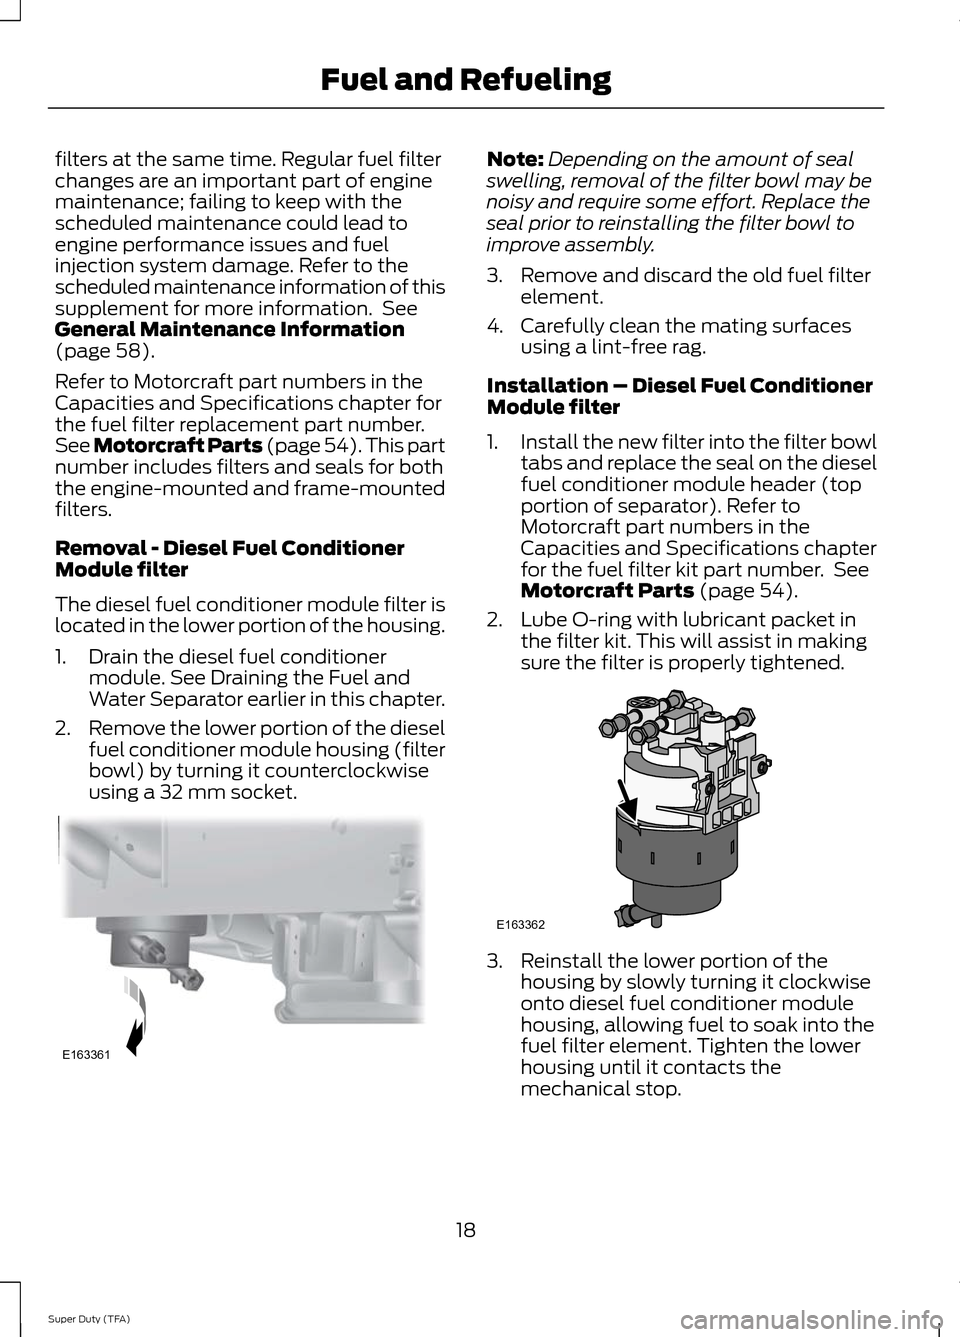
1. Drain the diesel fuel conditioner module. See Draining the Fuel and
Water Separator earlier in this chapter.
2. Remove the lower portion of the diesel
fuel conditioner module housing (filter
bowl) by turning it counterclockwise
using a 32 mm socket. Note:
Depending on the amount of seal
swelling, removal of the filter bowl may be
noisy and require some effort. Replace the
seal prior to reinstalling the filter bowl to
improve assembly.
3. Remove and discard the old fuel filter element.
4. Carefully clean the mating surfaces using a lint-free rag.
Installation – Diesel Fuel Conditioner
Module filter
1. Install the new filter into the filter bowl
tabs and replace the seal on the diesel
fuel conditioner module header (top
portion of separator). Refer to
Motorcraft part numbers in the
Capacities and Specifications chapter
for the fuel filter kit part number. See
Motorcraft Parts
(page 54).
2. Lube O-ring with lubricant packet in the filter kit. This will assist in making
sure the filter is properly tightened. 3. Reinstall the lower portion of the
housing by slowly turning it clockwise
onto diesel fuel conditioner module
housing, allowing fuel to soak into the
fuel filter element. Tighten the lower
housing until it contacts the
mechanical stop.
18
Super Duty (TFA) Fuel and RefuelingE163361 E163362