2014 FORD MONDEO reset
[x] Cancel search: resetPage 199 of 446

Downloaded from www.Manualslib.com manuals search engine The system uses radar sensors which arelocated behind the bumper fascia on eachside of your vehicle. Do not allow mud,snow or bumper stickers to obstruct theseareas, this can cause degraded systemperformance.
If the system detects a degradedperformance condition, a message warningof a blocked sensor or low visibility willappear in the information display alongwith a warning indicator. You can clear theinformation display warning but thewarning indicator will remain illuminated.
When you remove a blockage, you canreset the system in two ways:
•While driving, the system detects atleast two objects.
•You cycle the ignition from on to offand then back on.
If the blockage is still present after the keycycle and driving in traffic, check again fora blockage.
Reasons for messages being displayed
Clean the fascia area in frontof the radar or remove theobstruction.
The radarsurface isdirty orobstructed
Drive normally in traffic fora few minutes to allow theradar to detect passingvehicles so it can clear theblocked state.
The radarsurface isnot dirty orobstructed
No action required. Thesystem automatically resetsto an unblocked state oncethe rainfall or snowfall ratedecreases or stops. Do notuse the Blind Spot Informa-tion System or Cross TrafficAlert in these conditions.
Heavy rain-fall orsnowfallinterfereswith theradarsignals
Detection Limitations
There may be instances where the systemwill not always detect vehicles enteringand exiting the blind spot zone.
Instances which may cause non-detection:
•Debris build up on the rear bumperpanels in the area of the sensors.
•Certain maneuvering of vehiclesentering and exiting the blind spotzone.
•Vehicles passing through the blind spotzone at high speed.
•Severe weather conditions.
•Several vehicles passing through theblind spot zone following each otherclosely.
197Mondeo (CNG) Vehicles Built From: 08-09-2014 Vehicles Built Up To: 19-04-2015, CG3633en enGBR, Edition date: 10/2014, First PrintingDriving Aids
Page 268 of 446

Downloaded from www.Manualslib.com manuals search engine When the Temporary Spare Tire isInstalled
If you need to replace a road wheel andtire with the temporary spare wheel, thesystem will continue to identify a defect.This is to remind you to repair the damagedroad wheel and tire and refit the repairedroad wheel and tire assembly to yourvehicle. To restore the correct operationof the system, you must have the repaired
road wheel and tire assembly refitted toyour vehicle.
When You Believe the System is NotOperating Correctly
The main function of the system is to warnyou when the tire pressures are low. It canalso warn you in the event the system isno longer capable of operating correctly.See the following chart for informationconcerning the system:
ActionDescriptionWarning lamp
1.Make sure tires are at the correctpressure. See Wheels and Tires(page 260). The tire pressures are alsoon the tire inflation pressure label(located on the edge of driver dooror the B-Pillar).
2.After inflating the tires to the correctpressure you must carry out the tirepressure monitoring system resetprocedure. See Tire PressureMonitoring System ResetProcedure in this chapter.
Tire(s) under-inflatedSolid warning lamp
Repair the damaged road wheel and tireand refit the repaired road wheel and tireassembly to your vehicle to restore thecorrect operation of the system.
Spare tire in use
If the tires are correctly inflated and thespare tire is not in use but the lightremains on, the system has detected afault that requires service.
Tire pressure monitoringsystem malfunction
Repair the damaged road wheel and tireand refit the repaired road wheel and tireassembly to your vehicle to restore thecorrect operation of the system.
Spare tire in useSolid warning lampinitially followed bya flashing warninglamp
If the tires are correctly inflated and thespare tire is not in use but the lightremains on, the system has detected afault that requires service.
Tire pressure monitoringsystem malfunction
266Mondeo (CNG) Vehicles Built From: 08-09-2014 Vehicles Built Up To: 19-04-2015, CG3633en enGBR, Edition date: 10/2014, First PrintingWheels and Tires
Page 269 of 446

Downloaded from www.Manualslib.com manuals search engine Tire Pressure Monitoring SystemReset Procedure
Overview
You must carry out the system resetprocedure after each tire replacement oradjustment of the tire pressures.
To maintain your vehicle load carryingcapability, your vehicle requires differenttire pressures in the front tires comparedto the rear tires.
The system illuminates the warning lampat different pressures for the front and reartires.
The tires need to be periodically rotatedto provide consistent performance andmaximum tire life, the system needs toknow when the tires have been rotated todetermine which set of tires are on thefront and rear axles. With this information,the system can detect and correctly warnof low tire pressures.
Carrying Out the System ResetProcedure
Switch the ignition on. Using theinformation display control select:
Description and ActionMessage
Press the OK button.Settings
Press the OK button.Driver assist
Press and hold the OK button until confirmation appears.Alternatively, if your vehicle has a tire pressure monitoringsystem reset button, press and hold the button untilconfirmation appears.
Tire Monitor
How Temperature Affects the TirePressures
Under normal driving conditions tirepressures may increase by up to 4 psi(0.3 bar) from a cold start situation.
If the vehicle is stationary overnight andthe temperature significantly lower thanthe daytime temperature, tire pressuresmay decrease by up to 3 psi (0.2 bar) whenthere is a drop in the ambient temperatureof 63°F (17°C) or more. The systemdetects this pressure decrease as beingsignificantly below the correct inflationpressure and the warning lamp illuminates.
When Inflating the Tires
When inflating the tires the system maynot respond immediately to the air addedto the tires.
If the Warning Lamp is On:
1.Check each tire to verify that none areflat.
2.If one or more tires are flat, repair asnecessary.
3.Check the tire pressures and inflate allthe tires to the correct pressure.
4.Carry out the tire pressure monitoringsystem reset procedure.
267Mondeo (CNG) Vehicles Built From: 08-09-2014 Vehicles Built Up To: 19-04-2015, CG3633en enGBR, Edition date: 10/2014, First PrintingWheels and Tires
Page 296 of 446

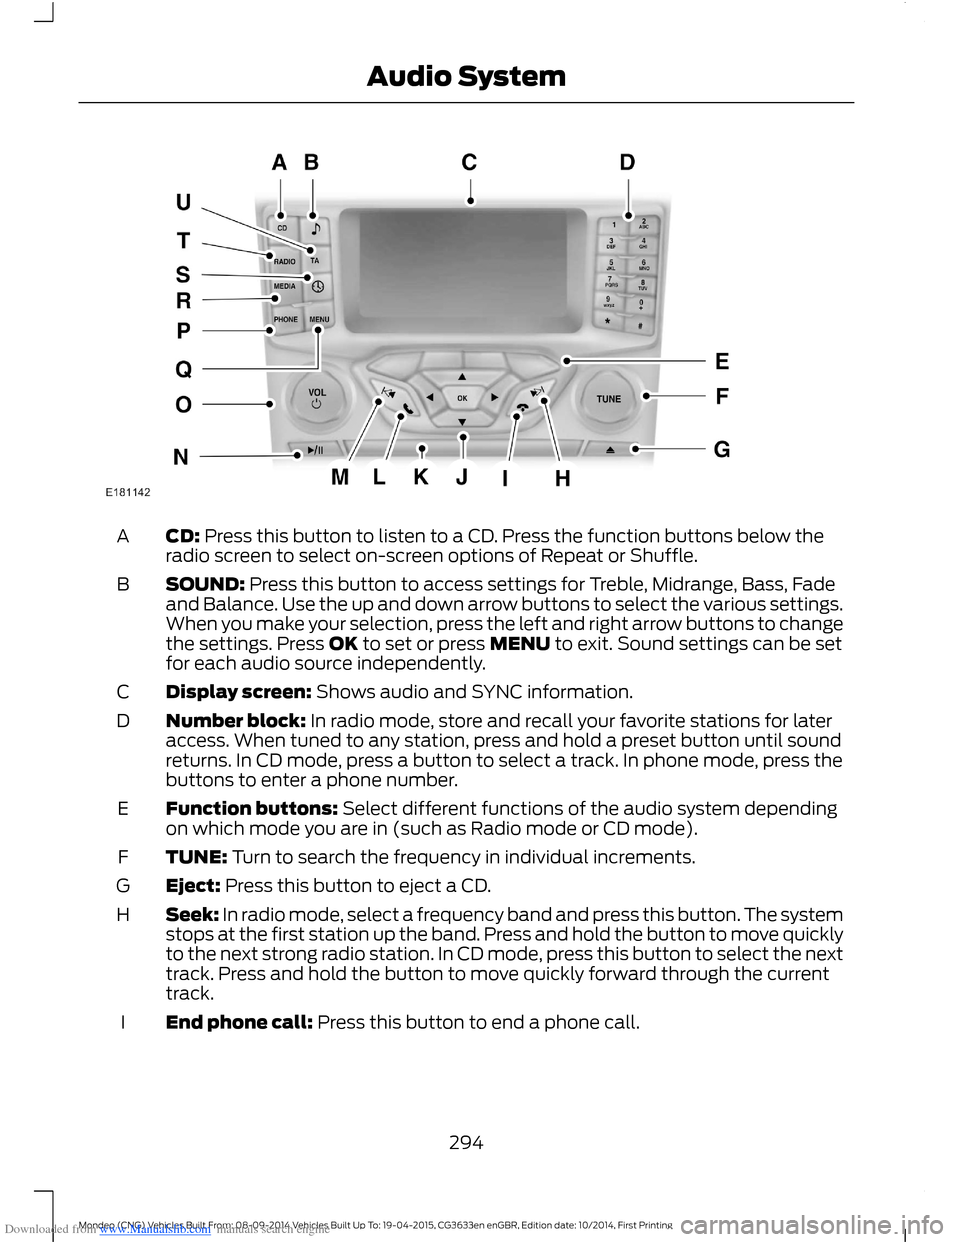
Downloaded from www.Manualslib.com manuals search engine CD: Press this button to listen to a CD. Press the function buttons below theradio screen to select on-screen options of Repeat or Shuffle.A
SOUND: Press this button to access settings for Treble, Midrange, Bass, Fadeand Balance. Use the up and down arrow buttons to select the various settings.When you make your selection, press the left and right arrow buttons to changethe settings. Press OK to set or press MENU to exit. Sound settings can be setfor each audio source independently.
B
Display screen: Shows audio and SYNC information.C
Number block: In radio mode, store and recall your favorite stations for lateraccess. When tuned to any station, press and hold a preset button until soundreturns. In CD mode, press a button to select a track. In phone mode, press thebuttons to enter a phone number.
D
Function buttons: Select different functions of the audio system dependingon which mode you are in (such as Radio mode or CD mode).E
TUNE: Turn to search the frequency in individual increments.F
Eject: Press this button to eject a CD.G
Seek: In radio mode, select a frequency band and press this button. The systemstops at the first station up the band. Press and hold the button to move quicklyto the next strong radio station. In CD mode, press this button to select the nexttrack. Press and hold the button to move quickly forward through the currenttrack.
H
End phone call: Press this button to end a phone call.I
294Mondeo (CNG) Vehicles Built From: 08-09-2014 Vehicles Built Up To: 19-04-2015, CG3633en enGBR, Edition date: 10/2014, First PrintingAudio System
Page 303 of 446

Downloaded from www.Manualslib.com manuals search engine DIGITAL RADIO
General Information
The system allows you to listen to DAB(Digital Audio Broadcast) radio stations.
Note:Coverage differs from region to regionand influences the quality of reception. It isbroadcast nationwide, regionally andlocally.
The following formats are supported:
•DAB.
•DAB+.
•DMB-Audio (Digital MultimediaBroadcasting).
Ensembles
Ensembles contain a group of radiostations. Each ensemble can consist ofseveral different radio stations.
The radio station name displays below theensemble name.
Note:When you tune from one ensembleto another, it can take a while until thesystem synchronizes to the next ensemble.The system mutes during synchronization.
Service Linking
If you leave the coverage area of a DABradio station, the system automaticallyswitches to the corresponding FM radiostation.
You can switch this feature on and offusing the information display. See GeneralInformation (page 292).
Note:If a DAB radio station has nocorresponding FM radio station, the audiomutes when attempting to switch.
Note:The system displays the FM symbolwhen DAB and FM radio stations link.
Note:The sound quality changes when yoursystem switches from DAB to thecorresponding FM station.
Using Digital Audio Broadcast ona Non-Touchscreen
Selecting Radio Band
DAB1 and DAB2 operate in the same way.You can store up to 10 different presets oneach band.
1.Press the RADIO button.
2.Press the left arrow button to displaythe available wavebands.
3.Select DAB1 orDAB2.
Radio Station Tuning Control
Press the RADIO button and select DAB1orDAB2. All preset banks operate in thesame way and can store up to 10 differentpreset radio stations.
Note:When you reach the first or last radiostation within an ensemble, further tuningskips to the next ensemble. There may be adelay during this change and the audiobriefly mutes.
Seek Tuning
1.Press a seek button. The system stopsat the first radio station it finds in thedirection chosen.
Radio Station List
This feature displays all the available radiostations in a list.
1.Press function button 1.
2.Press the left or right arrow buttons tochange ensembles. Press the up ordown arrow button to navigate to yourrequired radio station.
3.Press OK to confirm your selection.
Note:The display only shows radio stationsin the current ensemble.
301Mondeo (CNG) Vehicles Built From: 08-09-2014 Vehicles Built Up To: 19-04-2015, CG3633en enGBR, Edition date: 10/2014, First PrintingAudio System
Page 304 of 446

Downloaded from www.Manualslib.com manuals search engine Manual Tuning
1.Press function button 2.
2.Press the left or right arrow button totune up or down the waveband in smallincrements. Press and hold to movethrough the waveband quickly.
3.Press OK to confirm your selection.
Note:Seek tuning is also possible withinthis screen.
Radio Station Preset Buttons
This feature allows you to store up to 10favorite radio stations from any ensemblein each preset bank.
1.Select a radio station.
2.Press and hold one of the presetbuttons. A progress bar and messageappear. When the progress barcompletes, the radio station has beenstored. The system mutes momentarilyas confirmation.
Once stored, press a preset button at anytime to select a favorite radio station.
Note:Radio stations stored on the presetbuttons may not always be available if youhave left the coverage area. The system willmute when this happens.
Radio Text
You can display extra information. Forexample; artist name. To switch this optionon, select a radio station and pressfunction button 3.
Note:Extra information may not always beavailable.
Using Digital Audio Broadcast andSYNC with Touchscreen
Selecting Radio Band
DAB1, DAB2 and DAB3 operate in the sameway. You can store up to 6 differentpresets on each band.
1.Press the RADIO button.
2.Press the left arrow button to displaythe available wavebands.
3.Select DAB1,DAB2 or DAB3.
Radio Station Tuning Control
Press the RADIO button and select DAB1,DAB2 or DAB3. All preset banks operatein the same way and can store up to 10different preset radio stations.
Note:When you reach the first or last radiostation within an ensemble, further tuningskips to the next ensemble. There may be adelay during this change and the audiobriefly mutes.
Seek Tuning
1.Press a seek button. The system stopsat the first radio station it finds in thedirection chosen.
Radio Station List
This feature displays all the available radiostations in a list.
1.Press the browse button.
2.Press the previous ensemble or nextensemble to change ensembles.Navigate through the list and select thestation by pressing the touchscreenarea displaying your selection.
3.Press OK to confirm your selection.
Note:The display only shows radio stationsin the current ensemble.
Manual Tuning
1.Press the + tune - button.
Radio Station Preset Buttons
This feature allows you to store up to 6favorite radio stations from any ensemblein each preset bank.
1.Select a radio station.
302Mondeo (CNG) Vehicles Built From: 08-09-2014 Vehicles Built Up To: 19-04-2015, CG3633en enGBR, Edition date: 10/2014, First PrintingAudio System
Page 305 of 446

Downloaded from www.Manualslib.com manuals search engine 2.Press and hold one of the presetbuttons. A message appears when theradio station has been stored. Thesystem mutes momentarily asconfirmation.
Once stored, press a preset button at anytime to select a favorite radio station.
Note:Radio stations stored on the presetbuttons may not always be available if youhave left the coverage area. The system willmute when this happens.
Radio Text
You can display extra information. Forexample; artist name. To switch this optionon select Options > Radio Text On.
Note:Extra information may not always beavailable.
AUDIO INPUT JACK
WARNINGS
Driving while distracted can result inloss of vehicle control, crash andinjury. We strongly recommend thatyou use extreme caution when using anydevice that may take your focus off theroad. Your primary responsibility is the safeoperation of your vehicle. We recommendagainst the use of any hand-held devicewhile driving and encourage the use ofvoice-operated systems when possible.Make sure you are aware of all applicablelocal laws that may affect the use ofelectronic devices while driving.
For safety reasons, do not connector adjust the settings on yourportable music player while yourvehicle is moving.
WARNINGS
Store the portable music player in asecure location, such as the centerconsole or the glove box, when yourvehicle is moving. Hard objects maybecome projectiles in a collision or suddenstop, which may increase the risk of seriousinjury. The audio extension cable must belong enough to allow the portable musicplayer to be safely stored while yourvehicle is moving.
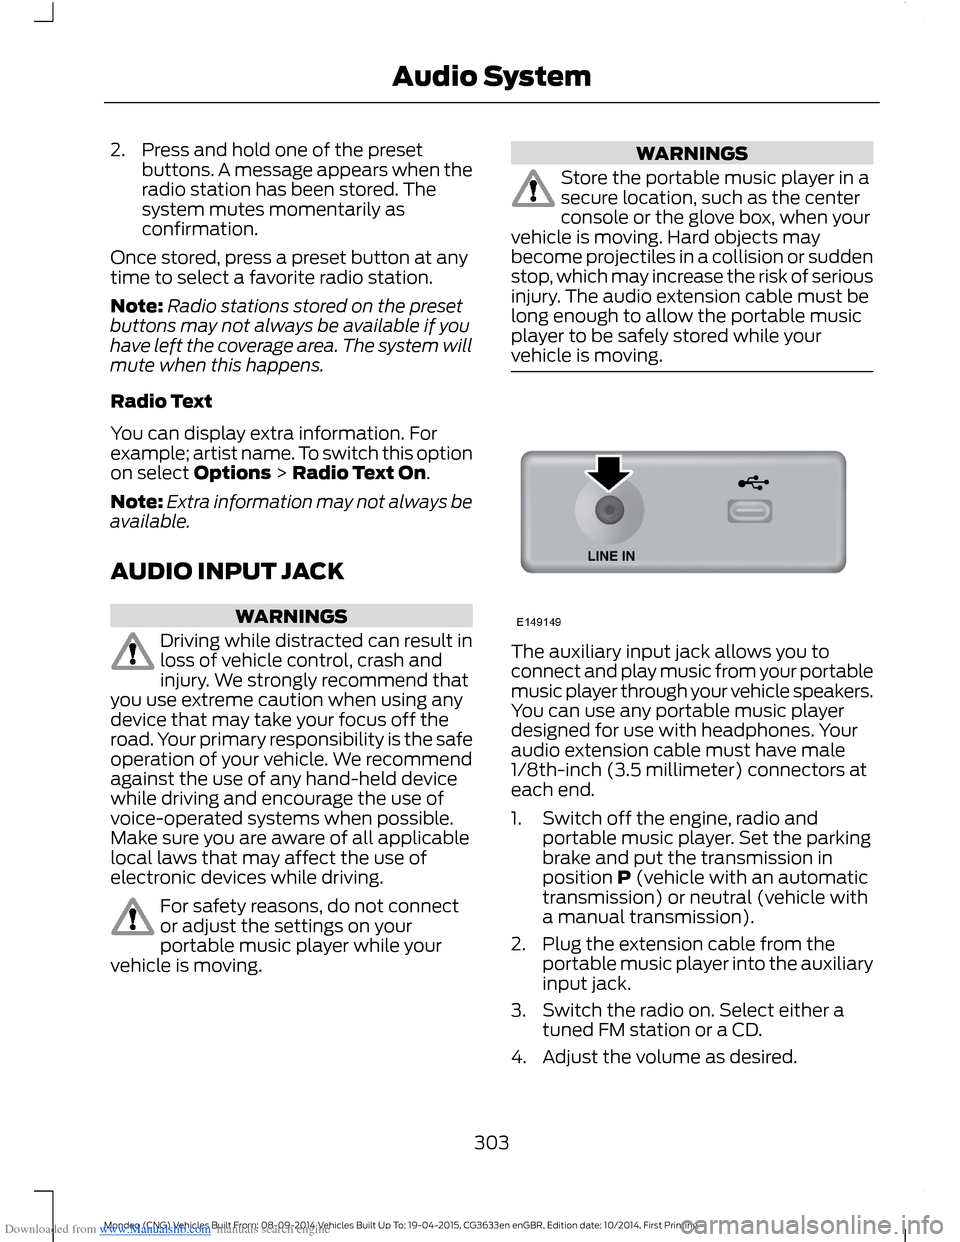
The auxiliary input jack allows you toconnect and play music from your portablemusic player through your vehicle speakers.You can use any portable music playerdesigned for use with headphones. Youraudio extension cable must have male1/8th-inch (3.5 millimeter) connectors ateach end.
1.Switch off the engine, radio andportable music player. Set the parkingbrake and put the transmission inposition P (vehicle with an automatictransmission) or neutral (vehicle witha manual transmission).
2.Plug the extension cable from theportable music player into the auxiliaryinput jack.
3.Switch the radio on. Select either atuned FM station or a CD.
4.Adjust the volume as desired.
303Mondeo (CNG) Vehicles Built From: 08-09-2014 Vehicles Built Up To: 19-04-2015, CG3633en enGBR, Edition date: 10/2014, First PrintingAudio System
Page 308 of 446

Downloaded from www.Manualslib.com manuals search engine Safety Information
WARNING
Driving while distracted can result inloss of vehicle control, crash andinjury. We strongly recommend thatyou use extreme caution when using anydevice that may take your focus off theroad. Your primary responsibility is the safeoperation of your vehicle. We recommendagainst the use of any hand-held devicewhile driving and encourage the use ofvoice-operated systems when possible.Make sure you are aware of all applicablelocal laws that may affect the use ofelectronic devices while driving.
When using SYNC:
•Do not operate playing devices if thepower cords or cables are broken, splitor damaged. Carefully place cords andcables where you cannot step on themor they do not interfere with theoperation of pedals, seats,compartments or safe driving abilities.
•Do not leave playing devices in yourvehicle during extreme conditions as itcould cause them damage. Refer toyour device's manual for furtherinformation.
•Do not attempt to service or repair thesystem. See an authorized dealer.
Privacy Information
When a cell phone is connected to SYNC,the system creates a profile that is linkedto that cell phone. The system creates theprofile to offer you more mobile featuresand to operate more efficiently. Amongother things, this profile may contain dataabout your phonebook, text messages(read and unread) and call history. Thiswill include the history of calls when yourcell phone was not connected to thesystem. If you connect a media player, thesystem creates and retains an index of
supported media content. The system alsorecords a short development log ofapproximately 10 minutes of all recentsystem activity. The log profile and othersystem data may be used to improve thesystem and help diagnose any problemsthat may occur.
The cell phone profile, media player indexand development log will remain in thesystem unless deleted. They are generallyaccessible in your vehicle only when youconnect your cell phone or media player.If you no longer plan to use the system oryour vehicle, we recommend you completea master reset to erase all storedinformation. See Information Displays(page 86).
Special equipment is required to accesssystem data. Access to your vehicle'sSYNC module is also required. We will notaccess the system data for any purposeother than as described without consent.Examples where system data can beaccessed are for a court order, whererequired by law enforcement, othergovernment authorities or other thirdparties acting with lawful authority. Otherparties may seek to access the informationindependently of us. Further privacyinformation is available. See SYNC™Applications and Services (page 320).
USING VOICE RECOGNITION
This system helps you control manyfeatures using voice commands. Thisallows you to keep your hands on thesteering wheel and focus on what is aroundyou.
Helpful Hints
Make sure the interior of your vehicle is asquiet as possible. Wind noise from openwindows and road vibrations may preventthe system from correctly recognizingspoken commands.
306Mondeo (CNG) Vehicles Built From: 08-09-2014 Vehicles Built Up To: 19-04-2015, CG3633en enGBR, Edition date: 10/2014, First PrintingSYNC™