Page 247 of 446
Downloaded from www.Manualslib.com manuals search engine ENGINE OIL DIPSTICK - 1.0L
ECOBOOST™
MinimumA
MaximumB
ENGINE OIL DIPSTICK - 1.5L
ECOBOOST™
Minimum.A
Maximum.B
ENGINE OIL DIPSTICK - 2.0L
ECOBOOST™
Minimum.A
Maximum.B
ENGINE OIL DIPSTICK - 2.5L
MINA
MAXB
245Mondeo (CNG) Vehicles Built From: 08-09-2014 Vehicles Built Up To: 19-04-2015, CG3633en enGBR, Edition date: 10/2014, First PrintingMaintenance
Page 248 of 446

Downloaded from www.Manualslib.com manuals search engine ENGINE OIL DIPSTICK - 1.5L
DURATORQ-TDCI DIESEL
Minimum.A
Maximum.B
ENGINE OIL DIPSTICK - 1.6L
DIESEL
MinimumA
MaximumB
ENGINE OIL DIPSTICK - 2.0L
DIESEL
Minimum.A
Maximum.B
ENGINE OIL CHECK
1.Make sure that your vehicle is on levelground.
2.Check the oil level before starting theengine, or switch the engine off andwait 10 minutes for the oil to drain intothe oil pan.
3.Remove the dipstick and wipe it witha clean, lint free cloth. Replace thedipstick and remove it again to checkthe oil level.
If the oil level is at the minimum mark, addoil immediately. See Capacities andSpecifications (page 283).
Note:Make sure that the oil level isbetween the minimum and the maximummarks.
Note:Do not use oil additives or otherengine treatments. Under certain conditionsthey may cause engine damage.
Note:The oil consumption of new enginesreaches its normal level after approximately3000 mi (5,000 km).
246Mondeo (CNG) Vehicles Built From: 08-09-2014 Vehicles Built Up To: 19-04-2015, CG3633en enGBR, Edition date: 10/2014, First PrintingMaintenance
Page 249 of 446

Downloaded from www.Manualslib.com manuals search engine Adding Engine Oil
WARNINGS
Only add oil when the engine is cold.If the engine is hot, wait 10 minutesfor the engine to cool down.
Do not remove the filler cap whenthe engine is running.
1.Remove the engine oil filler cap. SeeMaintenance (page 237).
2.Add engine oil that meets Fordspecifications. See Capacities andSpecifications (page 283).
3.Replace the engine oil filler cap. Turnit until you feel a strong resistance.
Note:Do not add oil further than themaximum mark. Oil levels above themaximum mark may cause engine damage.
Note:Soak up any spillage with anabsorbent cloth immediately.
ENGINE COOLANT CHECK
WARNINGS
Never remove the coolant reservoircap while the engine is running or hot.
Only add coolant when the engine iscold. If the engine is hot, wait 10minutes for the engine to cool down.
Do not allow the fluid to touch yourskin or eyes. If this happens, rinse theaffected areas immediately withplenty of water and contact your physician.
Undiluted coolant is flammable andmay ignite if spilt on a hot exhaust.
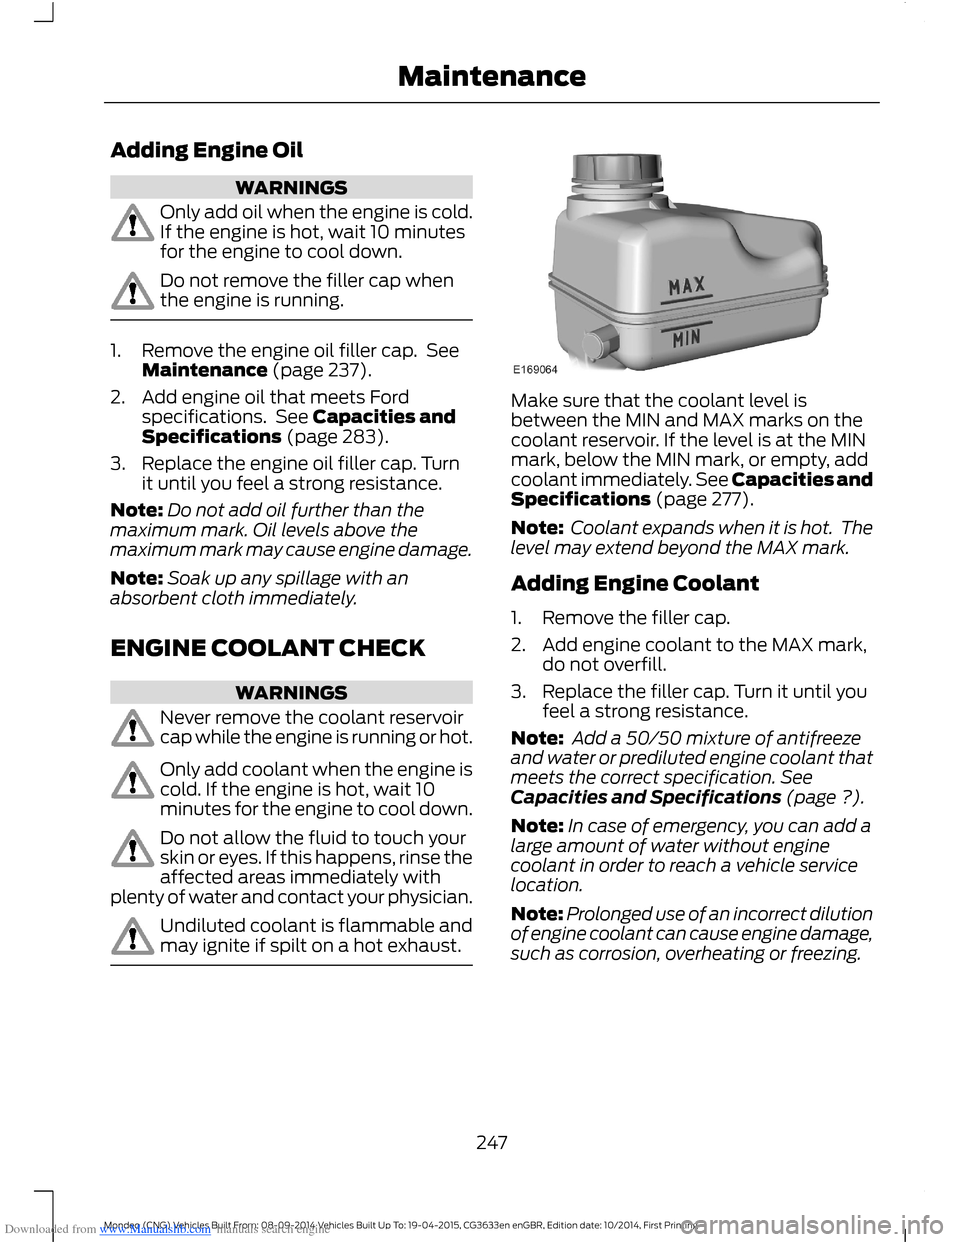
Make sure that the coolant level isbetween the MIN and MAX marks on thecoolant reservoir. If the level is at the MINmark, below the MIN mark, or empty, addcoolant immediately. See Capacities andSpecifications (page 277).
Note: Coolant expands when it is hot. Thelevel may extend beyond the MAX mark.
Adding Engine Coolant
1.Remove the filler cap.
2.Add engine coolant to the MAX mark,do not overfill.
3.Replace the filler cap. Turn it until youfeel a strong resistance.
Note: Add a 50/50 mixture of antifreezeand water or prediluted engine coolant thatmeets the correct specification. SeeCapacities and Specifications (page ?).
Note:In case of emergency, you can add alarge amount of water without enginecoolant in order to reach a vehicle servicelocation.
Note:Prolonged use of an incorrect dilutionof engine coolant can cause engine damage,such as corrosion, overheating or freezing.
247Mondeo (CNG) Vehicles Built From: 08-09-2014 Vehicles Built Up To: 19-04-2015, CG3633en enGBR, Edition date: 10/2014, First PrintingMaintenance
Page 250 of 446

Downloaded from www.Manualslib.com manuals search engine AUTOMATIC TRANSMISSION
FLUID CHECK
The automatic transmission does not havea transmission fluid dipstick.
Have an authorized dealer check andchange the transmission fluid at thecorrect service interval. Your transmissiondoes not consume fluid. However, if thetransmission slips, shifts slowly or if younotice a sign of leaking fluid, contact anauthorized dealer.
Do not use supplemental transmissionfluid additives, treatments or cleaningagents. The use of these materials mayaffect transmission operation and resultin damage to internal transmissioncomponents.
BRAKE AND CLUTCH FLUID
CHECK
WARNINGS
Do not use any fluid other than therecommended brake fluid as this willreduce brake efficiency. Use ofincorrect fluid could result in the loss ofvehicle control, serious personal injury ordeath.
Only use brake fluid from a sealedcontainer. Contamination with dirt,water, petroleum products or othermaterials may result in brake systemdamage or failure. Failure to adhere to thiswarning could result in the loss of vehiclecontrol, serious personal injury or death.
Do not allow the fluid to touch yourskin or eyes. This could cause seriouspersonal injury. Rinse the affectedareas immediately with plenty of waterand consult a physician.
WARNINGS
A fluid level between the MAX andMIN lines is within the normaloperating range and there is no needto add fluid. A fluid level outside of thenormal operating range could compromisethe performance of the brake or clutchsystems. Have your vehicle checkedimmediately.
See Capacities and Specifications(page 281).
Note:The brake and the clutch systems aresupplied from the same reservoir.
WASHER FLUID CHECK
Note:The reservoir supplies the front andrear washer systems.
When adding fluid, use a mixture of washerfluid and water to help prevent freezing incold weather and improve the cleaningcapability. We recommend that you useonly high quality washer fluid.
For information on fluid dilution, refer tothe product instructions.
248Mondeo (CNG) Vehicles Built From: 08-09-2014 Vehicles Built Up To: 19-04-2015, CG3633en enGBR, Edition date: 10/2014, First PrintingMaintenance
Page 251 of 446

Downloaded from www.Manualslib.com manuals search engine CHANGING THE 12V BATTERY
WARNING
For vehicles with Start-Stop thebattery requirement is different. Youmust replace the battery with one ofexactly the same specification.
The battery is located in the enginecompartment. See Maintenance (page237).
Make sure that you dispose ofold batteries in anenvironmentally friendly way.
Seek advice from your local authorityabout recycling old batteries.
CHECKING THE WIPER
BLADES
Run the tip of your fingers over the edge ofthe blade to check for roughness.
Clean the wiper blades with washer fluidor water applied with a soft sponge orcloth.
CHANGING THE WIPER
BLADES
The wiper arms can be manually movedwhen the ignition is off. This allows for easeof blade replacement and cleaning underthe blades.
Replace wiper blades at least once peryear for optimum performance.
Poor wiper quality can be improved bycleaning the wiper blades and thewindshield.
Changing the Front Wiper Blades
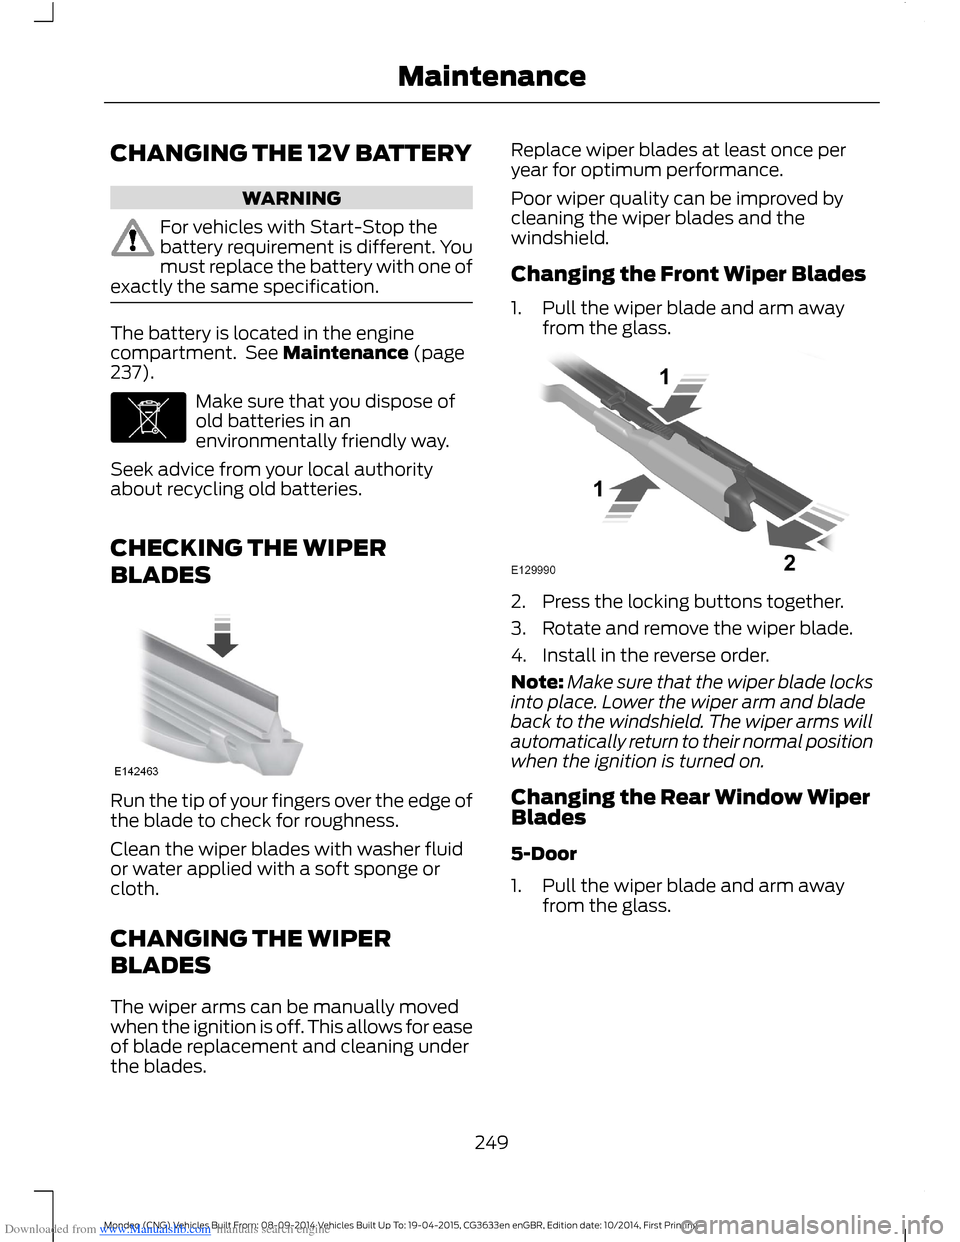
1.Pull the wiper blade and arm awayfrom the glass.
2.Press the locking buttons together.
3.Rotate and remove the wiper blade.
4.Install in the reverse order.
Note:Make sure that the wiper blade locksinto place. Lower the wiper arm and bladeback to the windshield. The wiper arms willautomatically return to their normal positionwhen the ignition is turned on.
Changing the Rear Window WiperBlades
5-Door
1.Pull the wiper blade and arm awayfrom the glass.
249Mondeo (CNG) Vehicles Built From: 08-09-2014 Vehicles Built Up To: 19-04-2015, CG3633en enGBR, Edition date: 10/2014, First PrintingMaintenance
Page 252 of 446
Downloaded from www.Manualslib.com manuals search engine 2.Press the locking buttons together.
3.Rotate and remove the wiper blade.
4.Install in the reverse order.
Note:Make sure that the wiper blade locksinto place. Lower the wiper arm and bladeback to the windshield. The wiper arms willautomatically return to their normal positionwhen the ignition is turned on.
Wagon
1.Lift the wiper arm.
2.Remove the wiper blade.
3.Install new wiper blades in the reverseorder.
Note:Make sure that the wiper blade locksinto place. Lower the wiper arm and bladeback to the windshield.
REMOVING A HEADLAMP
250Mondeo (CNG) Vehicles Built From: 08-09-2014 Vehicles Built Up To: 19-04-2015, CG3633en enGBR, Edition date: 10/2014, First PrintingMaintenance
Page 253 of 446

Downloaded from www.Manualslib.com manuals search engine Note:To remove push pins, use aflat-bladed screwdriver to pull up the centerrelease pin.
1.Make sure the headlamp control is inthe off position and open the hood.
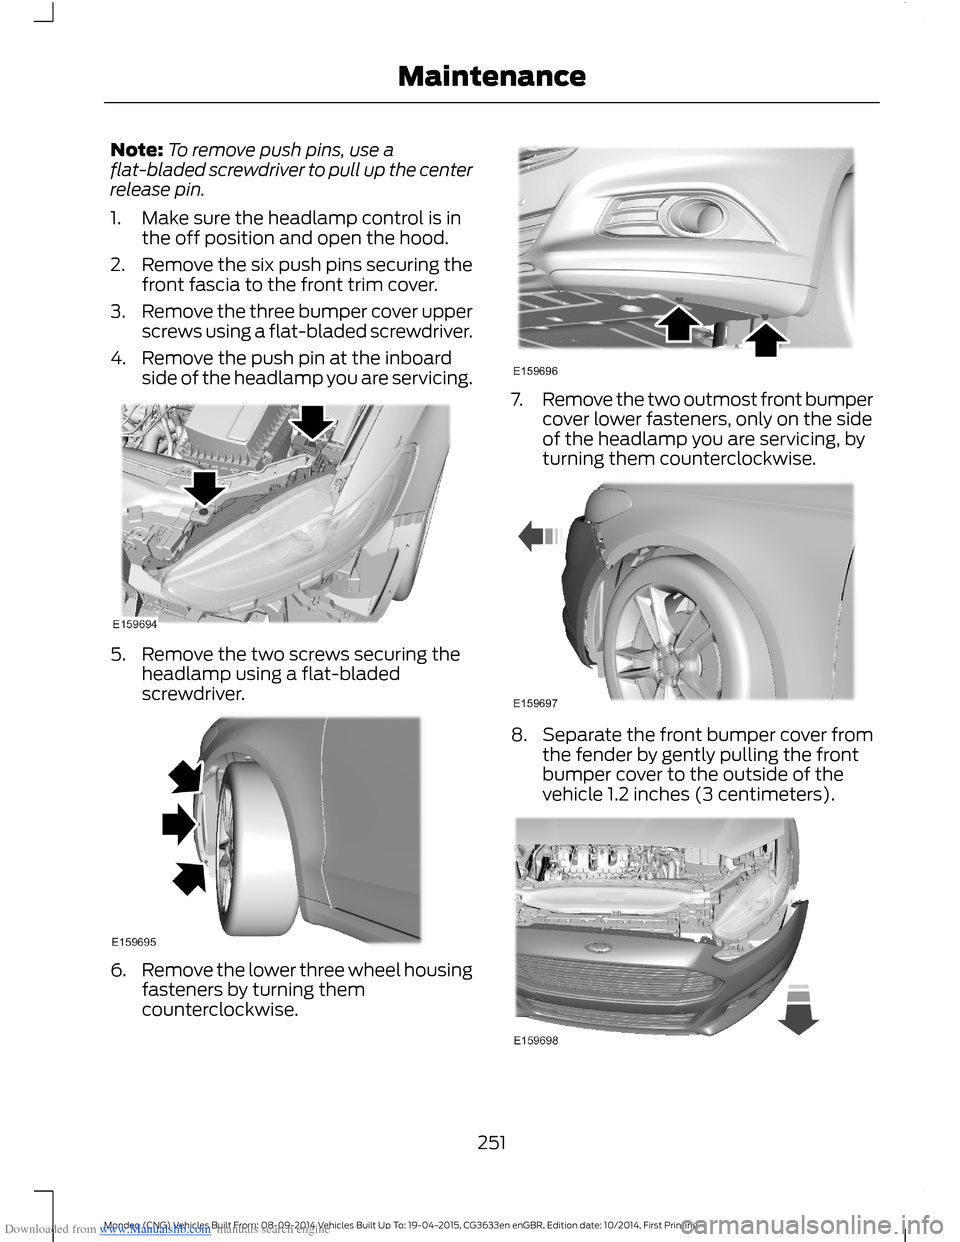
2.Remove the six push pins securing thefront fascia to the front trim cover.
3.Remove the three bumper cover upperscrews using a flat-bladed screwdriver.
4.Remove the push pin at the inboardside of the headlamp you are servicing.
5.Remove the two screws securing theheadlamp using a flat-bladedscrewdriver.
6.Remove the lower three wheel housingfasteners by turning themcounterclockwise.
7.Remove the two outmost front bumpercover lower fasteners, only on the sideof the headlamp you are servicing, byturning them counterclockwise.
8.Separate the front bumper cover fromthe fender by gently pulling the frontbumper cover to the outside of thevehicle 1.2 inches (3 centimeters).
251Mondeo (CNG) Vehicles Built From: 08-09-2014 Vehicles Built Up To: 19-04-2015, CG3633en enGBR, Edition date: 10/2014, First PrintingMaintenance
Page 254 of 446

Downloaded from www.Manualslib.com manuals search engine 9.From the front of the vehicle, gentlypull the front bumper cover forward 4inches (10 centimeters) by grasping itnext to the headlamp to be servicedand in the lower front of the wheelopening.
10.Gently pull the headlamp assemblyoutward to disengage it from thelower fixing point.
11.Carefully lift the headlamp andremove it from the vehicle.
12.Disconnect the electrical connectorfrom the headlamp assembly bypushing the release tab on theconnector.
CHANGING A BULB
WARNINGS
Switch all of the lamps and theignition off. Failure to follow thiswarning could result in seriouspersonal injury.
Bulbs become hot when in use. Letthem cool down before you removethem.
Use the correct specification bulb. SeeBulb Specification Chart (page 255).
Install in the reverse order unless otherwisestated.
Headlamp
You must remove the headlamp assemblyprior to replacing any bulb. See BulbSpecification Chart (page 255).
Front side lamp.A
High beam.B
Low beam.C
Front direction indicator.D
Front Side Lamp
1.Remove the headlamp.
2.Remove the cover.
3.Remove the bulb holder by pulling itstraight out.
4.Remove the bulb by pulling it straightout.
Front Direction Indicator
1.Remove the headlamp.
2.Turn the bulb holder counterclockwiseand remove it.
Note:You cannot separate the bulb fromthe bulb holder.
Headlamp Low Beam
1.Remove the headlamp.
2.Remove the cover.
252Mondeo (CNG) Vehicles Built From: 08-09-2014 Vehicles Built Up To: 19-04-2015, CG3633en enGBR, Edition date: 10/2014, First PrintingMaintenance