2014 FORD FUSION (AMERICAS) instrument panel
[x] Cancel search: instrument panelPage 219 of 458

HAZARD WARNING FLASHERS
Note:If used when the vehicle is notrunning, the battery will lose charge. Theremay be insufficient power to restart yourvehicle.
The hazard warning button islocated on the instrument panel.Use it when your vehicle iscreating a safety hazard for othermotorists.
•Press the button to turn on the hazardwarning function, and the front andrear direction indicators will flash.
•Press the button again to turn themoff.
FUEL SHUTOFF
WARNING
Failure to inspect and, if necessary,repair fuel leaks after a collision mayincrease the risk of fire and seriousinjury. Ford Motor Company recommendsthat the fuel system be inspected by anauthorized dealer after any collision.
In the event of a moderate to severecollision, this vehicle includes a fuel pumpshutoff feature that stops the flow of fuelto the engine. Not every impact will causea shutoff.
Should your vehicle shut off after acollision, you may restart your vehicle. Forvehicles equipped with a key system:
1.Switch off the ignition.
2.Switch on the ignition.
3.Repeat Steps 1 and 2 to re-enable thefuel pump.
For vehicles equipped with a push buttonstart system:
1.Press the START/STOP button toswitch off the ignition.
2.Press the brake pedal and press theSTART/STOP button to start thevehicle.
3.Remove your foot from the brake pedaland press the START/STOP buttonto switch off the ignition.
4.You can either attempt to start theengine by pressing the brake pedal andthe START/STOP button, or switchon the ignition only by pressing theSTART/STOP button withoutpressing the brake pedal. Both waysre-enable the fuel system.
Note:When you try to restart your vehicleafter a fuel shutoff, the vehicle makes surethat various systems are safe to restart.Once your vehicle determines that thesystems are safe, then the vehicle will allowyou to restart.
Note:In the event that your vehicle doesnot restart after your third attempt, contactan authorized dealer.
JUMP STARTING THE VEHICLE
WARNINGS
The gases around the battery canexplode if exposed to flames, sparks,or lit cigarettes. An explosion couldresult in personal injury or vehicle damage.
Batteries contain sulfuric acid whichcan burn skin, eyes and clothing, ifcontacted.
Use only an adequate-sized cablewith insulated clamps.
216Fusion (CC7) , enUSARoadside Emergencies
Page 235 of 458

Protected componentsFuse amp ratingFuse or relay number
Starter solenoid30A184
Not used (spare)30A185
1 M-type fuse2J-type fuse
Passenger Compartment FusePanel
The fuse panel is located under theinstrument panel to the left of the steeringcolumn.
Note:It may be easier to access the fusepanel if you remove the finish trim piece.
232Fusion (CC7) , enUSAFusesE145984
Page 239 of 458
GENERAL INFORMATION
Have your vehicle serviced regularly to helpmaintain its roadworthiness and resalevalue. There is a large network of Fordauthorized dealers that are there to helpyou with their professional servicingexpertise. We believe that their speciallytrained technicians are best qualified toservice your vehicle properly and expertly.They are supported by a wide range ofhighly specialized tools developedspecifically for servicing your vehicle.
To help you service your vehicle, weprovide scheduled maintenanceinformation which makes tracking routineservice easy. See ScheduledMaintenance (page 428).
If your vehicle requires professional service,your authorized dealer can provide thenecessary parts and service. Check yourwarranty information to find out whichparts and services are covered.
Use only recommended fuels, lubricants,fluids and service parts conforming tospecifications. Motorcraft® parts aredesigned and built to provide the bestperformance in your vehicle.
Precautions
•Do not work on a hot engine.
•Make sure that nothing gets caught inmoving parts.
•Do not work on a vehicle with theengine running in an enclosed space,unless you are sure you have enoughventilation.
•Keep all open flames and other burningmaterial (such as cigarettes) awayfrom the battery and all fuel relatedparts.
Working with the Engine Off
1.Set the parking brake and shift to P(Park).
2.Turn off the engine and remove the key(if equipped).
3.Block the wheels.
Working with the Engine On
WARNING
To reduce the risk of vehicle damageand/or personal burn injuries, do notstart your engine with the air cleanerremoved and do not remove it while theengine is running.
1.Set the parking brake and shift to P(Park).
2.Block the wheels
OPENING AND CLOSING THE
HOOD
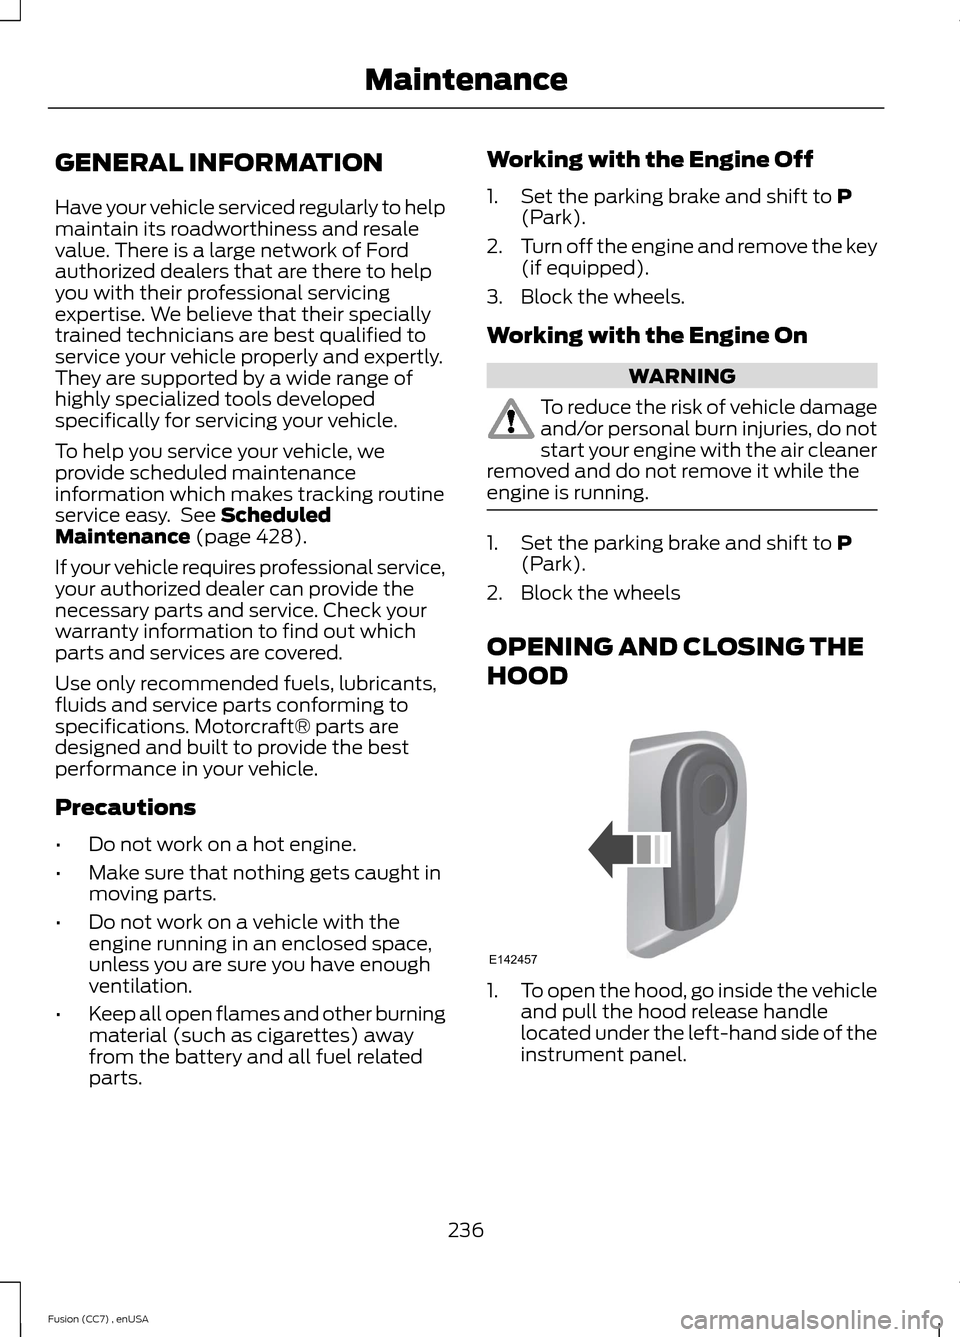
1.To open the hood, go inside the vehicleand pull the hood release handlelocated under the left-hand side of theinstrument panel.
236Fusion (CC7) , enUSAMaintenanceE142457
Page 257 of 458
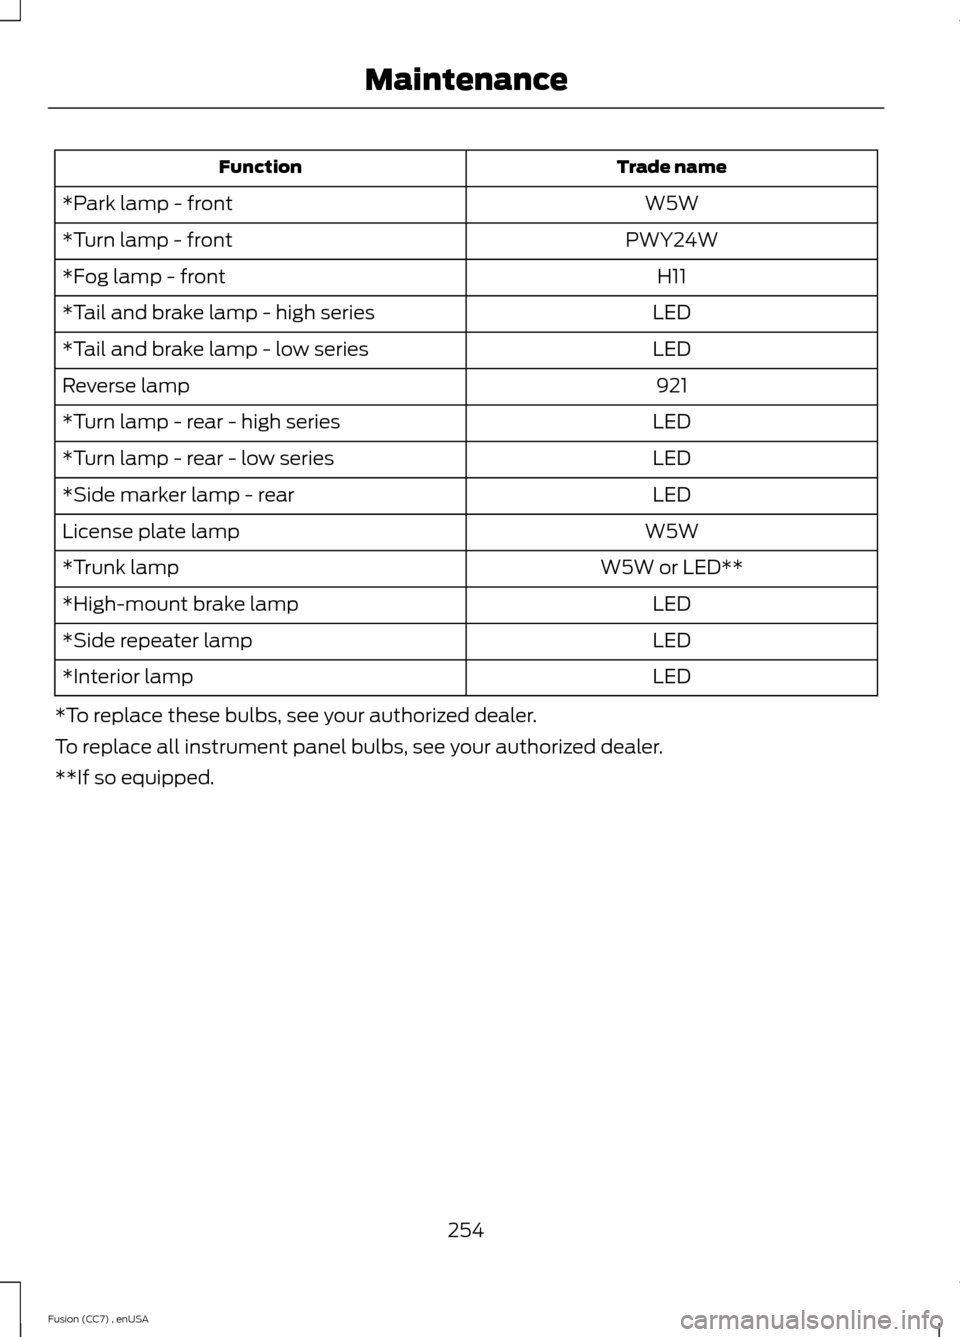
Trade nameFunction
W5W*Park lamp - front
PWY24W*Turn lamp - front
H11*Fog lamp - front
LED*Tail and brake lamp - high series
LED*Tail and brake lamp - low series
921Reverse lamp
LED*Turn lamp - rear - high series
LED*Turn lamp - rear - low series
LED*Side marker lamp - rear
W5WLicense plate lamp
W5W or LED***Trunk lamp
LED*High-mount brake lamp
LED*Side repeater lamp
LED*Interior lamp
*To replace these bulbs, see your authorized dealer.
To replace all instrument panel bulbs, see your authorized dealer.
**If so equipped.
254Fusion (CC7) , enUSAMaintenance
Page 261 of 458
•Never wash or rinse any ignition coil,spark plug wire or spark plug well, orthe area in and around these locations.
•Cover the battery, power distributionbox, and air filter assembly to preventwater damage when cleaning theengine.
CLEANING THE WINDOWS AND
WIPER BLADES
Car wash chemicals and environmentalfallout can result in windshield and wiperblade contamination. Dirty windshield andwipers will result in poor windshield wiperoperation. Keep the windshield and wiperblades clean to maintain windshield wiperperformance.
To clean the windshield and wiper blades:
•Clean the windshield with anon-abrasive glass cleaner.
•For windshields contaminated withtree sap, chemicals, wax or bugs, cleanthe entire windshield using steel wool(no greater than 0000 grade) in acircular motion and rinse with water.
•Clean the wiper blades with isopropylrubbing alcohol or windshield washerfluid.
Note: Do not use razor blades or othersharp objects to clean or remove decalsfrom the inside of the heated rear window.The vehicle warranty does not coverdamage caused to the heated rear windowgrid lines.
CLEANING THE INTERIOR
WARNINGS
Do not use cleaning solvents, bleachor dye on the vehicle’s safety belts,as these actions may weaken thebelt webbing.
WARNINGS
On vehicles equipped withseat-mounted airbags, do not usechemical solvents or strongdetergents. Such products couldcontaminate the side airbag system andaffect performance of the side airbag in acollision.
For fabric, carpets, cloth seats, safety beltsand seats equipped with side airbags:
•Remove dust and loose dirt with avacuum cleaner.
•Remove light stains and soil withMotorcraft Professional StrengthCarpet & Upholstery Cleaner.
•If grease or tar is present on thematerial, spot-clean the area first withMotorcraft Spot and Stain Remover. InCanada, use Motorcraft Multi-PurposeCleaner.
•If a ring forms on the fabric after spotcleaning, clean the entire areaimmediately (but do not oversaturate)or the ring will set.
•Do not use household cleaningproducts or glass cleaners, which canstain and discolor the fabric and affectthe flame retardant abilities of the seatmaterials.
CLEANING THE INSTRUMENT
PANEL AND INSTRUMENT
CLUSTER LENS
WARNING
Do not use chemical solvents orstrong detergents when cleaning thesteering wheel or instrument panelto avoid contamination of the airbagsystem.
258Fusion (CC7) , enUSAVehicle Care
Page 262 of 458
Clean the instrument panel and clusterlens with a clean, damp, white cottoncloth, then use a clean and dry whitecotton cloth to dry these areas.
•Avoid cleaners or polishes that increasethe gloss of the upper portion of theinstrument panel. The dull finish in thisarea helps protect you fromundesirable windshield reflection.
•Be certain to wash or wipe your handsclean if you have been in contact withcertain products such as insectrepellent and suntan lotion in order toavoid possible damage to the interiorpainted surfaces.
•Do not use household or glass cleanersas these may damage the finish of theinstrument panel, interior trim andcluster lens.
•Do not allow air fresheners and handsanitizers to spill onto interior surfaces.If a spill occurs, wipe off immediately.Damage may not be covered by yourwarranty.
If a staining liquid like coffee or juice hasbeen spilled on the instrument panel or oninterior trim surfaces, clean as follows:
1.Wipe up spilled liquid using a clean,white, cotton cloth.
2.Wipe the surface with a damp, clean,white cotton cloth. For more thoroughcleaning, use a mild soap and watersolution. If the spot cannot becompletely cleaned by this method,the area may be cleaned using acommercially available cleaningproduct designed for automotiveinteriors.
3.If necessary, apply more soap andwater solution or cleaning product toa clean, white, cotton cloth and pressthe cloth onto the soiled area. Allowthis to set at room temperature for 30minutes.
4.Remove the soaked cloth and if it is notsoiled badly, use this cloth to clean thearea by using a rubbing motion for 60seconds.
5.Following this, wipe area dry with aclean, white, cotton cloth.
CLEANING LEATHER SEATS (IF
EQUIPPED)
For routine cleaning, wipe the surface witha soft, damp cloth. For more thoroughcleaning, wipe the surface with a mild soapand water solution. Dry the area with a softcloth.
If you cannot completely clean the leatherusing a mild soap and water solution, youcan try a commercially available leathercleaning product designed for automotiveinteriors.
Note:To check for compatibility, first testany cleaner or stain remover on aninconspicuous part of the leather.
You should:
•remove dust and loose dirt with avacuum cleaner
•clean spills and stains as quickly aspossible
•check for compatibility by first testingany cleaner or stain remover on aninconspicuous part of the leather.
Do not use the following products as thesemay damage the leather:
•oil/petroleum-based leatherconditioners
•household cleaners
•alcohol solutions
•solvents or cleaners intendedspecifically for rubber, vinyl andplastics.
259Fusion (CC7) , enUSAVehicle Care
Page 292 of 458
VEHICLE IDENTIFICATION
NUMBER
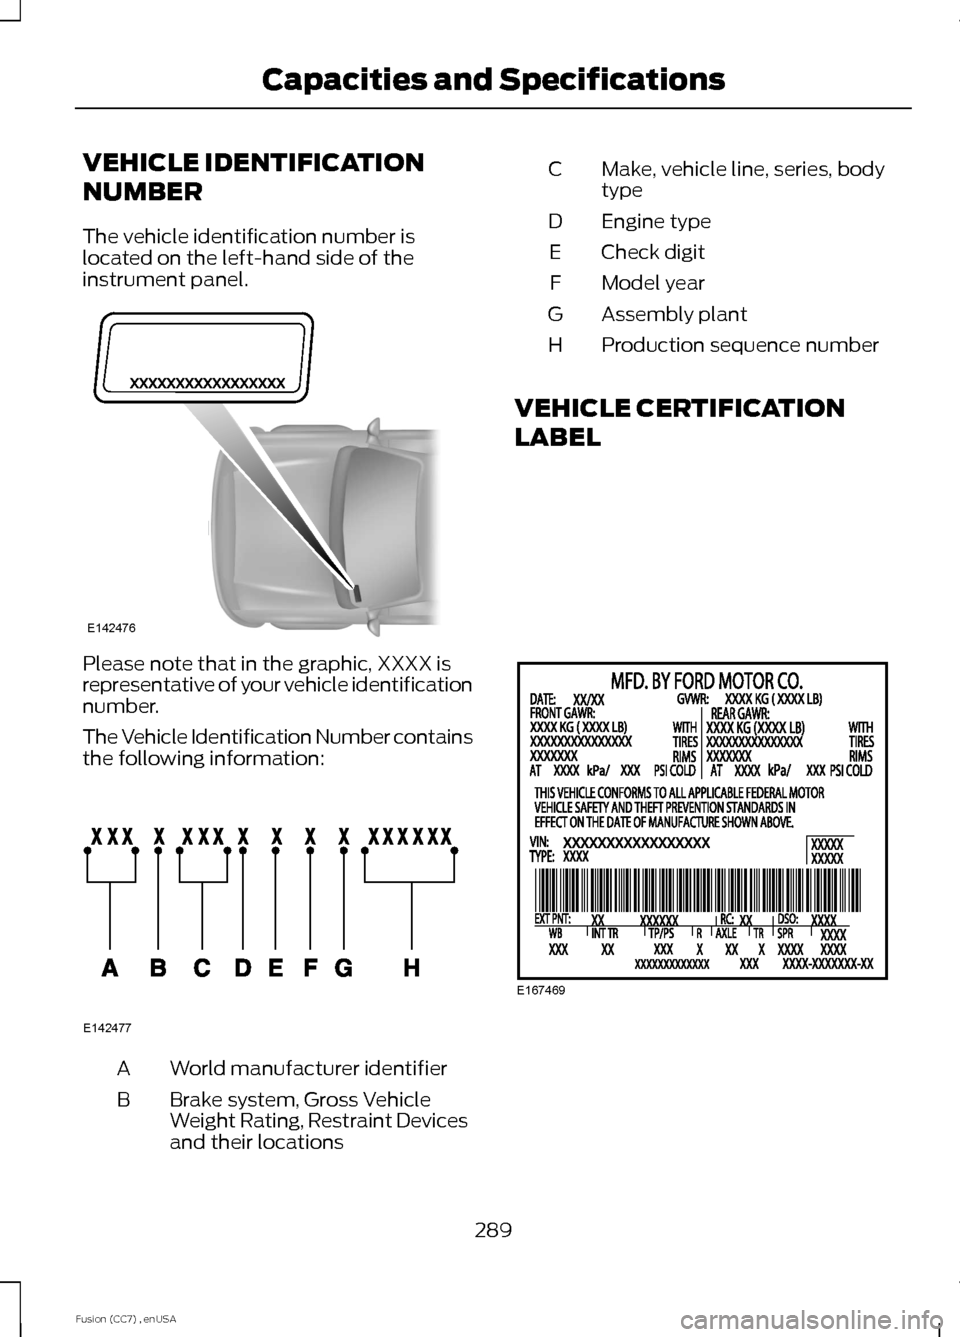
The vehicle identification number islocated on the left-hand side of theinstrument panel.
Please note that in the graphic, XXXX isrepresentative of your vehicle identificationnumber.
The Vehicle Identification Number containsthe following information:
World manufacturer identifierA
Brake system, Gross VehicleWeight Rating, Restraint Devicesand their locations
B
Make, vehicle line, series, bodytypeC
Engine typeD
Check digitE
Model yearF
Assembly plantG
Production sequence numberH
VEHICLE CERTIFICATION
LABEL
289Fusion (CC7) , enUSACapacities and SpecificationsE142476 E142477 E167469
Page 358 of 458
SettingsE
HelpF
Under this menu, you can setyour clock, access and adjust thedisplay, sound and vehiclesettings as well as access settings forspecific modes or the help feature.
Clock
Note:You cannot manually set the date.Your vehicle’s GPS does this for you.
Note:If the battery has been disconnected,your vehicle needs to acquire a GPS signalto update the clock. Once your vehicleacquires the signal, it may take a fewminutes for the update to display the correcttime.
1.Press the Settings icon > Clock.
2.Press + and - to adjust the time.
From this screen, you can also make otheradjustments such as 12-hour or 24-hourmode, activate GPS time synchronizationand have the system automatically updatenew time zones.
You can also turn the outside airtemperature display off and on. It appearsat the top center of the touchscreen, nextto the time and date.
The system automatically saves anyupdates you make to the settings.
Display
You can adjust the touchscreen displaythrough the touchscreen or by pressing thevoice button on your steering wheelcontrols and when prompted, say, "Displaysettings".
Press the Settings icon >Display, to access and makeadjustments using thetouchscreen.
•Brightness allows you to make thescreen display brighter or dimmer.
•Auto DIM, when set to On, lets you usethe Auto Dim Manual Offset feature.When set to Off, screen brightnessdoes not change.
•Mode allows you to set the screen toa certain brightness or have the systemautomatically change based on theoutside light level, or turn the displayoff.
•If you select AUTO or NIGHT, youhave the options of turning thedisplay's Auto Dim feature on or offand changing the Auto Dim ManualOffset feature.
•Auto Dim Manual Offset allows youto adjust screen dimming as theoutside lighting conditions change fromday to night. This feature also allowsyou to adjust screen brightness usingthe instrument panel dimming control.
•Edit Wallpaper
•You can have your touchscreendisplay the default photo or uploadyour own.
Uploading Photos for Your HomeScreen Wallpaper
Note:You cannot load photos directly fromyour camera. You must access the photoseither from your USB mass storage deviceor from an SD card.
355Fusion (CC7) , enUSAMyFord Touch™ (If Equipped)E142607 E142607 E142607