2014 FORD FUSION (AMERICAS) instrument panel
[x] Cancel search: instrument panelPage 117 of 458
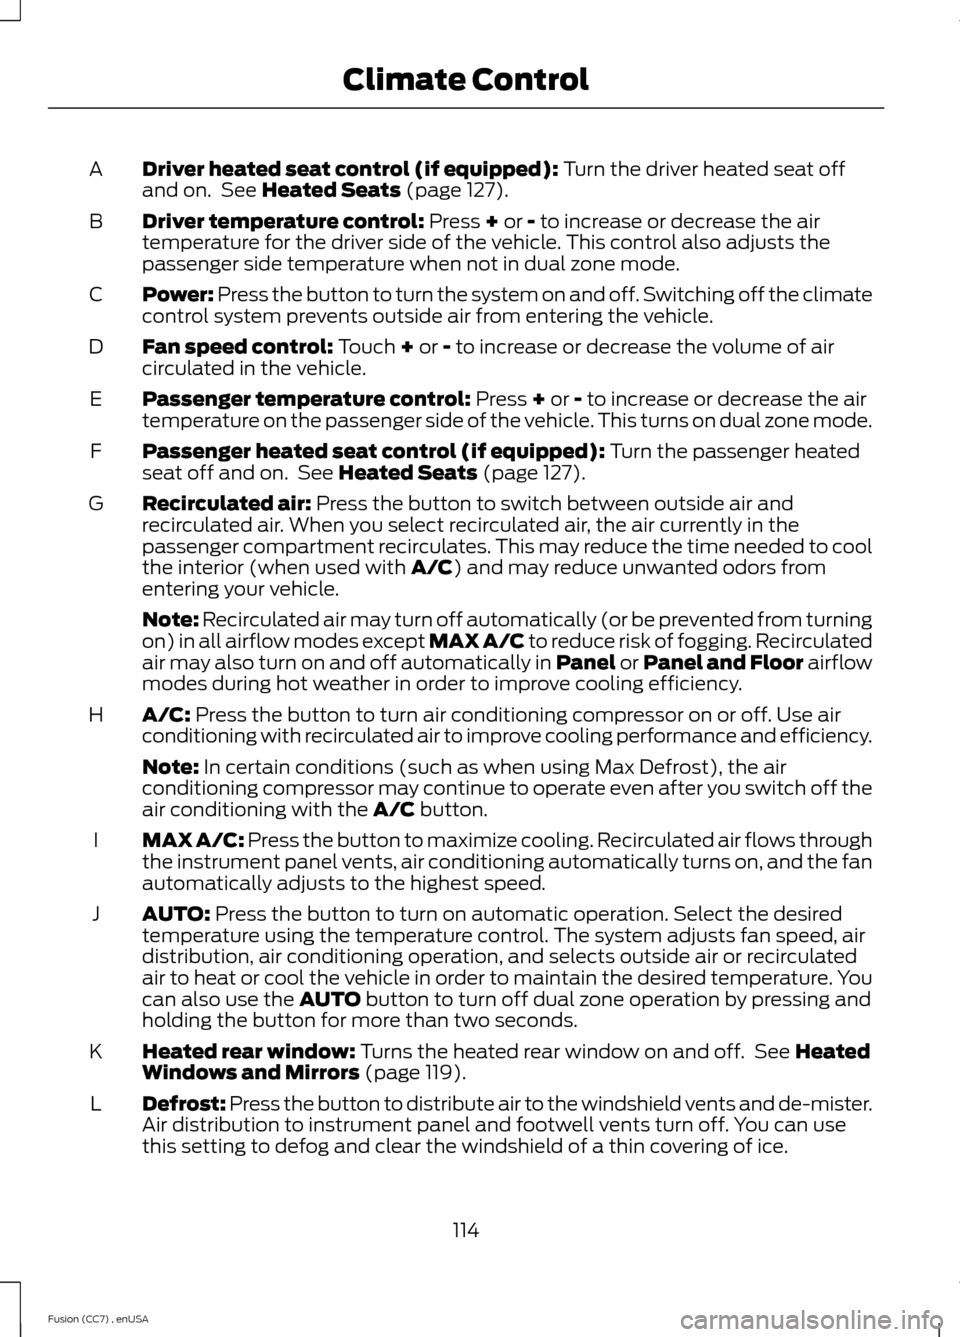
Driver heated seat control (if equipped): Turn the driver heated seat offand on. See Heated Seats (page 127).A
Driver temperature control: Press + or - to increase or decrease the airtemperature for the driver side of the vehicle. This control also adjusts thepassenger side temperature when not in dual zone mode.
B
Power: Press the button to turn the system on and off. Switching off the climatecontrol system prevents outside air from entering the vehicle.C
Fan speed control: Touch + or - to increase or decrease the volume of aircirculated in the vehicle.D
Passenger temperature control: Press + or - to increase or decrease the airtemperature on the passenger side of the vehicle. This turns on dual zone mode.E
Passenger heated seat control (if equipped): Turn the passenger heatedseat off and on. See Heated Seats (page 127).F
Recirculated air: Press the button to switch between outside air andrecirculated air. When you select recirculated air, the air currently in thepassenger compartment recirculates. This may reduce the time needed to coolthe interior (when used with A/C) and may reduce unwanted odors fromentering your vehicle.
G
Note: Recirculated air may turn off automatically (or be prevented from turningon) in all airflow modes except MAX A/C to reduce risk of fogging. Recirculatedair may also turn on and off automatically in Panel or Panel and Floor airflowmodes during hot weather in order to improve cooling efficiency.
A/C: Press the button to turn air conditioning compressor on or off. Use airconditioning with recirculated air to improve cooling performance and efficiency.H
Note: In certain conditions (such as when using Max Defrost), the airconditioning compressor may continue to operate even after you switch off theair conditioning with the A/C button.
MAX A/C: Press the button to maximize cooling. Recirculated air flows throughthe instrument panel vents, air conditioning automatically turns on, and the fanautomatically adjusts to the highest speed.
I
AUTO: Press the button to turn on automatic operation. Select the desiredtemperature using the temperature control. The system adjusts fan speed, airdistribution, air conditioning operation, and selects outside air or recirculatedair to heat or cool the vehicle in order to maintain the desired temperature. Youcan also use the AUTO button to turn off dual zone operation by pressing andholding the button for more than two seconds.
J
Heated rear window: Turns the heated rear window on and off. See HeatedWindows and Mirrors (page 119).K
Defrost: Press the button to distribute air to the windshield vents and de-mister.Air distribution to instrument panel and footwell vents turn off. You can usethis setting to defog and clear the windshield of a thin covering of ice.
L
114Fusion (CC7) , enUSAClimate Control
Page 119 of 458
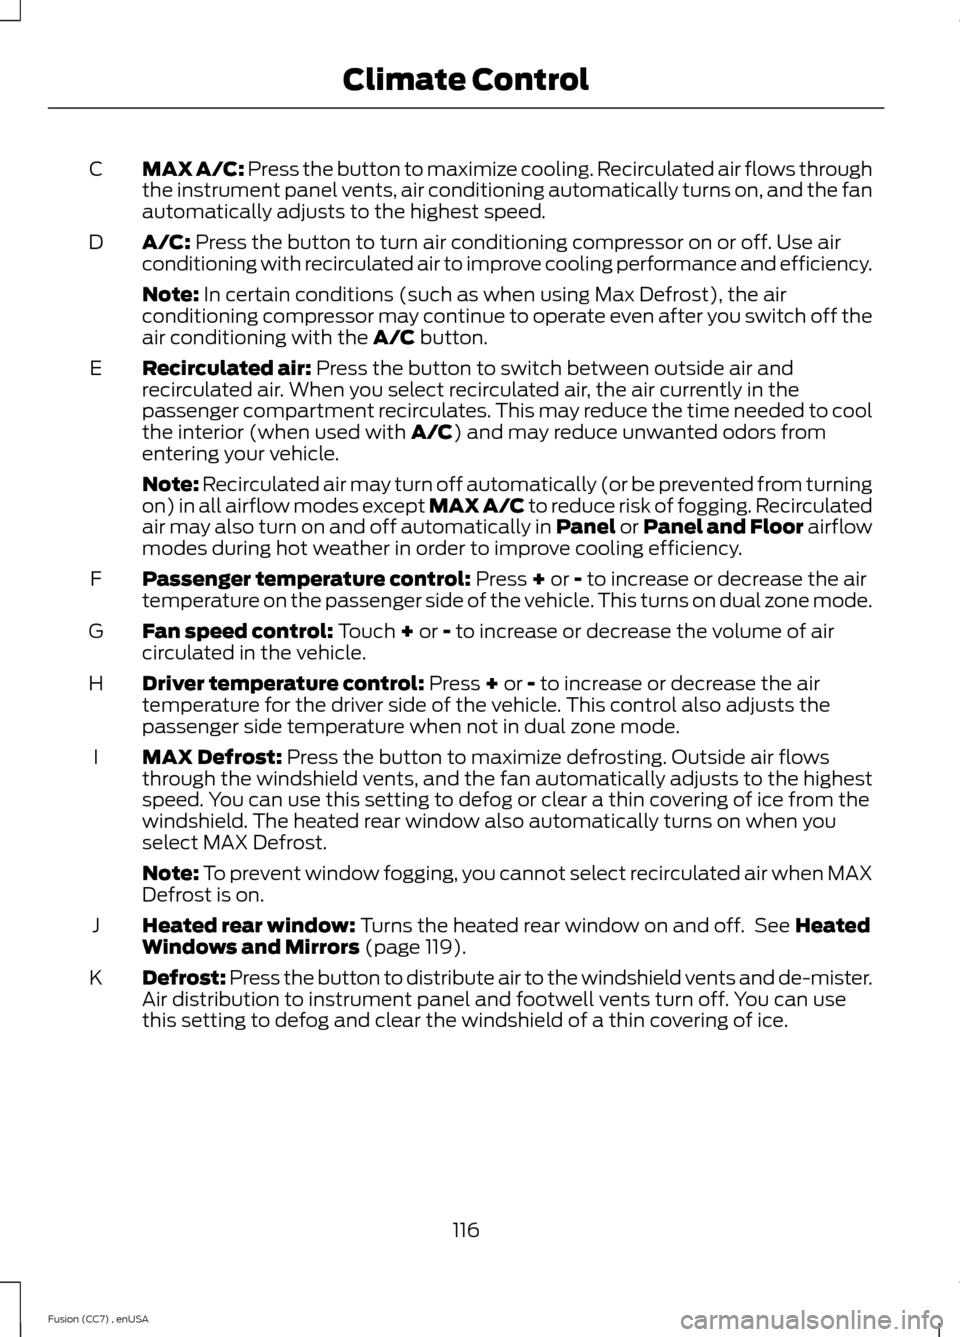
MAX A/C: Press the button to maximize cooling. Recirculated air flows throughthe instrument panel vents, air conditioning automatically turns on, and the fanautomatically adjusts to the highest speed.
C
A/C: Press the button to turn air conditioning compressor on or off. Use airconditioning with recirculated air to improve cooling performance and efficiency.D
Note: In certain conditions (such as when using Max Defrost), the airconditioning compressor may continue to operate even after you switch off theair conditioning with the A/C button.
Recirculated air: Press the button to switch between outside air andrecirculated air. When you select recirculated air, the air currently in thepassenger compartment recirculates. This may reduce the time needed to coolthe interior (when used with A/C) and may reduce unwanted odors fromentering your vehicle.
E
Note: Recirculated air may turn off automatically (or be prevented from turningon) in all airflow modes except MAX A/C to reduce risk of fogging. Recirculatedair may also turn on and off automatically in Panel or Panel and Floor airflowmodes during hot weather in order to improve cooling efficiency.
Passenger temperature control: Press + or - to increase or decrease the airtemperature on the passenger side of the vehicle. This turns on dual zone mode.F
Fan speed control: Touch + or - to increase or decrease the volume of aircirculated in the vehicle.G
Driver temperature control: Press + or - to increase or decrease the airtemperature for the driver side of the vehicle. This control also adjusts thepassenger side temperature when not in dual zone mode.
H
MAX Defrost: Press the button to maximize defrosting. Outside air flowsthrough the windshield vents, and the fan automatically adjusts to the highestspeed. You can use this setting to defog or clear a thin covering of ice from thewindshield. The heated rear window also automatically turns on when youselect MAX Defrost.
I
Note: To prevent window fogging, you cannot select recirculated air when MAXDefrost is on.
Heated rear window: Turns the heated rear window on and off. See HeatedWindows and Mirrors (page 119).J
Defrost: Press the button to distribute air to the windshield vents and de-mister.Air distribution to instrument panel and footwell vents turn off. You can usethis setting to defog and clear the windshield of a thin covering of ice.
K
116Fusion (CC7) , enUSAClimate Control
Page 120 of 458
HINTS ON CONTROLLING THE
INTERIOR CLIMATE
General Hints
Note:Prolonged use of recirculated air maycause the windows to fog up.
Note:You may feel a small amount of airfrom the footwell air vents regardless of theair distribution setting.
Note:To reduce humidity build-up insideyour vehicle, do not drive with the systemswitched off or with recirculated air alwaysswitched on.
Note:Do not place objects under the frontseats as this may interfere with the airflowto the rear seats.
Note:Remove any snow, ice or leaves fromthe air intake area at the base of thewindshield.
Note:To improve the time to reach comfortin hot weather, drive with the windowsslightly open for 2-3 minutes after start-upor until your vehicle airs out.
Manual Climate Control
Note:To reduce fogging of the windshieldduring humid weather, adjust the airdistribution control to the windshield airvents position.
Automatic Climate Control
Note:Adjusting the settings when yourvehicle interior is extremely hot or cold isnot necessary. The system automaticallyadjusts to heat or cool the cabin to yourselected temperature as quickly as possible.For the system to function efficiently, theinstrument panel and side air vents shouldbe fully open.
Note:If you select AUTO during coldoutside temperatures, the system directsairflow to the windshield and side windowvents. In addition, the fan may run at aslower speed until the engine warms up.
Note:If you select AUTO during hot outsidetemperatures, or when the inside of thevehicle is hot, the system automatically usesrecirculated air to maximize interior cooling.When the interior reaches the selectedtemperature, the system automaticallyswitches to using outside air.
Heating the Interior Quickly
Vehicle with automatic climate controlVehicle with manual climate control
Press the AUTO button.Adjust the fan speed to the highestspeed setting.1
Adjust the temperature control to thedesired setting.Adjust the temperature control to thehighest setting.2
Select the footwell air vents using theair distribution buttons.3
117Fusion (CC7) , enUSAClimate Control
Page 121 of 458
Recommended Settings for Heating
Vehicle with automatic climate controlVehicle with manual climate control
Press the AUTO button.Adjust the fan speed to the centersetting.1
Adjust the temperature control to thedesired setting. Use 72°F (22°C) as astarting point, then adjust the setting asnecessary.
Adjust the temperature control to themidway point of the hot settings.2
Select the footwell air vents using theair distribution buttons.3
Cooling the Interior Quickly
Vehicle with automatic climate controlVehicle with manual climate control
Press the MAX A/C button.Adjust the temperature control to theMAX A/C position.1
Drive with the windows open for 2-3minutes.2
Recommended Settings for Cooling
Vehicle with automatic climate controlVehicle with manual climate control
Press the AUTO button.Adjust the fan speed to the centersetting.1
Adjust the temperature control to thedesired setting. Use 72°F (22°C) as astarting point, then adjust the setting asnecessary.
Adjust the temperature control to themidway point of the cold settings.2
Select the instrument panel air ventsusing the air distribution buttons.3
118Fusion (CC7) , enUSAClimate Control
Page 122 of 458
Side Window Defogging in Cold Weather
Vehicle With Automatic Climate ControlVehicle With Manual Climate Control
Press the defrost button.Select the instrument panel and footwellair vents positions through the air distri-bution control.
1
Adjust the temperature control to thedesired setting. Use 72°F (22°C) as astarting point, then adjust the setting asnecessary.
Press the A/C button.2
Adjust the temperature control to thedesired setting.3
Adjust the fan speed to the highestsetting.4
Direct the instrument panel side air ventstoward the side windows.5
Close the instrument panel center vents.6
HEATED WINDOWS AND
MIRRORS (IF EQUIPPED)
Heated Rear Window
Note:You must switch the ignition on touse this feature.
Press the button to clear therear window of thin ice and fog.It switches off automaticallyafter 10 minutes, or when you switch offthe ignition. You can also press the buttonagain to switch it off.
Do not use razor blades or other sharpobjects to clean the inside of the rearwindow or to remove decals from theinside of the rear window. This maycause damage to the heated grid lines.Your warranty does not cover thisdamage.
Heated Exterior Mirror (If Equipped)
Note:Do not remove ice from the mirrorswith a scraper or attempt to readjust themirror glass that has frozen in place. Theseactions could cause damage to the glassand mirrors.
Note:Do not clean the housing or glass ofany mirror with harsh abrasives, fuel or otherpetroleum-based cleaning products.
The heated mirrors remove ice, mist andfog when you switch on the heated rearwindow.
CABIN AIR FILTER
Your vehicle is equipped with a cabin airfilter. It is located behind the glove box.
The particulate filtration system reducesthe concentration of airborne particlessuch as dust, spores and pollen in the airsupplied to the interior of your vehicle.
119Fusion (CC7) , enUSAClimate ControlE72507
Page 159 of 458
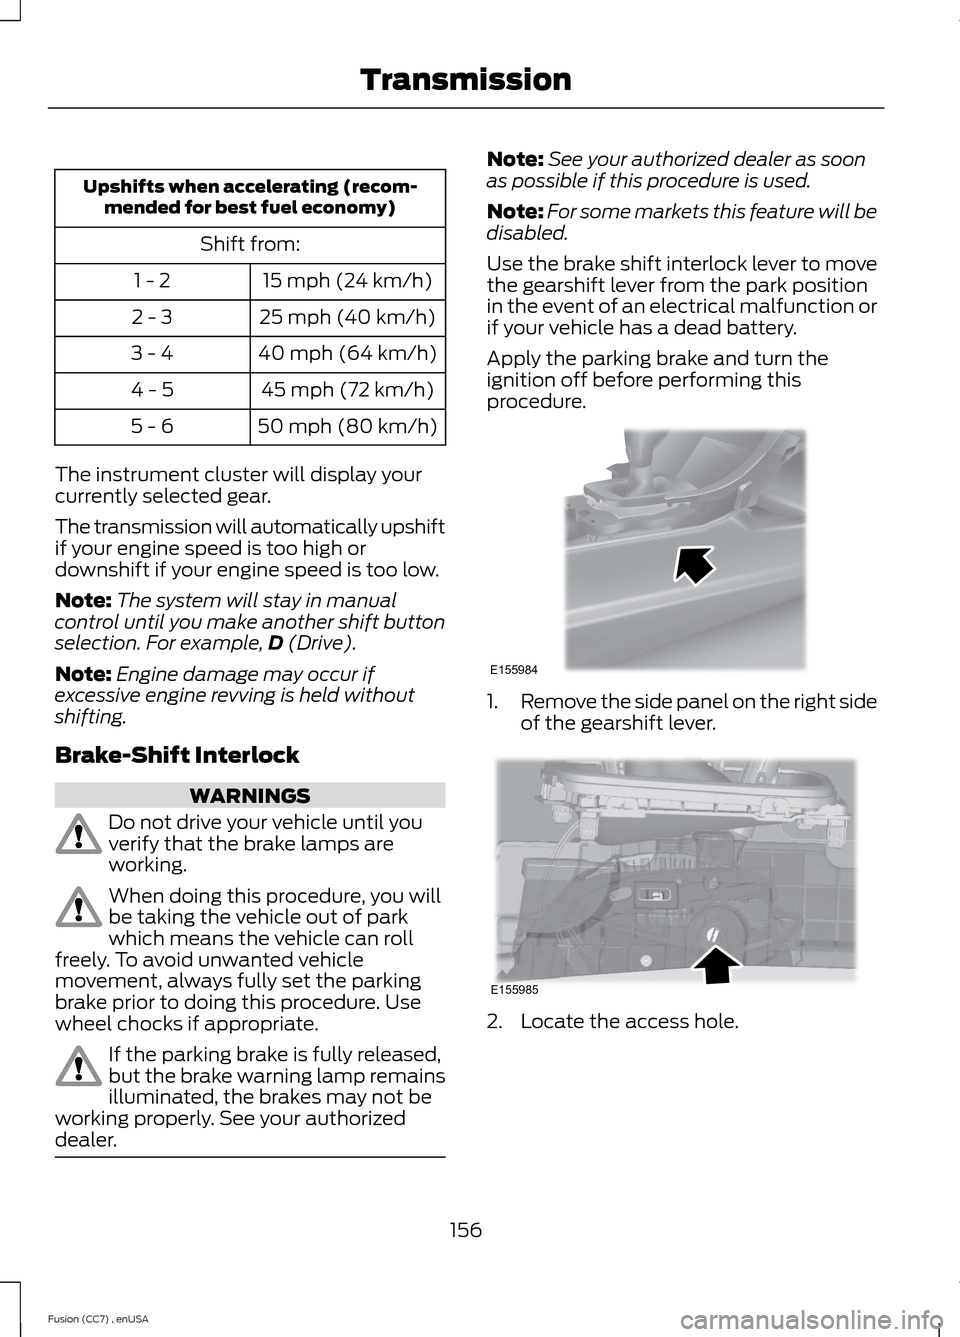
Upshifts when accelerating (recom-mended for best fuel economy)
Shift from:
15 mph (24 km/h)1 - 2
25 mph (40 km/h)2 - 3
40 mph (64 km/h)3 - 4
45 mph (72 km/h)4 - 5
50 mph (80 km/h)5 - 6
The instrument cluster will display yourcurrently selected gear.
The transmission will automatically upshiftif your engine speed is too high ordownshift if your engine speed is too low.
Note:The system will stay in manualcontrol until you make another shift buttonselection. For example,D (Drive).
Note:Engine damage may occur ifexcessive engine revving is held withoutshifting.
Brake-Shift Interlock
WARNINGS
Do not drive your vehicle until youverify that the brake lamps areworking.
When doing this procedure, you willbe taking the vehicle out of parkwhich means the vehicle can rollfreely. To avoid unwanted vehiclemovement, always fully set the parkingbrake prior to doing this procedure. Usewheel chocks if appropriate.
If the parking brake is fully released,but the brake warning lamp remainsilluminated, the brakes may not beworking properly. See your authorizeddealer.
Note:See your authorized dealer as soonas possible if this procedure is used.
Note:For some markets this feature will bedisabled.
Use the brake shift interlock lever to movethe gearshift lever from the park positionin the event of an electrical malfunction orif your vehicle has a dead battery.
Apply the parking brake and turn theignition off before performing thisprocedure.
1.Remove the side panel on the right sideof the gearshift lever.
2.Locate the access hole.
156Fusion (CC7) , enUSATransmissionE155984 E155985
Page 171 of 458
PRINCIPLE OF OPERATION
The traction control system helps avoiddrive wheel spin and loss of traction.
If your vehicle begins to slide, the systemapplies the brakes to individual wheelsand, when needed, reduces engine powerat the same time. If the wheels spin whenaccelerating on slippery or loose surfaces,the system reduces engine power in orderto increase traction.
USING TRACTION CONTROL
In certain situations for example, stuck insnow or mud, turning the traction controloff may be beneficial as this allows thewheels to spin with full engine power.Depending on the type of system you haveon your vehicle, you can either turn thesystem off using the information displayor by pressing the button.
Switching the System Off Usingthe Information Display Controls
(If Equipped)
Your vehicle comes with this featurealready enabled. If required, you can switchthis feature off using the informationdisplay controls. See Principle ofOperation (page 168).
Switching the System Off Using aSwitch (If Equipped)
The button is located in the instrumentpanel.
Press the button. You will see a messagein conjunction with an illuminated icon inthe display. Press the button again toreturn the system to normal mode.
When you switch the traction controlsystem off, stability control remains fullyactive.
System Indicator Lights andMessages
WARNING
If a failure has been detected withinthe AdvanceTrac system, thestability control light will illuminatesteadily. Verify that the AdvanceTracsystem was not manually disabled throughthe information display. If the stabilitycontrol light still illuminates steadily, havethe system serviced by an authorizeddealer immediately. Operating your vehiclewith AdvanceTrac disabled could lead toan increased risk of loss of vehicle control,vehicle rollover, personal injury and death.
The stability control lighttemporarily illuminates onengine start-up and flasheswhen a driving condition activates thestability system.
The stability control off lighttemporarily illuminates onengine start-up and stays onwhen you turn the traction control systemoff.
When you turn the traction control systemoff or on, a message appears in theinformation display showing system status.
168Fusion (CC7) , enUSATraction ControlE138639
Page 178 of 458
![FORD FUSION (AMERICAS) 2014 2.G Owners Manual The system does not position the vehicle where I want in the space
Your vehicle is rolling in the opposite direction of the transmission (rolling forward whenReverse [R] is selected)
An irregular curb FORD FUSION (AMERICAS) 2014 2.G Owners Manual The system does not position the vehicle where I want in the space
Your vehicle is rolling in the opposite direction of the transmission (rolling forward whenReverse [R] is selected)
An irregular curb](/manual-img/11/5191/w960_5191-177.png)
The system does not position the vehicle where I want in the space
Your vehicle is rolling in the opposite direction of the transmission (rolling forward whenReverse [R] is selected)
An irregular curb along the parking space prevents the system from aligning your vehicleproperly
Vehicles or objects bordering the space may not be positioned correctly
You pulled your vehicle too far past the parking space. The system performs best whenyou drive the same distance past the parking space
The tires may not be installed or maintained correctly (not inflated correctly, impropersize, or of different sizes)
A repair or alteration has changed detection capabilities
A parked vehicle has a high attachment (salt sprayer, snowplow, moving truck bed,etc.)
The parking space length or position of parked objects changed after your vehicle passed
The temperature around your vehicle changes quickly (driving from a heated garageinto the cold, or after leaving a car wash)
REAR VIEW CAMERA (IF EQUIPPED)
WARNINGS
The rear view camera system is areverse aid supplement device thatstill requires the driver to use it inconjunction with the interior and exteriormirrors for maximum coverage.
Objects that are close to eithercorner of the bumper or under thebumper, might not be seen on thescreen due to the limited coverage of thecamera system.
Back up as slow as possible sincehigher speeds might limit yourreaction time to stop the vehicle.
WARNINGS
Use caution when using the rearvideo camera and the trunk is ajar. Ifthe trunk is ajar, the camera will beout of position and the video image maybe incorrect. All guidelines (if enabled)have been removed when the trunk is ajar.
Use caution when turning camerafeatures on or off while in R(Reverse). Make sure the vehicle isnot moving.
The rear view camera system provides avideo image of the area behind the vehicle.The image will be displayed in either in therear view mirror or the display in the centerof the instrument panel.
During operation, lines appear in thedisplay which represent your vehicle’s pathand proximity to objects behind the vehicle.
175Fusion (CC7) , enUSAParking Aids