2014 FORD FUSION (AMERICAS) lights
[x] Cancel search: lightsPage 169 of 458

Note:If the electric parking brake warninglamp stays illuminated, the electric parkingbrake will not automatically release. Youmust release the electric parking brake usingthe electric parking brake switch.
Note:On manual transmission vehicles, ifthe transmission is not in neutral (N) whenyou release the clutch pedal and press theaccelerator pedal, the electric parking brakewill release automatically.
Note:On manual transmission vehicles, theclutch pedal must be fully pressed beforethe drive away release feature will operate.Drive as normal using the accelerator andclutch pedals and the electric parking brakewill be automatically released.
The brake system warning lamp will go offto confirm that the electric parking brakehas been released.
Note:The electric parking brake drive awayrelease makes starting on a hill easier. Thisfeature will release the parking brakeautomatically when the vehicle hassufficient drive force to move up the hill. Toassure drive away release when startinguphill, press the accelerator pedal quickly.
Battery With No Charge
WARNING
You will not be able to apply orrelease the electric parking brake ifthe battery is low or has no charge.
If the battery is low or has no charge, usejumper cables and a booster battery.
HILL START ASSIST
WARNINGS
The system does not replace theparking brake. When you leave yourvehicle, always apply the parkingbrake and put the transmission in park (P).
WARNINGS
You must remain in your vehicle onceyou have activated the system.
During all times, you are responsiblefor controlling your vehicle,supervising the system andintervening, if required.
If the engine is revved excessively, orif a malfunction is detected, thesystem will be deactivated.
The system makes it easier to pull awaywhen your vehicle is on a slope without theneed to use the parking brake.
When the system is active, your vehicle willremain stationary on the slope for two tothree seconds after you release the brakepedal. This allows you time to move yourfoot from the brake to the acceleratorpedal. The brakes are releasedautomatically once the engine hasdeveloped sufficient drive to prevent yourvehicle from rolling down the slope. Thisis an advantage when pulling away on aslope, (for example from a car park ramp,traffic lights or when reversing uphill intoa parking space).
The system will activate automatically onany slope that will cause significant vehiclerollback.
Using Hill Start Assist
1.Press the brake pedal to bring yourvehicle to a complete standstill. Keepthe brake pedal pressed.
2.If the sensors detect that your vehicleis on a slope, the system will activateautomatically.
3.When you remove your foot from thebrake pedal, your vehicle will remainon the slope without rolling away forabout two or three seconds. This holdtime will automatically be extended ifyou are in the process of driving off.
166Fusion (CC7) , enUSABrakes
Page 171 of 458

PRINCIPLE OF OPERATION
The traction control system helps avoiddrive wheel spin and loss of traction.
If your vehicle begins to slide, the systemapplies the brakes to individual wheelsand, when needed, reduces engine powerat the same time. If the wheels spin whenaccelerating on slippery or loose surfaces,the system reduces engine power in orderto increase traction.
USING TRACTION CONTROL
In certain situations for example, stuck insnow or mud, turning the traction controloff may be beneficial as this allows thewheels to spin with full engine power.Depending on the type of system you haveon your vehicle, you can either turn thesystem off using the information displayor by pressing the button.
Switching the System Off Usingthe Information Display Controls
(If Equipped)
Your vehicle comes with this featurealready enabled. If required, you can switchthis feature off using the informationdisplay controls. See Principle ofOperation (page 168).
Switching the System Off Using aSwitch (If Equipped)
The button is located in the instrumentpanel.
Press the button. You will see a messagein conjunction with an illuminated icon inthe display. Press the button again toreturn the system to normal mode.
When you switch the traction controlsystem off, stability control remains fullyactive.
System Indicator Lights andMessages
WARNING
If a failure has been detected withinthe AdvanceTrac system, thestability control light will illuminatesteadily. Verify that the AdvanceTracsystem was not manually disabled throughthe information display. If the stabilitycontrol light still illuminates steadily, havethe system serviced by an authorizeddealer immediately. Operating your vehiclewith AdvanceTrac disabled could lead toan increased risk of loss of vehicle control,vehicle rollover, personal injury and death.
The stability control lighttemporarily illuminates onengine start-up and flasheswhen a driving condition activates thestability system.
The stability control off lighttemporarily illuminates onengine start-up and stays onwhen you turn the traction control systemoff.
When you turn the traction control systemoff or on, a message appears in theinformation display showing system status.
168Fusion (CC7) , enUSATraction ControlE138639
Page 180 of 458

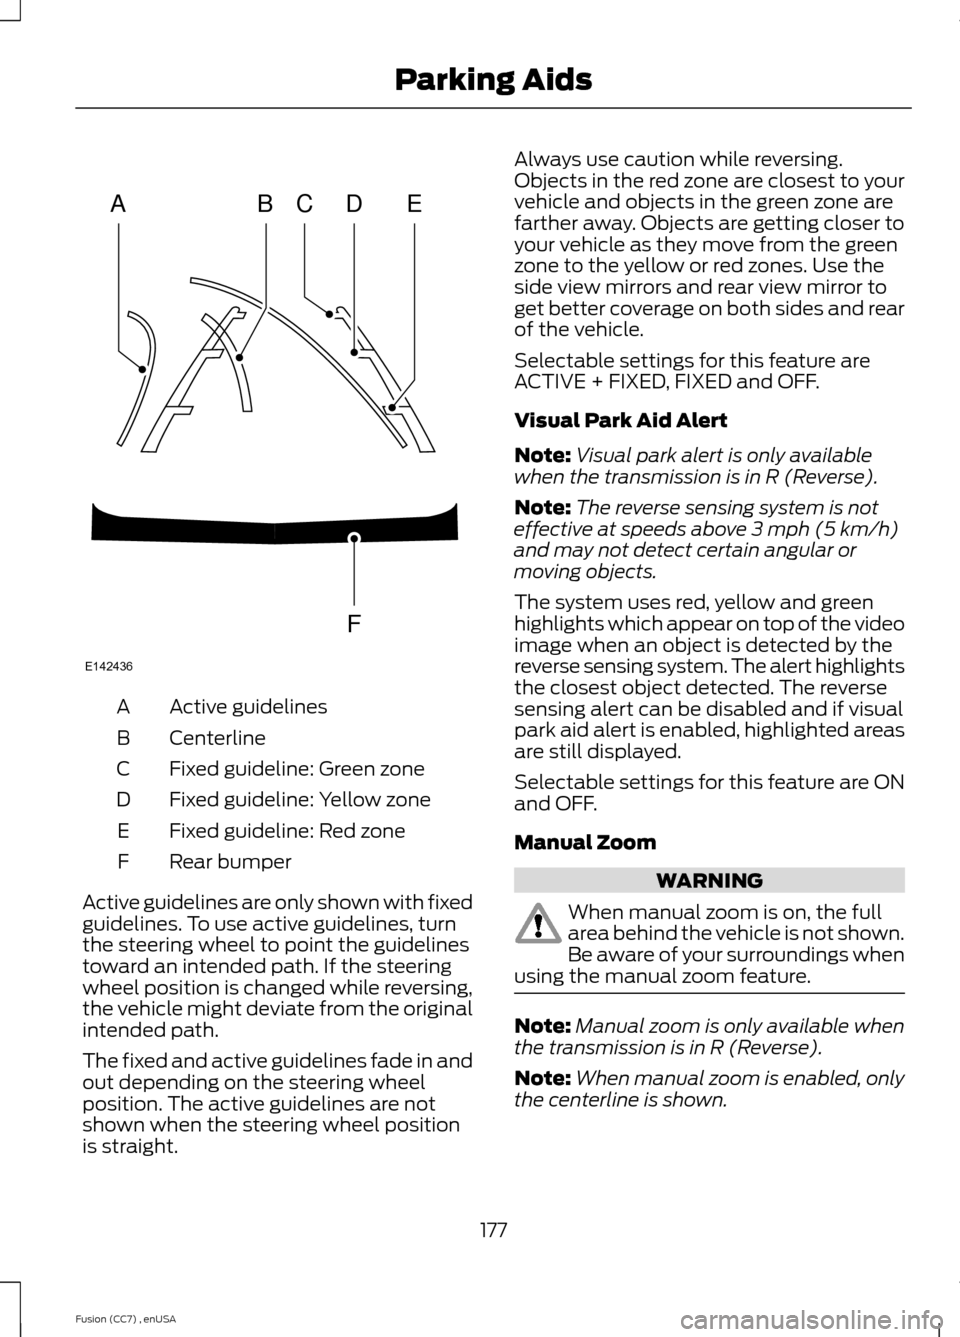
Active guidelinesA
CenterlineB
Fixed guideline: Green zoneC
Fixed guideline: Yellow zoneD
Fixed guideline: Red zoneE
Rear bumperF
Active guidelines are only shown with fixedguidelines. To use active guidelines, turnthe steering wheel to point the guidelinestoward an intended path. If the steeringwheel position is changed while reversing,the vehicle might deviate from the originalintended path.
The fixed and active guidelines fade in andout depending on the steering wheelposition. The active guidelines are notshown when the steering wheel positionis straight.
Always use caution while reversing.Objects in the red zone are closest to yourvehicle and objects in the green zone arefarther away. Objects are getting closer toyour vehicle as they move from the greenzone to the yellow or red zones. Use theside view mirrors and rear view mirror toget better coverage on both sides and rearof the vehicle.
Selectable settings for this feature areACTIVE + FIXED, FIXED and OFF.
Visual Park Aid Alert
Note:Visual park alert is only availablewhen the transmission is in R (Reverse).
Note:The reverse sensing system is noteffective at speeds above 3 mph (5 km/h)and may not detect certain angular ormoving objects.
The system uses red, yellow and greenhighlights which appear on top of the videoimage when an object is detected by thereverse sensing system. The alert highlightsthe closest object detected. The reversesensing alert can be disabled and if visualpark aid alert is enabled, highlighted areasare still displayed.
Selectable settings for this feature are ONand OFF.
Manual Zoom
WARNING
When manual zoom is on, the fullarea behind the vehicle is not shown.Be aware of your surroundings whenusing the manual zoom feature.
Note:Manual zoom is only available whenthe transmission is in R (Reverse).
Note:When manual zoom is enabled, onlythe centerline is shown.
177Fusion (CC7) , enUSAParking AidsABCDFEE142436
Page 196 of 458

Zone coverage also decreases whenparking at shallow angles. Here, the leftsensor is mostly obstructed; zone coverageon that side is severely limited.
System Lights and Messages
The Blind Spot Information and CrossTraffic Alert systems illuminate a yellowalert indicator in the outside mirror on theside of your vehicle the approachingvehicle is coming from.
Note:The alert indicator dims when thesystem detects nighttime darkness.
Cross Traffic Alert also sounds a series oftones and a message appears in theinformation display indicating a vehicle iscoming from the right or left. Cross TrafficAlert works with the reverse sensingsystem that sounds its own series of tones.See Parking Aid (page 170).
System Sensors
WARNING
Just prior to the system recognizinga blocked condition and alerting thedriver, the number of missed objectswill increase. To help avoid injuries, NEVERuse the Blind Spot Information System asa replacement for using the side and rearview mirrors and looking over your shoulderbefore changing lanes. The Blind SpotInformation System is not a replacementfor careful driving.
Note:It is possible to get a blockagewarning with no blockage present; this israre and known as a false blockage warning.A false blocked condition eitherself-corrects or clears after a key cycle.
193Fusion (CC7) , enUSADriving AidsE142441 E142442
Page 213 of 458

Trailer lamps are required on most towedvehicles. Make sure all running lights, brakelights, turn signals and hazard lights areworking.
Before Towing a Trailer
Practice turning, stopping and backing-upto get the feel of your vehicle-trailercombination before starting on a trip.When turning, make wider turns so thetrailer wheels clear curbs and otherobstacles.
When Towing a Trailer
•Do not drive faster than 70 mph (113km/h) during the first 500 miles (800kilometers).
•Do not make full-throttle starts.
•Check your hitch, electrical connectionsand trailer wheel lug nuts thoroughlyafter you have traveled 50 miles (80kilometers).
•When stopped in congested or heavytraffic during hot weather, place thegearshift in position P (automatictransmission) or neutral (manualtransmission) to aid engine andtransmission cooling and to help A/Cperformance.
•Turn off the speed control with heavyloads or in hilly terrain. The speedcontrol may turn off automaticallywhen you are towing on long, steepgrades.
•Shift to a lower gear when driving downa long or steep hill. Do not apply thebrakes continuously, as they mayoverheat and become less effective.
•If your transmission is equipped with aGrade Assist or Tow/Haul feature, usethis feature when towing. This providesengine braking and helps eliminateexcessive transmission shifting foroptimum fuel economy andtransmission cooling.
•Allow more distance for stopping witha trailer attached. Anticipate stops andbrake gradually.
•Avoid parking on a grade. However, ifyou must park on a grade:
1.Turn the steering wheel to point yourvehicle tires away from traffic flow.
2.Set your vehicle parking brake.
3.Place the automatic transmission inposition P or manual transmission in alow gear.
4.Place wheel chocks in front and backof the trailer wheels. (Chocks notincluded with vehicle.)
Launching or Retrieving a Boat orPersonal Watercraft (PWC)
Note:Disconnect the wiring to the trailerbefore backing the trailer into the water.
Note:Reconnect the wiring to the trailerafter removing the trailer from the water.
When backing down a ramp during boatlaunching or retrieval:
•Do not allow the static water level torise above the bottom edge of the rearbumper.
•Do not allow waves to break higherthan 6 inches (15 centimeters) abovethe bottom edge of the rear bumper.
Exceeding these limits may allow water toenter vehicle components:
•Causing internal damage to thecomponents.
•Affecting drivability, emissions, andreliability.
Replace the rear axle lubricant anytimethe rear axle has been submerged in water.Water may have contaminated the rearaxle lubricant, which is not normallychecked or changed unless a leak issuspected or other axle repair is required.
210Fusion (CC7) , enUSATowing
Page 255 of 458

Replacing the Low Beam HeadlampBulb
1.Remove the headlamp assembly.
2.Remove the service cap.
3.Disconnect the electrical connector.
4.Release the retainer spring and removeit from the headlamp assembly.
5.Install the new bulb in reverse order.
Replacing the Front Parking/TurnSignal Lamp Bulb
1.Remove the headlamp assembly.
2.Turn the bulb assemblycounterclockwise and remove it fromthe headlamp assembly.
3.Separate the bulb from the bulbsocket.
4.Install the new bulb in reverse order.
Replacing the Side Marker Lamp Bulb
1.Remove the headlamp assembly.
2.Remove the service cap.
3.Depress the tabs on the socket andremove the socket and bulb together.
4.Separate the bulb from the bulbsocket.
5.Install the new bulb in reverse order.
Replacing the Tail, Brake, High-Mount Brake Lamp, and TurnSignal Lamp Bulbs
These lamps are designed with LED lightsources. For replacement, see yourauthorized dealer.
Replacing a Reverse Lamp Bulb
1.Make sure the lighting control is in theoff position.
2.Open the trunk deck lid.
3.Remove the push pins and repositionthe inner body side trim.
4.Remove the three lamp assembly nuts.
5.Gently pull the lamp assembly awayfrom the vehicle.
252Fusion (CC7) , enUSAMaintenanceE145777 E145778
Page 433 of 458

Check every month
Engine oil level.
Function of all interior and exterior lights.
Tires (including spare) for wear and proper pressure.
Windshield washer fluid level.
Check every six months
Battery connections. Clean if necessary.
Body and door drain holes for obstructions. Clean if necessary.
Cooling system fluid level and coolant strength.
Door weatherstrips for wear. Lubricate if necessary.
Hinges, latches and outside locks for proper operation. Lubricate if necessary.
Parking brake for proper operation.
Safety belts and seat latches for wear and function.
Safety warning lamps (brake, ABS, airbag and safety belt) for operation.
Washer spray and wiper operation. Clean or replace blades as necessary.
Multi-Point Inspection
In order to keep your vehicle running right,it is important to have the systems on yourvehicle checked regularly. This can helpidentify potential issues and prevent majorproblems. We recommend having thefollowing multi-point inspection performedat every scheduled maintenance intervalto help make sure your vehicle keepsrunning great.
430Fusion (CC7) , enUSAScheduled Maintenance
Page 456 of 458

U
Under Hood Overview - 1.5L EcoBoost™/1.6L EcoBoost™........................................238Under Hood Overview - 2.0LEcoBoost™.................................................239Under Hood Overview - 2.5L...................240Unique Driving Characteristics................142Universal Garage Door Opener...............129HomeLink Wireless Control System............129USB Port.........................................................308Using Adaptive Cruise Control................180Blocked Sensor...................................................184Changing the Set Speed..................................183Detection Issues..................................................183Disengaging the System..................................182Following a Vehicle.............................................181Hilly Condition Usage........................................183Low Speed Automatic Cancellation...........183Overriding the System......................................182Resuming the Set Speed.................................183Setting a Speed..................................................180Setting the Gap Distance.................................181Switching the System Off...............................183Switching the System On...............................180Switching to Normal Cruise Control...........185System Not Available.......................................184Using All-Wheel Drive................................158Driving In Special Conditions WithAll-Wheel Drive (AWD)...............................158Using Cruise Control....................................179Switching Cruise Control Off..........................179Switching Cruise Control On...........................179Using MyKey With Remote StartSystems..........................................................52Using Snow Chains.....................................278Using Stability Control...............................169AdvanceTrac® ....................................................169Using SYNC™ With Your MediaPlayer.............................................................332Accessing Your Play Menu.............................336Connecting Your Digital Media Player to theUSB Port...........................................................332Media Menu Features.......................................335Media Voice Commands.................................333System Settings.................................................338What's Playing?.................................................333
Using SYNC™ With Your Phone.............313Accessing Features through the PhoneMenu...................................................................317Accessing Your Phone Settings...................320Making Calls.........................................................316Pairing a Phone for the First Time................314Pairing Subsequent Phones...........................314Phone Options during an Active Call..........316Phone Voice Commands.................................314Receiving Calls.....................................................316System Settings.................................................322Text Messaging....................................................319Using Traction Control...............................168Switching the System Off Using aSwitch................................................................168Switching the System Off Using theInformation Display Controls....................168System Indicator Lights andMessages..........................................................168Using Voice Recognition.............................311Initiating a Voice Session..................................311System Interaction and Feedback...............312Utilizing the Mediation/ArbitrationProgram (Canada Only).........................222
V
Vehicle Care...................................................256General Information.........................................256Vehicle Certification Label.......................289Vehicle Identification Number...............289Vehicle Storage............................................260Battery....................................................................261Body.......................................................................260Brakes.....................................................................261Cooling system....................................................261Engine.....................................................................261Fuel system...........................................................261General..................................................................260Miscellaneous......................................................261Removing Vehicle From Storage..................261Tires.........................................................................261Ventilated Seats............................................127Heated and ventilated seat air filterreplacement (if equipped).........................127VentilationSee: Climate Control..........................................110
453Fusion (CC7) , enUSAIndex