2014 FORD FUSION (AMERICAS) light
[x] Cancel search: lightPage 240 of 458

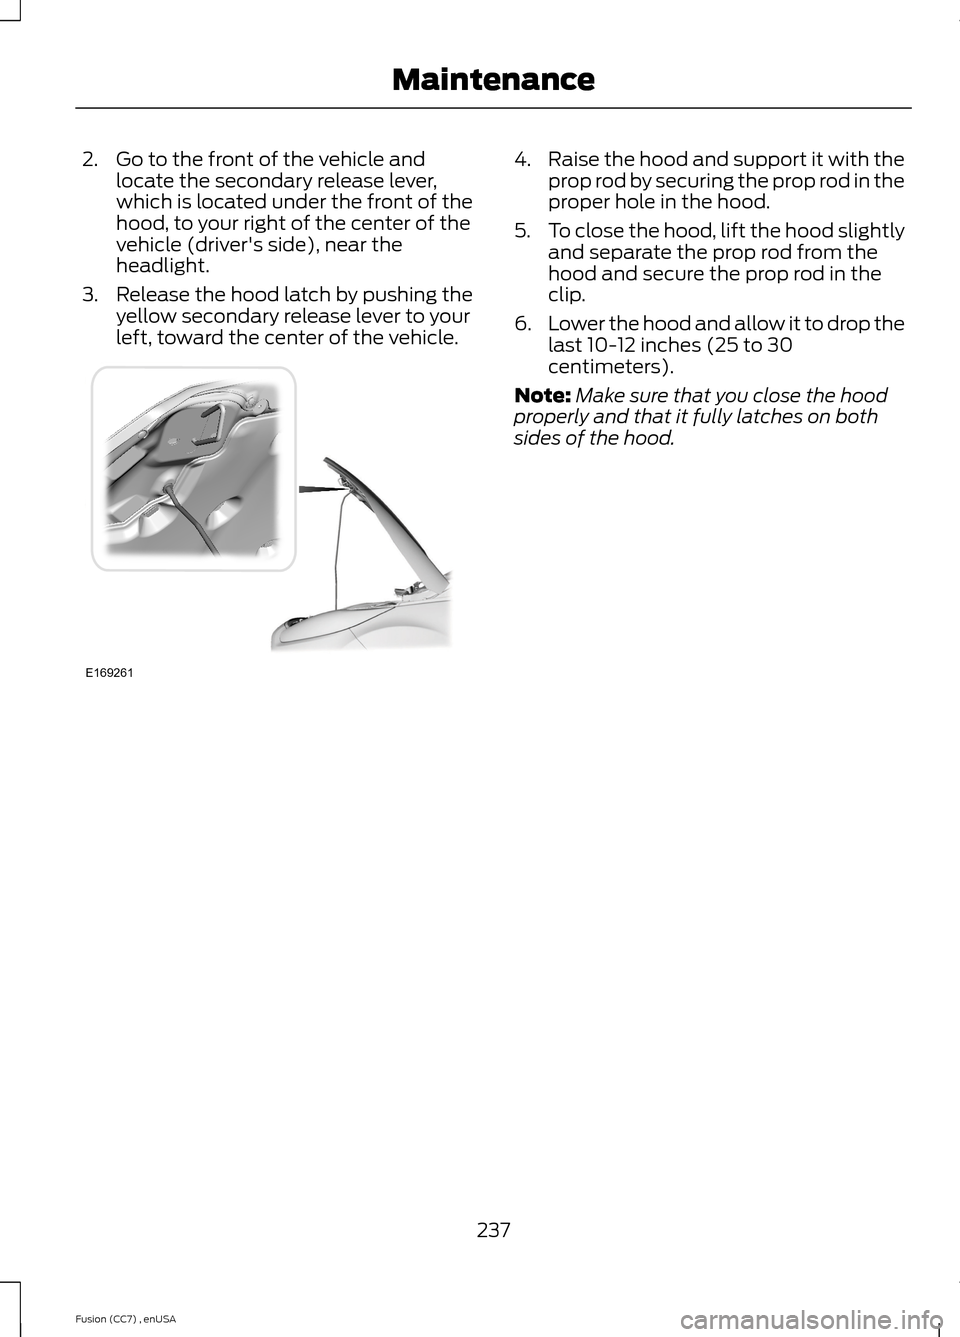
2.Go to the front of the vehicle andlocate the secondary release lever,which is located under the front of thehood, to your right of the center of thevehicle (driver's side), near theheadlight.
3.Release the hood latch by pushing theyellow secondary release lever to yourleft, toward the center of the vehicle.
4.Raise the hood and support it with theprop rod by securing the prop rod in theproper hole in the hood.
5.To close the hood, lift the hood slightlyand separate the prop rod from thehood and secure the prop rod in theclip.
6.Lower the hood and allow it to drop thelast 10-12 inches (25 to 30centimeters).
Note:Make sure that you close the hoodproperly and that it fully latches on bothsides of the hood.
237Fusion (CC7) , enUSAMaintenanceE169261
Page 245 of 458

1.Remove the filler cap.
2.Add engine oil that meets the Fordspecifications. See Capacities andSpecifications (page 287).
3.Replace the filler cap. Turn it until youfeel a strong resistance.
OIL CHANGE INDICATOR
RESET
To reset the oil monitoring system after anoil change, See General Information(page 87).
ENGINE COOLANT CHECK
Checking the Engine Coolant
When the engine is cold, check theconcentration and level of the enginecoolant at the intervals listed in thescheduled maintenance information. SeeScheduled Maintenance (page 428).
Note:Make sure that the level is betweenthe MIN and MAX marks on the coolantreservoir.
Note:Coolant expands when it is hot. Thelevel may extend beyond the MAX mark
Note:If the level is at the MIN mark, belowthe MIN mark, or empty, add coolantimmediately. See Adding Engine Coolantin this chapter.
The coolant concentration should bemaintained within 48% to 50%, whichequates to a freeze point between -29°F(-34°C) and -35°F (-37°C).
Note:For best results, coolantconcentration should be tested with arefractometer such as Rotunda tool300-ROB75240 available from anauthorized dealer. Ford does notrecommend the use of hydrometers orcoolant test strips for measuring coolantconcentrations.
Note:Automotive fluids are notinterchangeable. Do not use engine coolantor antifreeze or windshield washer fluidoutside of its specified function and vehiclelocation.
Adding Engine Coolant
WARNINGS
Do not add engine coolant when theengine is hot. Steam and scaldingliquids released from a hot coolingsystem can burn you badly. Also, you canbe burned if you spill coolant on hot engineparts.
Do not put engine coolant in thewindshield washer fluid container. Ifsprayed on the windshield, enginecoolant could make it difficult to seethrough the windshield.
To reduce the risk of personal injury,make sure the engine is cool beforeunscrewing the coolant pressurerelief cap. The cooling system is underpressure; steam and hot liquid can comeout forcefully when the cap is loosenedslightly.
Do not add coolant further than theMAX mark.
Note:Do not use stop leak pellets, coolingsystem sealants, or additives as they cancause damage to the engine cooling orheating systems. This damage would notbe covered under your vehicle’s warranty.
Note:During normal vehicle operation, theengine coolant may change color fromorange to pink or light red. As long as theengine coolant is clear and uncontaminated,this color change does not indicate theengine coolant has degraded nor does itrequire the engine coolant to be drained, thesystem to be flushed, or the engine coolantto be replaced.
242Fusion (CC7) , enUSAMaintenance
Page 247 of 458

What You Should Know About Fail-Safe Cooling
If the engine coolant supply is depleted,this feature allows the vehicle to be driventemporarily before incremental componentdamage is incurred. The fail-safe distancedepends on outside temperatures, vehicleload and terrain.
How Fail-Safe Cooling Works
If the engine begins to overheat, the enginecoolant temperature gauge will move tothe red (hot) area and:
A high engine temperaturemessage will appear in theinformation display.
The service engine soonindicator will light.
If the engine reaches a presetover-temperature condition, the enginewill automatically switch to alternatingcylinder operation. Each disabled cylinderacts as an air pump and cools the engine.
When this occurs, your vehicle will stilloperate. However:
•The engine power will be limited.
•The air conditioning system will bedisabled.
Continued operation will increase theengine temperature and the engine willcompletely shut down, causing steeringand braking effort to increase.
Once the engine temperature cools, theengine can be re-started. Take your vehicleto an authorized dealer as soon as possibleto minimize engine damage.
When Fail-Safe Mode Is Activated
WARNINGS
Fail-safe mode is for use duringemergencies only. Operate thevehicle in fail-safe mode only as longas necessary to bring the vehicle to rest ina safe location and seek immediate repairs.When in fail-safe mode, the vehicle willhave limited power, will not be able tomaintain high-speed operation, and maycompletely shut down without warning,potentially losing engine power, powersteering assist, and power brake assist,which may increase the possibility of acrash resulting in serious injury.
Never remove the coolant reservoircap while the engine is running or hot.
You have limited engine power when in thefail-safe mode, so drive your vehicle withcaution. Your vehicle will not be able tomaintain high-speed operation and theengine will run rough. Remember that theengine is capable of completely shuttingdown automatically to prevent enginedamage, therefore:
1.Pull off the road as soon as safelypossible and turn off the engine.
2.Arrange for the vehicle to be taken toan authorized dealer.
3.If this is not possible, wait a shortperiod for the engine to cool.
4.Check the coolant level and replenishif low.
5.Re-start the engine and take yourvehicle to an authorized dealer.
Note:Driving your vehicle without repairingthe engine problem increases the chance ofengine damage. Take your vehicle to anauthorized dealer as soon as possible.
244Fusion (CC7) , enUSAMaintenance
Page 248 of 458

AUTOMATIC TRANSMISSION
FLUID CHECK
Note:Transmission fluid should be checkedby an authorized dealer. If required, fluidshould be added by an authorized dealer.
The automatic transmission does not havea transmission fluid dipstick.
Have an authorized dealer check andchange the transmission fluid and filter atthe correct service interval. SeeScheduled Maintenance (page 428). Yourtransmission does not consume fluid.However, the fluid level should be checkedif the transmission is not working properly,(i.e., if the transmission slips or shiftsslowly) or if you notice some sign of fluidleakage.
Do not use supplemental transmissionfluid additives, treatments or cleaningagents. The use of these materials mayaffect transmission operation and resultin damage to internal transmissioncomponents.
BRAKE AND CLUTCH FLUID
CHECK
Fluid levels between the MIN and MAXlines are within the normal operating range;there is no need to add fluid. If the fluidlevels are outside of the normal operatingrange, the performance of the systemcould be compromised; seek service fromyour authorized dealer immediately.
POWER STEERING FLUID
CHECK
Your vehicle is equipped with an electricpower steering (EPS) system. There is nofluid reservoir to check or fill.
WASHER FLUID CHECK
WARNING
If you operate your vehicle intemperatures below 40°F (5°C), usewasher fluid with antifreezeprotection. Failure to use washer fluid withantifreeze protection in cold weather couldresult in impaired windshield vision andincrease the risk of injury or accident.
Add fluid to fill the reservoir if the level islow. Only use a washer fluid that meetsFord specifications. See Capacities andSpecifications (page 287).
State or local regulations on volatileorganic compounds may restrict the useof methanol, a common windshield washerantifreeze additive. Washer fluidscontaining non-methanol antifreezeagents should be used only if they providecold weather protection without damagingthe vehicle’s paint finish, wiper blades orwasher system.
FUEL FILTER
Your vehicle is equipped with a lifetimefuel filter that is integrated with the fueltank. Regular maintenance or replacementis not needed.
CHANGING THE 12V BATTERY
WARNINGS
Batteries normally produce explosivegases which can cause personalinjury. Therefore, do not allowflames, sparks or lighted substances tocome near the battery. When working nearthe battery, always shield your face andprotect your eyes. Always provide properventilation.
245Fusion (CC7) , enUSAMaintenance
Page 251 of 458

Note:Make sure that the wiper blade locksinto place. Lower the wiper arm and bladeback to the windshield. The wiper arms willautomatically return to their normal positionwhen the ignition is turned on.
Replace wiper blades at least once peryear for optimum performance.
Poor wiper quality can be improved bycleaning the wiper blades and thewindshield.
ADJUSTING THE HEADLAMPS
Vertical Aim Adjustment
The headlamps on your vehicle areproperly aimed at the assembly plant. Ifyour vehicle has been in an accident, thealignment of your headlamps should bechecked by your authorized dealer.
Headlamp Aiming Target
8 feet (2.4 meters)A
Center height of lamp to groundB
25 feet (7.6 meters)C
Horizontal reference lineD
Vertical Aim Adjustment Procedure
1.Park the vehicle directly in front of awall or screen on a level surface,approximately 25 feet (7.6 meters)away.
2.Measure the height of the headlampbulb center from the ground and markan 8 foot (2.4 meter) horizontalreference line on the vertical wall orscreen at this height.
Note:To see a clearer light pattern foradjusting, you may want to block the lightfrom one headlamp while adjusting theother.
3.Turn on the low beam headlamps toilluminate the wall or screen and openthe hood.
4.On the wall or screen you will observea flat zone of high intensity lightlocated at the top of the right handportion of the beam pattern. If the topedge of the high intensity light zone isnot at the horizontal reference line, theheadlamp will need to be adjusted.
248Fusion (CC7) , enUSAMaintenanceE142592 E142465
Page 252 of 458

5.Locate the vertical adjuster on eachheadlamp. Using a Phillips #2screwdriver, turn the adjuster eitherclockwise or counterclockwise in orderto adjust the vertical aim of theheadlamp. The horizontal edge of thebrighter light should touch thehorizontal reference line.
6.Close the hood and turn off the lamps.
Horizontal Aim Adjustment
Horizontal aim is not required for thisvehicle and is not adjustable.
REMOVING A HEADLAMP
1.Make sure the headlamp control is inthe off position and open the hood.
2.Remove the six fasteners securing thefront fascia to the front trim cover.
3.Remove the three bumper cover upperscrews.
4.Remove the fastener at the inboardside of the headlamp you are servicing.
249Fusion (CC7) , enUSAMaintenanceE145594 E159693
Page 255 of 458

Replacing the Low Beam HeadlampBulb
1.Remove the headlamp assembly.
2.Remove the service cap.
3.Disconnect the electrical connector.
4.Release the retainer spring and removeit from the headlamp assembly.
5.Install the new bulb in reverse order.
Replacing the Front Parking/TurnSignal Lamp Bulb
1.Remove the headlamp assembly.
2.Turn the bulb assemblycounterclockwise and remove it fromthe headlamp assembly.
3.Separate the bulb from the bulbsocket.
4.Install the new bulb in reverse order.
Replacing the Side Marker Lamp Bulb
1.Remove the headlamp assembly.
2.Remove the service cap.
3.Depress the tabs on the socket andremove the socket and bulb together.
4.Separate the bulb from the bulbsocket.
5.Install the new bulb in reverse order.
Replacing the Tail, Brake, High-Mount Brake Lamp, and TurnSignal Lamp Bulbs
These lamps are designed with LED lightsources. For replacement, see yourauthorized dealer.
Replacing a Reverse Lamp Bulb
1.Make sure the lighting control is in theoff position.
2.Open the trunk deck lid.
3.Remove the push pins and repositionthe inner body side trim.
4.Remove the three lamp assembly nuts.
5.Gently pull the lamp assembly awayfrom the vehicle.
252Fusion (CC7) , enUSAMaintenanceE145777 E145778
Page 256 of 458

6.Turn the bulb holder counterclockwiseand remove the bulb holder.
7.Remove the bulb from the bulb holder.
Install the new bulb in reverse order.
Replacing the License Plate LampBulb
1.Carefully release the spring clip.
2.Remove the lamp.
3.Remove the bulb.
Install the new bulb in reverse order.
BULB SPECIFICATION CHART
Replacement bulbs are specified in thechart below. Headlamp bulbs must bemarked with an authorized “D.O.T.” forNorth America to make sure they have theproper lamp performance, light brightness,light pattern, and safe visibility. The correctbulbs will not damage the lamp assemblyor void the lamp assembly warranty andwill provide quality bulb illumination time.
Trade nameFunction
H7LL*Headlamp high beam (Halogen)
H11LL*Headlamp low beam (Halogen)
LED*Side marker lamp - front
253Fusion (CC7) , enUSAMaintenanceE145779 E145780 321E72789