Page 208 of 460

HAZARD WARNING FLASHERS
Note:The hazard warning flashers willoperate when the ignition is in any positionor if the key is not in the ignition. If usedwhen the engine is not running, the batterywill lose charge. As a result, there may beinsufficient power to restart your engine.
In some models, the hazardflasher control is located on theinstrument panel.
In other models, this feature is located onthe steering column, just behind thesteering wheel.
Use your hazard warning flashers whenyour vehicle is creating a safety hazard forother motorists.
•Press the flasher control and all frontand rear direction indicators flash.
•Press the flasher control again to turnthem off.
FUEL SHUTOFF
WARNING
Failure to inspect and, if necessary,repair fuel leaks after a collision mayincrease the risk of fire and seriousinjury. Ford Motor Company recommendsthat the fuel system be inspected by anauthorized dealer after any collision.
In the event of a moderate to severecollision, this vehicle is equipped with afuel pump shut-off feature that stops theflow of fuel to the engine. Not every impactwill cause a shut-off.
Should your vehicle shut off after acollision, you may restart your vehicle bydoing the following:
1. Turn the ignition off.
2. Turn the ignition to crank.
3. Turn the ignition off.
4.Turn the ignition on again to re-enablethe fuel pump.
JUMP-STARTING THE VEHICLE
WARNINGS
The gases around the battery canexplode if exposed to flames, sparks,or lit cigarettes. An explosion couldresult in injury or vehicle damage.
Batteries contain sulfuric acid whichcan burn skin, eyes and clothing, ifcontacted.
Use only an adequate-sized cablewith insulated clamps.
Preparing Your Vehicle
Note:Do not attempt to push-start yourautomatic transmission vehicle. Automatictransmissions do not have push-startcapability. Attempting to push-start avehicle with an automatic transmission maycause transmission damage.
Note:Use only a 12-volt supply to start yourvehicle.
Note:Do not disconnect the battery of thedisabled vehicle as this could damage thevehicle's electrical system.
205
Super Duty (TFA)
Roadside EmergenciesE142663 E161463
Page 220 of 460
Protected componentsFuse amp ratingFuse or relay number
Vehicle power 5 (diesel engine)10A**37
Powertrain control module (diesel engine),Electronic control module (gas engine)Relay38
4x4 hub lock10A**39
4x4 electronic lock15A**40
Not used—41
Rear heated seats20A**42
Not used—43
Not used—44
Run/start relay coil10A**45
Transmission control module keep-alivepower (diesel engine)10A**46
A/C clutch feed10A**47
Run/startRelay48
Rearview camera system10A**49
Blower motor relay coil10A**50
Not used—51
Powertrain control module, Electroniccontrol module, Transmission controlmodule run/start
10A**52
4x4 module10A**53
Anti-lock brake system run/start10A**54
Rear window defroster coil, Battery chargecoil10A**55
Passenger compartment fuse panel run/start feed20A**56
Fuel pumpRelay57
Not used—58
Not used—59
217
Super Duty (TFA)
Fuses
Page 227 of 460
2. Go to the front of the vehicle andlocate the secondary release lever,which is located under the front of thehood, to your right of the center of thevehicle (driver's side), toward theheadlight.
3. Release the hood latch by pushing thesecondary release lever to your left,toward the center of the vehicle.
4. Raise the hood.
5.To close the hood, lower the hood andallow it to drop the last 8 to 11 inches(20 to 30 centimeters).
Note:Make sure that the hood is closedproperly.
UNDER HOOD OVERVIEW -
6.2L
Note:Refer to the diesel supplement fordiesel engine component locations.
Windshield washer fluid reservoirA.
Engine oil dipstickB.
Automatic transmission fluid dipstickC.
Brake fluid reservoirD.
Engine coolant reservoirE.
Power distribution boxF.
224
Super Duty (TFA)
MaintenanceE163634
ADFEBC
GHIJ
Page 228 of 460
Air filter assemblyG.
Power steering fluid reservoirH.
Engine oil filler capI.
BatteryJ.
UNDER HOOD OVERVIEW -
6.8L
Note:Refer to the diesel supplement fordiesel engine component locations.
Windshield washer fluid reservoir Engine coolant reservoirA.
BatteryB.
Automatic transmission fluid dipstickC.
Engine oil filler capD.
Engine oil dipstickE.
225
Super Duty (TFA)
MaintenanceE163635
ABCEHIJFDG
Page 234 of 460

•the engine coolant temperature gaugemoves fully into the red (hot) area
•the coolant temperature warning lightilluminates
•the service engine soon indicatorilluminates.
WARNING
Never remove the coolant reservoircap while the engine is running or hot.
1. Pull off the road as soon as safelypossible and place the vehicle in P(Park).
2. Leave the engine running until thecoolant temperature gauge needlemoves away from the H range. Afterseveral minutes, if this does nothappen, follow the remaining steps.
3. Turn the engine off and wait for it tocool before checking the coolant level.
4. If the coolant level is normal, you mayrestart your engine and continue on.
5. If the coolant is low, add coolant,restart the engine and take your vehicleto an authorized dealer. See Addingengine coolant in this chapter for moreinformation. Refer to fail-safe coolingfor additional information.
AUTOMATIC TRANSMISSION
FLUID CHECK
Have an authorized dealer check andchange the transmission fluid and filter atthe correct service interval. SeeScheduled Maintenance (page 430).
Do not use supplemental transmissionfluid additives, treatments or cleaningagents. The use of these materials mayaffect transmission operation and resultin damage to internal transmissioncomponents.
Checking Automatic TransmissionFluid (If Equipped)
For scheduled intervals of the fluid checksand changes, See ScheduledMaintenance (page 430). Yourtransmission does not consume fluid.However, the fluid level should be checkedif the transmission is not working properly,i.e., if the transmission slips or shifts slowlyor if you notice some sign of fluid leakage.
Automatic transmission fluid expandswhen warmed. To obtain an accurate fluidcheck, drive the vehicle until it is at normaloperating temperature (approximately19 mi (30 km)). Verify that thetransmission fluid temperature gauge,located on the instrument cluster, is withinnormal range.
1. Drive the vehicle 19 mi (30 km)until itreaches normal operating temperature.
2.Park the vehicle on a level surface andengage the parking brake.
3.With the engine running, parking brakeengaged and your foot on the brakepedal, move the gearshift lever throughall of the gear ranges. Allow sufficienttime for each gear to engage.
4.Latch the gearshift lever in P and leavethe engine running.
5. Remove the dipstick, wiping it cleanwith a clean, dry lint free rag. Ifnecessary, refer to the Under HoodOverview in this chapter for thelocation of the dipstick.
6.Install the dipstick making sure it is fullyseated in the filler tube.
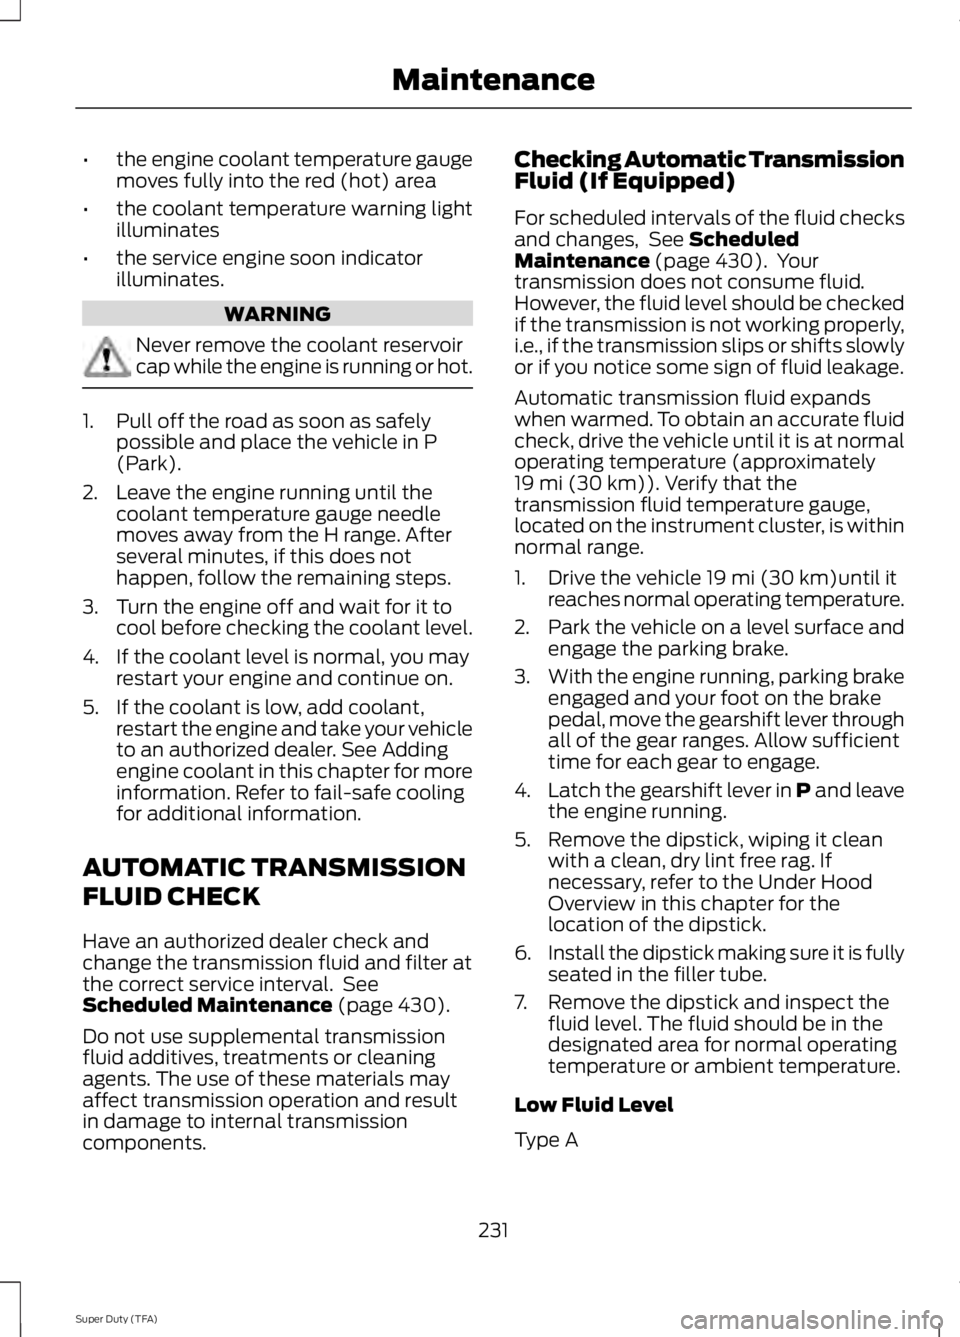
7. Remove the dipstick and inspect thefluid level. The fluid should be in thedesignated area for normal operatingtemperature or ambient temperature.
Low Fluid Level
Type A
231
Super Duty (TFA)
Maintenance
Page 235 of 460
Type B
Do not drive the vehicle if there is noindication of fluid on the dipstick and theambient temperature is above 50°F(10°C).
Correct Fluid Level
Type A
Type B
For vehicles equipped with 5-speedtransmissions, check the fluid at thenormal operating temperature of 151°F(66°C) to 170°F (77°C) on a level surface.For vehicles equipped with 6-speedtransmissions, check the fluid at thenormal operating temperature of 196°F(91°C) to 215°F (102°C) on a level surface.The normal operating temperature can bereached after approximately 19 mi(30 km).
High Fluid Level
Type A
Type B
232
Super Duty (TFA)
MaintenanceE163739 E163740 E163741 E163742 E163743
Page 236 of 460

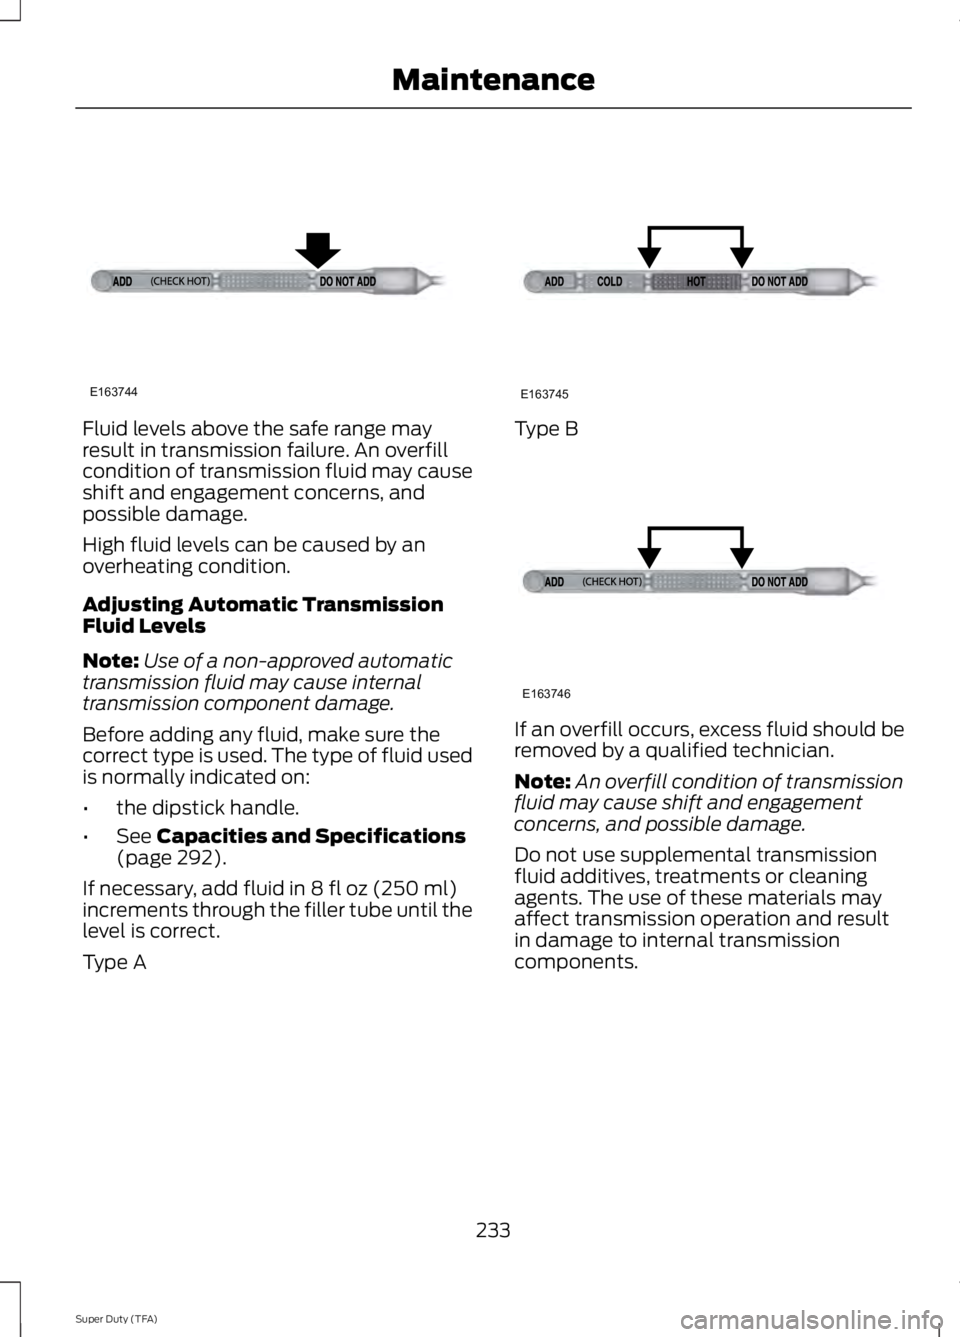
Fluid levels above the safe range mayresult in transmission failure. An overfillcondition of transmission fluid may causeshift and engagement concerns, andpossible damage.
High fluid levels can be caused by anoverheating condition.
Adjusting Automatic TransmissionFluid Levels
Note:Use of a non-approved automatictransmission fluid may cause internaltransmission component damage.
Before adding any fluid, make sure thecorrect type is used. The type of fluid usedis normally indicated on:
•the dipstick handle.
•See Capacities and Specifications(page 292).
If necessary, add fluid in 8 fl oz (250 ml)increments through the filler tube until thelevel is correct.
Type A
Type B
If an overfill occurs, excess fluid should beremoved by a qualified technician.
Note:An overfill condition of transmissionfluid may cause shift and engagementconcerns, and possible damage.
Do not use supplemental transmissionfluid additives, treatments or cleaningagents. The use of these materials mayaffect transmission operation and resultin damage to internal transmissioncomponents.
233
Super Duty (TFA)
MaintenanceE163744 E163745 E163746
Page 285 of 460

1.Attach the spare tire lock key (A) to thejack handle (B).
2. Fully insert the jack handle (with oneextension) through the bumper holeand into the guide tube. The key andlock will engage with a slight push andcounterclockwise turn. You will feelsome resistance when you turn the jackhandle assembly.
3.Turn the handle counterclockwise andlower the spare tire until you can slidethe tire rearward and the cable is slack.
4.Remove the retainer through the centerof the wheel. If your vehicle is equippedwith a tether, perform the followingsteps.
5.Lift the spare tire on end to access thetether attachment.
6. Use the lug wrench to remove the lugnut from the spare tire tether.
7. If not replacing the spare or flat tire tothe underbody storage area, raise thewheel retainer up into the installedposition.
8. Use the attached fastener strap (onthe spare tire tether) to attach thetether end to the winch retainer priorto raising to the installed position.
Tire Change Procedure
WARNINGS
When one of the front wheels is offthe ground, the transmission alonewill not prevent the vehicle frommoving or slipping off the jack, even if thetransmission is in park (P).
To help prevent the vehicle frommoving when you change a tire, besure to place the transmission in park(P), set the parking brake and block (inboth directions) the wheel that isdiagonally opposite (other side and end ofthe vehicle) to the tire being changed.
Never get underneath a vehicle thatis supported only by a jack. If thevehicle slips off the jack, you orsomeone else could be seriously injured.
282
Super Duty (TFA)
Wheels and TiresE162798
AB
AB E162799 E162800