2014 FORD F250 air condition
[x] Cancel search: air conditionPage 79 of 460

Engine Oil Pressure Gauge
Indicates engine oil pressure. The needle
should stay in the normal operating range
(between L and H). If the needle falls
below the normal range, stop the vehicle,
turn off the engine and check the engine
oil level. Add oil if needed. If the oil level is
correct, have your vehicle checked by your
authorized dealer.
Engine Coolant Temperature
Gauge
WARNING
Never remove the coolant reservoir
cap while the engine is running or hot.
Indicates engine coolant temperature. At
normal operating temperature, the level
indicator will be in the normal range. If the
engine coolant temperature exceeds the
normal range, stop the vehicle as soon as
safely possible, switch off the engine and
let the engine cool.
Transmission Fluid Temperature
Gauge
Indicates transmission fluid temperature.
At normal operating temperature, the level
indicator will be in the normal range. If the
transmission fluid temperature exceeds
the normal range, stop the vehicle as soon
as safely possible and verify the airflow is
not restricted such as snow or debris
blocking airflow through the grill. Also,
higher than normal operating temperature
can be caused by special operation
conditions (i.e. snowplowing, towing or
off-road use). Refer to Special operating
conditions in the scheduled maintenance
information for instructions. Operating the transmission for extended periods of time
with the gauge in the higher than normal
area may cause internal transmission
damage. Altering the severity of the driving
conditions is recommended to lower the
transmission temperature into the normal
range. If the gauge continues to show high
temperatures, see your authorized dealer.
Fuel Gauge
Note:
The fuel gauge may vary slightly
when your vehicle is moving or on a gradient.
Switch the ignition on. The fuel gauge will
indicate approximately how much fuel is
left in the fuel tank. The arrow adjacent to
the fuel pump symbol indicates on which
side of your vehicle the fuel filler door is
located.
The needle should move toward F when
you refuel your vehicle. If the needle points
to E after adding fuel, this indicates your
vehicle needs service soon.
After refueling some variability in needle
position is normal:
• It may take a short time for the needle
to reach F after leaving the gas station.
This is normal and depends upon the
slope of pavement at the gas station.
• The fuel amount dispensed into the
tank is a little less or more than the
gauge indicated. This is normal and
depends upon the slope of pavement
at the gas station.
• If the gas station nozzle shuts off
before the tank is full, try a different
gas pump nozzle.
Low Fuel Reminder
A low fuel reminder triggers when the fuel
gauge needle is at 1/16th.
76
Super Duty (TFA) Instrument Cluster
Page 85 of 460

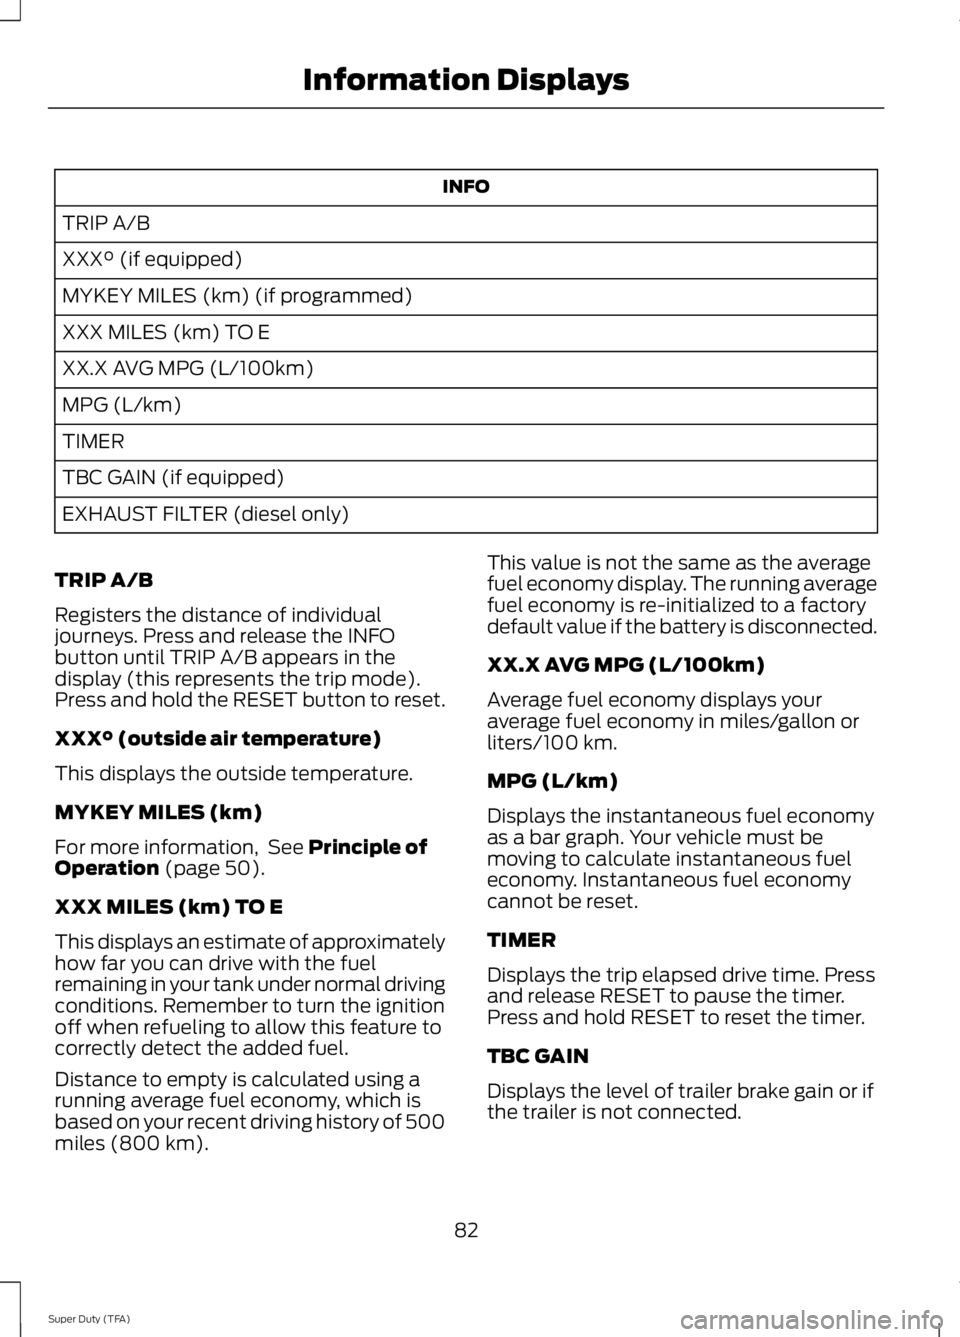
INFO
TRIP A/B
XXX° (if equipped)
MYKEY MILES (km) (if programmed)
XXX MILES (km) TO E
XX.X AVG MPG (L/100km)
MPG (L/km)
TIMER
TBC GAIN (if equipped)
EXHAUST FILTER (diesel only)
TRIP A/B
Registers the distance of individual
journeys. Press and release the INFO
button until TRIP A/B appears in the
display (this represents the trip mode).
Press and hold the RESET button to reset.
XXX° (outside air temperature)
This displays the outside temperature.
MYKEY MILES (km)
For more information, See Principle of
Operation (page 50).
XXX MILES (km) TO E
This displays an estimate of approximately
how far you can drive with the fuel
remaining in your tank under normal driving
conditions. Remember to turn the ignition
off when refueling to allow this feature to
correctly detect the added fuel.
Distance to empty is calculated using a
running average fuel economy, which is
based on your recent driving history of 500
miles (800 km). This value is not the same as the average
fuel economy display. The running average
fuel economy is re-initialized to a factory
default value if the battery is disconnected.
XX.X AVG MPG (L/100km)
Average fuel economy displays your
average fuel economy in miles/gallon or
liters/100 km.
MPG (L/km)
Displays the instantaneous fuel economy
as a bar graph. Your vehicle must be
moving to calculate instantaneous fuel
economy. Instantaneous fuel economy
cannot be reset.
TIMER
Displays the trip elapsed drive time. Press
and release RESET to pause the timer.
Press and hold RESET to reset the timer.
TBC GAIN
Displays the level of trailer brake gain or if
the trailer is not connected.
82
Super Duty (TFA) Information Displays
Page 106 of 460

MANUAL CLIMATE CONTROL
Defrost: Distributes air through the windshield defroster vents and demister
vents. You can also use this setting to defog and clear the windshield of a thin
covering of ice.
A
Rear defrost and heated mirrors: Turns the heated mirrors off and on as well
as the heated rear window, if your vehicle has that feature. See
Heated
Windows and Mirrors (page 106).
B
Air distribution control:
Press to set the air distribution to a position. Floor
and defrost distributes air through the windshield defroster vents, demister
vents and floor vents. Panel distributes air through the instrument panel vents.
Panel and floor distributes air through the instrument panel vents, floor vents,
and demister vents. Floor distributes air through the floor vents.
C
A/C:
Press to turn air conditioning off and on. Air conditioning cools the vehicle
using outside air. To improve air conditioning when starting your vehicle, drive
with the windows slightly open for two to three minutes.
D
Recirculated air:
Press to switch between outside air and recirculated air.
When the air in the passenger compartment is recirculating, the LED on the
button illuminates. Using recirculated air can reduce the time needed to cool
the interior and reduce unwanted odors from entering your vehicle.
E
MAX A/C:
Distributes recirculated air through the instrument panel vents to
cool the vehicle. This position is more economical and efficient than normal
A/C.
F
Temperature control:
Controls the temperature of the air circulated in your
vehicle. Turn to select the desired temperature.
G
103
Super Duty (TFA) Climate ControlE163163
ABDCE
F
G
I
H
Page 108 of 460

A/C: Press to turn air conditioning off and on. Air conditioning cools the vehicle
using outside air. To improve air conditioning when starting your vehicle, drive
with the windows slightly open for two to three minutes. Use air conditioning
with recirculated air to improve cooling performance and efficiency. Note:
Air
conditioning turns on automatically in MAX A/C, defrost and floor and defrost
modes.
E
MAX A/C:
Distributes recirculated air through the instrument panel vents to
cool the vehicle. This position is more economical and efficient than normal air
conditioning. When in MAX A/C mode, pressing
MAX A/C returns you to your
previous settings.
F
Recirculated air:
Press to switch between outside air and recirculated air.
When the air currently in the passenger compartment is recirculating, the LED
on the button illuminates. Using recirculated air can reduce the time needed to
cool the interior and reduce unwanted odors from entering your vehicle. Even
when you do not select this button, air may still recirculate in some instances
in order to reduce vehicle warm-up time in cold conditions or to cool down time
G
in hot conditions. Note: Recirculated air engages automatically when you select
MAX A/C
, or turn on manually in any airflow mode except defrost. Note: You
may notice changes in sound between recirculated mode and other airflow
modes. Note:
For better cooling in hot conditions, recirculated air automatically
engages when the air distribution control is in panel or panel and floor modes
and the air conditioning is on. You can switch to fresh air by pressing the
recirculated air button again.
PASS TEMP:
Press to switch between single and dual zone. Turn to increase
or decrease the air temperature on the passenger side of the vehicle.
H
Fan speed control +:
Press to increase the volume of air circulated in your
vehicle.
I
AUTO:
Press to turn on fully automatic operation. Select the desired
temperature using the temperature control. The system automatically
determines fan speed, air distribution, A/C operation, and outside or recirculated
air, to heat or cool the vehicle to maintain the selected temperature.
J
Fan speed control -:
Press to decrease the volume of air circulated in your
vehicle.
K
HINTS ON CONTROLLING THE
INTERIOR CLIMATE
Note: To reduce fogging of the windshield
during humid weather, adjust the air
distribution control to the windshield air
vents position. Increase the temperature
and fan speed to improve clearing, if
required. Note:
To reduce humidity build-up inside
your vehicle, do not drive with the system
switched off or with recirculated air always
switched on.
Note: Do not place objects under the front
seats as this may interfere with the airflow
to the rear seats.
Note: Remove any snow, ice or leaves from
the air intake area at the base of the
windshield.
105
Super Duty (TFA) Climate Control
Page 133 of 460

GENERAL INFORMATION
WARNINGS
Extended idling at high engine
speeds can produce very high
temperatures in the engine and
exhaust system, creating the risk of fire or
other damage. Do not park, idle or drive your vehicle
on dry grass or other dry ground
cover. The emission system heats up
the engine compartment and exhaust
system, creating the risk of fire. Do not start the engine in a closed
garage or in other enclosed areas.
Exhaust fumes can be toxic. Always
open the garage door before you start the
engine. If you smell exhaust fumes inside
your vehicle, have your vehicle
checked by your authorized dealer
immediately. Do not drive your vehicle if
you smell exhaust fumes. If you disconnect the battery, your vehicle
may exhibit some unusual driving
characteristics for approximately 5 miles
(8 kilometers) after you reconnect it. This
is because the engine management system
must realign itself with the engine. You can
disregard any unusual driving
characteristics during this period.
The powertrain control system meets all
Canadian interference-causing equipment
standard requirements regulating the
impulse electrical field or radio noise.
When you start the engine, avoid pressing
the accelerator pedal before and during
operation. Only use the accelerator pedal
when you have difficulty starting the
engine. If your vehicle is operated in a heavy snow
storm or blowing snow conditions, the
engine air induction may become partially
clogged with snow and ice. If this occurs,
the engine may experience a significant
reduction in power output. At the earliest
opportunity, clear all the snow and ice
away from the air induction inlet.
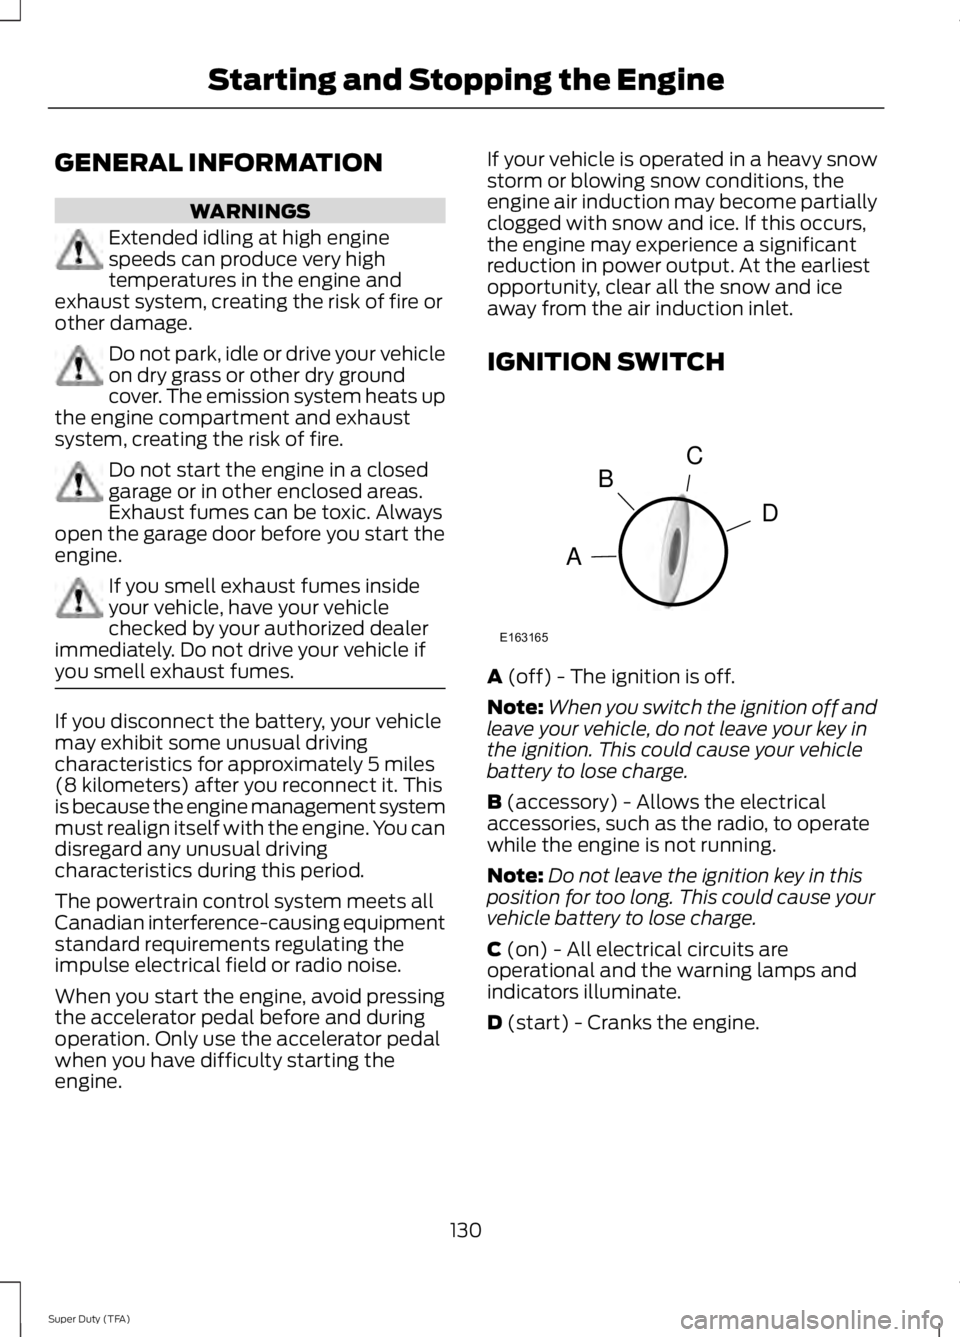
IGNITION SWITCH
A (off) - The ignition is off.
Note: When you switch the ignition off and
leave your vehicle, do not leave your key in
the ignition. This could cause your vehicle
battery to lose charge.
B
(accessory) - Allows the electrical
accessories, such as the radio, to operate
while the engine is not running.
Note: Do not leave the ignition key in this
position for too long. This could cause your
vehicle battery to lose charge.
C
(on) - All electrical circuits are
operational and the warning lamps and
indicators illuminate.
D
(start) - Cranks the engine.
130
Super Duty (TFA) Starting and Stopping the EngineC
D
B
A
E163165
Page 151 of 460

9. Start the vehicle.
Perform Steps 4 through 8 in reverse order,
making sure to engage the hinge pivots
between the upper and lower halves of the
shroud. Keep slight pressure in the forward
direction as the halves are rotated
together.
If Your Vehicle Gets Stuck In Mud
or Snow
Note:
Do not rock the vehicle if the engine
is not at normal operating temperature or
damage to the transmission may occur.
Note: Do not rock the vehicle for more than
a minute or damage to the transmission and
tires may occur, or the engine may overheat.
If your vehicle gets stuck in mud or snow,
it may be rocked out by shifting between
forward and reverse gears, stopping
between shifts in a steady pattern. Press
lightly on the accelerator in each gear.
POWER TAKE-OFF
Auxiliary equipment called power take-off,
or PTO, is often added to the engine or
transmission to operate utility equipment.
Examples include a wheel-lift for tow
trucks, cranes, tools for construction or tire
service, and pumping fluids. PTO
applications draw auxiliary horsepower
from the powertrain, often while the
vehicle is stationary. In this condition, there
is limited cooling air flow through the
radiator and around the vehicle that
normally occurs when a vehicle is moving.
The aftermarket PTO system installer,
having the most knowledge of the final
application, is responsible for determining
whether additional chassis heat protection
or powertrain cooling is required, and
alerting the user to the safe and proper
operation. Ford Super Duty Vehicles are approved for
use as a stationary (including split shaft
capability) or mobile power source, within
limits and operating guidelines detailed in
the Ford Truck Body Builders Layout Book,
found at www.fleet.ford.com/truckbbas,
and through the Ford Truck Body Builders
Advisory Service.
148
Super Duty (TFA) Transmission
Page 156 of 460

If SHIFT DELAYED PULL FORWARD is
displayed in the information display,
transfer case gear tooth blockage is
present. To alleviate this condition, place
the transmission in a forward gear, move
the vehicle forward approximately 5 feet
(1.5 meters), and shift the transmission
back to neutral to allow the transfer case
to complete the range shift.
How Your Vehicle Differs From
Other Vehicles WARNING
Vehicles with a higher center of
gravity such as utility and four-wheel
drive vehicles handle differently than
vehicles with a lower center of gravity.
Utility and four-wheel drive vehicles are
not designed for cornering at speeds as
high as passenger cars any more than
low-slung sports cars are designed to
perform satisfactorily under off-road
conditions. Avoid sharp turns, excessive
speed and abrupt maneuvers in these
vehicles. Failure to drive cautiously could
result in an increased risk of loss of vehicle
control, vehicle rollover, personal injury and
death. Truck and utility vehicles can differ from
some other vehicles. Your vehicle may be
higher to allow it to travel over rough
terrain without getting hung up or
damaging underbody components.
The differences that make your vehicle so
versatile also make it handle differently
than an ordinary passenger car.
Maintain steering wheel control at all
times, especially in rough terrain. Since
sudden changes in terrain can result in
abrupt steering wheel motion, make sure
you grip the steering wheel from the
outside. Do not grip the spokes. Drive cautiously to avoid vehicle damage
from concealed objects such as rocks and
stumps.
You should either know the terrain or
examine maps of the area before driving.
Map out your route before driving in the
area. To maintain steering and braking
control of your vehicle, you must have all
four wheels on the ground and they must
be rolling, not sliding or spinning.
Driving Off-Road With Truck and
Utility Vehicles
Note:
On some models, the initial shift from
two-wheel drive to four-wheel drive while
the vehicle is moving can cause some
momentary clunk and ratcheting sounds.
This is the front drivetrain coming up to
speed and the automatic locking hubs
engaging and is not cause for concern.
Note: Your vehicle may be equipped with
a front air dam that can become damaged
(due to reduced ground clearance) when
taking your vehicle off-road. This air dam
can be taken off by removing two bolts.
Four-wheel drive vehicles are specially
equipped for driving on sand, snow, mud
and rough terrain and have operating
characteristics that are somewhat
different from conventional vehicles, both
on and off the road.
Power is supplied to all four wheels
through a transfer case. On Four-wheel
drive vehicles, the transfer case allows you
to select 4WD when necessary.
Information on transfer case operation and
shifting procedures can be found in this
chapter. Information on transfer case
maintenance can be found in the
Maintenance chapter. You should become
thoroughly familiar with this information
before you operate your vehicle.
153
Super Duty (TFA) Four-Wheel Drive
(If Equipped)
Page 197 of 460

TRAILER BRAKE MODULE FAULT:
Displays in response to faults sensed by
the trailer brake controller, accompanied
by a single tone. If this message appears,
contact an authorized dealer as soon as
possible for diagnosis and repair. The
controller may still function, but
performance may be degraded.
WIRING FAULT ON TRAILER: Displays
when there is a short circuit on the electric
brake output wire. If the
WIRING FAULT
ON TRAILER message displays,
accompanied by a single tone, with no
trailer connected, the problem is with your
vehicle wiring between the trailer brake
controller and the 7-pin connector at the
bumper. If the message only displays with
a trailer connected, the problem is with the
trailer wiring. Consult your trailer dealer for
assistance. This can be a short to ground
(such as a chaffed wire), short to voltage
(such as a pulled pin on trailer emergency
breakaway battery) or the trailer brakes
may be drawing too much current.
Points to Remember
Note: Do not attempt removal of the trailer
brake controller without consulting the
Workshop Manual. Damage to the unit may
result.
• Adjust gain setting before using the
trailer brake controller for the first time.
• Adjust gain setting, using the procedure
above, whenever road, weather and
trailer or vehicle loading conditions
change from when the gain was initially
set.
• Only use the manual control lever for
proper adjustment of the gain during
trailer setup. Misuse, such as
application during trailer sway, could
cause instability of trailer or tow
vehicle. •
Avoid towing in adverse weather
conditions. The trailer brake controller
does not provide anti-lock control of
the trailer wheels. Trailer wheels can
lock up on slippery surfaces, resulting
in reduced stability of trailer and tow
vehicle.
• The trailer brake controller is equipped
with a feature that reduces output at
vehicle speeds below 11 mph (18 km/h)
so trailer and vehicle braking is not jerky
or harsh. This feature is only available
when applying the brakes using your
vehicle's brake pedal, not the
controller.
• The controller interacts with the brake
control system and powertrain control
system of your vehicle to provide the
best performance on different road
conditions.
• Your vehicle's brake system and the
trailer brake system work
independently of each other. Changing
the gain setting on the controller does
not affect the operation of your
vehicle's brakes whether you attach a
trailer or not.
• When you switch the engine off, the
controller output is disabled and the
display and module shut down. The
controller module and display turn on
when you switch the ignition on.
• The trailer brake controller is only a
factory-installed or dealer-installed
item. Ford is not responsible for
warranty or performance of the
controller due to misuse or customer
installation.
194
Super Duty (TFA) Towing