2014 FORD F150 ECO mode
[x] Cancel search: ECO modePage 160 of 472
Power is supplied to all four wheels
through a transfer case. On Four-wheel
drive vehicles, the transfer case allows you
to select 4WD when necessary.
Information on transfer case operation and
shifting procedures can be found in this
chapter. Information on transfer case
maintenance can be found in the
Maintenance chapter. You should become
thoroughly familiar with this information
before you operate your vehicle.
Four-wheel drive (when you select a 4WD
mode) uses all four wheels to power the
vehicle. This increases traction, enabling
you to drive over terrain and road
conditions that a conventional two-wheel
drive vehicle cannot.
Basic Operating Principles
•
Drive slower in strong crosswinds which
can affect the normal steering
characteristics of your vehicle.
• When driving your vehicle on surfaces
made slippery by loose sand, water,
gravel, snow or ice proceed with care.
• Do not use Four-wheel drive on dry,
hard surfaced roads. Doing so will
produce excessive noise, increase tire
wear and may damage drive
components. Four-wheel drive modes
are only intended for consistently
slippery or loose surfaces.
If Your Vehicle leaves the Road
If your vehicle leaves the road, reduce your
vehicle speed and avoid severe braking.
When your vehicle speed has been reduced
ease your vehicle back onto the road. Do
not turn the steering wheel sharply while
returning your vehicle to the road.
It may be safer to stay on the shoulder of
the road and slow down gradually before
returning to the road. You may lose control
if you do not slow down or if you turn the
steering wheel too sharply or abruptly. It may be less risky to strike small objects,
such as freeway reflectors, with minor
damage to your vehicle rather than
attempt a sudden return to the road which
could cause your vehicle to slide sideways
out of control or roll over. Remember, your
safety and the safety of others should be
your primary concern.
Emergency Maneuvers
In an unavoidable emergency situation
where a sudden sharp turn must be made,
remember to avoid over-driving your
vehicle (i.e. turn the steering wheel only as
rapidly and as far as required to avoid the
emergency). Excessive steering can result
in loss of vehicle control. Apply smooth
pressure to the accelerator pedal or brake
pedal when changes in vehicle speed are
required. Avoid abrupt steering,
acceleration and braking. This could result
in an increased risk of vehicle roll over, loss
of vehicle control and personal injury. Use
all available road surface to bring your
vehicle to a safe direction of travel.
In the event of an emergency stop, avoid
skidding the tires and do not attempt any
sharp steering wheel movements.
If your vehicle goes from one type of
surface to another (i.e. from concrete to
gravel) there will be a change in the way
your vehicle responds to a maneuver (i.e.
steering, acceleration or braking).
Sand
When driving over sand, try to keep all four
wheels on the most solid area of the trail.
Avoid reducing the tire pressures but shift
to a lower gear and drive steadily through
the terrain. Apply the accelerator slowly
and avoid excessive wheel slip.
When driving at slow speeds in deep sand
under high outside temperatures, use a low
gear when possible. Low gear operation
will maximize the engine and transmission
cooling capability.
157
F150 (TF6) , enUSA Four-Wheel Drive (If Equipped)
Page 164 of 472
LIMITED SLIP DIFFERENTIAL
(IF EQUIPPED)
This axle provides added traction on
slippery surfaces, particularly when one
wheel is on a poor traction surface. Under
normal conditions, the limited-slip axle
functions like a standard rear axle. The axle
may exhibit a slight noise or vibration
during tight turns with low vehicle speed.
This is normal behavior and indicates the
axle is working.
ELECTRONIC LOCKING
DIFFERENTIAL (IF EQUIPPED)
Note: The electronic locking differential is
for off-road use only and is not for use on
dry pavement. Using the electronic locking
differential on dry pavement will result in
increased tire wear, noise and vibration.
The electronic locking differential is a
device housed in the rear axle that allows
both rear wheels to turn at the same
speed. The electronic locking differential
can provide additional traction should your
vehicle become stuck. You can activate
the differential electronically and shift it
on the fly within the differential operating
speed range. The differential is for use in
mud, rocks, sand, or any off-road condition
where you need maximum traction. It is
not for use on dry pavement.
The following conditions will affect the
electronic locking differential:
• The electronic locking differential will
not engage if your vehicle speed is
above 20 mph (32 km/h) in 4x2, 4x4
Auto, or 4x4 High modes
• The electronic locking differential will
not engage if your vehicle speed is
above or 56 mph (90 km/h) in 4X4
Low •
The electronic locking differential will
not engage if you press your
accelerator pedal beyond 50% during
an engagement attempt
• In 4x2, 4x4 Auto, and 4x4 High modes,
the electronic locking differential will
automatically disengage at speeds
above 25 mph (41 km/h) and will
automatically reengage at speeds
below 20 mph (32 km/h)
• In 4L (4X4 low), the electronic locking
differential will automatically
disengage at speeds above 62 mph
(100 km/h) and will automatically
reengage at speeds below 56 mph (90
km/h)
• The AdvanceTrac system has the
ability to take over control of the
electronic locking differential and
disable it during driving maneuvers
when necessary
When you switch the system on, if you do
not meet the required conditions for
electronic locking differential activation,
the instrument cluster will display the
appropriate information guiding you
through the proper activation process.
Activating the Electronic Locking
Differential
(If Equipped)
Note: Do not use electronic locking
differential on dry, hard surfaced roads.
Doing so will produce excessive noise,
vibration and increase tire wear.
Note: If the electronic locking differential
has difficulty disengaging, release the
accelerator pedal and turn the steering
wheel in the opposite direction while rolling.
161
F150 (TF6) , enUSA Rear Axle
Page 172 of 472
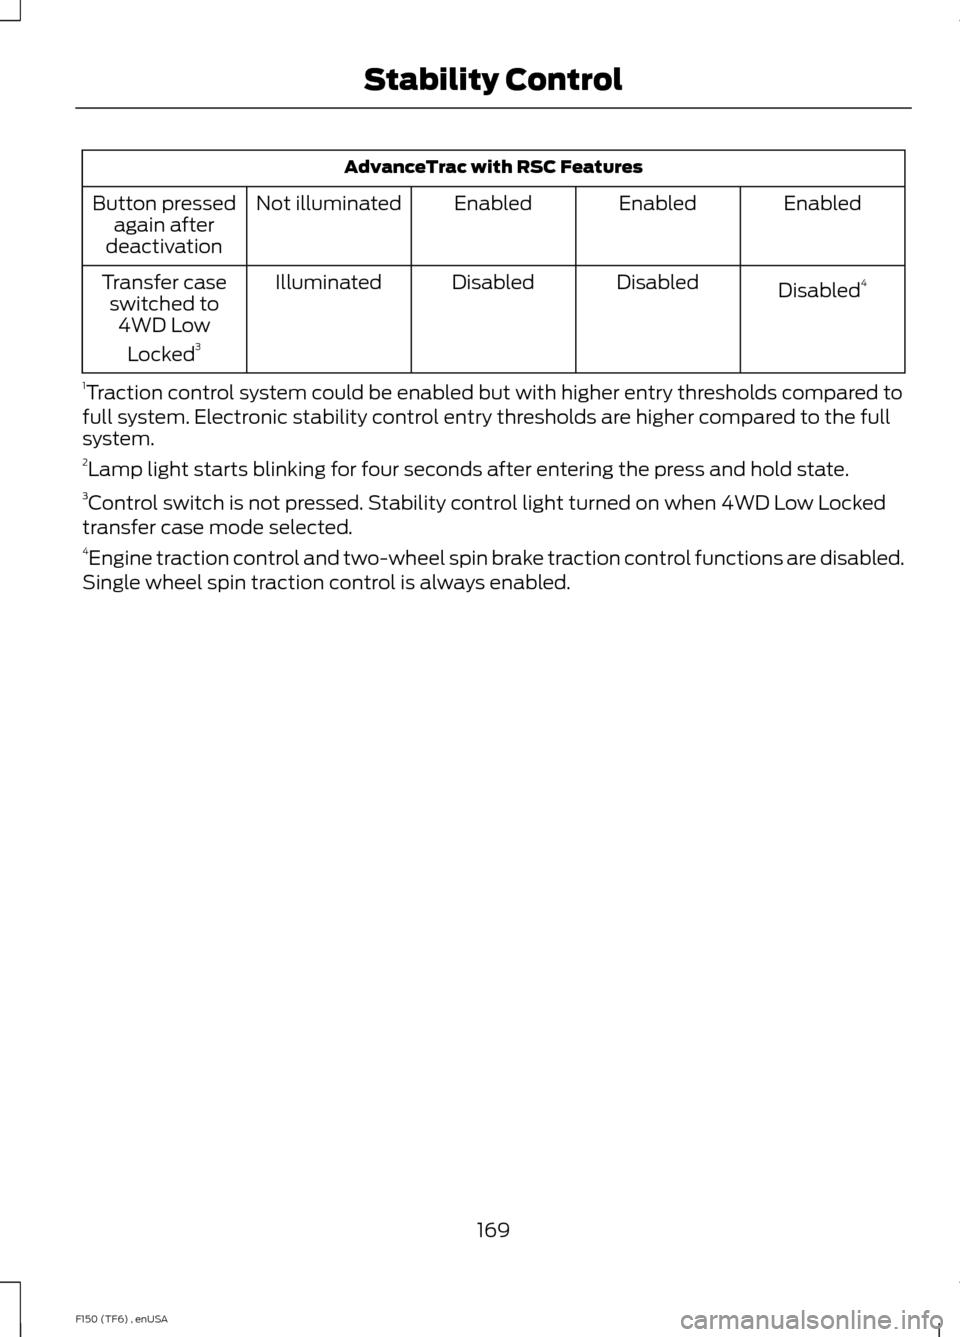
AdvanceTrac with RSC Features
Enabled
Enabled
Enabled
Not illuminated
Button pressed
again after
deactivation
Disabled4
Disabled
Disabled
Illuminated
Transfer case
switched to 4WD Low
Locked 3
1 Traction control system could be enabled but with higher entry thresholds compared to
full system. Electronic stability control entry thresholds are higher compared to the full
system.
2 Lamp light starts blinking for four seconds after entering the press and hold state.
3 Control switch is not pressed. Stability control light turned on when 4WD Low Locked
transfer case mode selected.
4 Engine traction control and two-wheel spin brake traction control functions are disabled.
Single wheel spin traction control is always enabled.
169
F150 (TF6) , enUSA Stability Control
Page 211 of 472
Ford Motor Company produces a towing
manual for all authorized tow truck
operators. Have your tow truck operator
refer to this manual for proper hook-up
and towing procedures for your vehicle.
It is acceptable to have your two-wheel
drive vehicle towed with the front wheels
on the ground (without dollies) and the
rear wheels off the ground.
We recommend towing a four-wheel drive
vehicle with all wheels off the ground, such
as using a wheel lift and dollies or flatbed
equipment.
TOWING THE VEHICLE ON
FOUR WHEELS
Emergency Towing
If your vehicle becomes inoperable
(without access to wheel dollies,
car-hauling trailer, or flatbed transport
vehicle), it can be flat-towed (all wheels
on the ground, regardless of the powertrain
and transmission configuration) under the
following conditions:
•
Your vehicle is facing forward for
towing in a forward direction.
• Place the transmission in position N. If
you cannot move the transmission into
N
, you may need to override it. See
Transmission (page 147).
• Maximum speed is 35 mph (56 km/h).
• Maximum distance is 50 miles (80
kilometers).
Recreational Towing
Note: Put your climate control system in
recirculated air mode to prevent exhaust
fumes from entering your vehicle. See
Climate Control
(page 106). Follow these guidelines if you have a need
for recreational towing, such as towing
your vehicle behind a motorhome. We
designed these guidelines to prevent
damage to your transmission.
Two-wheel Drive Vehicles
You cannot tow a two-wheel drive vehicle
with any wheels on the ground as vehicle
or transmission damage may occur. You
must tow your vehicle with all four wheels
off the ground, such as when using a
car-hauling trailer.
Four-wheel Drive Vehicles
You can only tow a four-wheel drive
vehicle with all wheels on the ground by
placing the transfer case in its neutral
position and engaging the
four-wheel-down towing feature. Perform
the steps outlined in the following section
after positioning your vehicle behind the
tow vehicle and properly securing them
together.
Four-wheel-down Towing
1.
Turn the ignition to the on position. Do
not start the engine.
2. Press and hold the brake pedal.
3. Rotate the four-wheel drive switch to 2H
.
4. Shift the transmission to position
N.
5. Rotate the four-wheel drive switch from
2H to 4L and back to 2H five
times within seven seconds.
Note: If completed successfully, the
information display shows NEUTRAL TOW
LEAVE IN N or NEUTRAL TOW ENABLED
LEAVE TRANSMISSION IN NEUTRAL
.
This indicates that your vehicle is safe to
tow with all wheels on the ground
Note: If you do not see the message in the
display, you must perform the procedure
again from the beginning.
208
F150 (TF6) , enUSA Towing
Page 213 of 472
BREAKING-IN
You need to break in new tires for
approximately 300 miles (480
kilometers). During this time, your vehicle
may exhibit some unusual driving
characteristics.
Avoid driving too fast during the first 1000
miles (1600 kilometers). Vary your speed
frequently and change up through the
gears early. Do not labor the engine.
Do not tow during the first 1000 miles
(1600 kilometers).
ECONOMICAL DRIVING
Your fuel economy is affected by several
things, such as how you drive, the
conditions you drive under, and how you
maintain your vehicle.
You may improve your fuel economy by
keeping these things in mind:
•
Accelerate and slow down in a smooth,
moderate fashion.
• Drive at steady speeds without
stopping.
• Anticipate stops; slowing down may
eliminate the need to stop.
• Combine errands and minimize
stop-and-go driving.
• Close the windows for high-speed
driving.
• Drive at reasonable speeds (traveling
at 55 mph [88 km/h] uses 15% less
fuel than traveling at 65 mph [105
km/h]).
• Keep the tires properly inflated and use
only the recommended size.
• Use the recommended engine oil.
• Perform all regularly scheduled
maintenance. Avoid these actions; they reduce your fuel
economy:
•
Sudden accelerations or hard
accelerations.
• Revving the engine before turning it off.
• Idle for periods longer than one minute.
• Warm up your vehicle on cold
mornings.
• Use the air conditioner or front
defroster.
• Use the speed control in hilly terrain.
• Rest your foot on the brake pedal while
driving.
• Drive a heavily loaded vehicle or tow a
trailer.
• Carry unnecessary weight
(approximately 1 mpg [0.4 km/L] is
lost for every 400 lb [180 kilogram] of
weight carried).
• Driving with the wheels out of
alignment.
Conditions
• Heavily loading a vehicle or towing a
trailer may reduce fuel economy at any
speed.
• Adding certain accessories to your
vehicle (for example bug deflectors,
rollbars, light bars, running boards, ski
racks or luggage racks) may reduce
fuel economy.
• To maximize the fuel economy, drive
with the tonneau cover installed (if
equipped).
• Using fuel blended with alcohol may
lower fuel economy.
• Fuel economy may decrease with lower
temperatures during the first 8– 10
miles (12 –16 kilometers) of driving.
• Driving on flat terrain offers improved
fuel economy as compared to driving
on hilly terrain.
210
F150 (TF6) , enUSA Driving Hints
Page 219 of 472
HAZARD WARNING FLASHERS
Note:
The hazard warning flashers will
operate when the ignition is in any position
or if the key is not in the ignition. If used
when the engine is not running, the battery
will lose charge. As a result, there may be
insufficient power to restart your engine. The hazard flasher control is
located on the instrument panel
by the radio. Use it when your
vehicle is disabled and is creating a safety
hazard for other motorists.
• Press the flasher control and all front
and rear direction indicators flash.
• Press the flasher control again to turn
them off.
FUEL SHUTOFF WARNING
Failure to inspect and, if necessary,
repair fuel leaks after a collision may
increase the risk of fire and serious
injury. Ford Motor Company recommends
that the fuel system be inspected by an
authorized dealer after any collision. In the event of a moderate to severe
collision, this vehicle is equipped with a
fuel pump shut-off feature that stops the
flow of fuel to the engine. Not every impact
will cause a shut-off.
Should your vehicle shut off after a
collision, you may restart your vehicle. For
vehicles equipped with a key system:
1. Switch off the ignition.
2. Switch on the ignition.
3. Repeat Steps 1 and 2 to re-enable the
fuel pump. For vehicles equipped with a push button
start system:
1. Press the START/STOP button to
switch off the ignition.
2. Press the brake pedal and press the START/STOP
button to start the
vehicle.
3. Remove your foot from the brake pedal
and press the
START/STOP button
to switch off the ignition.
4. You can either attempt to start the engine by pressing the brake pedal and
the
START/STOP button, or switch
on the ignition only by pressing the
START/STOP
button without
pressing the brake pedal. Both ways
re-enable the fuel system.
Note: When you try to restart your vehicle
after a fuel shutoff, the vehicle makes sure
that various systems are safe to restart.
Once your vehicle determines that the
systems are safe, then the vehicle will allow
you to restart.
Note: In the event that your vehicle does
not restart after your third attempt, contact
an authorized dealer.
JUMP STARTING THE VEHICLE WARNINGS
The gases around the battery can
explode if exposed to flames, sparks,
or lit cigarettes. An explosion could
result in personal injury or vehicle damage. Batteries contain sulfuric acid which
can burn skin, eyes and clothing, if
contacted.
Use only an adequate-sized cable
with insulated clamps.
216
F150 (TF6) , enUSA Roadside EmergenciesE142663
Page 291 of 472

•
To reduce the chances of interference
from another vehicle, perform the
system reset procedure at least three
feet (one meter) away from another
Ford Motor Company vehicle
undergoing the system reset procedure
at the same time.
• Do not wait more than two minutes
between resetting each tire sensor or
the system will time-out and the entire
procedure will have to be repeated on
all four wheels.
• A double horn will sound indicating the
need to repeat the procedure.
Performing the System Reset Procedure
Read the entire procedure before
attempting.
1. Drive the vehicle above 20 mph (32 km/h) for at least two minutes, then
park in a safe location where you can
easily get to all four tires and have
access to an air pump.
2. Place the ignition in the off position and
keep the key in the ignition.
3. Cycle the ignition to the on position with the engine off.
4. Turn the hazard flashers on then off three times. You must accomplish this
within 10 seconds. If the reset mode
has been entered successfully, the horn
will sound once, the system indicator
will flash and a message is shown in
the information display. If this does not
occur, please try again starting at Step
2. If after repeated attempts to enter
the reset mode, the horn does not
sound, the system indicator does not
flash and no message is shown in the
information display, seek service from
your authorized dealer. 5. Train the tire pressure monitoring
system sensors in the tires using the
following system reset sequence
starting with the left front tire in the
following clockwise order: Left front
(driver's side front tire), Right front
(passenger's side front tire), Right rear
(passenger's side rear tire), Left rear
(driver's side rear tire)
6. Remove the valve cap from the valve stem on the left front tire. Decrease the
air pressure until the horn sounds.
Note: The single horn chirp confirms
that the sensor identification code has
been learned by the module for this
position. If a double horn is heard, the
reset procedure was unsuccessful, and
you must repeat it.
7. Remove the valve cap from the valve stem on the right front tire. Decrease
the air pressure until the horn sounds.
8. Remove the valve cap from the valve stem on the right rear tire. Decrease the
air pressure until the horn sounds.
9. Remove the valve cap from the valve stem on the left rear tire. Decrease the
air pressure until the horn sounds.
Training is complete after the horn
sounds for the last tire trained (driver's
side rear tire), the system indicator
stops flashing, and a message is shown
in the information display.
10. Turn the ignition off. If two short horn
beeps are heard, the reset procedure
was unsuccessful and you must
repeat it. If after repeating the
procedure and two short beeps are
heard when the ignition is turned to
off, seek assistance from your
authorized dealer.
288
F150 (TF6) , enUSA Wheels and Tires
Page 309 of 472
GENERAL INFORMATION
Radio Frequencies and Reception
Factors
AM and FM frequencies are established by
the Federal Communications Commission
(FCC) and the Canadian Radio and
Telecommunications Commission (CRTC).
Those frequencies are:
•
AM: 530, 540-1700, 1710 kHz
• FM: 87.9-107.7, 107.9 MHz Radio Reception Factors
The further you travel from an FM station, the weaker the
signal and the weaker the reception.
Distance and strength
Hills, mountains, tall buildings, bridges, tunnels, freeway
overpasses, parking garages, dense tree foliage and
thunderstorms can interfere with the reception.
Terrain
When you pass a ground-based broadcast repeating
tower, a stronger signal may overtake a weaker one and
result in the audio system muting.
Station overload
CD and CD Player Information
Note: CD units play commercially pressed
4.75-inch (12 centimeter) audio compact
discs only. Due to technical incompatibility,
certain recordable and re-recordable
compact discs may not function correctly
when used in Ford CD players.
Note: Do not insert CDs with homemade
paper (adhesive) labels into the CD player
as the label may peel and cause the CD to
become jammed. You should use a
permanent felt tip marker rather than
adhesive labels on your homemade CDs.
Ballpoint pens may damage CDs. Please
contact an authorized dealer for further
information.
Note: Do not use any irregularly shaped
discs or discs with a scratch protection film
attached.
Always handle discs by their edges only.
Clean the disc with an approved CD
cleaner only. Wipe it from the center of the
disc toward the edge. Do not clean in a
circular motion. Do not expose discs to direct sunlight or
heat sources for extended periods.
MP3 Track and Folder Structure
Audio systems capable of recognizing and
playing MP3 individual tracks and folder
structures work as follows:
•
There are two different modes for MP3
disc playback: MP3 track mode
(system default) and MP3 folder
mode.
• MP3 track mode ignores any folder
structure on the MP3 disc. The player
numbers each MP3 track on the disc
(noted by the .mp3 file extension) from
T001 to a maximum of T255. The
maximum number of playable MP3
files may be less depending on the
structure of the CD and exact model
of radio present.
306
F150 (TF6) , enUSA Audio System