Page 49 of 143
.
4.Place wheel chocks in the front andback of the trailer wheels. (Chocks notincluded with vehicle.)
Launching or Retrie")
2.Set your vehicle parking brake.
3.Place the automatic transmission inpark (P).
4.Place wheel chocks in the front andback of the trailer wheels. (Chocks notincluded with vehicle.)
Launching or Retrieving a Boat orPersonal Watercraft (PWC)
Note:Disconnect the wiring to the trailerbefore backing the trailer into the water.
Note:Reconnect the wiring to the trailerafter removing the trailer from the water.
When backing down a ramp during boatlaunching or retrieval:
•Do not allow the static water level torise above the bottom edge of the rearbumper.
•Do not allow waves to break higherthan 6 in (15 cm) above the bottomedge of the rear bumper.
Exceeding these limits may allow water toenter vehicle components:
•Causing internal damage to thecomponents.
•Affecting driveability, emissions andreliability.
Replace the rear axle lubricant anytimethe rear axle has been submerged in water.Water may have contaminated the rearaxle lubricant, which is not normallychecked or changed unless a leak issuspected or other axle repair is required.
TRANSPORTING THE VEHICLE
If you need to have your vehicle towed,contact a professional towing service or,if you are a member of a roadsideassistance program, your roadsideassistance service provider. When callingfor a tow truck, let the operator know whatkind of vehicle you have.
It is advisable to have your vehicle towedwith a wheel lift and dollies or flatbedequipment. Do not tow with a slingbelt.Ford Motor Company has not approved aslingbelt towing procedure. Vehicledamage may occur if towed incorrectly, orby any other means.
46Motorhome (TY3) , enUSATowingE143886
Page 50 of 143
Do not exceed a maximum distance of 50miles (80 kilometers) and maximumspeed of 35 mph (56 km/h) when towingyour vehicle from the front with the rearwheels on the ground. If you must exceedthe maximum distance or speed, aqualified technician must remove thedriveshaft. This prevents transmissiondamage.
TOWING THE VEHICLE ON
FOUR WHEELS
Emergency Towing
If your vehicle becomes inoperable(without access to wheel dollies,car-hauling trailer, or flatbed transportvehicle), it can be flat-towed (all wheelson the ground, regardless of the powertrainand transmission configuration) under thefollowing conditions:
•Your vehicle is facing forward fortowing in a forward direction.
•Place the transmission in position N. Ifyou cannot move the transmission intoN, you may need to override it.
•Maximum speed is 35 mph (56 km/h).
•Maximum distance is 50 miles (80kilometers).
47Motorhome (TY3) , enUSATowing
Page 51 of 143
. During this time, your vehiclemay exhibit some unusual drivingcharacteristics.
Avoid driving too fast during the")
BREAKING-IN
You need to break in new tires forapproximately 300 miles (480kilometers). During this time, your vehiclemay exhibit some unusual drivingcharacteristics.
Avoid driving too fast during the first 1000miles (1600 kilometers). Vary your speedfrequently and change up through thegears early. Do not labor the engine.
Do not tow during the first 1000 miles(1600 kilometers).
ECONOMICAL DRIVING
Your fuel economy is affected by severalthings, such as how you drive, theconditions you drive under, and how youmaintain your vehicle.
You may improve your fuel economy bykeeping these things in mind:
•Accelerate and slow down in a smooth,moderate fashion.
•Drive at steady speeds withoutstopping.
•Anticipate stops; slowing down mayeliminate the need to stop.
•Combine errands and minimizestop-and-go driving.
•Close the windows for high-speeddriving.
•Drive at reasonable speeds (travelingat 55 mph [88 km/h] uses 15% lessfuel than traveling at 65 mph [105km/h]).
•Keep the tires properly inflated and useonly the recommended size.
•Use the recommended engine oil.
•Perform all regularly scheduledmaintenance.
Avoid these actions; they reduce your fueleconomy:
•Sudden accelerations or hardaccelerations.
•Revving the engine before turning it off.
•Idle for periods longer than one minute.
•Warm up your vehicle on coldmornings.
•Use the air conditioner or frontdefroster.
•Use the speed control in hilly terrain.
•Rest your foot on the brake pedal whiledriving.
•Drive a heavily loaded vehicle or tow atrailer.
•Carry unnecessary weight(approximately 1 mpg [0.4 km/L] islost for every 400 lb [180 kilogram] ofweight carried).
•Driving with the wheels out ofalignment.
Conditions
•Heavily loading a vehicle or towing atrailer may reduce fuel economy at anyspeed.
•Adding certain accessories to yourvehicle (for example bug deflectors,rollbars, light bars, running boards, skiracks or luggage racks) may reducefuel economy.
•To maximize the fuel economy, drivewith the tonneau cover installed (ifequipped).
•Using fuel blended with alcohol maylower fuel economy.
•Fuel economy may decrease with lowertemperatures during the first 8–10miles (12–16 kilometers) of driving.
•Driving on flat terrain offers improvedfuel economy as compared to drivingon hilly terrain.
48Motorhome (TY3) , enUSADriving Hints
Page 52 of 143
•Transmissions give their best fueleconomy when operated in the topcruise gear and with steady pressureon the gas pedal.
•Four-wheel-drive operation (ifequipped) is less fuel efficient thantwo-wheel-drive operation.
•Close the windows for high-speeddriving.
DRIVING THROUGH WATER
Note:Driving through deep water abovethe recommended levels can cause vehicledamage.
If driving through deep or standing wateris unavoidable, proceed very slowly. Neverdrive through water that is higher than thebottom of the wheel rims (for cars) or thebottom of the hubs (for trucks).
When driving through water, traction orbrake capability may be limited. Also,water may enter your engine’s air intakeand severely damage your engine or yourvehicle may stall.
Once through the water, always dry thebrakes by moving your vehicle slowly whileapplying light pressure on the brake pedal.Wet brakes do not stop the vehicle asquickly as dry brakes.
49Motorhome (TY3) , enUSADriving HintsE142667
Page 53 of 143

ROADSIDE ASSISTANCE
Vehicles Sold in the United States:Getting Roadside Assistance
To fully assist you should you have avehicle concern, Ford Motor Companyoffers a complimentary roadsideassistance program. This program isseparate from the New Vehicle LimitedWarranty. The service is available:
•24 hours a day, seven days a week.
•For the coverage period listed on theRoadside Assistance Card included inyour Owner's Manual portfolio.
Roadside Assistance covers:
•A flat tire change with a good spare, ifprovided with the vehicle (exceptvehicles supplied with a tire inflationkit).
•Battery jump start.
•Lock-out assistance (key replacementcost is the customer's responsibility).
•Fuel delivery — independent servicecontractors, if not prohibited by state,local or municipal law, shall deliver upto 2 gal (7.6 L) of gasoline or 5 gal(18.9 L) of diesel fuel to a disabledvehicle. Roadside Assistance limits fueldelivery service to two no-chargeoccurrences within a 12-month period.
•Winch out — available within 100 ft(30.5 m) of a paved or countymaintained road, no recoveries.
•Towing — Ford eligible vehicles towedto an authorized dealer within 35 mi(56 km) of the disablement locationor to the nearest authorized dealer. Ifa member requests a tow to anauthorized dealer that is more than35 mi (56 km) from the disablementlocation, the member shall beresponsible for any mileage costs inexcess of 35 mi (56 km).
Roadside Assistance includes up to $200for a towed trailer if the disabled eligiblevehicle requires service at the nearestauthorized dealer. If the towing vehicle isoperational but the trailer is not, then thetrailer does not qualify for any roadsideservices.
Vehicles Sold in the United States:Using Roadside Assistance
Complete the roadside assistanceidentification card and place it in yourwallet for quick reference. This card is inthe owner's information portfolio in theglove compartment.
United States Ford vehicle customers whorequire Roadside Assistance, call1-800-241-3673.
If you need to arrange roadside assistancefor yourself, Ford Motor Companyreimburses a reasonable amount fortowing to the nearest dealership within35 mi (56 km). To obtain reimbursementinformation, United States Ford vehiclecustomers call 1-800-241-3673.Customers need to submit their originalreceipts.
Vehicles Sold in Canada: GettingRoadside Assistance
Canadian customers who require roadsideassistance, call 1-800-665-2006.
Vehicles Sold in Canada: UsingRoadside Assistance
For your convenience, you may completethe roadside assistance identification cardfound in the centerfold of your warrantyguide and retain for future reference.
50Motorhome (TY3) , enUSARoadside Emergencies
Page 54 of 143

Canadian roadside coverage and benefitsmay differ from the U.S. coverage. If yourequire more information, please refer tothe coverage section of your warrantyguide, call us in Canada at1-800-665-2006, or visit our website atwww.ford.ca.
Sykes Assistance Services Corporationadministers the Roadside Assistanceprogram. You must receive coveredservices in Canada or the continentalUnited States. Coverage extends tovehicles that use public, non-seasonal,annually traveled roadways. RoadsideAssistance coverage does not extend tovehicles involved in cross-country driving,logging, autocross and any other form ofoff-road use. Well maintained roads andsurfaces help ensure safe travel for thesupplier, and allow their representativesto perform service as per the standardoperating procedures.
In Remote Locations
If our supplier cannot take your vehicle byroad to the nearest authorized dealership,transportation by rail or water may benecessary. The program covers a tow tothe dock or rail terminal and also to thedealership at the end of the trip.
For rail or water transportation, however,contact your authorized dealer to confirmif you are eligible for additional coveragebefore you authorize or pay for the service.
Call the Ford Roadside Assistance at1-800-665-2006 for additionalinformation.
HAZARD WARNING FLASHERS
Note:The hazard warning flashers willoperate when the ignition is in any positionor if the key is not in the ignition. If usedwhen the engine is not running, the batterywill lose charge. As a result, there may beinsufficient power to restart your engine.
The hazard flasher control is located onthe steering column, just behind thesteering wheel. Use it when your vehicle iscreating a safety hazard for othermotorists.
•Press the flasher control and all frontand rear direction indicators flash.
•Press the flasher control again to turnthem off.
JUMP STARTING THE VEHICLE
WARNINGS
The gases around the battery canexplode if exposed to flames, sparks,or lit cigarettes. An explosion couldresult in personal injury or vehicle damage.
Batteries contain sulfuric acid whichcan burn skin, eyes and clothing, ifcontacted.
Use only an adequate-sized cablewith insulated clamps.
51Motorhome (TY3) , enUSARoadside EmergenciesE161463
Page 55 of 143

Preparing Your Vehicle
Note:Do not attempt to push-start yourautomatic transmission vehicle. Automatictransmissions do not have push-startcapability. Attempting to push-start avehicle with an automatic transmission maycause transmission damage.
Note:Use only a 12-volt supply to start yourvehicle.
Note:Do not disconnect the battery of thedisabled vehicle as this could damage thevehicle's electrical system.
Park the booster vehicle close to the hoodof the disabled vehicle, making sure thetwo vehicles do not touch. Turn allaccessories off.
Connecting the Jumper Cables
WARNING
Do not attach the cables to fuel lines,engine rocker covers, the intakemanifold or electrical componentsas grounding points. Stay clear of movingparts. To avoid reverse polarityconnections, make sure that you correctlyidentify the positive (+) and negative (-)terminals on both the disabled and boostervehicles before connecting the cables.
Note:In the illustration, the bottom vehiclerepresents the booster vehicle.
1.Connect the positive (+) jumper cableto the positive (+) terminal of thedischarged battery.
2.Connect the other end of the positive(+) cable to the positive (+) terminalof the assisting battery.
3.Connect the negative (-) cable to thenegative (-) terminal of the assistingbattery.
4.Make the final connection of thenegative (-) cable to an exposed metalpart of the stalled vehicle's engine, orconnect the negative (-) cable to aground connection point if available.
WARNING
Do not connect the end of thesecond cable to the negative (-)terminal of the battery to be jumped.A spark may cause an explosion of thegases that surround the battery.
52Motorhome (TY3) , enUSARoadside Emergencies4213E142664
Page 56 of 143

Jump Starting
1.Start the engine of the booster vehicleand rev the engine moderately, or pressthe accelerator gently to keep yourengine speed between 2000 and 3000rpms, as shown in your tachometer.
2.Start the engine of the disabled vehicle.
3.Once the disabled vehicle has beenstarted, run both vehicle engines for anadditional three minutes beforedisconnecting the jumper cables.
Removing the Jumper Cables
Remove the jumper cables in the reverseorder that they were connected.
1.Remove the jumper cable from theground metal surface or connectingpoint, if available.
2.Remove the jumper cable on thenegative (-) terminal of the boostervehicle's battery.
3.Remove the jumper cable from thepositive (+) terminal of the boostervehicle's battery.
4.Remove the jumper cable from thepositive (+) terminal of the disabledvehicle's battery.
After the disabled vehicle has been startedand the jumper cables removed, allow itto idle for several minutes so the batterycan recharge.
53Motorhome (TY3) , enUSARoadside Emergencies4132E142665
 1
1 2
2 3
3 4
4 5
5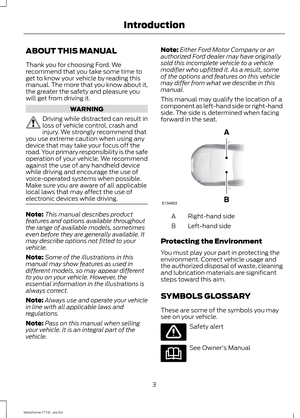 6
6 7
7 8
8 9
9 10
10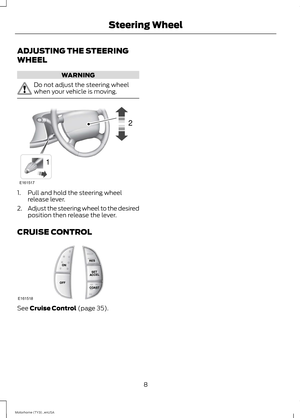 11
11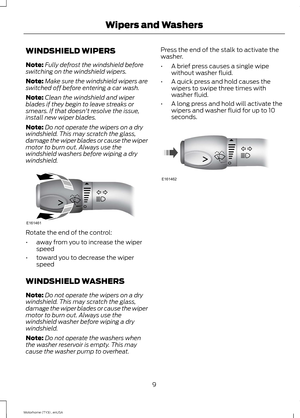 12
12 13
13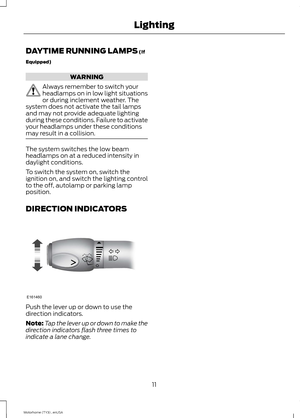 14
14 15
15 16
16 17
17 18
18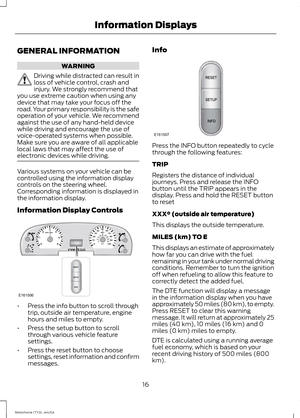 19
19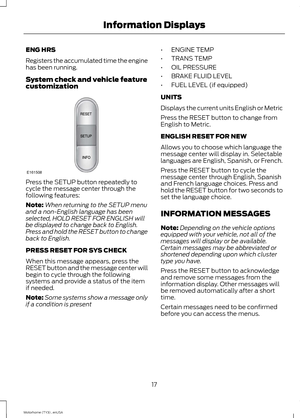 20
20 21
21 22
22 23
23 24
24 25
25 26
26 27
27 28
28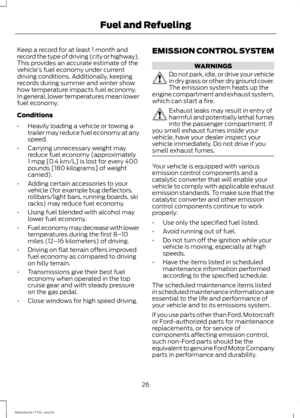 29
29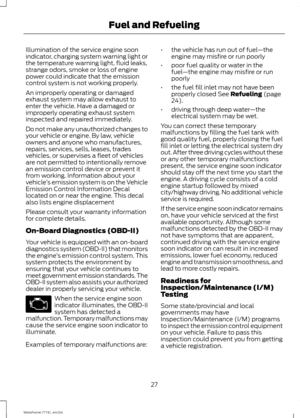 30
30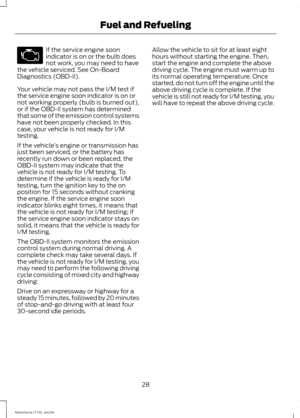 31
31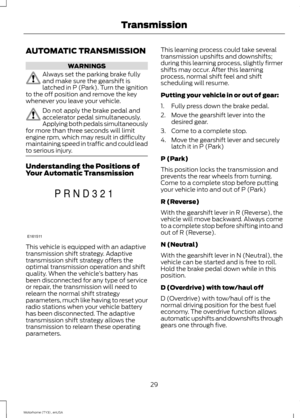 32
32 33
33 34
34 35
35 36
36 37
37 38
38 39
39 40
40 41
41 42
42 43
43 44
44 45
45 46
46 47
47 48
48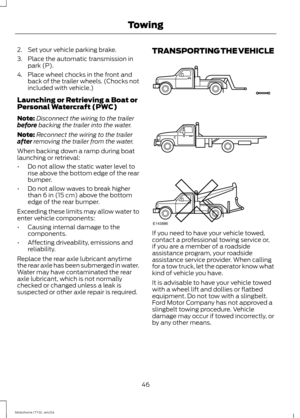 49
49 50
50 51
51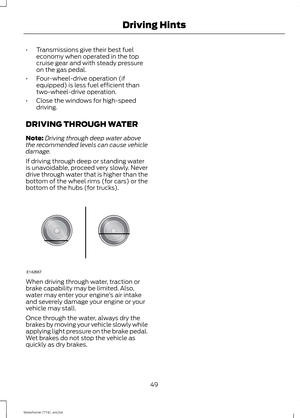 52
52 53
53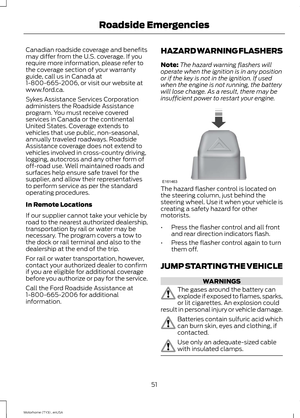 54
54 55
55 56
56 57
57 58
58 59
59 60
60 61
61 62
62 63
63 64
64 65
65 66
66 67
67 68
68 69
69 70
70 71
71 72
72 73
73 74
74 75
75 76
76 77
77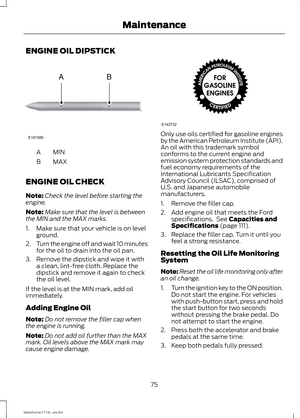 78
78 79
79 80
80 81
81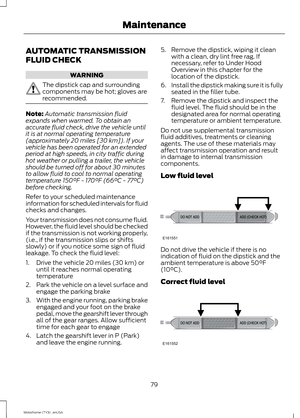 82
82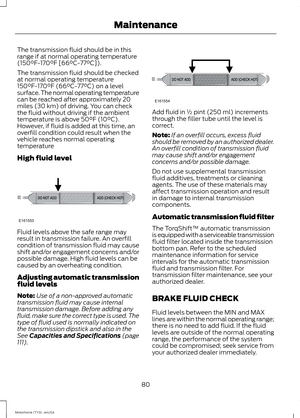 83
83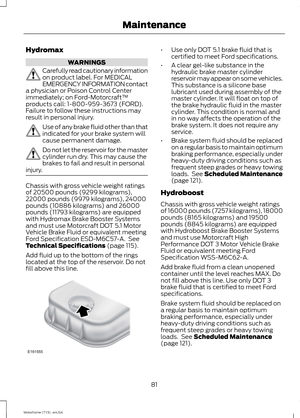 84
84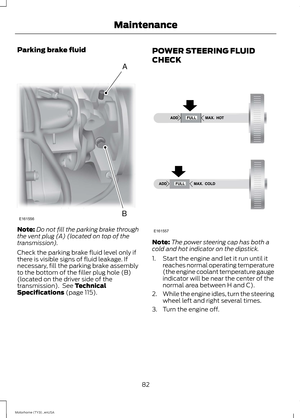 85
85 86
86 87
87 88
88 89
89 90
90 91
91 92
92 93
93 94
94 95
95 96
96 97
97 98
98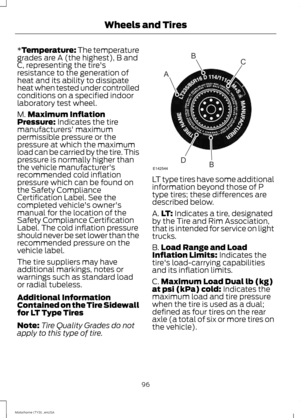 99
99 100
100 101
101 102
102 103
103 104
104 105
105 106
106 107
107 108
108 109
109 110
110 111
111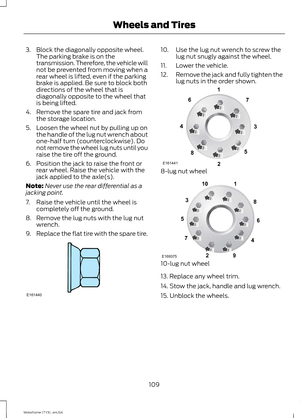 112
112 113
113 114
114 115
115 116
116 117
117 118
118 119
119 120
120 121
121 122
122 123
123 124
124 125
125 126
126 127
127 128
128 129
129 130
130 131
131 132
132 133
133 134
134 135
135 136
136 137
137 138
138 139
139 140
140 141
141 142
142 and maximumspeed of 35 mph (56 km/h) when towingyour vehicle from the front with the rearwheels on the ground. If you must exceedthe maximum")
 is less fuel efficient thantwo-whe")