2014 FORD EXPLORER engine
[x] Cancel search: enginePage 3 of 10

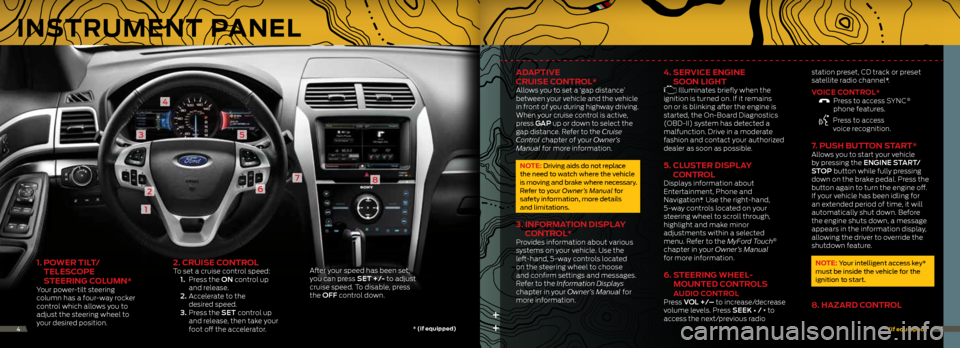
1. Po Wer tiL t/
teLe SCoPe
S teering C oLUMn*
Your power-tilt steering
column has a four-way rocker
control which allows you to
adjust the steering wheel to
your desired position.
2. CrUiSe ControLTo set a cruise control speed:
1. Press the ON control up
and release.
2. Accelerate to the
desired speed.
3. Press the SET control up
and release, then take your
foot off the accelerator. After your speed has been set,
you can press SET +/- to adjust
cruise speed. To disable, press
the OFF control down.
1
2
3
4
5
6
78
++
adaP tive
Cr UiSe C ontroL*
Allows you to set a ‘gap distance’
between your vehicle and the vehicle
in front of you during highway driving.
When your cruise control is active,
press GAP up or down to select the
gap distance. Refer to the Cruise
Control chapter of your Owner’s
Manual for more information.
note: driving aids do not replace
the need to watch where the vehicle
is moving and brake where necessary.
r efer to your Owner’s Manual for
safety information, more details
and limitations.
3. inF orMation diSPLay
C ontroL*
Provides information about various
systems on your vehicle. Use the
left-hand, 5-way controls located
on the steering wheel to choose
and confirm settings and messages.
Refer to the Information Displays
chapter in your Owner’s Manual for
more information.
4. ServiCe engine
S oon Light
Illuminates briefly when the
ignition is turned on. If it remains
on or is blinking after the engine is
started, the On-Board Diagnostics
(OBD-II) system has detected a
malfunction. Drive in a moderate
fashion and contact your authorized
dealer as soon as possible.
5. CLUS ter diSPLay
C ontroL
Displays information about
Entertainment, Phone and
Navigation*. Use the right-hand,
5-way controls located on your
steering wheel to scroll through,
highlight and make minor
adjustments within a selected
menu. Refer to the MyFord Touch
®
chapter in your Owner’s Manual
for more information.
6. Steering WheeL -
Mo Unted C ontroLS
aUdio C ontroL Press VOL +/– to increase/decrease
volume levels. Press SEEK ∏ / π to
access the next/previous radio station preset,
CD track or preset
satellite radio channel*.
voiCe C ontroL* Press to access SYNC ®
phone features.
Press to access
voice recognition.
7. P USh bUtton S tart*Allows you to start your vehicle
by pressing the ENGINE START/
STOP button while fully pressing
down on the brake pedal. Press the
button again to turn the engine off.
If your vehicle has been idling for
an extended period of time, it will
automatically shut down. Before
the engine shuts down, a message
appears in the information display,
allowing the driver to override the
shutdown feature.
note: Your intelligent access key*
must be inside the vehicle for the
ignition to start.
8. hazard C ontroL
*
(if equipped) *
(if equipped)45
inStrUMent PaneL
Page 6 of 10

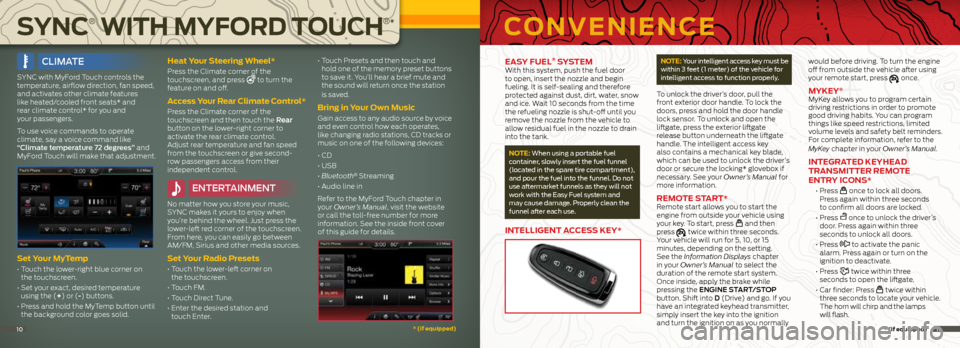
ClIma Te
SYNC with MyFord Touch controls the
temperature, airflow direction, fan speed,
and activates other climate features
like heated/cooled front seats* and
rear climate control* for you and
your passengers.
To use voice commands to operate
climate, say a voice command like
“Climate temperature 72 degrees” and
MyFord Touch will make that adjustment.
Set y our Myt emp
• Touch the lower-right blue corner on
the touchscreen.
• Set your exact, desired temperature
using the (+) or (-) buttons.
• Press and hold the MyTemp button until
the background color goes solid.
heat y our Steering Wheel*
Press the Climate corner of the
touchscreen, and press to turn the
feature on and off.
a ccess y our rear Climate Control*
Press the Climate corner of the
touchscreen and then touch the Rear
button on the lower-right corner to
activate the rear climate control.
Adjust rear temperature and fan speed
from the touchscreen or give second-
row passengers access from their
independent control.
enTeRT aInmenT
No matter how you store your music,
SYNC makes it yours to enjoy when
you’re behind the wheel. Just press the
lower-left red corner of the touchscreen.
From here, you can easily go between
AM/FM, Sirius and other media sources.
Set y our r adio Presets
• Touch the lower-left corner on
the touchscreen.
• Touch FM.
• Touch Direct Tune.
• Enter the desired station and
touch Enter. •
Touch Presets and then touch and
hold one of the memory preset buttons
to save it. You’ll hear a brief mute and
the sound will return once the station
is saved.
bring in y our own Music
Gain access to any audio source by voice
and even control how each operates,
like changing radio stations, CD tracks or
music on one of the following devices:
• CD
• USB
• Bluetooth
® Streaming
• Audio line in
Refer to the MyFord Touch chapter in
your Owner’s Manual, visit the website
or call the toll-free number for more
information. See the inside front cover
of this guide for details.
ea Sy FUeL® S ySteM With this system, push the fuel door
to open, insert the nozzle and begin
fueling. It is self-sealing and therefore
protected against dust, dirt, water, snow
and ice. Wait 10 seconds from the time
the refueling nozzle is shut-off until you
remove the nozzle from the vehicle to
allow residual fuel in the nozzle to drain
into the tank.
note: When using a portable fuel
container, slowly insert the fuel funnel
(located in the spare tire compartment),
and pour the fuel into the funnel. do not
use aftermarket funnels as they will not
work with the e asy fuel system and
may cause damage. Properly clean the
funnel after each use.
inteLLigent aCCe SS Key*
note: Your intelligent access key must be
within 3 feet (1 meter) of the vehicle for
intelligent access to function properly.
To unlock the driver’s door, pull the
front exterior door handle. To lock the
doors, press and hold the door handle
lock sensor. To unlock and open the
liftgate, press the exterior liftgate
release button underneath the liftgate
handle. The intelligent access key
also contains a mechanical key blade,
which can be used to unlock the driver’s
door or secure the locking* glovebox if
necessary. See your Owner’s Manual for
more information.
reMote Start* Remote start allows you to start the
engine from outside your vehicle using
your key. To start, press
and then
press twice within three seconds.
Your vehicle will run for 5, 10, or 15
minutes, depending on the setting.
See the Information Displays chapter
in your Owner’s Manual to select the
duration of the remote start system.
Once inside, apply the brake while
pressing the ENGINE START/STOP
button. Shift into d (Drive) and go. If you
have an integrated keyhead transmitter,
simply insert the key into the ignition
and turn the ignition on as you normally would before driving. To turn the engine
off from outside the vehicle after using
your remote start, press
once.
MyKey®
MyKey allows you to program certain
driving restrictions in order to promote
good driving habits. You can program
things like speed restrictions, limited
volume levels and safety belt reminders.
For complete information, refer to the
MyKey chapter in your Owner’s Manual.
integrated Keyhead
tranSMitter reMote
entry iC onS*
• Press once to lock all doors.
Press again within three seconds
to confirm all doors are locked.
• Press
once to unlock the driver’s
door. Press again within three
seconds to unlock all doors.
• Press
to activate the panic
alarm. Press again or turn on the
ignition to deactivate.
• Press
twice within three
seconds to open the liftgate.
• Car finder: Press
twice within
three seconds to locate your vehicle.
The horn will chirp and the lamps
will flash.
Convenien CeSyn C
®
With M yFord toUC h
®
*
*
(if equipped) *
(if equipped)1011
Page 7 of 10

++ +
eSSentiaL in ForM ation
hiLL de SCent ControL™*Hill descent mode allows the driver to
set and maintain vehicle speed, while
descending steep grades on various
surface conditions. To enable, press
the
control located in the center of
the Terrain management dial. The icon
will light up and a chime will sound
when it is active. Use your pedals to
increase or decrease your speed as
you normally would, until your desired
speed is reached. Remove your feet
from the pedals and your speed will be
maintained. Press the
control again
to deactivate the system.
note: This system only operates
between the speeds of 3 mph (5 km/h)
and 20 mph (32 km/h).
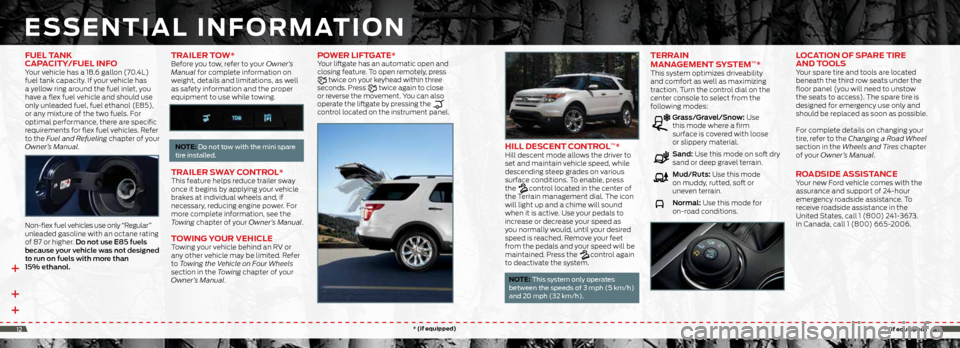
terrain
ManageMent Sy SteM™* This system optimizes driveability
and comfort as well as maximizing
traction. Turn the control dial on the
center console to select from the
following modes:
Grass/Gravel/Snow: Use
this mode where a firm
surface is covered with loose
or slippery material.
Sand: Use this mode on soft dry
sand or deep gravel terrain.
mud/Ruts: Use this mode
on muddy, rutted, soft or
uneven terrain.
Normal: Use this mode for
on-road conditions.
LoC ation oF SP are tire
and t ooLS
Your spare tire and tools are located
beneath the third row seats under the
floor panel (you will need to unstow
the seats to access). The spare tire is
designed for emergency use only and
should be replaced as soon as possible.
For complete details on changing your
tire, refer to the Changing a Road Wheel
section in the Wheels and Tires chapter
of your Owner’s Manual.
road Side aSSiS tanCe Your new Ford vehicle comes with the
assurance and support of 24-hour
emergency roadside assistance. To
receive roadside assistance in the
United States, call 1 (800) 241-3673.
In Canada, call 1 (800) 665-2006.
FUeL tanK
CaP aCity/FUeL inF o
Your vehicle has a 18.6 gallon (70.4L)
fuel tank capacity. If your vehicle has
a yellow ring around the fuel inlet, you
have a flex fuel vehicle and should use
only unleaded fuel, fuel ethanol (E85),
or any mixture of the two fuels. For
optimal performance, there are specific
requirements for flex fuel vehicles. Refer
to the Fuel and Refueling chapter of your
Owner’s Manual.
Non-flex fuel vehicles use only “Regular”
unleaded gasoline with an octane rating
of 87 or higher. Do not use e85 fuels
because your vehicle was not designed
to run on fuels with more than
15% ethanol.
traiLer t oW*Before you tow, refer to your Owner’s
Manual for complete information on
weight, details and limitations, as well
as safety information and the proper
equipment to use while towing.
note: do not tow with the mini spare
tire installed.
traiLer SW ay ControL* This feature helps reduce trailer sway
once it begins by applying your vehicle
brakes at individual wheels and, if
necessary, reducing engine power. For
more complete information, see the
Towing chapter of your Owner’s Manual.
to Wing yo Ur vehiCLe Towing your vehicle behind an RV or
any other vehicle may be limited. Refer
to Towing the Vehicle on Four Wheels
section in the Towing chapter of your
Owner’s Manual.
PoWer LiFtgate* Your liftgate has an automatic open and
closing feature. To open remotely, press
twice on your keyhead within three
seconds. Press twice again to close
or reverse the movement. You can also
operate the liftgate by pressing the
control located on the instrument panel.
*
(if equipped) *
(if equipped)1213
Page 10 of 10

CoMFort Contin Ued
heated and C ooLed
Front Seat S*
To access heated seats and cooled
seats on touchscreen-equipped
vehicles, press the Climate corner on
your touchscreen. Press the heated
or cooled seat icon repeatedly to
cycle through the various heat or cool
modes and off. For non-touchscreen
vehicles, use the hard button controls
(indicated by the same symbols). Press
the controls repeatedly to cycle through
the various heat or cool modes and off.
Indicator lights on the control will show
what settings you have selected.
MeMory FUnC tion* Allows one-touch recall of memory
positions for the driver seat, power
mirrors, steering column and power-
adjustable foot pedals. Use the memory
controls located on the driver’s door
to program and then recall memory
positions. To program position 1, press
and hold the 1 button until you hear a
chime. Use this same procedure to set
positions 2 and 3 using the respective
buttons. You can now use these controls
to recall the set memory positions.
tiLting head re Straint S
Your vehicle’s front-row head restraints
can be adjusted. Pull up to raise the
head restraint. To lower, press the head restraint down while pressing and
holding the guide sleeve adjust/release
button. Tilt the head restraint for
additional comfort by gently pulling the
top of the head restraint forward. Once it
is in the forward-most position, tilting it
forward once more will release it to the
upright position.
note: do not attempt to force the
head restraint backward after it is tilted.
instead, continue tilting it forward
until the head restraint releases to
the upright position.
Se Cond-ro W heated Seat S*To operate, press the button located
on the rear of the floor console to cycle
through the various heat settings and
off. Warmer settings are indicated by
more indicator lights.
note: The heated seats operate only
when the ignition is on. if activated, they
will turn off automatically when the
engine is turned off.
Po WerFoLd® third-ro W Seat*
note: The Powerfold seats work only
when the vehicle is in P (Park) and the
liftgate is open.
The third-row seat features a power
one-touch operation that allows you to
fold and stow the seats. The buttons are
located behind the third-row seats on the
left-side quarter trim panel. To use, press
the Rh/BOTh/Lh button to select the
right-side seat, the left-side seat or both
seats you want to move. Then, select the
desired seat position:
• Press the STOW button to stow the
seat into the tub floor.
• Press the FOLd button (the top
portion of the button) to fold down
the seatback.
• Press the NORmAL button to
return the seat to the normal
seating position.
*
(if equipped) *
(if equipped)1819