2014 FORD EXPEDITION ECO mode
[x] Cancel search: ECO modePage 283 of 519
CHANGING THE WIPER BLADES
Replace wiper blades at least once per year for optimum performance.
To replace the wiper blades:
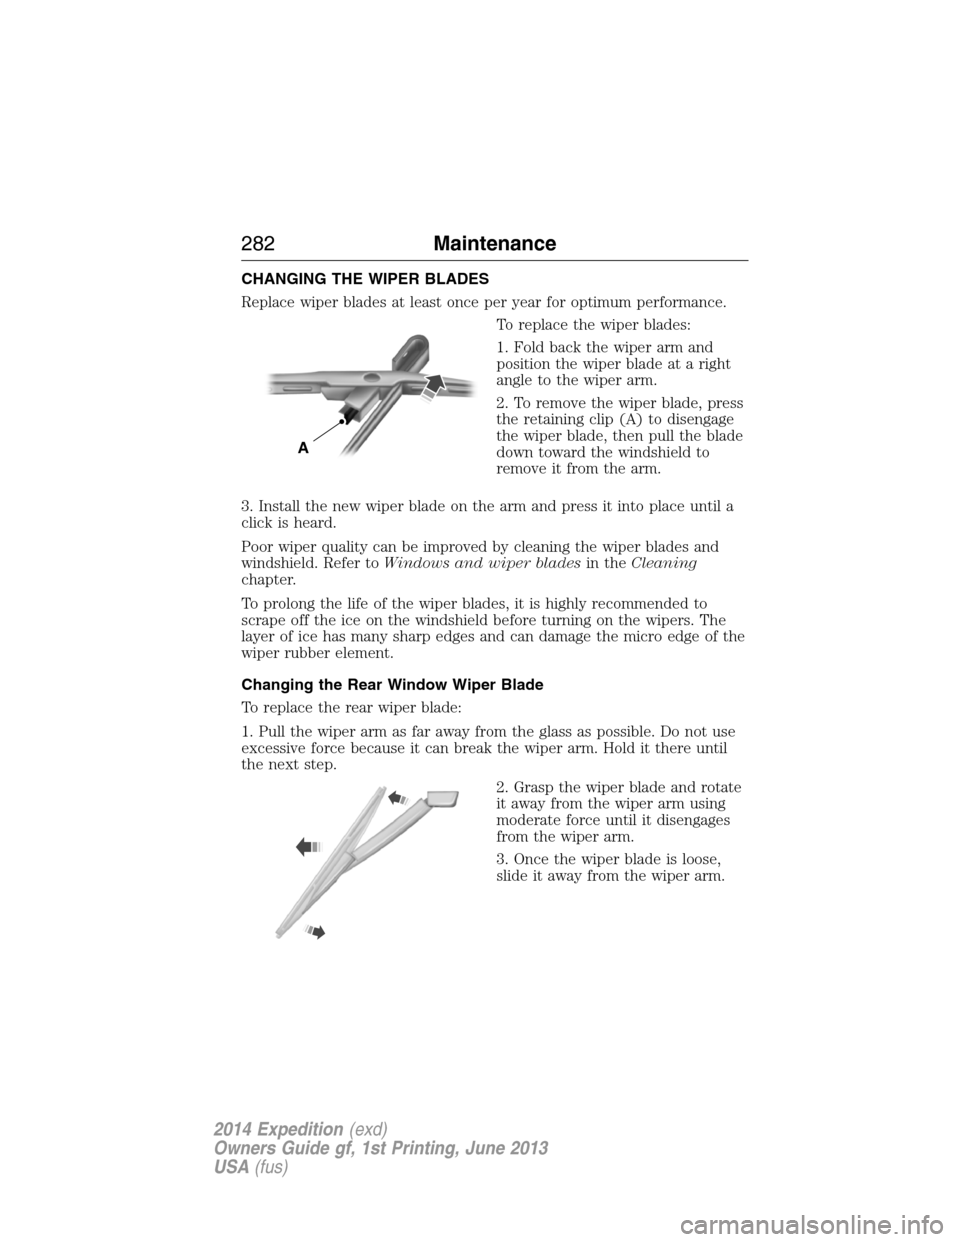
1. Fold back the wiper arm and
position the wiper blade at a right
angle to the wiper arm.
2. To remove the wiper blade, press
the retaining clip (A) to disengage
the wiper blade, then pull the blade
down toward the windshield to
remove it from the arm.
3. Install the new wiper blade on the arm and press it into place until a
click is heard.
Poor wiper quality can be improved by cleaning the wiper blades and
windshield. Refer toWindows and wiper bladesin theCleaning
chapter.
To prolong the life of the wiper blades, it is highly recommended to
scrape off the ice on the windshield before turning on the wipers. The
layer of ice has many sharp edges and can damage the micro edge of the
wiper rubber element.
Changing the Rear Window Wiper Blade
To replace the rear wiper blade:
1. Pull the wiper arm as far away from the glass as possible. Do not use
excessive force because it can break the wiper arm. Hold it there until
the next step.
2. Grasp the wiper blade and rotate
it away from the wiper arm using
moderate force until it disengages
from the wiper arm.
3. Once the wiper blade is loose,
slide it away from the wiper arm.
A
282Maintenance
2014 Expedition(exd)
Owners Guide gf, 1st Printing, June 2013
USA(fus)
Page 306 of 519

Power is supplied to all four wheels through a transfer case or power
transfer unit. Four-wheel drive vehicles allow you to select different drive
modes as necessary. You can find information on transfer case operation
and shifting procedures in theTransmissionchapter. You can find
information on transfer case maintenance in theMaintenancechapter.
You should become thoroughly familiar with this information before you
operate your vehicle.
On some four-wheel drive models, the initial shift from two-wheel drive
to four-wheel drive while the vehicle is moving can cause a momentary
clunk and ratcheting sound. These sounds are normal as the front
drivetrain comes up to speed and are not cause for concern.
How Your Vehicle Differs from Other Vehicles
Sport-utility vehicles, vans and
trucks can differ from some other
vehicles in a few noticeable ways.
Your vehicle may be:
•Higher – to allow higher load
carrying capacity and to allow it
to travel over rough terrain
without getting hung up or
damaging underbody
components.
•Shorter – to give it the capability
to approach inclines and drive
over the crest of a hill without
getting hung up or damaging
underbody components. All other
things held equal, a shorter
wheelbase may make your vehicle quicker to respond to steering
inputs than a vehicle with a longer wheelbase.
Wheels and Tires305
2014 Expedition(exd)
Owners Guide gf, 1st Printing, June 2013
USA(fus)
Page 351 of 519

MP3 Track and Folder Structure
Audio systems capable of recognizing and playing MP3 individual tracks
and folder structures work as follows:
•There are two different modes for MP3 disc playback: MP3 track
mode (system default) and MP3 folder mode.
•MP3 track mode ignores any folder structure on the MP3 disc. The
player numbers each MP3 track on the disc (noted by the .mp3 file
extension) from T001 to a maximum of T255.Note:The maximum
number of playable MP3 files may be less depending on the structure
of the CD and exact model of radio present.
•MP3 folder mode represents a folder structure consisting of one level
of folders. The CD player numbers all MP3 tracks on the disc (noted
by the .mp3 file extension) and all folders containing MP3 files, from
F001 (folder) T001 (track) to F253 T255.
•Creating discs with only one level of folders helps with navigation
through the disc files.
If you are burning your own MP3 discs, it is important to understand
how the system reads the structures you create. While various files may
be present, (files with extensions other than mp3), only files with the
.mp3 extension are played; other files are ignored by the system. This
enables you to use the same MP3 disc for a variety of tasks on your work
computer, home computer and your in-vehicle system.
In track mode, the system displays and plays the structure as if it were
only one level deep (all .mp3 files play, regardless of being in a specific
folder). In folder mode, the system only plays the .mp3 files in the
current folder.
350Audio System
2014 Expedition(exd)
Owners Guide gf, 1st Printing, June 2013
USA(fus)
Page 356 of 519
E.Left arrow button
•In radio mode, press and release this button to scroll through
memory presets. Press and hold to go to the previous station
•In CD and SYNC modes, press and release this button to advance to
the previous track. Press and hold to rewind within that track.
F.Auxiliary audio input jacks:Plug in and play auxiliary audio
sources.
G.VOLUMEPress the up and down arrow buttons to increase or
decrease the headphone volume level. From the rear seat controls, the
volume cannot be higher than the current audio setting unless the
speakers are off.
H.Wired headphone jack
I.-Press the button to access the previous CD.
J.+Press to access the next CD.
Switching the Rear Audio Controls On
After you switch the ignition on, FULL rear controls are on and the
system is in Single Play mode.
Parental Control
The multimedia system allows for three varying levels of parental control.
By simultaneously pressing the 3 and 5 memory preset buttons, the rear
passengers may be allowed to access FULL or LOCAL control or be
LOCKED out of rear seat controls altogether.
1. Press the 3 and 5 memory preset buttons at the same time. LOCAL
illuminates in both front and rear audio displays, indicating that only
LOCAL rear control is available.Note:While in Single Play mode,
LOCAL is the same as LOCKED. In Dual Play mode, LOCAL allows
the driver to control the media selected at the radio, or over media
played through the rear auxiliary input jacks.
2. Pressing the 3 and 5 buttons a second time locks the rear control.
The rear passengers are restricted from control over media of any
kind (the rear controls are disabled).Note:If in Dual Play mode, the
headphone icon normally illuminated in the audio display when in
Dual Play turns off in the audio display.
3. Pressing the 3 and 5 buttons a third time restores full control to the
rear seat controls. Switching the ignition off and then on again has
the same effect.
Audio System355
2014 Expedition(exd)
Owners Guide gf, 1st Printing, June 2013
USA(fus)
Page 357 of 519
Switching Dual Play Mode On
You can switch Dual Play mode on by simultaneously pressing the 2 and
4 memory preset buttons on the audio or by doing the following:
1. Press the headphone/speaker control. The headphone icon
illuminates in both front and rear audio displays indicating the rear
seat speakers are off and the headphones are on.
2. Press MEDIA to change audio sources (as heard in the headphones
only).
3. Use the other controls to adjust the playing media.
Switching Off Dual Play Mode
Use any one of the following to switch off Dual Play mode:
•Press the 2 and 4 memory preset buttons simultaneously again.
•Press the 3 and 5 memory preset buttons simultaneously to LOCK
the rear seat controls.
•Press the headphone/speaker button again.
Using Dual Play Mode with Headphones
WARNING:Do not leave children unattended in your vehicle
and do not let children operate the system while unsupervised. If
wired headphones or auxiliary systems are used, children may become
entangled in the cords and seriously injure themselves.
Plug a 1/8–inch (3.5 millimeter) headphone (not included) into the
headphone jack. Press the speaker button, or the 2 and 4 memory preset
buttons simultaneously on the radio to switch on the headphones. DUAL
PLAY illuminates in the audio display, there is no sound from the rear
speakers and the fade control is inactive, signaling that Dual Play is on.
The front speakers remain on for the front passengers. Press the speaker
button, or the 2 and 4 memory preset buttons simultaneously on the
radio again to switch off the headphones and Dual Play mode. SINGLE
PLAY illuminates in the audio display; fade control is active and there is
sound from rear speakers, signaling that Single Play is on.
You need to switch the rear seat controls on to use any rear controls
(whether in Single Play or Dual Play mode). To use Dual Play, switch on
the rear seat controls; the headphone icon illuminates in the audio
display. SeeSwitching the rear audio controls onpreviously.
356Audio System
2014 Expedition(exd)
Owners Guide gf, 1st Printing, June 2013
USA(fus)
Page 370 of 519
21.EJECT:Press this button to eject or load a disc.
22.TV-Monitor B*:Press this button to control TV mode of Monitor B.
23.DVD-Monitor B:Press this button to control DVD mode of Monitor
B.
24.SOUND AROUND SELECT
*:Press this button to select an FM
transmitter channel.
25.PIX:Press this button to access settings for BRIGHTNESS,
CONTRAST, SATURATION, HUE, SHARPNESS, IR HEADPHONE, and
RESET. When you find the desired setting, useCH +andCH -to
change the setting. The bar display automatically disappears if no
changes are made within six seconds, or if any button is pressed.
26.REPEAT:Press this button to switch the repeat mode by ALL, TITLE,
CHAPTER and cancel the repeat mode while playing DVD-video.
Other disc types such as VCD, CD, and SVCD only have two repeat
modes that you can select: TRACK and ALL.Note:Both repeat
functions of VCD and SVCD need the PBC status set to ON, when
available.
27.AUDIO:Press this button if a disc has different language options.
Press this button repeatedly until you reach your desired option.
28.ANGLE:Press this button to view with a different camera angle.
Press this button repeatedly until you have reached your desired
viewing angle. This feature is only available on DVDs that support
frames with multiple angles.
29.DISPLAY:Press this button display information on the screen
including title, chapter or track, time elapsed and time remaining.
You can also press this button to turn off the display.
30.RANDOM:Press this button to play titles in a random order
31.INT:Press this button to play each audio file for 10 seconds as a
review or scan.
32.NEXT:When a disc has more than one chapter, track or file, press
this button to move to the next chapter, track or file. Press the button
briefly during play to select the next chapter for DVD-video or track
and file for media such as VCD, SVCD, MP3 and CD.
33.PREV:When a disc has more than one chapter, track or file, press this
button to move to the previous chapter, track or file. Press the button
briefly during play to select the next chapter for DVD-video or track
and file for media such as VCD, SVCD, MP3 and CD.
*If available
Audio System369
2014 Expedition(exd)
Owners Guide gf, 1st Printing, June 2013
USA(fus)
Page 376 of 519
Skipping Songs
PressNEXTon the remote control to move to the next song. Press
PREVto move to the beginning of the currently playing song. Press
PREVtwice to move to the previous song.
Selecting a Play Mode
You can choose what order the songs play on a disc temporarily. The
FOLDER play mode is the default. To access the play mode operations,
pressREPEATon the remote control. The play mode options are:
•Single:Play a selected song.
•Repeat One:Repeat the song that is playing.
•Folder:Play the folder in the order you recorded the songs.
•Folder Repeat:Repeat the folder that is playing.
•Random:Play the songs in the random order.
•Shuffle:Play the songs within the selected folder in random order.
Order of Tracks
The DVD-headrest module plays the files in the order that you added
them to the USB drive. Therefore, the playback order may not be the
same as what appears on the screen. To access the file structure and
menus, for the USB device, you need the remote control set to the
appropriate systems (A or B).
When you insert the USB device, the system may begin playing files
automatically, returning to the previous position, if it was unplugged
during a previous playback. To return to the menus, pressMENUor
VOL -,depending on the type of file you are playing. The current
directory appears, listing all file types.
Controls
•MENU:Press this button to return to the menu structure.
•CH + and CH -:Press these buttons to move the select bar up and
down within the selected menu or file list.
•VOL -:Press this button to move the menu up one level. Pressing
this button in some menu functions returns you to the menu
structure.
•VOL +:Press this button to select a menu item.
•ENTER:Press this button to make a selection or begin file playback.
•P L AY:Press this button to play a file.
•STOP:Press this button to stop the playing media.
•PAUSE:Press this button to stop the media playback temporarily.
Audio System375
2014 Expedition(exd)
Owners Guide gf, 1st Printing, June 2013
USA(fus)
Page 378 of 519
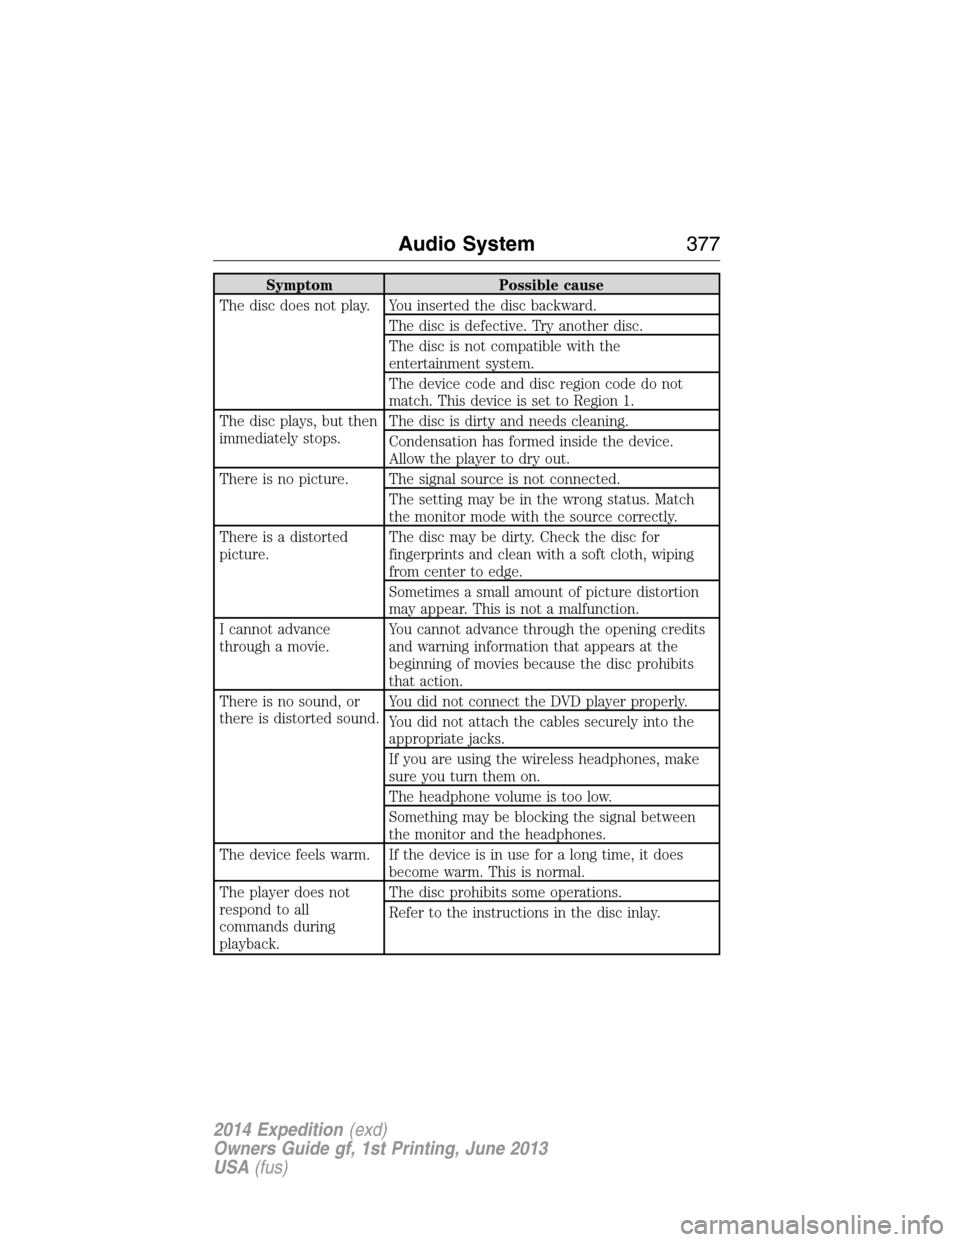
Symptom Possible cause
The disc does not play. You inserted the disc backward.
The disc is defective. Try another disc.
The disc is not compatible with the
entertainment system.
The device code and disc region code do not
match. This device is set to Region 1.
The disc plays, but then
immediately stops.The disc is dirty and needs cleaning.
Condensation has formed inside the device.
Allow the player to dry out.
There is no picture. The signal source is not connected.
The setting may be in the wrong status. Match
the monitor mode with the source correctly.
There is a distorted
picture.The disc may be dirty. Check the disc for
fingerprints and clean with a soft cloth, wiping
from center to edge.
Sometimes a small amount of picture distortion
may appear. This is not a malfunction.
I cannot advance
through a movie.You cannot advance through the opening credits
and warning information that appears at the
beginning of movies because the disc prohibits
that action.
There is no sound, or
there is distorted sound.You did not connect the DVD player properly.
You did not attach the cables securely into the
appropriate jacks.
If you are using the wireless headphones, make
sure you turn them on.
The headphone volume is too low.
Something may be blocking the signal between
the monitor and the headphones.
The device feels warm. If the device is in use for a long time, it does
become warm. This is normal.
The player does not
respond to all
commands during
playback.The disc prohibits some operations.
Refer to the instructions in the disc inlay.
Audio System377
2014 Expedition(exd)
Owners Guide gf, 1st Printing, June 2013
USA(fus)