Page 122 of 519
MANUAL HEATING AND AIR CONDITIONING SYSTEM WITHOUT
AUXILIARY CLIMATE CONTROL
A.Fan speed control:Controls the volume of air circulated in your
vehicle. Turn to select the desired fan speed or switch off. If you switch
the fan off, the windshield may fog up.
B.Temperature control:Controls the temperature of the air circulated
in your vehicle. Turn to select the desired temperature.
C.Air distribution control:Turn to set the air distribution to a
position listed below:
MAX A/C:Distributes recirculated air through the instrument panel
vents to cool the vehicle. This position is more economical and efficient
than normal A/C.
Distributes air through the instrument panel vents.
Distributes air through the instrument panel vents, floor vents,
and demister vents.
O (Off):Turns the system off and on. When the system is off, outside
air cannot enter the vehicle.
MAX
A/C
A/C
1
2
3
4
R
A
FED
BC
Climate Control121
2014 Expedition(exd)
Owners Guide gf, 1st Printing, June 2013
USA(fus)
Page 124 of 519
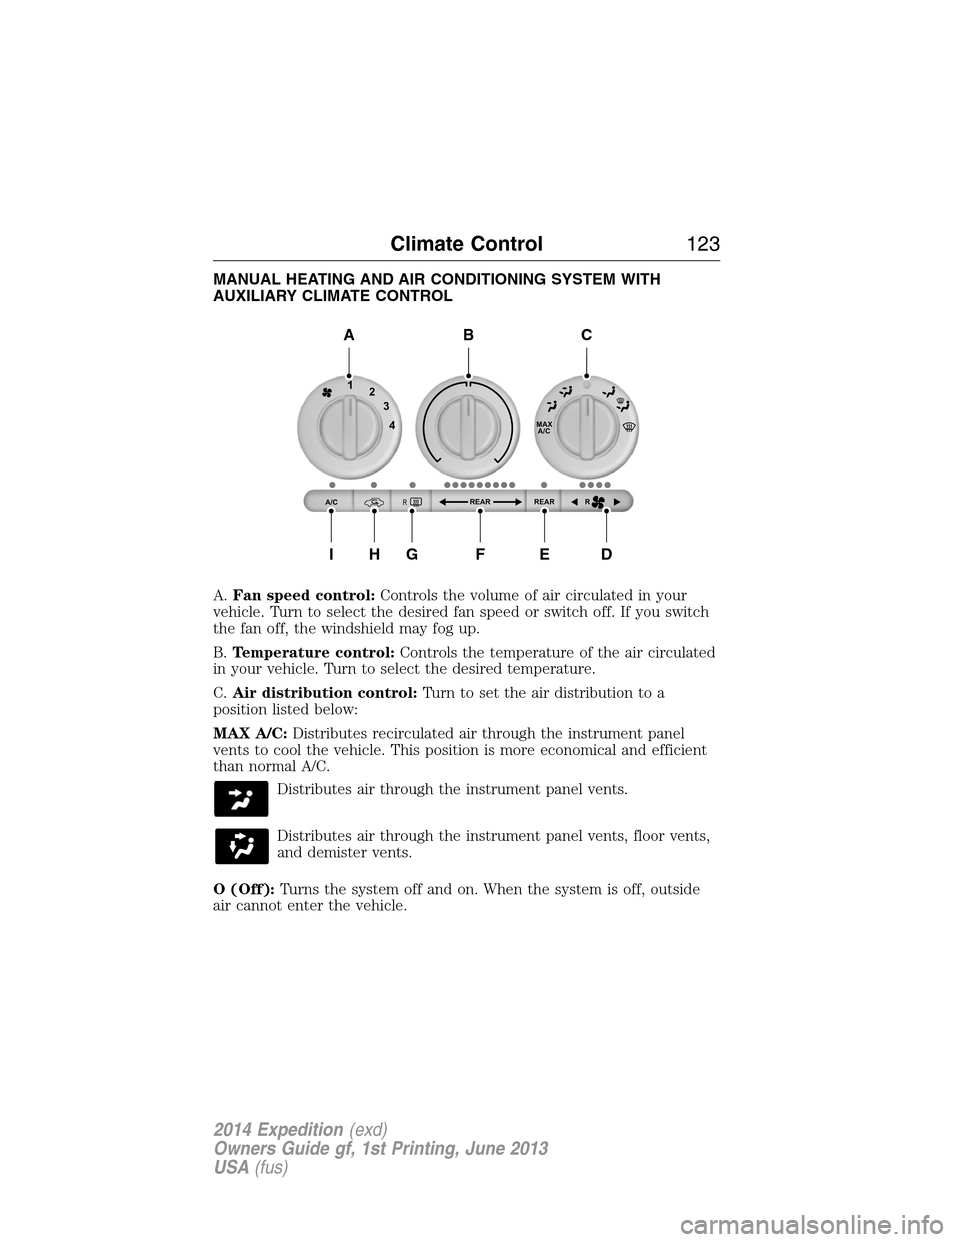
MANUAL HEATING AND AIR CONDITIONING SYSTEM WITH
AUXILIARY CLIMATE CONTROL
A.Fan speed control:Controls the volume of air circulated in your
vehicle. Turn to select the desired fan speed or switch off. If you switch
the fan off, the windshield may fog up.
B.Temperature control:Controls the temperature of the air circulated
in your vehicle. Turn to select the desired temperature.
C.Air distribution control:Turn to set the air distribution to a
position listed below:
MAX A/C:Distributes recirculated air through the instrument panel
vents to cool the vehicle. This position is more economical and efficient
than normal A/C.
Distributes air through the instrument panel vents.
Distributes air through the instrument panel vents, floor vents,
and demister vents.
O (Off):Turns the system off and on. When the system is off, outside
air cannot enter the vehicle.
MAX
A/C
REAR R REAR
1
2
3
4
A/CR
A
IHGFED
BC
Climate Control123
2014 Expedition(exd)
Owners Guide gf, 1st Printing, June 2013
USA(fus)
Page 127 of 519
When this button is pressed, the display only shows the rear temperature
setting. After the rear setting changes are completed on the front
control, the display automatically shows both climate settings.
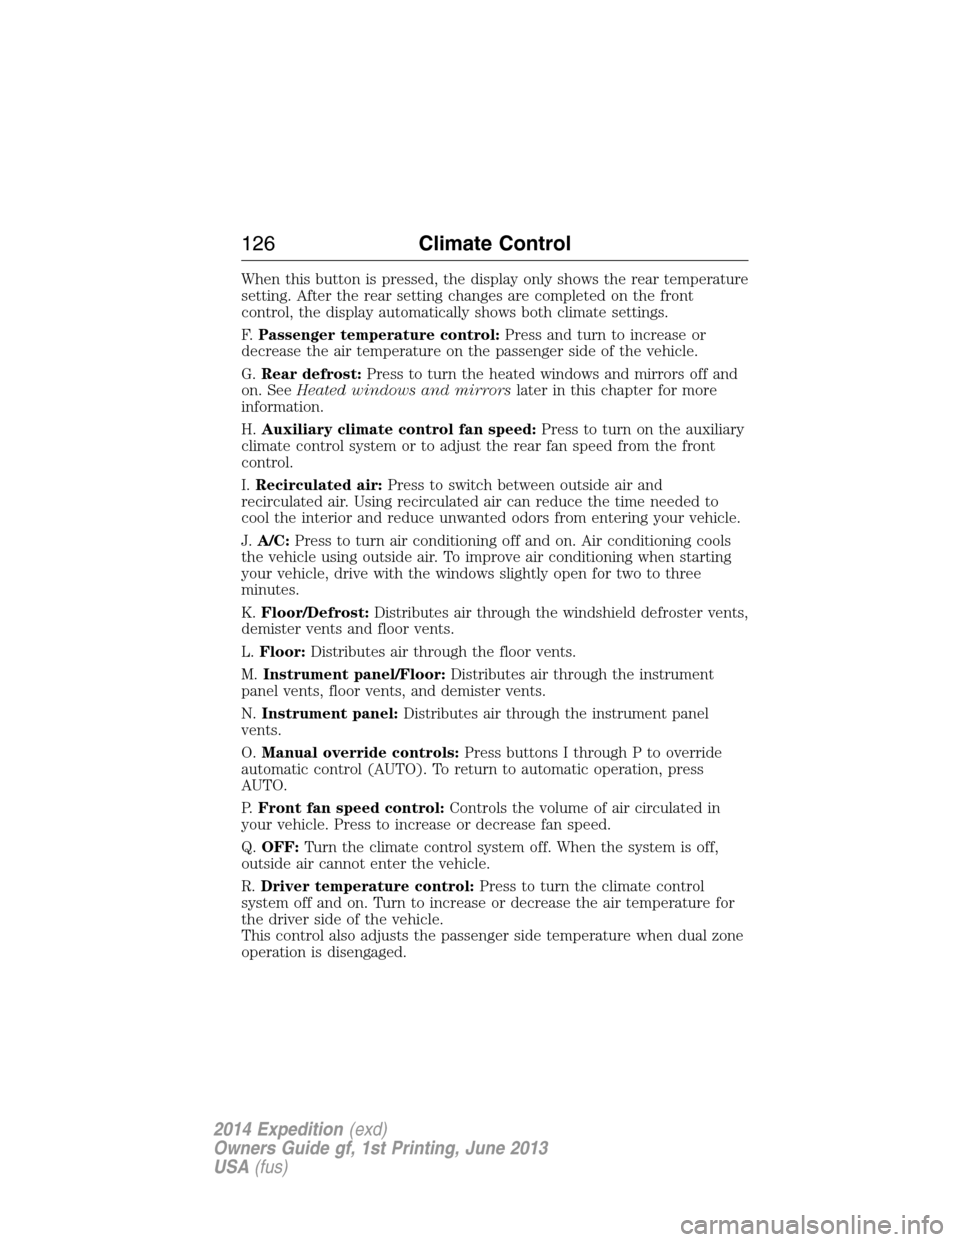
F.Passenger temperature control:Press and turn to increase or
decrease the air temperature on the passenger side of the vehicle.
G.Rear defrost:Press to turn the heated windows and mirrors off and
on. SeeHeated windows and mirrorslater in this chapter for more
information.
H.Auxiliary climate control fan speed:Press to turn on the auxiliary
climate control system or to adjust the rear fan speed from the front
control.
I.Recirculated air:Press to switch between outside air and
recirculated air. Using recirculated air can reduce the time needed to
cool the interior and reduce unwanted odors from entering your vehicle.
J.A/C:Press to turn air conditioning off and on. Air conditioning cools
the vehicle using outside air. To improve air conditioning when starting
your vehicle, drive with the windows slightly open for two to three
minutes.
K.Floor/Defrost:Distributes air through the windshield defroster vents,
demister vents and floor vents.
L.Floor:Distributes air through the floor vents.
M.Instrument panel/Floor:Distributes air through the instrument
panel vents, floor vents, and demister vents.
N.Instrument panel:Distributes air through the instrument panel
vents.
O.Manual override controls:Press buttons I through P to override
automatic control (AUTO). To return to automatic operation, press
AUTO.
P.Front fan speed control:Controls the volume of air circulated in
your vehicle. Press to increase or decrease fan speed.
Q.OFF:Turn the climate control system off. When the system is off,
outside air cannot enter the vehicle.
R.Driver temperature control:Press to turn the climate control
system off and on. Turn to increase or decrease the air temperature for
the driver side of the vehicle.
This control also adjusts the passenger side temperature when dual zone
operation is disengaged.
126Climate Control
2014 Expedition(exd)
Owners Guide gf, 1st Printing, June 2013
USA(fus)
Page 129 of 519
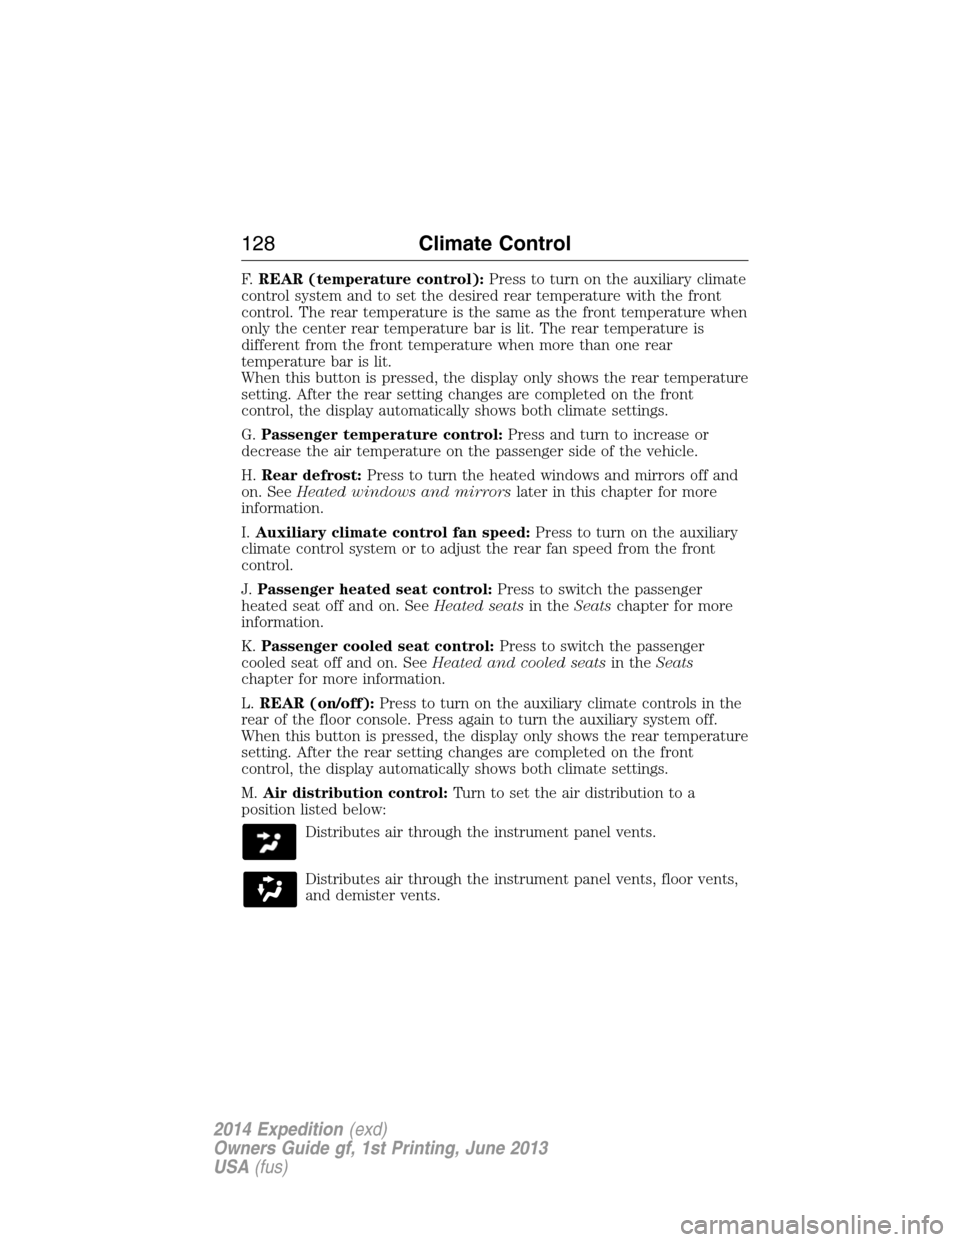
F.REAR (temperature control):Press to turn on the auxiliary climate
control system and to set the desired rear temperature with the front
control. The rear temperature is the same as the front temperature when
only the center rear temperature bar is lit. The rear temperature is
different from the front temperature when more than one rear
temperature bar is lit.
When this button is pressed, the display only shows the rear temperature
setting. After the rear setting changes are completed on the front
control, the display automatically shows both climate settings.
G.Passenger temperature control:Press and turn to increase or
decrease the air temperature on the passenger side of the vehicle.
H.Rear defrost:Press to turn the heated windows and mirrors off and
on. SeeHeated windows and mirrorslater in this chapter for more
information.
I.Auxiliary climate control fan speed:Press to turn on the auxiliary
climate control system or to adjust the rear fan speed from the front
control.
J.Passenger heated seat control:Press to switch the passenger
heated seat off and on. SeeHeated seatsin theSeatschapter for more
information.
K.Passenger cooled seat control:Press to switch the passenger
cooled seat off and on. SeeHeated and cooled seatsin theSeats
chapter for more information.
L.REAR (on/off):Press to turn on the auxiliary climate controls in the
rear of the floor console. Press again to turn the auxiliary system off.
When this button is pressed, the display only shows the rear temperature
setting. After the rear setting changes are completed on the front
control, the display automatically shows both climate settings.
M.Air distribution control:Turn to set the air distribution to a
position listed below:
Distributes air through the instrument panel vents.
Distributes air through the instrument panel vents, floor vents,
and demister vents.
128Climate Control
2014 Expedition(exd)
Owners Guide gf, 1st Printing, June 2013
USA(fus)
Page 131 of 519
GENERAL OPERATING TIPS
Manual Heating and Air Conditioning System
•To reduce fog build-up on the windshield during humid weather,
select Defrost. Temperature and fan speed can also be increased to
improve clearing.
•To reduce humidity build-up inside the vehicle, do not drive with the
system off or with recirculated air engaged.
•Do not put objects under the front seats that will interfere with the
airflow to the back seats.
•Remove any snow, ice or leaves from the air intake area at the base
of the windshield.
Cooling the interior quickly:
1. Adjust the fan speed to the highest speed setting initially and then
adjust it to suit the desired comfort level.
2. Adjust the temperature control to the lowest temperature setting.
3. Adjust the air distribution control toMAX A/C.
Recommended settings for cooling:
1. Select Panel/Floor.
2. SelectA/C.
3. Adjust the temperature control to maintain comfort.
If your vehicle stationary for extended periods during extreme high
ambient temperatures
•SelectMAX A/C.
For maximum cooling performance, turn the air distribution control to
MAX A/C.
To aid in side window defogging and demisting in cold or humid weather:
1. Select Panel/Floor.
2. SelectA/C.
3. Adjust the temperature control to maintain comfort.
4. Set the fan speed to the highest setting.
5. Direct the outer instrument panel vents toward the side windows.
6. To increase airflow to the outer instrument panel vents, close the
vents located in the middle of the instrument panel.
130Climate Control
2014 Expedition(exd)
Owners Guide gf, 1st Printing, June 2013
USA(fus)
Page 132 of 519
Dual Automatic Temperature Control System
•To reduce fog build-up on the windshield during humid weather,
select Defrost. Temperature and fan speed can also be increased to
improve clearing.
•To reduce humidity build-up inside the vehicle, do not drive with the
system off or with recirculated air engaged.
•Do not put objects under the front seats that will interfere with the
airflow to the back seats.
•Remove any snow, ice or leaves from the air intake area at the base
of the windshield.
Cooling the interior quickly:
1. Adjust the fan speed to the highest speed setting initially and then
adjust it to suit the desired comfort level.
2. Adjust the temperature control to the lowest temperature setting.
3. Adjust the air distribution control toMAX A/C.
Recommended settings for cooling:
1. Select Panel/Floor.
2. SelectA/C.
3. Adjust the temperature control to maintain comfort.
If your vehicle stationary for extended periods during extreme high
ambient temperatures
•SelectMAX A/C.
For maximum cooling performance in manual override control:
1. Choose Panel, A/C, and recirc controls.
2. Set the temperature to LO.
3. Set the fan to the highest blower setting.
To aid in side window defogging and demisting in cold or humid weather:
1. Select Panel/Floor.
2. SelectA/C.
3. Adjust the temperature control to maintain comfort.
4. Set the fan speed to the highest setting.
5. Direct the outer instrument panel vents toward the side windows.
6. To increase airflow to the outer instrument panel vents, close the
vents located in the middle of the instrument panel.
Climate Control131
2014 Expedition(exd)
Owners Guide gf, 1st Printing, June 2013
USA(fus)
Page 165 of 519
AUXILIARY POWER POINTS
WARNING:Do not plug optional electrical accessories into the
cigarette lighter socket (if equipped). Improper use of the lighter
can cause damage not covered by your warranty, and can result in fire
or serious injury.
Note:If used when the engine is not running, the battery will discharge.
There may be insufficient power to restart your engine.
Note:Do not insert objects other than an accessory plug into the power
point. This will damage the outlet and blow the fuse.
Note:Do not hang any type of accessory or accessory bracket from the
plug.
Note:Do not use the power point over the vehicle capacity of 12 volt
DC 180 watts or a fuse may blow.
Note:Do not use the power point for operating a cigarette lighter
element.
Note:Improper use of the power outlet can cause damage not covered
by your warranty.
Note:Always keep the power point caps closed when not in use.
Run the engine for full capacity use of the power point. To prevent the
battery from being discharged:
•Do not use the power point longer than necessary when the engine is
not running.
•Do not leave devices plugged in overnight or when the vehicle is
parked for extended periods.
Locations
Power points may be found:
•on the instrument panel
•by the passenger’s ankle near the floor on the front console
•on the rear of the center console
•on the right rear quarter panel.
164Auxiliary Power Points
2014 Expedition(exd)
Owners Guide gf, 1st Printing, June 2013
USA(fus)
Page 169 of 519
ASHTRAY (IF EQUIPPED)
The ashtray and cupholders are
located on the instrument panel.
To open the ashtray, push on the
door to release the assembly, then
pull it out fully. To close, push the
assembly in completely and release.
168Storage Compartments
2014 Expedition(exd)
Owners Guide gf, 1st Printing, June 2013
USA(fus)