2014 FORD EXPEDITION change wheel
[x] Cancel search: change wheelPage 279 of 519

AUTOMATIC TRANSMISSION FLUID CHECK
Note:Transmission fluid should be checked by an authorized dealer.
If required, fluid should be added by an authorized dealer.
The automatic transmission does not have a transmission fluid dipstick.
Refer to yourscheduled maintenance informationfor scheduled
intervals for fluid checks and changes. Your transmission does not
consume fluid. However, the fluid level should be checked if the
transmission is not working properly, (i.e., if the transmission slips or
shifts slowly) or if you notice some sign of fluid leakage.
Do not use supplemental transmission fluid additives, treatments or
cleaning agents. The use of these materials may affect transmission
operation and result in damage to internal transmission components.
BRAKE FLUID CHECK
Fluid levels between the MIN and MAX lines are within the normal
operating range; there is no need to add fluid. If the fluid levels are
outside of the normal operating range, the performance of the system
could be compromised; seek service from your authorized dealer
immediately.
POWER STEERING FLUID CHECK
Check the power steering fluid. Refer toscheduled maintenance
information.
1. Start the engine and let it run until it reaches normal operating
temperature (the engine coolant temperature gauge indicator will be
near the center of the normal area between H and C).
2. While the engine idles, turn the steering wheel left and right several
times.
3. Turn the engine off.
4. Check the fluid level in the reservoir. It should be between the MIN
and MAX lines. Do not add fluid if the level is in this range.
5. If the fluid is low, add fluid in small amounts, continuously checking
the level until it reaches the range between the MIN and MAX lines.
Be sure to put the cap back on the reservoir. Refer to theCapacities
and Specificationschapter for the proper fluid type.
278Maintenance
2014 Expedition(exd)
Owners Guide gf, 1st Printing, June 2013
USA(fus)
Page 311 of 519
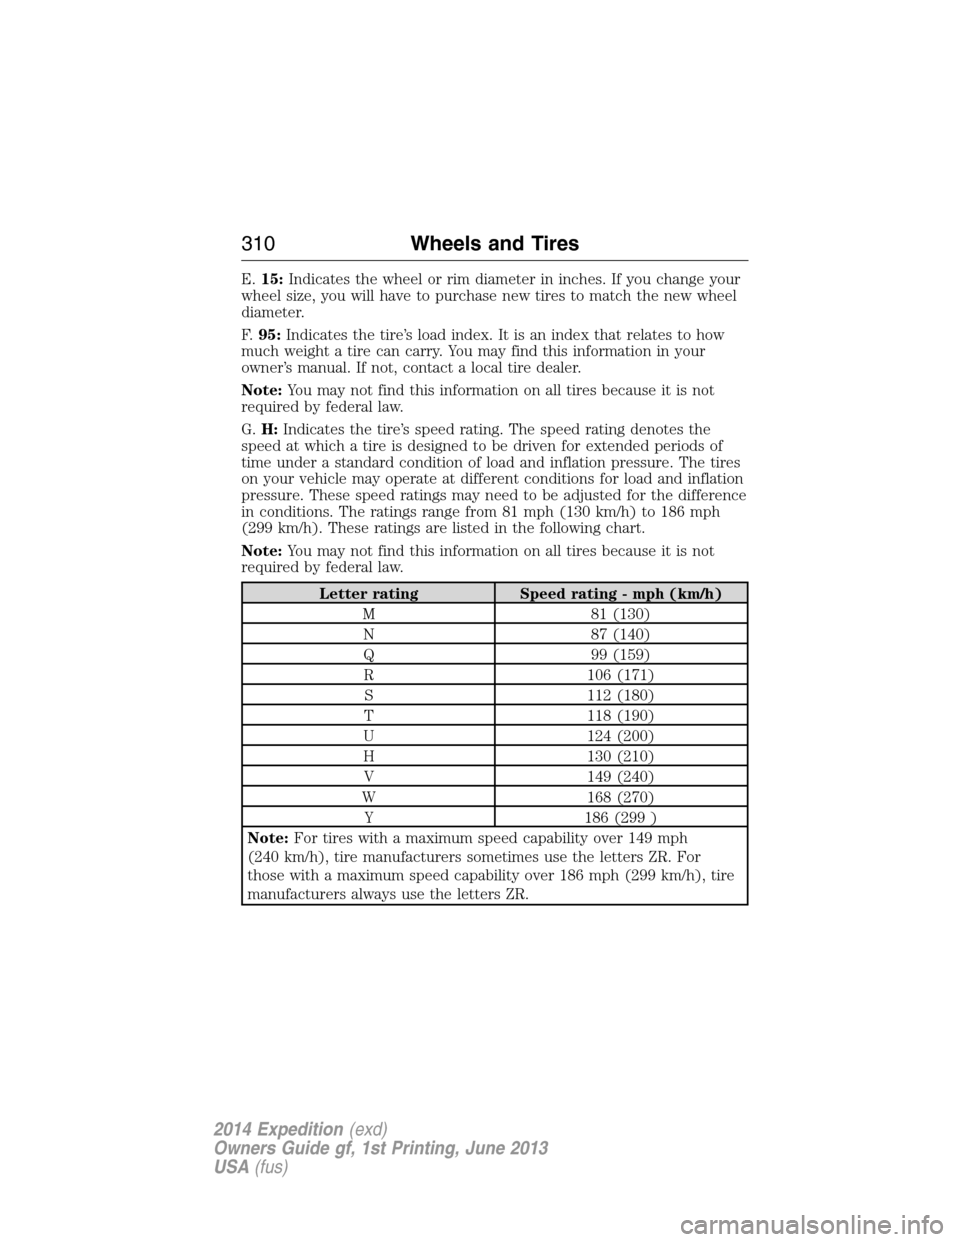
E.15:Indicates the wheel or rim diameter in inches. If you change your
wheel size, you will have to purchase new tires to match the new wheel
diameter.
F.95:Indicates the tire’s load index. It is an index that relates to how
much weight a tire can carry. You may find this information in your
owner’s manual. If not, contact a local tire dealer.
Note:You may not find this information on all tires because it is not
required by federal law.
G.H:Indicates the tire’s speed rating. The speed rating denotes the
speed at which a tire is designed to be driven for extended periods of
time under a standard condition of load and inflation pressure. The tires
on your vehicle may operate at different conditions for load and inflation
pressure. These speed ratings may need to be adjusted for the difference
in conditions. The ratings range from 81 mph (130 km/h) to 186 mph
(299 km/h). These ratings are listed in the following chart.
Note:You may not find this information on all tires because it is not
required by federal law.
Letter rating Speed rating - mph (km/h)
M 81 (130)
N 87 (140)
Q 99 (159)
R 106 (171)
S 112 (180)
T 118 (190)
U 124 (200)
H 130 (210)
V 149 (240)
W 168 (270)
Y 186 (299 )
Note:For tires with a maximum speed capability over 149 mph
(240 km/h), tire manufacturers sometimes use the letters ZR. For
those with a maximum speed capability over 186 mph (299 km/h), tire
manufacturers always use the letters ZR.
310Wheels and Tires
2014 Expedition(exd)
Owners Guide gf, 1st Printing, June 2013
USA(fus)
Page 314 of 519
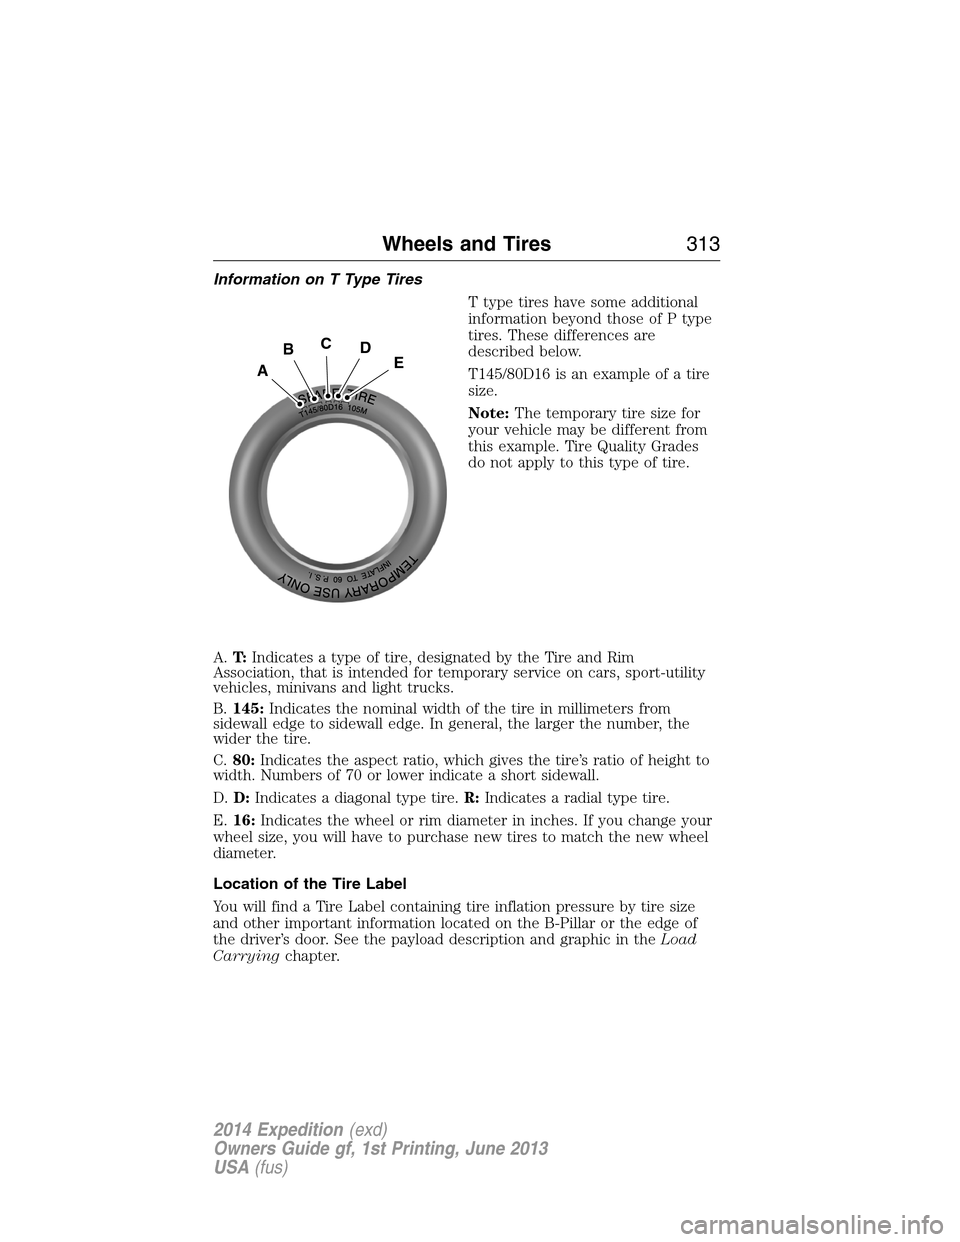
Information on T Type Tires
T type tires have some additional
information beyond those of P type
tires. These differences are
described below.
T145/80D16 is an example of a tire
size.
Note:The temporary tire size for
your vehicle may be different from
this example. Tire Quality Grades
do not apply to this type of tire.
A.T:Indicates a type of tire, designated by the Tire and Rim
Association, that is intended for temporary service on cars, sport-utility
vehicles, minivans and light trucks.
B.145:Indicates the nominal width of the tire in millimeters from
sidewall edge to sidewall edge. In general, the larger the number, the
wider the tire.
C.80:Indicates the aspect ratio, which gives the tire’s ratio of height to
width. Numbers of 70 or lower indicate a short sidewall.
D.D:Indicates a diagonal type tire.R:Indicates a radial type tire.
E.16:Indicates the wheel or rim diameter in inches. If you change your
wheel size, you will have to purchase new tires to match the new wheel
diameter.
Location of the Tire Label
You will find a Tire Label containing tire inflation pressure by tire size
and other important information located on the B-Pillar or the edge of
the driver’s door. See the payload description and graphic in theLoad
Carryingchapter.
A
BCDE
Wheels and Tires313
2014 Expedition(exd)
Owners Guide gf, 1st Printing, June 2013
USA(fus)
Page 316 of 519
Maximum Inflation Pressureis the tire manufacturer’s maximum
permissible pressure or the pressure at which the maximum load can be
carried by the tire. This pressure is normally higher than the manufacturer’s
recommended cold inflation pressure, which can be found on the Safety
Compliance Certification Label (affixed to either the door hinge pillar,
door-latch post, or the door edge that meets the door-latch post, next to the
driver’s seating position), or Tire Label which is located on the B-Pillar or
the edge of the driver’s door. The cold inflation pressure should never be
set lower than the recommended pressure on the Safety Compliance
Certification Label or Tire Label.
When weather temperature changes occur, tire inflation pressures also
change. A 10°F (6°C) temperature drop can cause a corresponding
drop of 1 psi (7 kPa) in inflation pressure. Check your tire pressures
frequently and adjust them to the proper pressure which can be found
on the Safety Compliance Certification Label or Tire Label.
To check the pressure in your tire(s):
1. Make sure the tires are cool, meaning they are not hot from driving
even a mile.
Note:If you are checking tire pressure when the tire is hot (for
example, driven more than 1 mile [1.6 kilometers]), never bleed or
reduce air pressure. The tires are hot from driving and it is normal for
pressures to increase above recommended cold pressures. A hot tire at
or below recommended cold inflation pressure could be significantly
under-inflated.
Note:If you have to drive a distance to get air for your tire(s), check
and record the tire pressure first and add the appropriate air pressure
when you get to the pump. It is normal for tires to heat up and the air
pressure inside to go up as you drive.
2. Remove the cap from the valve on one tire, then firmly press the tire
gauge onto the valve and measure the pressure.
3. Add enough air to reach the recommended air pressure.
Note:If you overfill the tire, release air by pressing on the metal stem in
the center of the valve. Then recheck the pressure with your tire gauge.
4. Replace the valve cap.
5. Repeat this procedure for each tire, including the spare.
Note:Some spare tires operate at a higher inflation pressure than the
other tires. For T-type mini-spare tires, see theDissimilar Spare Tire
and Wheel Assembly Informationsection. Store and maintain at 60 psi
Wheels and Tires315
2014 Expedition(exd)
Owners Guide gf, 1st Printing, June 2013
USA(fus)
Page 330 of 519
The usage of a full-size dissimilar spare tire and wheel assembly can lead
to impairment of the following:
•Handling, stability and braking performance
•Comfort and noise
•Ground clearance and parking at curbs
•Winter weather driving capability
•Wet weather driving capability
•All-wheel driving capability (if applicable)
•Load leveling adjustment (if applicable)
When driving with the full-size dissimilar spare tire and wheel assembly,
additional caution should be given to:
•towing a trailer.
•driving vehicles equipped with a camper body.
•driving vehicles with a load on the cargo rack.
Drive cautiously when using a full-size dissimilar spare tire and wheel,
and seek service as soon as possible.
Tire Change Procedure
WARNING:When one of the front wheels is off the ground, the
transmission alone will not prevent the vehicle from moving or
slipping off the jack, even if the transmission selector lever is in
positionP.
WARNING:To help prevent the vehicle from moving when you
change a tire, be sure to place the transmission selector lever in
positionP,set the parking brake and block (in both directions) the
wheel that is diagonally opposite (other side and end of the vehicle) to
the tire being changed.
WARNING:Never get underneath a vehicle that is supported
only by a jack. If the vehicle slips off the jack, you or someone
else could be seriously injured.
Wheels and Tires329
2014 Expedition(exd)
Owners Guide gf, 1st Printing, June 2013
USA(fus)
Page 331 of 519
WARNING:Do not attempt to change a tire on the side of the
vehicle close to moving traffic. Pull far enough off the road to
avoid the danger of being hit when operating the jack or changing the
wheel.
WARNING:Always use the jack provided as original equipment
with your vehicle. If using a jack other than the one provided as
original equipment with your vehicle, make sure the jack capacity is
adequate for the vehicle weight, including any vehicle cargo or
modifications.
WARNING:Disable the power running boards before jacking,
lifting, or placing any object under the vehicle. Never place your
hand between the power running board and vehicle as extended power
running boards will retract when the doors are closed. Failure to follow
these instructions may result in personal injury.
Note:Passengers should not remain in the vehicle when the vehicle is
being jacked.
Park on a level surface, activate the hazard flashers and set the parking
brake. Then, place the transmission selector lever in positionPand turn
the engine off.
Location of the spare tire and tools
The spare tire and tools for your vehicle are stowed in the following
locations:
Item Location
Spare tire Under the vehicle, just forward of
the rear bumper
Jack tools Under the access panel located in
the floor compartment behind the
rear seat
330Wheels and Tires
2014 Expedition(exd)
Owners Guide gf, 1st Printing, June 2013
USA(fus)
Page 333 of 519
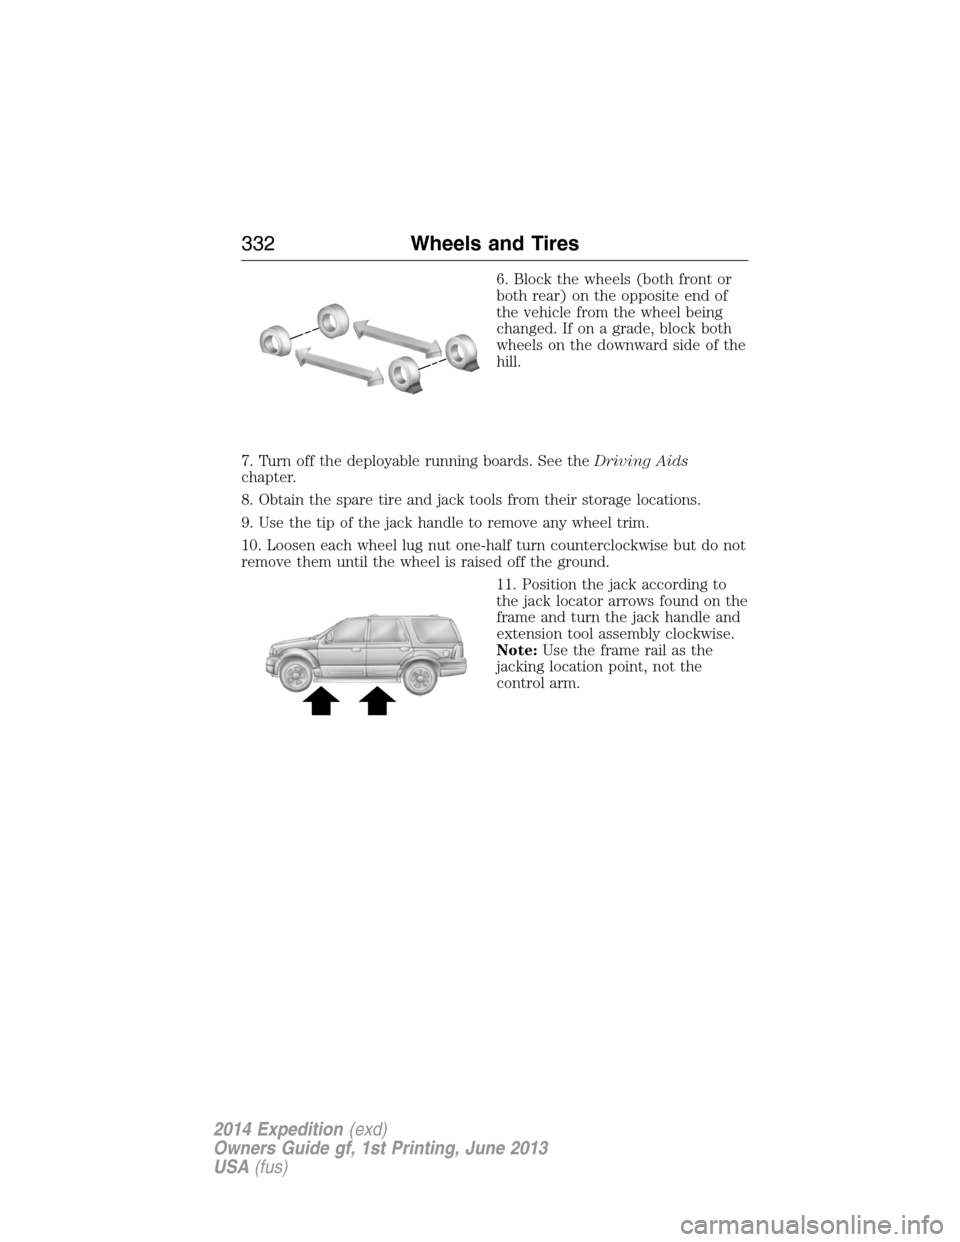
6. Block the wheels (both front or
both rear) on the opposite end of
the vehicle from the wheel being
changed. If on a grade, block both
wheels on the downward side of the
hill.
7. Turn off the deployable running boards. See theDriving Aids
chapter.
8. Obtain the spare tire and jack tools from their storage locations.
9. Use the tip of the jack handle to remove any wheel trim.
10. Loosen each wheel lug nut one-half turn counterclockwise but do not
remove them until the wheel is raised off the ground.
11. Position the jack according to
the jack locator arrows found on the
frame and turn the jack handle and
extension tool assembly clockwise.
Note:Use the frame rail as the
jacking location point, not the
control arm.
332Wheels and Tires
2014 Expedition(exd)
Owners Guide gf, 1st Printing, June 2013
USA(fus)
Page 385 of 519
USING VOICE RECOGNITION
This system helps you control many features using voice commands. This
allows you to keep your hands on the wheel and focus on what is in
front of you.
Initiating a Voice Session
Push the voice icon; a tone sounds and Listening appears in the
display. Say any of the following:
Say: If you want to:
“Phone” Make calls.
“USB” Access the device connected to your USB
port.
“Bluetooth Audio” Stream audio from your phone.
“Line in” Access the device connected to the auxiliary
input jack.
“Cancel” Cancel the requested action.
“SYNC” Return to the main menu.
“Voice settings” Adjust the level of voice interaction and
feedback.
“Vehicle Health Report” Run a vehicle health report.
*
“Services” Access the SYNC Services portal.*
“Mobile apps” Access mobile applications.*
“Help” Hear a list of voice commands available in the
current mode.
*If equipped, U.S. only.
System Interaction and Feedback
The system provides feedback through audible tones, prompts, questions
and spoken confirmations depending on the situation and the chosen
level of interaction (voice settings). You can customize the voice
recognition system to provide more or less instruction and feedback.
The default setting is to a higher level of interaction in order to help you
learn to use the system. You can change these settings at any time.
384SYNC®
2014 Expedition(exd)
Owners Guide gf, 1st Printing, June 2013
USA(fus)