Page 289 of 519
Replacing Headlamp Bulbs
WARNING:Handle a halogen headlamp bulb carefully and keep
out of children’s reach. Grasp the bulb only by its plastic base
and do not touch the glass. The oil from your hand could cause the
bulb to break the next time the headlamps are operated.
1. Make sure that the headlamp control is in the off position.
2. Open the hood.
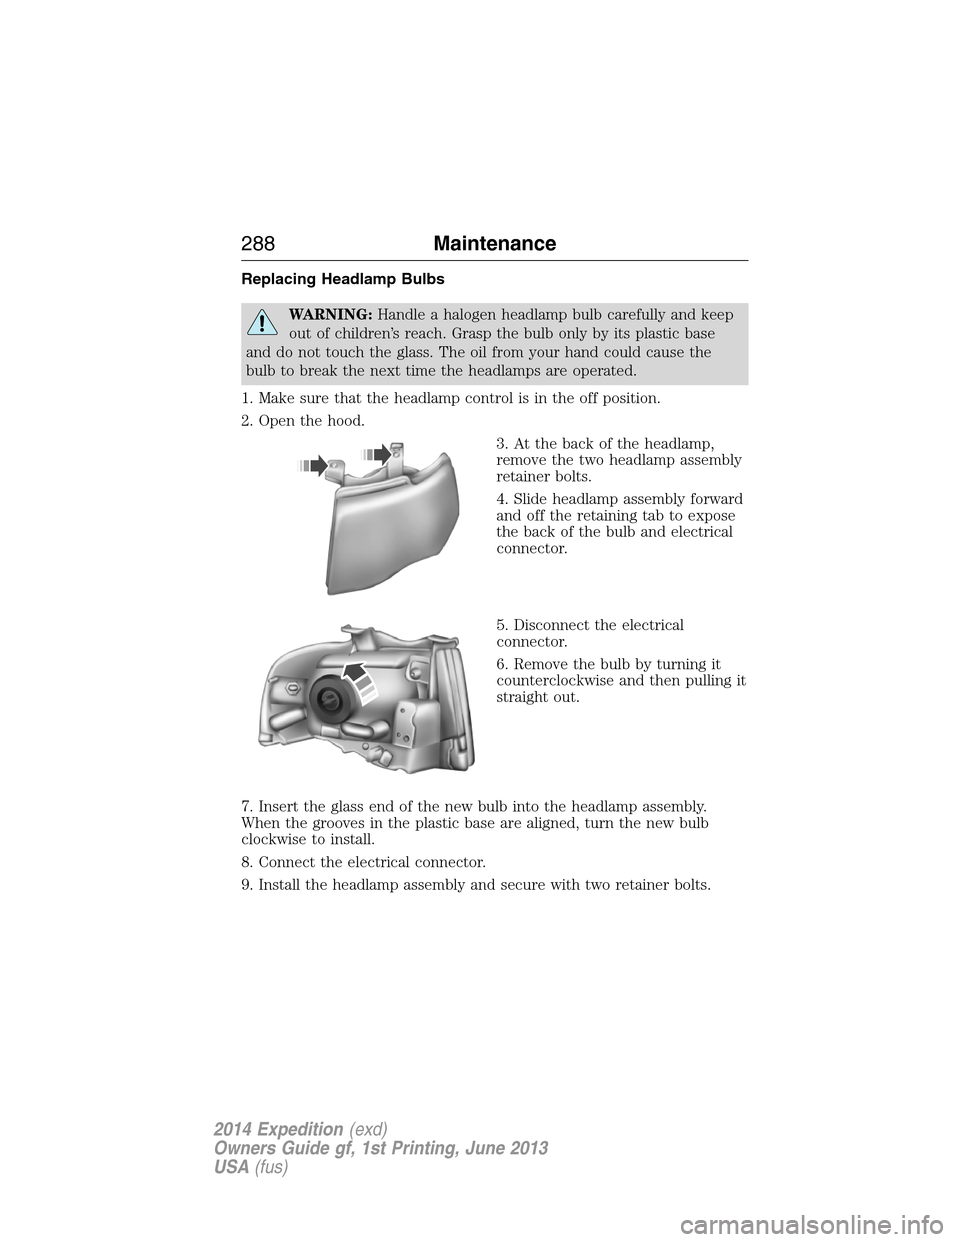
3. At the back of the headlamp,
remove the two headlamp assembly
retainer bolts.
4. Slide headlamp assembly forward
and off the retaining tab to expose
the back of the bulb and electrical
connector.
5. Disconnect the electrical
connector.
6. Remove the bulb by turning it
counterclockwise and then pulling it
straight out.
7. Insert the glass end of the new bulb into the headlamp assembly.
When the grooves in the plastic base are aligned, turn the new bulb
clockwise to install.
8. Connect the electrical connector.
9. Install the headlamp assembly and secure with two retainer bolts.
288Maintenance
2014 Expedition(exd)
Owners Guide gf, 1st Printing, June 2013
USA(fus)
Page 290 of 519
Replacing Front Parking Lamp, Turn Signal, and Side Marker Bulbs
1. Make sure that the headlamp control is in the off position.
2. Open the hood.
3. At the back of the headlamp,
remove the two headlamp assembly
retainer bolts.
4. Slide headlamp assembly forward
and off the retaining tab to expose
the back of the headlamp assembly.
5. Rotate the bulb socket
counterclockwise and remove from
the lamp assembly.
6. Carefully pull the bulb out of the
socket and push in the new bulb.
7. Install the bulb socket into the
lamp assembly and rotate clockwise.
8. Install the headlamp assembly
and secure with two retainer bolts.
Maintenance289
2014 Expedition(exd)
Owners Guide gf, 1st Printing, June 2013
USA(fus)
Page 291 of 519
Replacing Tail, Stop, Turn Signal, Side Marker, and Backup Lamp
Bulbs
The tail, stop, turn signal, side marker, and backup lamp bulbs are
located in the same portion of the tail lamp assembly, one just below the
other. Follow the same steps to replace any bulb:
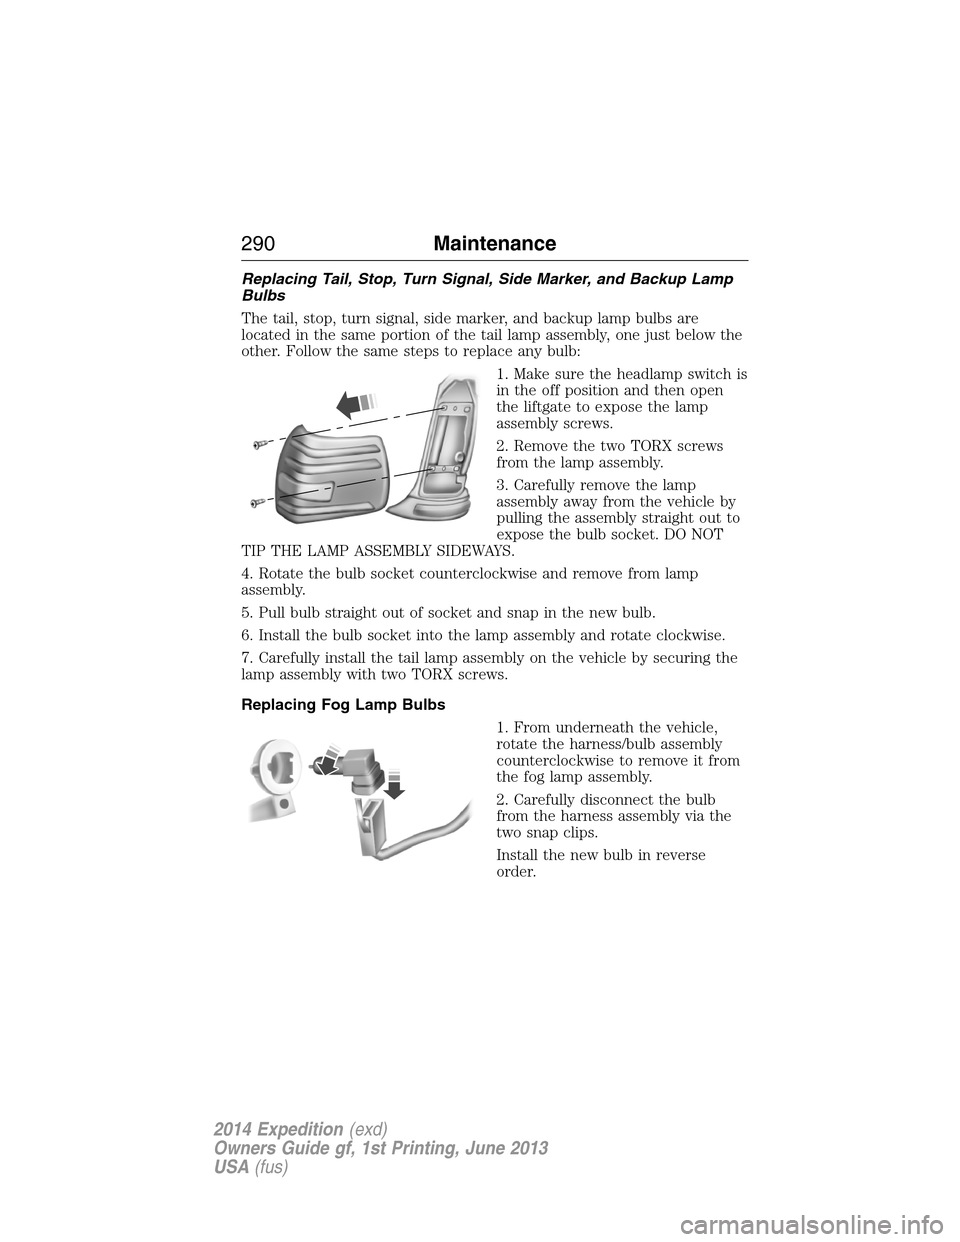
1. Make sure the headlamp switch is
in the off position and then open
the liftgate to expose the lamp
assembly screws.
2. Remove the two TORX screws
from the lamp assembly.
3. Carefully remove the lamp
assembly away from the vehicle by
pulling the assembly straight out to
expose the bulb socket. DO NOT
TIP THE LAMP ASSEMBLY SIDEWAYS.
4. Rotate the bulb socket counterclockwise and remove from lamp
assembly.
5. Pull bulb straight out of socket and snap in the new bulb.
6. Install the bulb socket into the lamp assembly and rotate clockwise.
7. Carefully install the tail lamp assembly on the vehicle by securing the
lamp assembly with two TORX screws.
Replacing Fog Lamp Bulbs
1. From underneath the vehicle,
rotate the harness/bulb assembly
counterclockwise to remove it from
the fog lamp assembly.
2. Carefully disconnect the bulb
from the harness assembly via the
two snap clips.
Install the new bulb in reverse
order.
290Maintenance
2014 Expedition(exd)
Owners Guide gf, 1st Printing, June 2013
USA(fus)
Page 292 of 519
Replacing License Plate Lamp Bulbs
The license plate bulbs are located in the license plate housing assembly
on the liftgate. To change the license plate bulbs:
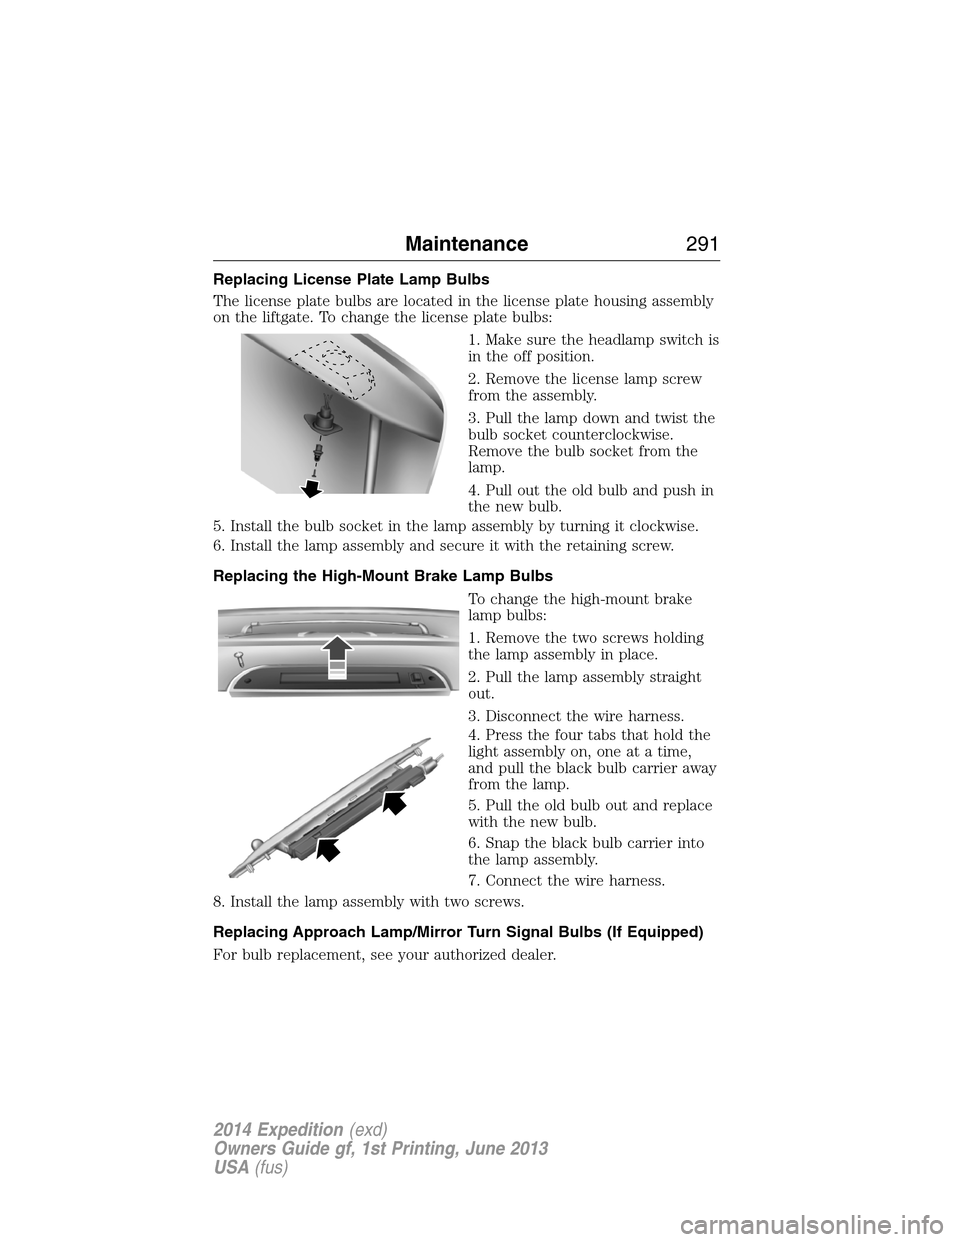
1. Make sure the headlamp switch is
in the off position.
2. Remove the license lamp screw
from the assembly.
3. Pull the lamp down and twist the
bulb socket counterclockwise.
Remove the bulb socket from the
lamp.
4. Pull out the old bulb and push in
the new bulb.
5. Install the bulb socket in the lamp assembly by turning it clockwise.
6. Install the lamp assembly and secure it with the retaining screw.
Replacing the High-Mount Brake Lamp Bulbs
To change the high-mount brake
lamp bulbs:
1. Remove the two screws holding
the lamp assembly in place.
2. Pull the lamp assembly straight
out.
3. Disconnect the wire harness.
4. Press the four tabs that hold the
light assembly on, one at a time,
and pull the black bulb carrier away
from the lamp.
5. Pull the old bulb out and replace
with the new bulb.
6. Snap the black bulb carrier into
the lamp assembly.
7. Connect the wire harness.
8. Install the lamp assembly with two screws.
Replacing Approach Lamp/Mirror Turn Signal Bulbs (If Equipped)
For bulb replacement, see your authorized dealer.
Maintenance291
2014 Expedition(exd)
Owners Guide gf, 1st Printing, June 2013
USA(fus)
Page 332 of 519
Removing the jack and tools
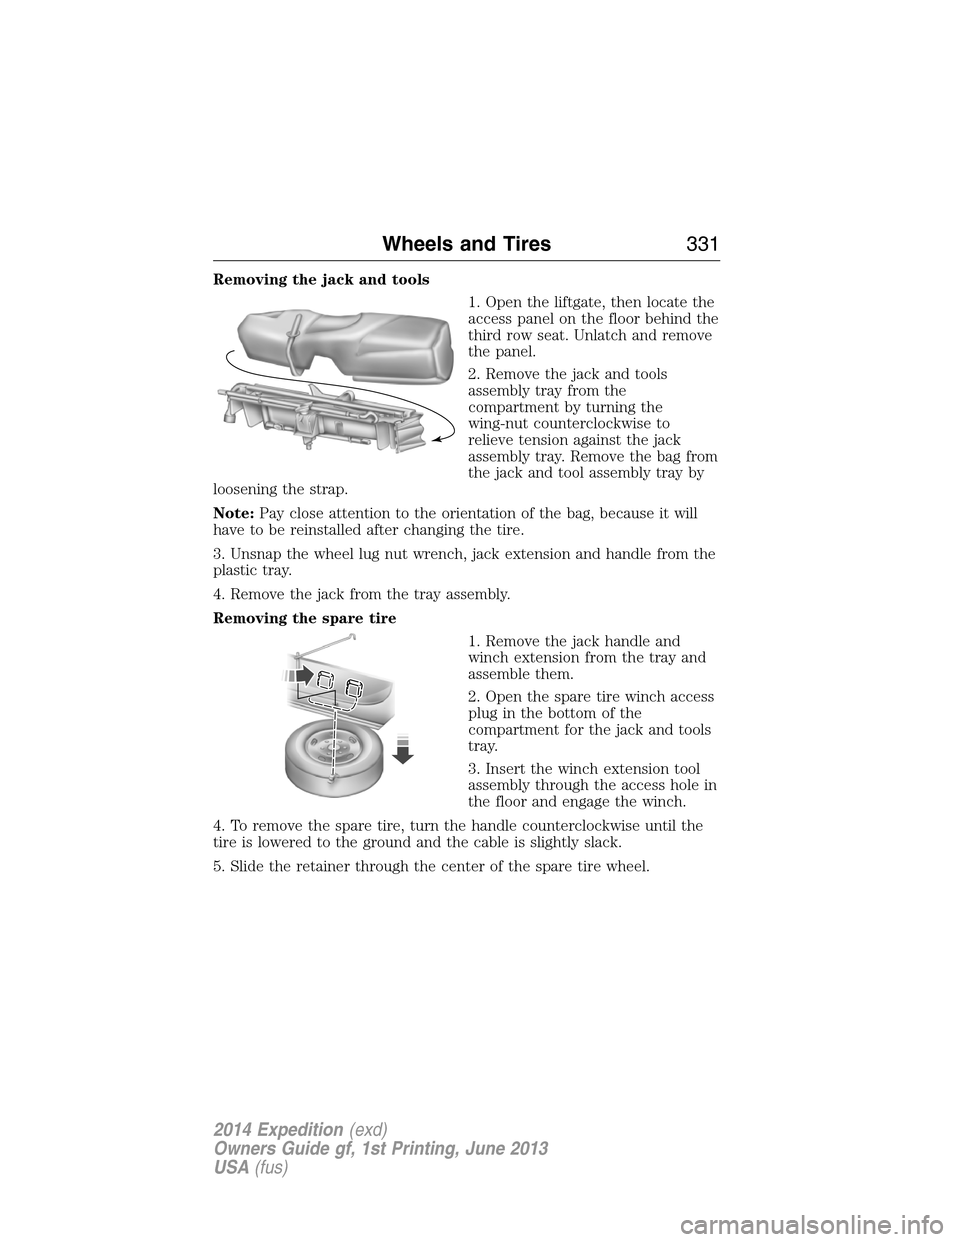
1. Open the liftgate, then locate the
access panel on the floor behind the
third row seat. Unlatch and remove
the panel.
2. Remove the jack and tools
assembly tray from the
compartment by turning the
wing-nut counterclockwise to
relieve tension against the jack
assembly tray. Remove the bag from
the jack and tool assembly tray by
loosening the strap.
Note:Pay close attention to the orientation of the bag, because it will
have to be reinstalled after changing the tire.
3. Unsnap the wheel lug nut wrench, jack extension and handle from the
plastic tray.
4. Remove the jack from the tray assembly.
Removing the spare tire
1. Remove the jack handle and
winch extension from the tray and
assemble them.
2. Open the spare tire winch access
plug in the bottom of the
compartment for the jack and tools
tray.
3. Insert the winch extension tool
assembly through the access hole in
the floor and engage the winch.
4. To remove the spare tire, turn the handle counterclockwise until the
tire is lowered to the ground and the cable is slightly slack.
5. Slide the retainer through the center of the spare tire wheel.
Wheels and Tires331
2014 Expedition(exd)
Owners Guide gf, 1st Printing, June 2013
USA(fus)
Page 333 of 519
6. Block the wheels (both front or
both rear) on the opposite end of
the vehicle from the wheel being
changed. If on a grade, block both
wheels on the downward side of the
hill.
7. Turn off the deployable running boards. See theDriving Aids
chapter.
8. Obtain the spare tire and jack tools from their storage locations.
9. Use the tip of the jack handle to remove any wheel trim.
10. Loosen each wheel lug nut one-half turn counterclockwise but do not
remove them until the wheel is raised off the ground.
11. Position the jack according to
the jack locator arrows found on the
frame and turn the jack handle and
extension tool assembly clockwise.
Note:Use the frame rail as the
jacking location point, not the
control arm.
332Wheels and Tires
2014 Expedition(exd)
Owners Guide gf, 1st Printing, June 2013
USA(fus)
Page 334 of 519
12. Raise the vehicle to provide sufficient ground clearance when
installing the spare tire; about 1/4 inch (6 millimeters).
•Front
•Rear
•Note:Jack at the specified locations to avoid damage to the vehicle.
13. Remove the lug nuts with the lug wrench.
14. Replace the flat tire with the spare tire, making sure the valve stem
is facing outward.
15. Reinstall the lug nuts until the wheel is snug against the hub. Do not
fully tighten the lug nuts until the wheel has been lowered.
16. Lower the wheel by turning the jack handle counterclockwise.
Wheels and Tires333
2014 Expedition(exd)
Owners Guide gf, 1st Printing, June 2013
USA(fus)
Page 335 of 519
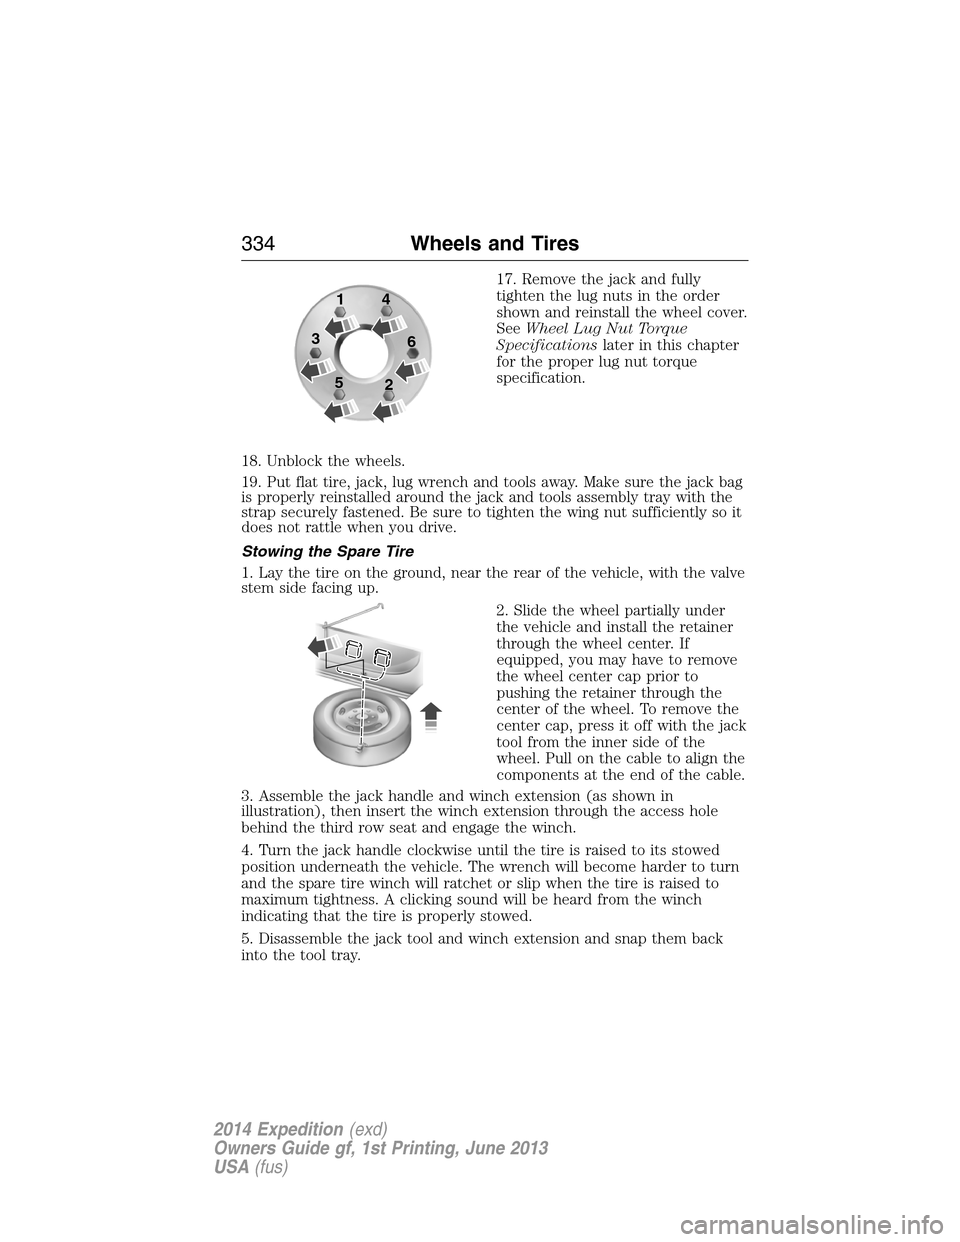
17. Remove the jack and fully
tighten the lug nuts in the order
shown and reinstall the wheel cover.
SeeWheel Lug Nut Torque
Specificationslater in this chapter
for the proper lug nut torque
specification.
18. Unblock the wheels.
19. Put flat tire, jack, lug wrench and tools away. Make sure the jack bag
is properly reinstalled around the jack and tools assembly tray with the
strap securely fastened. Be sure to tighten the wing nut sufficiently so it
does not rattle when you drive.
Stowing the Spare Tire
1. Lay the tire on the ground, near the rear of the vehicle, with the valve
stem side facing up.
2. Slide the wheel partially under
the vehicle and install the retainer
through the wheel center. If
equipped, you may have to remove
the wheel center cap prior to
pushing the retainer through the
center of the wheel. To remove the
center cap, press it off with the jack
tool from the inner side of the
wheel. Pull on the cable to align the
components at the end of the cable.
3. Assemble the jack handle and winch extension (as shown in
illustration), then insert the winch extension through the access hole
behind the third row seat and engage the winch.
4. Turn the jack handle clockwise until the tire is raised to its stowed
position underneath the vehicle. The wrench will become harder to turn
and the spare tire winch will ratchet or slip when the tire is raised to
maximum tightness. A clicking sound will be heard from the winch
indicating that the tire is properly stowed.
5. Disassemble the jack tool and winch extension and snap them back
into the tool tray.
1
3
54
6
2
334Wheels and Tires
2014 Expedition(exd)
Owners Guide gf, 1st Printing, June 2013
USA(fus)