2014 FIAT FREEMONT audio
[x] Cancel search: audioPage 36 of 388

MESSAGES
In the Main Menu, press and release the UP or DOWN
button until “Messages: XX” displays highlighted in the
EVIC. If there is more than one message, pressing the
SELECT button will display a stored warning message.
Press and release the UP and DOWN buttons if there
is more than one message to step through the remain-
ing stored messages. If there are no message, pressing
the SELECT button will do nothing.
TURN MENU OFF
Select from Main Menu using the DOWN button.
Pressing the SELECT button blanks the menu display.
Pressing any one of the four steering wheel buttons
brings the menu back.Uconnect® SETTINGS
HARD-KEYS
Hard-Keys are located on the left and right side of the
Uconnect® 4.3 screen. In addition, there is a Scroll/
Enter control knob located on the right side of the
Climate Controls in the center of the instrument
panel. Turn the control knob to scroll through menus
and change settings (i.e., 30, 60, 90), press the center of
the control knob one or more times to select or
change a setting (i.e., ON, OFF).
SOFT-KEYS
Soft-Keys are accessible on the Uconnect® touch-
screen.
CUSTOMER PROGRAMMABLE FEATURES —
Uconnect® 4.3 SETTINGS
In this mode the Uconnect® system allows you to
access programmable features that may be equipped
such as Display, Clock, Safety/Assistance, Lights, Doors
& Locks, Heated Seats (for versions/markets, where
provided), Engine Off Operation, Compass Settings,
Audio and Phone/Bluetooth settings through hard-keys
and soft-keys.
NOTE:Only one touchscreen area may be selected at
a time.
30
KNOWING YOUR
VEHICLE
SAFETY
STARTING AND
DRIVING
W
ARNING LIGHTS AND
MESSAGES
IN AN
EMERGENCY
SERVICING AND CARE
TECHNICAL
SPECIFICATIONS
CONTENTS
Page 43 of 388

•Calibration (for versions/markets, where provided)
Press the Calibration key to change this setting. This
compass is self-calibrating, which eliminates the need
to manually reset the compass. When the vehicle is
new, the compass may appear erratic and the EVIC will
display CAL until the compass is calibrated. You may
also calibrate the compass by pressing the ON soft-key
and completing one or more 360–degree turns (in an
area free from large metal or metallic objects) until the
CAL indicator displayed in the EVIC turns off. The
compass will now function normally.
NOTE:A good calibration requires a level surface
and an environment free from large metallic objects
such as buildings, bridges, underground cables, railroad
tracks, etc.
Audio
• Equalizer (for versions/markets, where provided)
Press the Equalizer soft-key to change this display.
When in this display you may adjust the Bass, Mid and
Treble settings. Adjust the settings with the + and –
setting soft-keys or by selecting any point on the scale
in between the + and – soft-keys followed by pressing
the arrow back soft-key.
NOTE: Bass/mid/treble allow the you to simply slide
your finger up/down to change the setting as well as
press directly on the desired setting. • Balance / Fade (for versions/markets, where
provided)
Press the Balance / Fade soft-key to change this display.
When in this display you may adjust the Balance and
Fade settings.
• Speed Adjusted Volume (for versions/markets,
where provided)
Press the Speed Adjusted Volume soft-key to change
this display. Decreases volume relative to vehicle
speed. To change the Speed Adjusted Volume press the
Off, 1, 2 or 3 soft-key followed by pressing the arrow
back soft-key.
• Surround Sound (for versions/markets, where
provided)
Press the Surround Sound soft-key to change this
display. Provides simulated surround sound mode. To
make your selection, press the Surround Sound soft-
key, select ON or OFF followed by pressing the arrow
back soft-key.
Phone / Bluetooth®
• Paired Devices
This feature shows which phones are paired to the
Phone/Bluetooth® system. For further information,
refer to the Uconnect® Supplement.
37
KNOWING
YOUR
VEHICLE
SAFETY
STARTING
AND
DRIVING
W
ARNING
LIGHTS
AND
MESSAGES
IN AN
EMERGENCY
SERVICING
AND CARE
TECHNICAL
SPECIFICATIONS
CONTENTS
Page 44 of 388

CUSTOMER PROGRAMMABLE FEATURES —
Uconnect® 8.4 SETTINGS
In this mode the Uconnect® system allows you to
access programmable features that may be equipped
such as Display, Clock, Safety/Assistance, Lights, Doors
& Locks, Auto-On Comfort, Engine Off Operation,
Compass Settings, Audio and Phone/Bluetooth set-
tings.
NOTE:Only one touchscreen area may be selected at
a time.
When making a selection, scroll up or down until the
preferred setting is highlighted, then press and release
the preferred setting until a check-mark appears next
to the setting, showing that setting has been selected.
Display
• Display Mode (for versions/markets, where
provided)
When in this display you may select one of the auto
display settings. To change Mode status press and
release the Day, Night or Auto soft-key followed by
pressing the arrow back soft-key.
• Display Brightness with Headlights ON
(for versions/markets, where provided)
When in this display you may select display brightness
with the headlights on and the headlights off. Adjust the
brightness with the + and – setting soft-keys or by selecting any point on the scale in between the + and –
soft-keys followed by pressing the arrow back soft-key.
• Display Brightness with Headlights OFF
(for versions/markets, where provided)
When in this display you may select display brightness
with the headlights on and the headlights off. Adjust the
brightness with the + and – setting soft-keys or by
selecting any point on the scale in between the + and –
soft-keys followed by pressing the arrow back soft-key.
• Set Language (for versions/markets, where
provided)
When in this display you may select a different language
for all display nomenclature, including the trip functions
and the navigation system (for versions/markets, where
provided). Press the German, French, Spanish, Italian,
Dutch or English button to select the language pre-
ferred followed by pressing the arrow back soft-key.
Then, as you continue, the information will display in
the selected language.
• Units (for versions/markets, where provided)
When in this display you may select to have the EVIC,
odometer, and navigation system (for versions/
markets, where provided) changed between US and
Metric units of measure. Press US or Metric followed
by pressing the arrow back soft-key. Then, as you
continue, the information will display in the selected
units of measure.
38
KNOWING
YOUR
VEHICLE
SAFETY
STARTING AND
DRIVING
W
ARNING LIGHTS AND
MESSAGES
IN AN
EMERGENCY
SERVICING AND CARE
TECHNICAL
SPECIFICATIONS
CONTENTS
Page 50 of 388

• Perform Compass Calibration (for versions/
markets, where provided)
Press the Calibration key to change this setting. This
compass is self-calibrating, which eliminates the need
to manually reset the compass. When the vehicle is
new, the compass may appear erratic and the EVIC will
display CAL until the compass is calibrated. You may
also calibrate the compass by pressing the ON soft-key
and completing one or more 360–degree turns (in an
area free from large metal or metallic objects) until the
CAL indicator displayed in the EVIC turns off. The
compass will now function normally.
Audio
• Balance/Fade (for versions/markets, where
provided)
When in this display you may adjust the Balance and
Fade settings.
• Equalizer (for versions/markets, where provided)
When in this display you may adjust the Bass, Mid and
Treble settings. Adjust the settings with the + and –
setting soft-keys or by selecting any point on the scale
in between the + and – soft-keys followed by pressing
the arrow back soft-key.NOTE:
Bass/mid/treble allow the you to simply slide
your finger up/down to change the setting as well as
press directly on the desired setting.
• Speed Adjusted Volume (for versions/markets,
where provided)
Decreases volume relative to vehicle speed. To change
the Speed Adjusted Volume press the Off, 1, 2 or 3
soft-key followed by pressing the arrow back soft-key.
• Music Info Cleanup (for versions/markets, where
provided)
This feature helps organize music files for optimized
music navigation. To make your selection, press the
Music Info Cleanup soft-key, select On or Off followed
by pressing the arrow back soft-key.
Phone / Bluetooth®
• Paired Devices
This feature shows which phones are paired to the
Phone/Bluetooth® system. For further information,
refer to the Uconnect® Supplement.
44
KNOWING YOUR
VEHICLE
SAFETY
STARTING AND
DRIVING
W
ARNING LIGHTS AND
MESSAGES
IN AN
EMERGENCY
SERVICING AND CARE
TECHNICAL
SPECIFICATIONS
CONTENTS
Page 165 of 388

PARKVIEW® REAR BACK UP
CAMERA (for versions/markets,
where provided)
Your vehicle may be equipped with the ParkView®
Rear Back Up Camera that allows you to see an
on-screen image of the rear surroundings of your
vehicle whenever the shift lever is put into REVERSE.
The image will be displayed on the radio touchscreen
display along with a caution note to “check entire
surroundings” across the top of the screen. After five
seconds this note will disappear. The ParkView® cam-
era is located on the rear of the vehicle above the rear
License plate.When the vehicle is shifted out of REVERSE, the rear
camera mode is exited and the navigation or audio
screen appears again.
When displayed, static grid lines will illustrate the
width of the vehicle and will show separate zones that
will help indicate the distance to the rear of the vehicle.
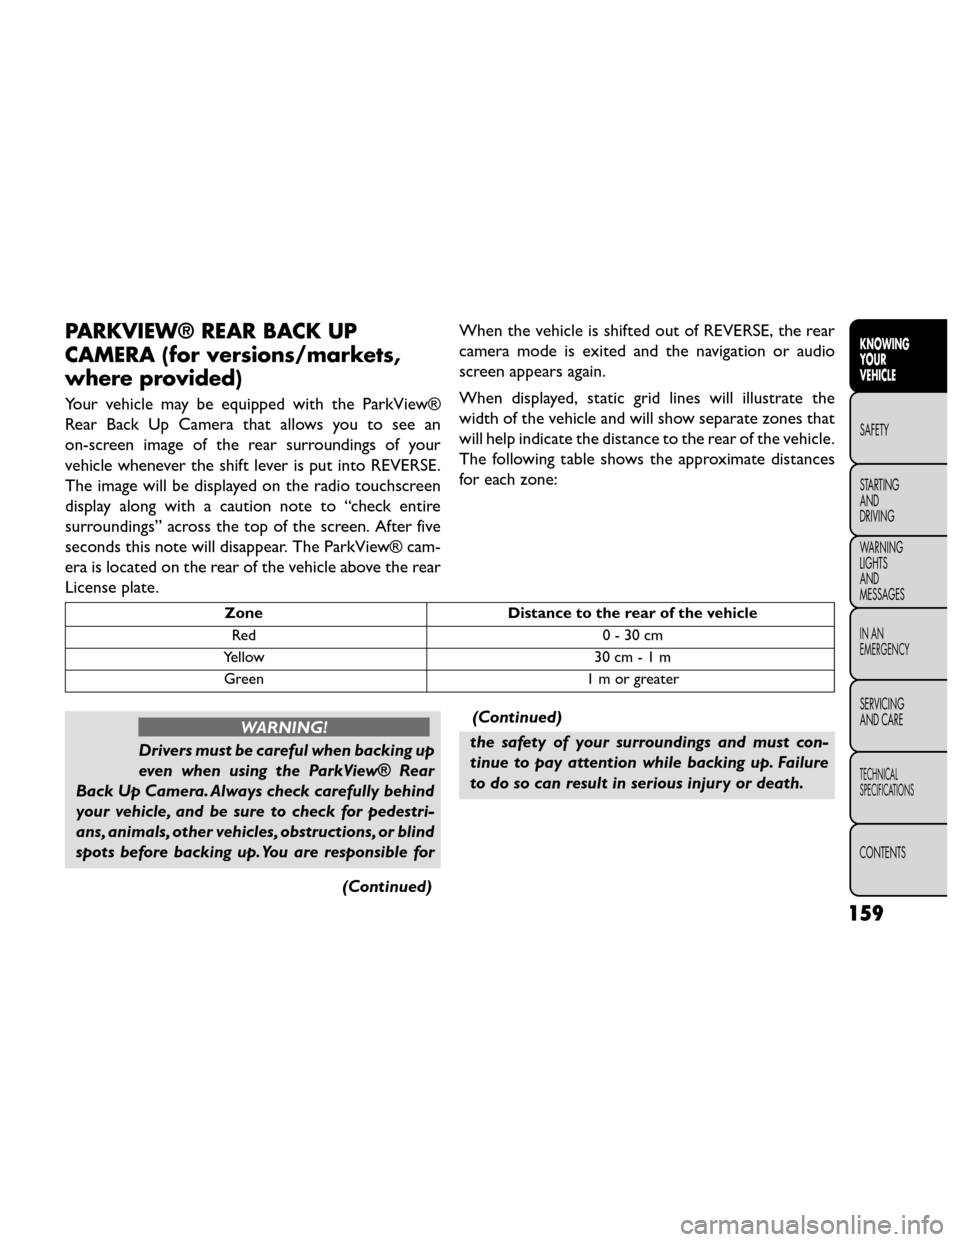
The following table shows the approximate distances
foreachzone:
Zone
Distance to the rear of the vehicle
Red 0 - 30 cm
Yellow 30 cm - 1 m
Green 1 m or greater
WARNING!
Drivers must be careful when backing up
even w
hen using the ParkView® Rear
Back Up Camera. Always check carefully behind
your vehicle, and be sure to check for pedestri-
ans, animals, other vehicles, obstructions, or blind
spots before backing up. You are responsible for
(Continued)(Continued)
the safety of your surroundings and must con-
tinue to pay attention while backing up. Failure
to do so can result in serious injur y or death.
159
KNOWING
YOUR
VEHICLE
SAFETY
STARTING
AND
DRIVING
W
ARNING
LIGHTS
AND
MESSAGES
IN AN
EMERGENCY
SERVICING
AND CARE
TECHNICAL
SPECIFICATIONS
CONTENTS
Page 167 of 388

SOUND SYSTEMS
Refer to your Uconnect® User Manual.
STEERING WHEEL AUDIO
CONTROLS
The remote sound system controls are located on the
rear surface of the steering wheel. The left and right-
hand controls are rocker-type switches with a pushbut-
ton in the center of each switch. Reach behind the
steering wheel to access the switches.
(fig. 120)
(fig. 120)Remote Sound Controls (Back View Of Steering Wheel)
161
KNOWING
YOUR
VEHICLE
SAFETY
STARTING
AND
DRIVING
W
ARNING
LIGHTS
AND
MESSAGES
IN AN
EMERGENCY
SERVICING
AND CARE
TECHNICAL
SPECIFICATIONS
CONTENTS
Page 169 of 388

UCONNECT® MULTIMEDIA VIDEO
ENTERTAINMENT SYSTEM (VES™)
(for versions/markets, where
provided)
Your rear seat Video Entertainment System (VES™) is
designed to give your family years of enjoyment. You
can play your favorite CDs or DVDs, listen to audio
over the wireless headphones, or plug and play a variety
of standard video games or audio devices. Please re-
view this Owner's Manual to become familiar with its
features and operation.Getting Started
•
Screen located in the overhead console: Unfold
the overhead LCD screen by pushing the button on
the overhead console behind the screen.
(fig. 121)
• With the ignition switch in the ON or ACC position, turn the radio on by pushing the ON/OFF Volume
Control knob.
• When the Video Screen is open and a DVD is inserted into the radio, the screen turns on auto-
matically, the headphone transmitters turn on and
playback begins.
(fig. 121)
Overhead Video Screen
163
KNOWING
YOUR
VEHICLE
SAFETY
STARTING
AND
DRIVING
W
ARNING
LIGHTS
AND
MESSAGES
IN AN
EMERGENCY
SERVICING
AND CARE
TECHNICAL
SPECIFICATIONS
CONTENTS
Page 170 of 388

Video Screen
NOTE:Typically there are two different ways to
operate the features of the Video Entertainment Sys-
tem (VES™).
• The Remote Control
• The Touch-Screen Radio (for versions/markets, where provided)
Play Video Games
Connect the video game console to the Auxiliary RCA
input jacks located on the back of the center console. Audio/Video RCA Jacks (AUX Jacks)
on the rear of the center console
enable the monitor to display video
directly from a video camera, con-
nect video games for display on the
screen, or play music directly from an
MP3 player.
1. Video in (yellow)
2. Left audio in (white)
3. Right audio in (red)
When connecting an external source to the AUX
input, be sure to follow the standard color coding for
the VES™ jacks: NOTE:
Certain high-end video games, such as Playsta-
tion3 and XBox360 will exceed the power limit of the
vehicle's Power Inverter. Refer to the Power Inverter
section in your vehicle's Owner's Manual for more
information.
Ensure the remote control channel selector switch and
Headphone switch (IR channel) are the same number.
Using The Remote Control
1. Press the MODE button on the Remote Control.
2. While looking at the video screen, highlight AUX 1, by either pressing Up/Down/Left/Right buttons or
by repeatedly pressing the MODE button, then
press ENTER on the Remote Control.
Using The Touchscreen Radio Controls
1. Touch the “MORE” soft-key.
2. Touch the “Rear Entertainment” soft-key to display the Rear Entertainment Controls.
3. If the Rear Entertainment is turned off, touch the “Power” soft-key.
4. Touch the “1” or “2” soft-key for the channel desired and press “Source” soft-key to select the
desired mode.
164
KNOWING YOUR
VEHICLE
SAFETY
STARTING AND
DRIVING
W
ARNING LIGHTS AND
MESSAGES
IN AN
EMERGENCY
SERVICING AND CARE
TECHNICAL
SPECIFICATIONS
CONTENTS