2014 FIAT BRAVO key
[x] Cancel search: keyPage 56 of 275

EXTERIOR LIGHTSThe left lever fig. 33 includes the controls for the
exterior lights.
The exterior lights can only be switched on when
the ignition key is at MAR-ON.
LIGHTS OFF
Ring nut turned to position
.
SIDE LIGHTS
Turn the ring nut to position.
The warning light
switches on in the instrument
panel.
DIPPED HEADLIGHTS
Turn the ring nut to position
.The warning light
switches on in the instrument
panel.
MAIN BEAM HEADLIGHTS
With the ring nut atposition, push the stalk
forward towards the dashboard (stable position).
The warning light
switches on in the instrument
panel.
To turn the main beam headlights off, pull the stalk
towards the steering wheel (dipped headlights will
turn on).
PARKING LIGHTS
These lights can be turned on only with the ignition
key at STOP or extracted by turning the ring nut
on the left stalk first to position
and then to
position
or
.
The warning light
switches on in the instrument
panel. Operate the direction indicator stalk to select
the side (right or left).
FLASHING
Pull the stalk towards the steering wheel (unstable
position) regardless of the position of the ring nut.
The warning lightswitches on in the instrument
panel.
fig. 33
F0Q0649
52GETTING TO
KNOW YOUR CAR
SAFETY
STARTING AND
DRIVING
WARNING LIGHTS
AND MESSAGES
IN AN EMERGENCY
SERVICING AND
MAINTENANCE
TECHNICAL
SPECIFICATIONS
INDEX
Page 57 of 275

DIRECTION INDICATORS
Place the stalk in the (stable) position fig. 34:
❒up (position 1): activates the right direction
indicator
❒down (position 2): activates the left direction
indicator
Warning light
or
will flash in the instrument
panel.
Direction indicators are switched off automatically
when the steering wheel is straightened.
Lane change function
If you wish to signal a lane change, put the left stalk
in the unstable position for less than half a second.
The direction indicator on the side selected will flash
five times and then switch off automatically.“Cornering lights”
When the dipped headlights are on and the speed is
below 40 km/h, if the steering wheel rotation angle is
large or the direction indicators are on, a light
(incorporated in the fog light) will come on on the
relevant side to improve visibility at nighttime.
"FOLLOW ME HOME" DEVICE
This allows the space in front of the car to be lit up
for a certain period of time.
Activation
With the ignition key turned to STOP or removed,
pull the stalk fig. 35 towards the steering wheel
within 2 minutes from when the engine is turned off.
At each single movement of the stalk, the lights
will remain on for an extra 30 seconds up to a
maximum of 210 seconds; then the lights are
switched off automatically.
Each action of the stalk corresponds with the lighting
of the
warning light in the instrument panel
(along with a message shown on the display) (see
"Warning lights and messages" chapter).
Deactivation
Keep the stalk pulled towards the steering wheel for
more than 2 seconds.
fig. 34
F0Q0650
53GETTING TO
KNOW YOUR CARSAFETY
STARTING AND
DRIVING
WARNING LIGHTS
AND MESSAGES
IN AN EMERGENCY
SERVICING AND
MAINTENANCE
TECHNICAL
SPECIFICATIONS
INDEX
Page 59 of 275

WINDOW CLEANINGWINDSCREEN WASHER/WIPER
They can be operated only with the ignition key
turned to MAR-ON.
The right stalk can be moved to five different
positions fig. 37:A
windscreen wiper off.
Bintermittent operation.
With the stalk in position B, turn ring nut F to select
one of four different speeds for the intermittent
operation mode:
= intermittent low speed= slow intermittent operation.
= medium intermittent operation.
= fast intermittent operation.
C
continuous slow operation;
D
continuous fast operation;
Etemporary fast operation (unstable position).
Temporary fast operation position E is limited to the
time that the stalk is manually held in this position.
The stalk returns to position A when it is released,
automatically stopping the windscreen wipers.IMPORTANT With the windscreen wipers in use, if
reverse gear is engaged, the rear window wiper is
automatically activated.
fig. 37
F0Q0645
55GETTING TO
KNOW YOUR CARSAFETY
STARTING AND
DRIVING
WARNING LIGHTS
AND MESSAGES
IN AN EMERGENCY
SERVICING AND
MAINTENANCE
TECHNICAL
SPECIFICATIONS
INDEX
Page 61 of 275
Activation
Move the right stalk down by one click.
The activation of the sensor is signalled by a "stroke"
to show that the command has been acquired.
IMPORTANT Keep the glass in the sensor area clean.
By turning ring nut F fig. 37 is it possible to increase
the sensitivity of the rain sensor to obtain a more
rapid variation between wiper still (no stroke) when
the windscreen is dry, to wiper at first continuous
speed (slow continuous operation).
The increasing of the rain sensor sensitivity is also
signalled by a stroke of the wipers.
If the windscreen washer is used with the rain sensor
activated, the normal washing cycle is performed,
after which the rain sensor resumes its normal
automatic operation.
Deactivation
Turn the ignition key to STOP.
At the next start-up (key at MAR-ON), the sensor
will not be reactivated even if the stalk is at B fig. 37.
To activate the sensor, move the stalk to position
A or C and then back to position B.
Rain sensor activation will be indicated by at least
one wiper “stroke” even if the windscreen is dry.
Do not activate the rain sensor when
washing the car in an automatic car wash.
Make sure the device is switched off if
there is ice on the windscreen.
WARNING
Make sure the device is switched off
whenever the windscreen is being
cleaned.
REAR WINDOW WASHER/WIPER
It can be operated only with the ignition key turned
to MAR-ON. The function stops when the stalk is
released.
Turning the stalk ring nut A fig. 40 from position
to position
will operate the rear window wiper
as follows:
❒in intermittent mode when the rear window wiper
is not operating;
❒in synchronous mode (at half the speed of the
windscreen wiper) when the windscreen wiper
is operating;
❒in continuous mode with reverse gear engaged and
the control active.
With the windscreen wiper on and reverse gear
engaged the rear window wiper is activated in
continuous mode. Pushing the stalk towards the
dashboard (unstable position) will activate the rear
window washer jet.
57GETTING TO
KNOW YOUR CARSAFETY
STARTING AND
DRIVING
WARNING LIGHTS
AND MESSAGES
IN AN EMERGENCY
SERVICING AND
MAINTENANCE
TECHNICAL
SPECIFICATIONS
INDEX
Page 64 of 275
INCREASING THE STORED SPEED
This can be done in two ways:
❒by pressing the accelerator and memorising the
new speed reached;
or
❒by temporarily turning ring nut B fig. 42 to (+).
Each movement of the ring nut will correspond to a
slight increase in speed (about 1 km/h), while keeping
the ring nut turned will correspond to a continuous
speed increase.
REDUCING THE STORED SPEED
This can be done in two ways:
❒by switching off the device and then memorising
the new speed;
or
❒by keeping ring nut B fig. 42 turned to (–) until the
new speed is reached; it will then be memorised
automatically.
Each movement of the ring nut will correspond to a
slight reduction in speed (about 1 km/h), while
keeping the ring nut turned will correspond to a
continuous reduction in speed.TURNING THE DEVICE OFF
Turn the ring nut A fig. 42 to OFF or turn the
ignition key to STOP. The device is automatically
turned off in one of the following cases:
❒when the brake or clutch pedal is pressed;
❒if the ASR or ESP system cuts in (for versions/
markets, where provided);
❒if the gear is shifted in versions with Dualogic
gearbox (for versions/markets, where provided) in
Manual mode;
❒if the Dualogic gearbox lever (where provided) is
inadvertently shifted to N or R.
WARNING
Whilst driving with the device on, never
place the gear lever in neutral and do
not move the Dualogic gearbox lever into
position N or R.
WARNING
If the device is faulty, turn ring nut A
fig. 42 to OFF, check the condition of the
protective fuse and contact a Fiat Dealership.
60GETTING TO
KNOW YOUR CAR
SAFETY
STARTING AND
DRIVING
WARNING LIGHTS
AND MESSAGES
IN AN EMERGENCY
SERVICING AND
MAINTENANCE
TECHNICAL
SPECIFICATIONS
INDEX
Page 65 of 275
ROOF LIGHTSFRONT ROOF LIGHT WITH SPOT LIGHTS
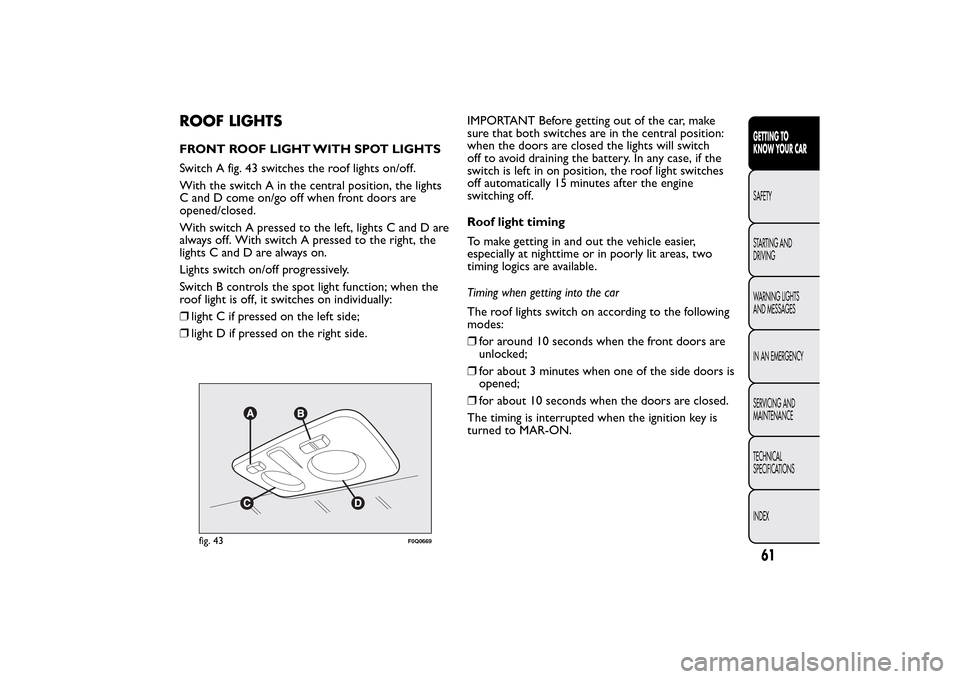
Switch A fig. 43 switches the roof lights on/off.
With the switch A in the central position, the lights
C and D come on/go off when front doors are
opened/closed.
With switch A pressed to the left, lights C and D are
always off. With switch A pressed to the right, the
lights C and D are always on.
Lights switch on/off progressively.
Switch B controls the spot light function; when the
roof light is off, it switches on individually:
❒light C if pressed on the left side;
❒light D if pressed on the right side.IMPORTANT Before getting out of the car, make
sure that both switches are in the central position:
when the doors are closed the lights will switch
off to avoid draining the battery. In any case, if the
switch is left in on position, the roof light switches
off automatically 15 minutes after the engine
switching off.
Roof light timing
To make getting in and out the vehicle easier,
especially at nighttime or in poorly lit areas, two
timing logics are available.
Timing when getting into the car
The roof lights switch on according to the following
modes:
❒for around 10 seconds when the front doors are
unlocked;
❒for about 3 minutes when one of the side doors is
opened;
❒for about 10 seconds when the doors are closed.
The timing is interrupted when the ignition key is
turned to MAR-ON.
fig. 43
F0Q0669
61GETTING TO
KNOW YOUR CARSAFETY
STARTING AND
DRIVING
WARNING LIGHTS
AND MESSAGES
IN AN EMERGENCY
SERVICING AND
MAINTENANCE
TECHNICAL
SPECIFICATIONS
INDEX
Page 66 of 275
Timing when getting out of the car
After removing the key from the ignition switch, the
roof lights switch on as follows:
❒within 2 minutes of the engine being switched off
for a period of around 10 seconds;
❒when one of the side doors is opened for a period
of around 3 minutes;
❒when one of the doors is closed for a period of
about 10 seconds.
❒if the fuel cut-off switch operates, they are on for
about 15 minutes, then they switch off
automatically.
Door locking switches the lights off immediately
(unless the fuel cut-off switch is operating).
REAR ROOF LIGHT
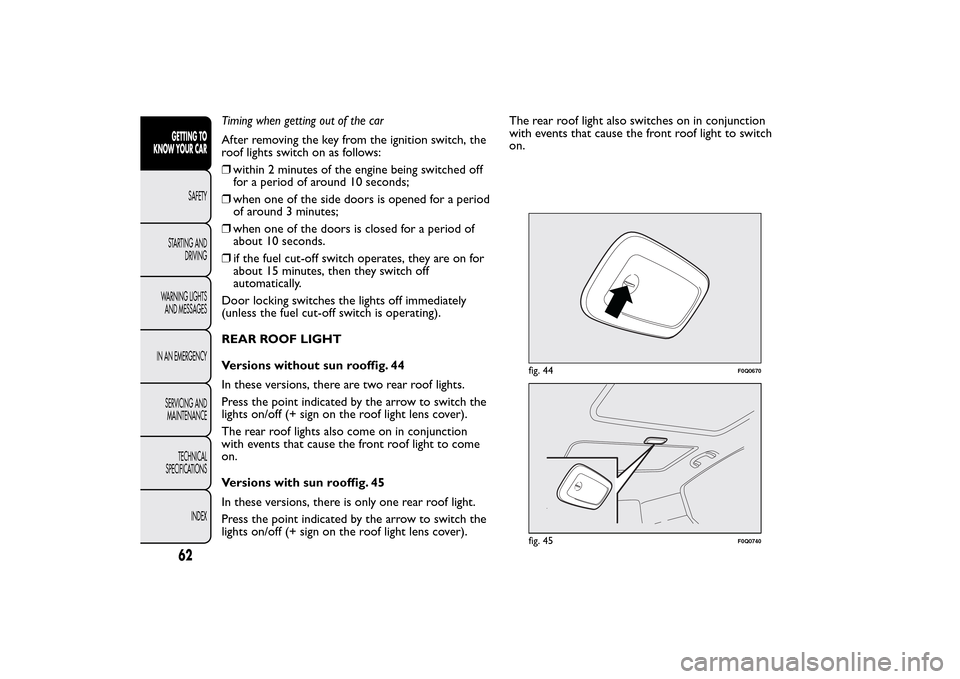
Versions without sun rooffig. 44
In these versions, there are two rear roof lights.
Press the point indicated by the arrow to switch the
lights on/off (+ sign on the roof light lens cover).
The rear roof lights also come on in conjunction
with events that cause the front roof light to come
on.
Versions with sun rooffig. 45
In these versions, there is only one rear roof light.
Press the point indicated by the arrow to switch the
lights on/off (+ sign on the roof light lens cover).The rear roof light also switches on in conjunction
with events that cause the front roof light to switch
on.
fig. 44
F0Q0670
fig. 45
F0Q0740
62GETTING TO
KNOW YOUR CAR
SAFETY
STARTING AND
DRIVING
WARNING LIGHTS
AND MESSAGES
IN AN EMERGENCY
SERVICING AND
MAINTENANCE
TECHNICAL
SPECIFICATIONS
INDEX
Page 67 of 275
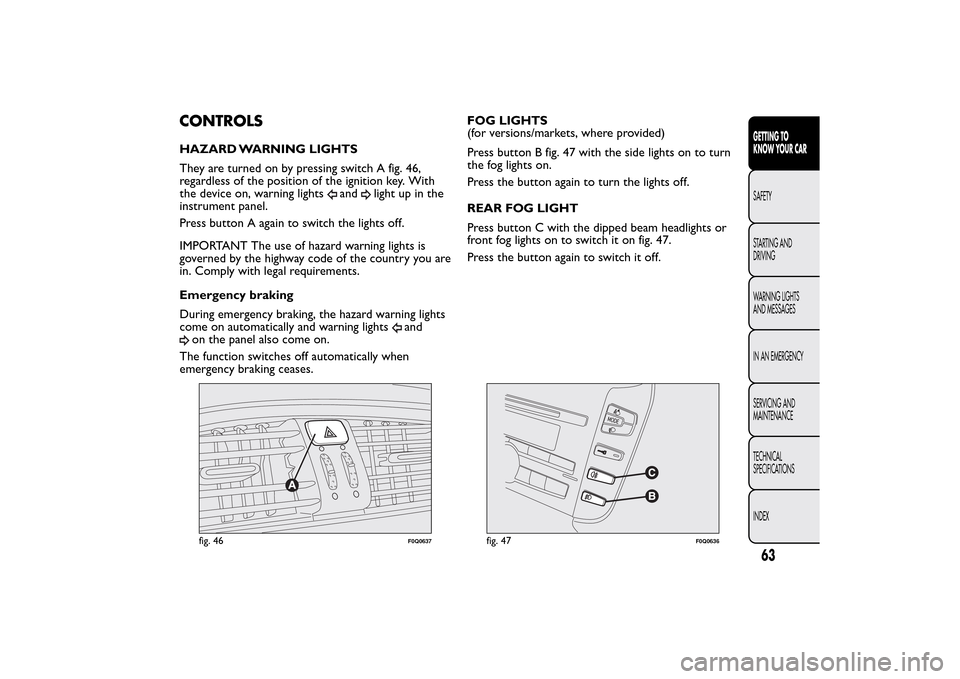
CONTROLSHAZARD WARNING LIGHTS
They are turned on by pressing switch A fig. 46,
regardless of the position of the ignition key. With
the device on, warning lights
and
light up in the
instrument panel.
Press button A again to switch the lights off.
IMPORTANT The use of hazard warning lights is
governed by the highway code of the country you are
in. Comply with legal requirements.
Emergency braking
During emergency braking, the hazard warning lights
come on automatically and warning lights
and
on the panel also come on.
The function switches off automatically when
emergency braking ceases.FOG LIGHTS
(for versions/markets, where provided)
Press button B fig. 47 with the side lights on to turn
the fog lights on.
Press the button again to turn the lights off.
REAR FOG LIGHT
Press button C with the dipped beam headlights or
front fog lights on to switch it on fig. 47.
Press the button again to switch it off.fig. 46
F0Q0637
fig. 47
F0Q0636
63GETTING TO
KNOW YOUR CARSAFETY
STARTING AND
DRIVING
WARNING LIGHTS
AND MESSAGES
IN AN EMERGENCY
SERVICING AND
MAINTENANCE
TECHNICAL
SPECIFICATIONS
INDEX