2014 FIAT BRAVO key
[x] Cancel search: keyPage 19 of 275
IMPORTANT The alarm is adapted to meet
requirements in various countries.
TURNING THE ALARM OFF
Press button
on the key with remote control.
The following operations are performed (excluding
some versions for specific markets):
❒direction indicators flash twice;
❒there are two short acoustic signals (beeps);
❒doors are unlocked.
IMPORTANT The alarm does not switch off when
the central opening is activated using the metal insert
in the key.
VOLUME SENSING/ANTI-LIFT
PROTECTION
To guarantee the correct operation of the protection
system it is advisable to shut all the side windows
and the sun roof (for versions/markets, where
provided).
If necessary, the function can be turned off (if, for
example, you are leaving an animal in the car) by
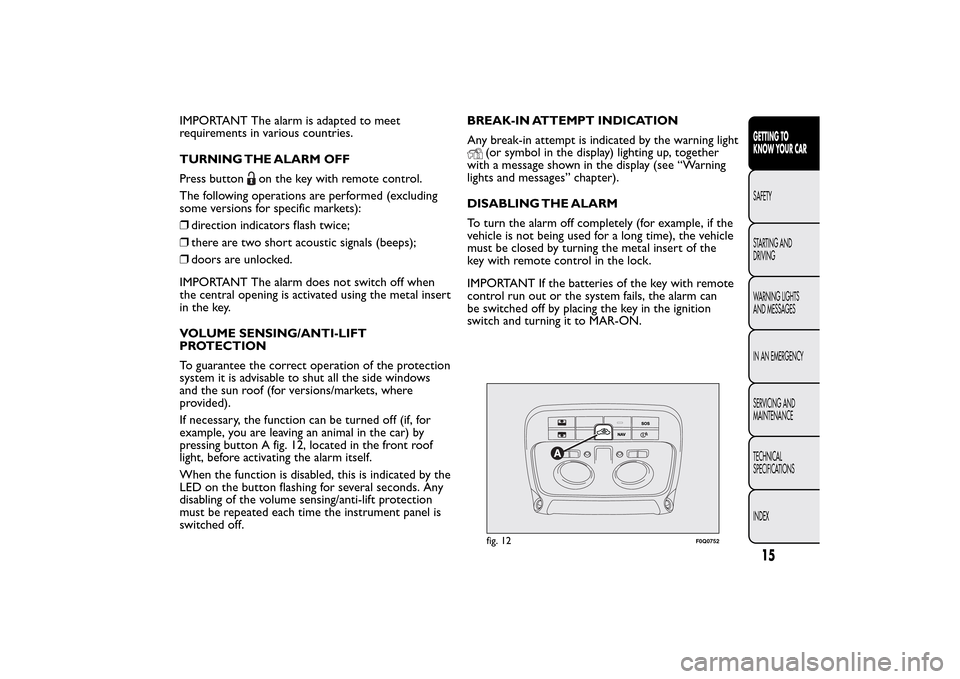
pressing button A fig. 12, located in the front roof
light, before activating the alarm itself.
When the function is disabled, this is indicated by the
LED on the button flashing for several seconds. Any
disabling of the volume sensing/anti-lift protection
must be repeated each time the instrument panel is
switched off.BREAK-IN ATTEMPT INDICATION
Any break-in attempt is indicated by the warning light
(or symbol in the display) lighting up, together
with a message shown in the display (see “Warning
lights and messages” chapter).
DISABLING THE ALARM
To turn the alarm off completely (for example, if the
vehicle is not being used for a long time), the vehicle
must be closed by turning the metal insert of the
key with remote control in the lock.
IMPORTANT If the batteries of the key with remote
control run out or the system fails, the alarm can
be switched off by placing the key in the ignition
switch and turning it to MAR-ON.fig. 12
F0Q0752
15GETTING TO
KNOW YOUR CARSAFETY
STARTING AND
DRIVING
WARNING LIGHTS
AND MESSAGES
IN AN EMERGENCY
SERVICING AND
MAINTENANCE
TECHNICAL
SPECIFICATIONS
INDEX
Page 20 of 275

IGNITION SWITCHThe key can be turned to 3 different positionsfig. 13:
❒STOP: engine off, key can be removed, steering
column locked. Some electrical devices (e.g. radio,
central door locking system, electronic alarm,
etc.) are enabled.
❒MAR-ON: driving position. All electrical devices
are enabled.
❒AVV: engine start-up.
The ignition switch is fitted with a safety system that
requires the ignition key to be turned back to STOP
if the engine does not start, before the starting
operation can be repeated.
WARNING
If the ignition switch is tampered with
(e.g. attempted theft), have it checked
over by a Fiat Dealership before driving again.
WARNING
Always remove the key when you leave
your car to prevent someone from
accidentally operating the controls. Remember
to engage the handbrake. If the car is parked on
uphill slope, engage the first gear; if the car is
facing downhill, engage the reverse gear. Never
leave children unattended in the car.STEERING LOCK
Engagement
When at STOP, remove the key and turn the steering
wheel until it locks.
Disengagement
Move the steering wheel slightly as you turn the
ignition key to MAR-ON.
IMPORTANT In some parking conditions (e.g.:
wheels turned) the effort required to move the
steering wheel and disengage the steering lock may
be increased.
fig. 13
F0Q0642
16GETTING TO
KNOW YOUR CAR
SAFETY
STARTING AND
DRIVING
WARNING LIGHTS
AND MESSAGES
IN AN EMERGENCY
SERVICING AND
MAINTENANCE
TECHNICAL
SPECIFICATIONS
INDEX
Page 21 of 275
WARNING
It is absolutely forbidden to carr y out
any aftermarket operation involving
steering system or steering column
modifications (e.g.: installation of anti-theft
device) that could badly affect performance and
safety, invalidate the warranty and also result
in non-compliance of the car with type-
approval requirements.
WARNING
Never remove the key while the car is
moving.The steering wheel will lock
as soon as it is turned.This holds true for cars
being towed as well.
DISPLAYThe car is equipped with a multifunction display that,
according to the previously applied settings, will
show useful driving information.
When one of the front doors is opened, the display
is activated, showing the time and mileage for a
few seconds.
NoteWith a low outside temperature (below 0°C)
it may take longer than normal for information to
appear on the display.
17GETTING TO
KNOW YOUR CARSAFETY
STARTING AND
DRIVING
WARNING LIGHTS
AND MESSAGES
IN AN EMERGENCY
SERVICING AND
MAINTENANCE
TECHNICAL
SPECIFICATIONS
INDEX
Page 27 of 275

Set date (Setting the date)
Using this function it is possible to update the date
(day - month - year).
Proceed as follows to start the update:
❒briefly press the SET button: the “year” will flash
on the display;
❒press the
or
button to make the adjustment;
❒briefly press the SET button: the “month” will flash
on the display;
❒press the
or
button to make the adjustment;
❒briefly press the SET button: the “day” will flash on
the display;
❒press the buttonor
for setting.
IMPORTANT The setting will increase or decrease
by one unit each time the button
or
is pressed.
Hold down the button to increase/decrease the
setting rapidly and automatically. Complete the
adjustment with single presses of the button when
you approach the desired value.
Briefly press the MODE button to return to the
menu screen or hold the button down to return to
the standard screen without storing.First page (display of information on the main
screen)
(for versions/markets, where provided)
This function allows you to choose the information
you would like to display on the main screen.
You can choose to display the date or the
turbocharger boost pressure.
To make your choice, proceed as follows:
❒briefly press the MODE button: "First page" will
appear on the display;
❒briefly press the MODE button again to display the
"Date" and "Engine info" options;
❒press
or
to select the information you wish to
see on the main page of the display;
❒press the MODE button briefly to return to the
menu screen or hold the button down to return
to the standard screen without storing.
When the key is turned to MAR-ON and the initial
check stage is over, the display will show the
information set previously via the “First page” menu
function.
23GETTING TO
KNOW YOUR CARSAFETY
STARTING AND
DRIVING
WARNING LIGHTS
AND MESSAGES
IN AN EMERGENCY
SERVICING AND
MAINTENANCE
TECHNICAL
SPECIFICATIONS
INDEX
Page 30 of 275
Button volume (adjusting the button volume)
This function allows the volume of the acoustic
signal that accompanies MODE,
and
button
presses to 8 levels
To set the desired volume, proceed as follows:
❒press the MODE button briefly, making the display
flash the previously set volume "level";
❒press the
or
button to make the adjustment;
❒press the MODE button briefly to return to the
menu screen or hold the button down to return
to the standard screen without storing.
Seat belt buzzer (Buzzer activation for SBR
indication)
This function can be displayed only after a Fiat
Dealership has deactivated the SBR system (see the
“Safety” section in the “SBR system” paragraph).
To reactivate this function, proceed as follows:
❒briefly press the MODE button, the display shows
"Off" flashing. Press the
or
button and "On"
will appear;
❒briefly press the MODE button to return to the
submenu screen or hold the button down to
return to the main menu screen without storing.Service (Scheduled servicing)
Using this function you can display information about
the mileage intervals for car servicing.
To consult this information, proceed as follows:
❒briefly press the MODE button: the display shows
when servicing is due in km or mi according to the
previous setting (see paragraph “Units of
measurement”);
❒briefly press the MODE button to go back to the
menu screen or hold the button down to go back
to the standard screen.
NoteAccording to the “Scheduled Servicing Plan”,
the car must be serviced every 35,000 km (or
equivalent value in miles). This message is displayed
automatically - when the key is turned to MAR-ON -
2,000 km (or equivalent value in miles) before these
deadlines and reappears every 200 km (or equivalent
value in miles). Below 200 km servicing indications
are more frequent. The indication will appear in
kilometres or miles depending on the unit of
measurement settings. When one of the next
scheduled deadlines is approaching, the word
“Service” will appear on the display, followed by the
number of kilometres or miles left, when the key
is turned to MAR-ON. Contact a Fiat Dealership.
The operations in the “Scheduled servicing plan” will
be performed and the message will be reset.
26GETTING TO
KNOW YOUR CAR
SAFETY
STARTING AND
DRIVING
WARNING LIGHTS
AND MESSAGES
IN AN EMERGENCY
SERVICING AND
MAINTENANCE
TECHNICAL
SPECIFICATIONS
INDEX
Page 32 of 275
TRIP COMPUTERGeneral information
The Trip computer is used to display information on
car operation when the key is turned to MAR-ON.
Two separate trips, called “Trip A” and “Trip B”,
are provided to monitor the entire mission (journey)
in a reciprocally independent manner.
Both functions can be reset (reset - start of a new
journey).
“Trip A” is used to display the figures relating to:
❒Range
❒Distance covered
❒Average consumption
❒Instantaneous consumption
❒Average speed
❒Trip time (driving time).
“Trip B” is used to display the figures relating to:
❒Distance travelled B
❒Average consumption B
❒Average speed B
❒Trip time B (driving time).
NoteThe “Trip B” function may be disabled (see
“Activating Trip B”). The “Range” and “Instant
consumption" parameters cannot be reset.Values displayed
Range
This indicates the approximate distance which can be
travelled with the amount of fuel present in the
tank.“----”will appear on the display in the
following cases:
❒range value lower than 50 km (or 30 mi)
❒car parked with engine running for an extended
period.
IMPORTANT The range value variation can be
affected by several factors: driving style, type of route
(motorway, urban, mountain roads, etc.), conditions
of use (load, tyre pressures, etc.). Trip planning
must therefore take the above into account.
Distance covered
Shows the distance covered since the start of the
new journey.
Average consumption
Shows the approximate average fuel consumption
since the start of the new journey.
Instantaneous consumption
This indicates the fuel consumption. The value is
constantly updated. The display will show “----”if
the car is parked with the engine running.
28GETTING TO
KNOW YOUR CAR
SAFETY
STARTING AND
DRIVING
WARNING LIGHTS
AND MESSAGES
IN AN EMERGENCY
SERVICING AND
MAINTENANCE
TECHNICAL
SPECIFICATIONS
INDEX
Page 33 of 275
Average speed
This shows the average car speed as a function of the
overall time elapsed since the start of the new
journey.
Tr i p t i me
The time elapsed since the start of a new journey.
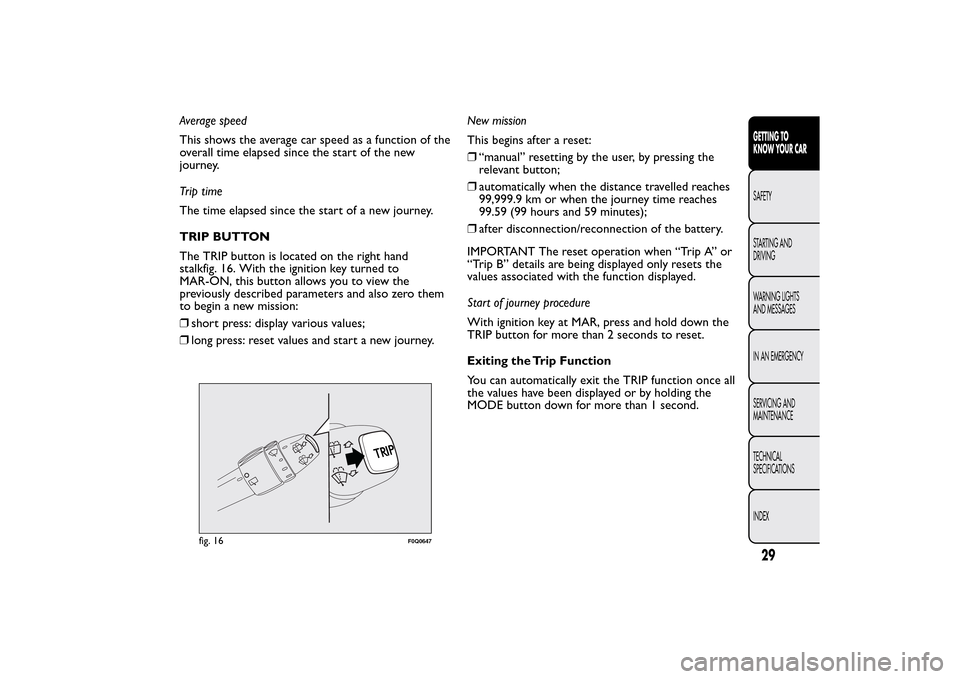
TRIP BUTTON
The TRIP button is located on the right hand
stalkfig. 16. With the ignition key turned to
MAR-ON, this button allows you to view the
previously described parameters and also zero them
to begin a new mission:
❒short press: display various values;
❒long press: reset values and start a new journey.New mission
This begins after a reset:
❒“manual” resetting by the user, by pressing the
relevant button;
❒automatically when the distance travelled reaches
99,999.9 km or when the journey time reaches
99.59 (99 hours and 59 minutes);
❒after disconnection/reconnection of the battery.
IMPORTANT The reset operation when “Trip A” or
“Trip B” details are being displayed only resets the
values associated with the function displayed.
Start of journey procedure
With ignition key at MAR, press and hold down the
TRIP button for more than 2 seconds to reset.
Exiting the Trip Function
You can automatically exit the TRIP function once all
the values have been displayed or by holding the
MODE button down for more than 1 second.
fig. 16
F0Q0647
29GETTING TO
KNOW YOUR CARSAFETY
STARTING AND
DRIVING
WARNING LIGHTS
AND MESSAGES
IN AN EMERGENCY
SERVICING AND
MAINTENANCE
TECHNICAL
SPECIFICATIONS
INDEX
Page 39 of 275
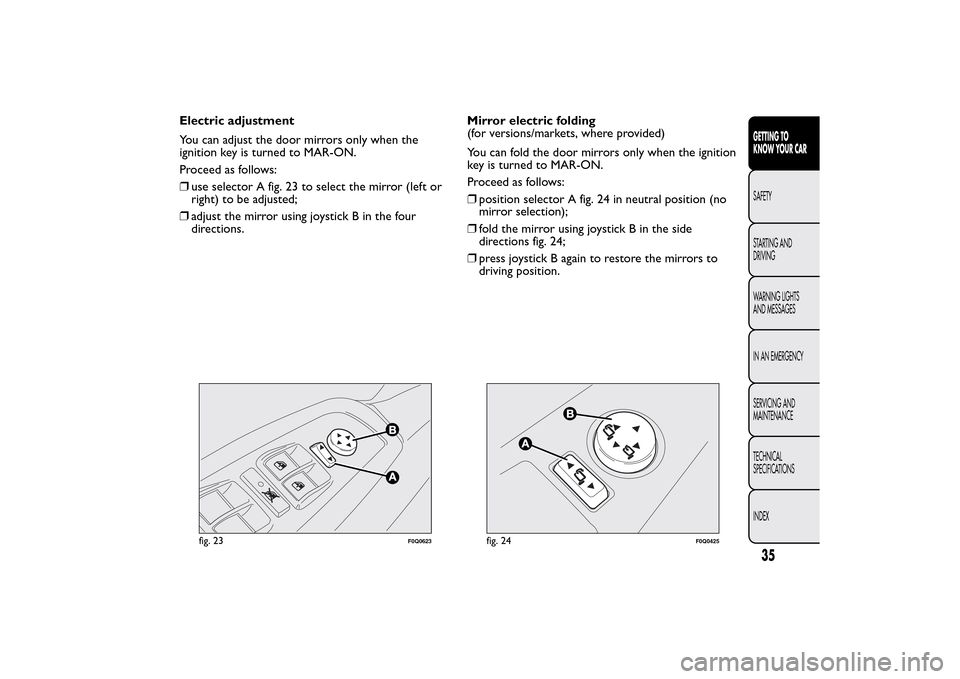
Electric adjustment
You can adjust the door mirrors only when the
ignition key is turned to MAR-ON.
Proceed as follows:
❒use selector A fig. 23 to select the mirror (left or
right) to be adjusted;
❒adjust the mirror using joystick B in the four
directions.Mirror electric folding
(for versions/markets, where provided)
You can fold the door mirrors only when the ignition
key is turned to MAR-ON.
Proceed as follows:
❒position selector A fig. 24 in neutral position (no
mirror selection);
❒fold the mirror using joystick B in the side
directions fig. 24;
❒press joystick B again to restore the mirrors to
driving position.
fig. 23
F0Q0623
fig. 24
F0Q0425
35GETTING TO
KNOW YOUR CARSAFETY
STARTING AND
DRIVING
WARNING LIGHTS
AND MESSAGES
IN AN EMERGENCY
SERVICING AND
MAINTENANCE
TECHNICAL
SPECIFICATIONS
INDEX