Page 6 of 116
DRIVER COCKPIT
1.Power Mirrors
2.Uconnect® Phone (Bluetooth® Hands Free Calling) pg.32
3.Turn Signals/Lights/High Beam Lever pg.19
4.Instrument Cluster pg.6
5.Electronic Vehicle Information Center (EVIC) Display pg.62
6.Speed Control pg.22
7.Wiper/Washer Lever (behind steering wheel) pg.21
8.Ignition Switch
9.Audio System pg.32
10.Switch Panel
•Hazard Switch
•Fog Lights pg.20
•Electronic Vehicle Information Center (EVIC) Controls pg.63
CONTROLS AT A GLANCE
4
Page 26 of 116
MANUAL CLIMATE CONTROLS
Air Recirculation
•Use Recirculation for maximum A/C operation.
•For window defogging, turn the recirculation off.
•Recirculation is not allowed in defrost, floor, defrost/floor (mix) modes.
Heated Mirrors
•The mirrors are heated to melt frost or ice.This feature is activated whenever you
turn on the rear window defroster.
OPERATING YOUR VEHICLE
24
Page 27 of 116
AUTOMATIC TEMPERATURE CONTROLS (ATC)
Automatic Operation
•Push the AUTO button.
•Select the desired temperature by rotating temperature control knobs.
•The system will maintain the set temperature automatically.
Air Recirculation
•Use Recirculation for maximum A/C operation.
•For window defogging, turn the recirculation off.
•Recirculation is not allowed in defrost, floor, defrost/floor (mix) modes.
Heated Mirrors
•The mirrors are heated to melt frost or ice.This feature is activated whenever you
turn on the rear window defroster.
OPERATING YOUR VEHICLE
25
Page 44 of 116

VOICE COMMAND QUICK REFERENCE
Uconnect® 5.0 Voice Command
•If the Uconnect Voice Commandbutton exists on your steering wheel, you
have the Voice Command feature, which is optimized for the driver.The Voice Com-
mand feature lets you keep your hands on the wheel, and your eyes on the road.
•When you press the Voice Command
button located on the steering wheel,
you hear a beep.After the beep, give your command.If you do not know what com-
mands to say, you can say “help” and the system provides options to you.If you ever
wish to interrupt the system while it lists options, press the Voice Command
button, and after the beep, say your command.
NOTE:
All phone oriented voice commands are accessible by first pressing the Phone Pick Up
button, not the Voice Command button.To end a call, simply press the Phone Hang Up
button.In some vehicles, the Phone Pickup button serves the dual purpose of ending calls
as well.
Voice Command (VR) User TIPs
•To hear available commands, press the Uconnect® Voice Command button and say
“Help.” You hear available commands for the menu displayed.
•At any time, you can say the words “Cancel” or “Help.” These commands are universal
and can be used from virtually any menu.All other specific commands can be used
depending upon the active application.
•You can interrupt the system prompts at any time by pressing the Uconnect® Voice
Command button while the system is speaking.After the beep, you can say a com-
mand.
•You can ‘chain’ commands together for faster results.Say “Call Joe Doe mobile,” for
example.
•For best performance, adjust the rearview mirror to provide at least ½ inch (1 cm)
gap between the overhead console (if equipped) and the mirror.This creates an
unobstructed path to the microphone on the overhead console.
•Always wait for the beep before speaking.
•Speak normally, without pausing, just as you would speak to a person sitting a few
feet/meters away from you.
•Ensure that no one other than you is speaking during a Voice Command period.
ELECTRONICS
42
Page 61 of 116

•For best performance, adjust the rearview mirror to provide at least ½ in (1 cm) gap
between the overhead console (if equipped) and the mirror.This will create an unob-
structed path to the microphone on the overhead console.
•Always wait for the beep before speaking.
•Speak normally, without pausing, just as you would speak to a person sitting a few
feet/meters away from you.
•Make sure that no one other than you is speaking during a Voice Command period.
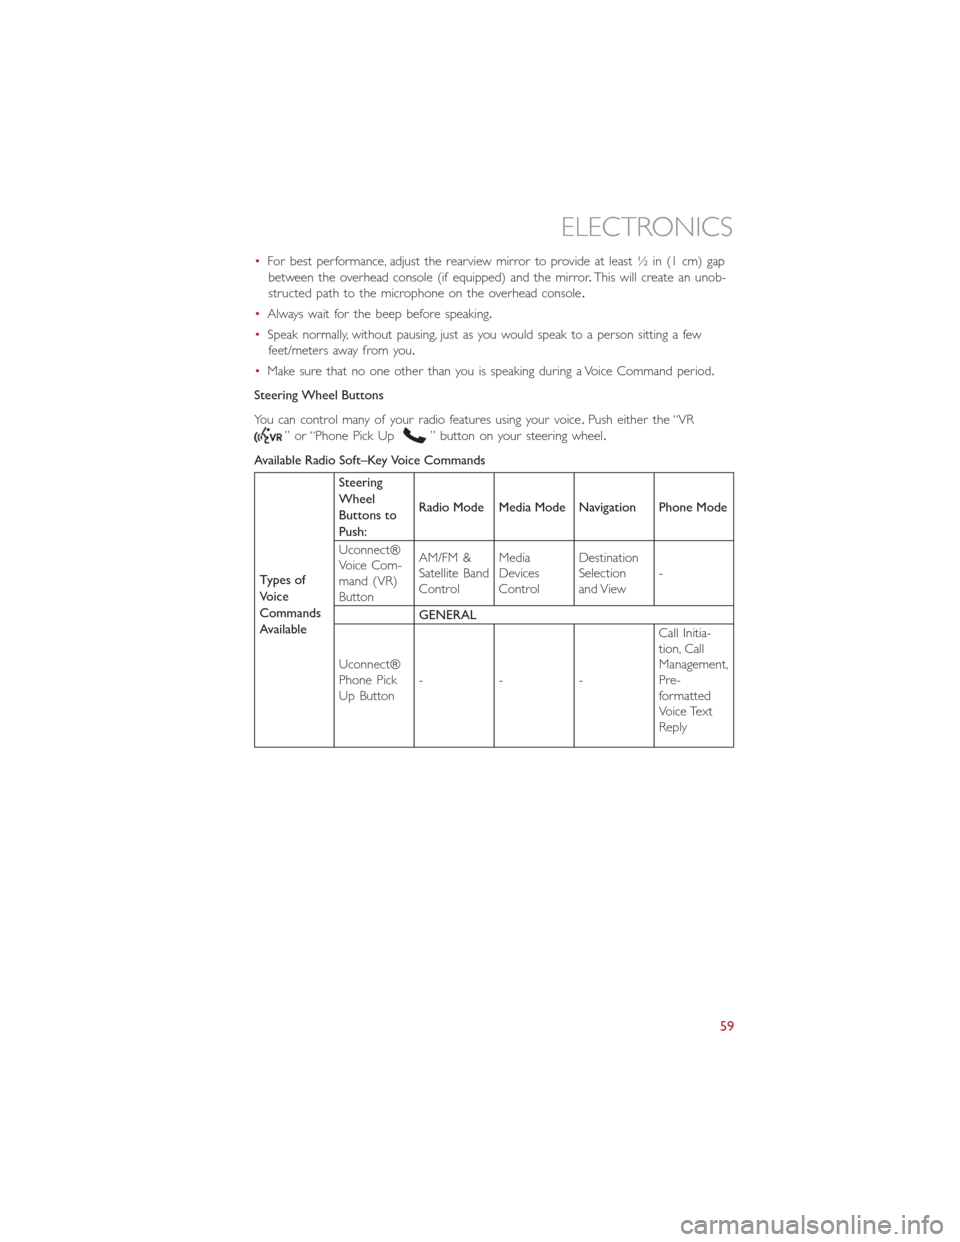
Steering Wheel Buttons
You can control many of your radio features using your voice.Push either the “VR
” or “Phone Pick Up” button on your steering wheel.
Available Radio Soft–Key Voice Commands
Types of
Voice
Commands
AvailableSteering
Wheel
Buttons to
Push:Radio Mode Media Mode Navigation Phone Mode
Uconnect®
Voice Com-
mand (VR)
ButtonAM/FM &
Satellite Band
ControlMedia
Devices
ControlDestination
Selection
and View-
GENERAL
Uconnect®
Phone Pick
Up Button---Call Initia-
tion, Call
Management,
Pre-
formatted
Voice Text
Reply
ELECTRONICS
59
Page 103 of 116

Cavity Maxi Fuse Mini Fuse Description
F21 15 Amp Blue Fuel Pump
F23 20 Amp Yellow Anti-Lock Brake Valves
F24 7.5 Amp Brown Stability Control System
F30 5 Amp Tan After Run Pump
F81 70 Amp Tan PTC (Secondary)
F82 40 Amp Orange Transmission
F83 40 Amp Orange PTC (Primary)
F84 7.5 Amp Brown Transmission
F85 15 Amp Blue Front Power Outlet 12V
F86 15 Amp Blue Rear Power Outlet 12V
F88 7.5 Amp Brown Heated Mirrors
Interior Fuses
•The interior fuse panel is part of the Body Control Module (BCM) and is located on
the driver's side under the instrument panel.
CavityVehicle Fuse
NumberMini Fuse Description
1 F12 7.5 Amp Brown Right Low Beam
2 F32 7.5 Amp BrownFront and Rear Ceiling Lights Trunk
and Door Courtesy Lights
3 F53 7.5 Amp Brown Instrument Panel Node
4 F38 20 Amp Yellow Central Door Locking
5 F36 15 Amp BlueDiagnostic Socket, Car Radio, Climate
Control System, TPMS, Sunroof
6 F43 20 Amp Yellow Bi-Directional Washer
7 F48 20 Amp Yellow Passenger Power Window
MAINTAINING YOUR VEHICLE
101
Page 104 of 116

CavityVehicle Fuse
NumberMini Fuse Description
8 F13 7.5 Amp Brown Left Low Beam, Headlamp Leveling
9 F50 7.5 Amp Brown Airbag
10 F51 5 Amp TanCar Radio Switch, Climate Control
System, Stop Light, Clutch, Reverse
Gear, Sunroof, Parking Sensor, Rear
Camera
11 F37 7.5 Amp BrownStop Light Switch, Instrument Panel
Node
12 F49 5 Amp TanExterior Mirror, GPS, Electric Mirror,
Parking Sensor
13 F31 5 Amp Tan Climate Control, Seat Regulation
14 F47 20 Amp Yellow Driver Power Window
Rear Interior Fuses
•The rear interior fuse panel is located on the driver's side in the rear compartment.
CavityVehicle Fuse
NumberMini Fuse Description
1 F61 15 Amp Blue Lumbar Regulation Seats
2 F62 15 Amp Blue Heated Seats
3 F64 20 Amp Yellow Hi Fi System
4 F65 20 Amp Yellow Sun Blind
5 F66 20 Amp Yellow Sunroof
6 F90 7.5 Amp Brown Left High Beam
7 F91 7.5 Amp Brown Right High Beam
8 F92 7.5 Amp Brown Left Fog Light
9 F93 7.5 Amp Brown Right Fog Light
10 F33 5 Amp Tan BSM, ESP
11 F34 20 Amp Yellow Rear Left Passenger Window
12 F49 20 Amp Yellow Rear Right Passenger Window
MAINTAINING YOUR VEHICLE
102
Page 109 of 116

AUTHENTIC ACCESSORIES BY MOPAR®
•The following highlights just some of the many Authentic FIAT Accessories by Mopar®
featuring a fit, finish, and functionality specifically for your FIAT 500 L.
•In choosing Authentic Accessories you gain far more than expressive style, premium
protection, or extreme entertainment, you also benefit from enhancing your vehicle
with accessories that have been thoroughly tested and factory-approved.
•For the full line of Authentic FIAT Accessories by Mopar®, visit your local FIAT dealer
or online at mopar.com.
EXTERIOR:
•Chrome Hood Spear•17” Wheels•Front End Cover
•Chrome Mirror Cover•Wheel Locks•Molded Splash Guards
•Front Air Deflector•Roof Rack•Vehicle Cover
•Roof And Body Graphics
INTERIOR:
•Door Sill Guards•Interior Appliques•Premium Carpet Mats
•Chrome Shift Knob•Key Covers•Slush Mats
•Pedal Kits•Roadside Safety Kit•Cargo Organizer
•Cargo Tray•Seat Covers•Katzkin Leather Interiors
ELECTRONICS:
•GPS Tracking System(s)•Sound System Upgrades•Interior/Ambient Lighting
•Wi-Fi•In Wireless Charging
CARRIERS:
•Roof Rack•Bike Carrier•Hitch-mount Bike Carrier
•Snowboard/Ski Carrier•Luggage Carrier•Roof Basket
PERFORMANCE:
•Cold Air Intake•Performance Exhaust
MOPAR ACCESSORIES
107