2014 FIAT 500L check engine
[x] Cancel search: check enginePage 65 of 116

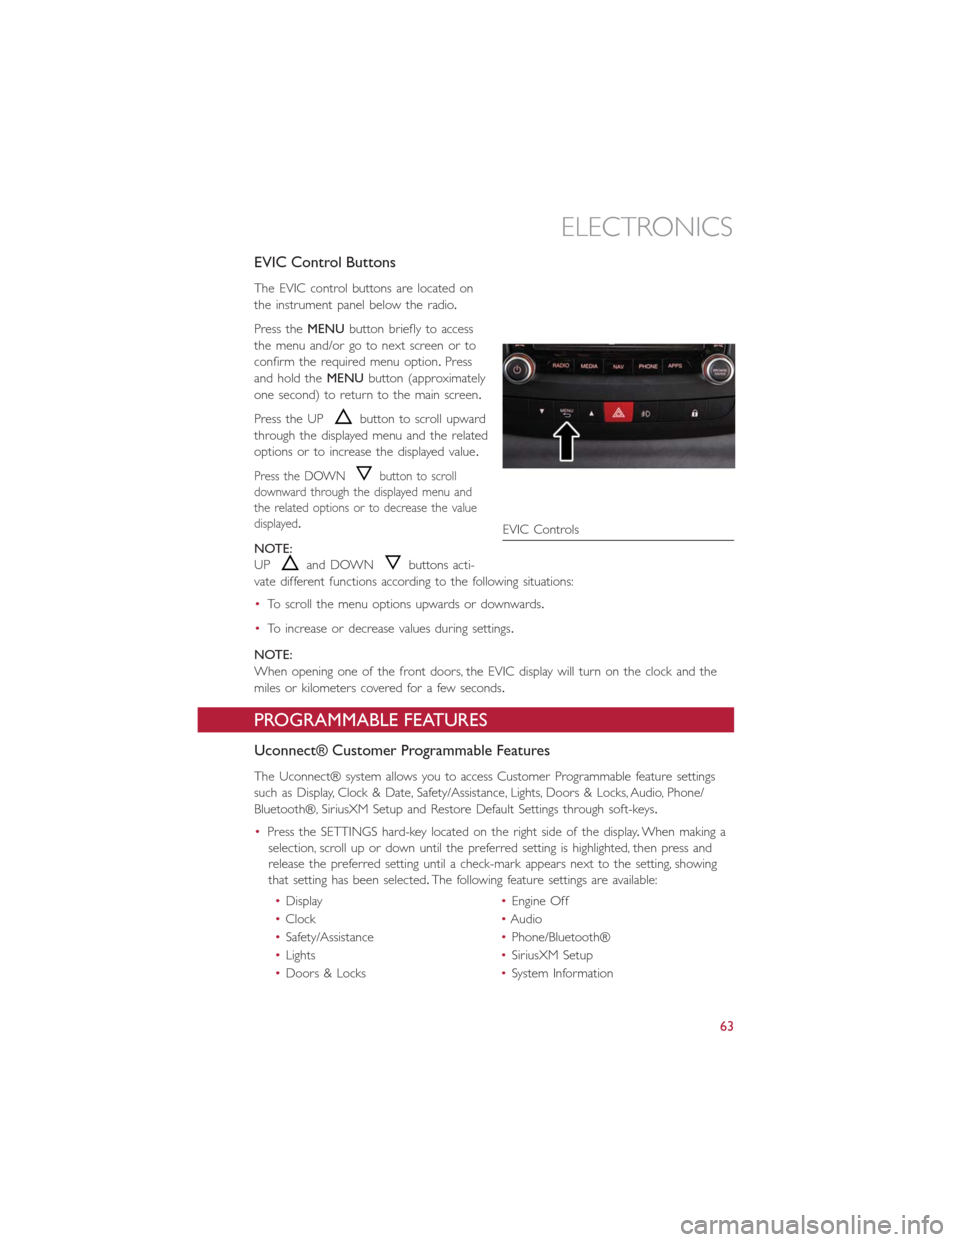
EVIC Control Buttons
The EVIC control buttons are located on
the instrument panel below the radio.
Press theMENUbutton briefly to access
the menu and/or go to next screen or to
confirm the required menu option.Press
and hold theMENUbutton (approximately
one second) to return to the main screen.
Press the UP
button to scroll upward
through the displayed menu and the related
options or to increase the displayed value.
Press the DOWNbutton to scroll
downward through the displayed menu and
the related options or to decrease the value
displayed.
NOTE:
UP
and DOWNbuttons acti-
vate different functions according to the following situations:
•To scroll the menu options upwards or downwards.
•To increase or decrease values during settings.
NOTE:
When opening one of the front doors, the EVIC display will turn on the clock and the
miles or kilometers covered for a few seconds.
PROGRAMMABLE FEATURES
Uconnect® Customer Programmable Features
The Uconnect® system allows you to access Customer Programmable feature settings
such as Display, Clock & Date, Safety/Assistance, Lights, Doors & Locks, Audio, Phone/
Bluetooth®, SiriusXM Setup and Restore Default Settings through soft-keys.
•Press the SETTINGS hard-key located on the right side of the display.When making a
selection, scroll up or down until the preferred setting is highlighted, then press and
release the preferred setting until a check-mark appears next to the setting, showing
that setting has been selected.The following feature settings are available:
•Display•Engine Off
•Clock•Audio
•Safety/Assistance•Phone/Bluetooth®
•Lights•SiriusXM Setup
•Doors & Locks•System Information
EVIC Controls
ELECTRONICS
63
Page 74 of 116

NOTE:
Tire pressures change by approximately 1 psi (7 kPa) per 12° F (7° C) of air tempera-
ture change.Keep this in mind when checking tire pressure inside a garage, especially in
the Winter.Example: If garage temperature is 68°F (20°C) and the outside temperature
is 32°F (0°C), then the cold tire inflation pressure should be increased by 3 psi (21 kPa),
which equals 1 psi (7 kPa) for every 12°F (7°C) for this outside temperature condition.
CAUTION!
The TPMS has been optimized for the original equipment tires and wheels.TPMS pres-
sures and warning have been established for the tire size equipped on your vehicle.
Undesirable system operation or sensor damage may result when using replacement
equipment that is not of the same size, type, and/or style.Aftermarket wheels can cause
sensor damage.Do not use tire sealant from a can, or balance beads if your vehicle is
equipped with a TPMS, as damage to the sensors may result.
BRAKE- Brake Warning Light
The Brake Warning light illuminates when there is either a system malfunction or the
parking brake is applied.If the light is on and the parking brake is not applied, it indicates
a possible brake hydraulic malfunction, brake booster problem or an Anti-Lock Brake Sys-
tem problem.
Please have your vehicle serviced immediately.
WARNING!
Driving a vehicle with the red brake light on is dangerous.Part of the brake system
may have failed.It will take longer to stop the vehicle.You could have a collision.Have
the vehicle checked immediately.
- Malfunction Indicator Light (MIL)
Certain conditions, such as a loose or missing gas cap, poor fuel quality, etc., may illumi-
nate the MIL after engine start.The vehicle should be serviced if the light stays on
through several typical driving cycles.In most situations, the vehicle will drive normally and
not require towing.
If the MIL flashes when the engine is running, serious conditions may exist that could lead
to immediate loss of power or severe catalytic converter damage.We recommend you
do not operate the vehicle.Have the vehicle serviced immediately.
WHAT TO DO IN EMERGENCIES
72
Page 75 of 116

- Charging System Light
This light shows the status of the electrical charging system.If the charging system light
remains on, it means that the vehicle is experiencing a problem with the charging system.
We recommend you do not continue driving if the charging system light is on.Have the
vehicle serviced immediately.
- Oil Pressure Warning Light
This light indicates low engine oil pressure.If the light turns on while driving, stop the
vehicle and shut off the engine as soon as possible.A chime will sound when this light
turns on.
We recommend you do not operate the vehicle or engine damage will occur.Have the
vehicle serviced immediately.
- Anti-Lock Brake (ABS) Light
This light monitors the Anti-Lock Brake System (ABS).
If the light is not on during starting, stays on, or turns on while driving, we recommend
you contact the nearest authorized dealer and have the vehicle serviced immediately.
- Air Bag Warning Light
If the light is not on during starting, stays on, or turns on while driving, have the vehicle
serviced by an authorized dealer immediately.
- Seat Belt Reminder Light
When the ignition switch is first turned to ON/RUN, this light will turn on if the driver’s
seat belt is unbuckled, a chime will sound.When driving, if the driver’s seat belt remains
unbuckled, the Seat Belt Reminder Light will illuminate and the chime will sound.
Please have your vehicle serviced immediately.
WARNING!
Driving a vehicle with the red brake light on is dangerous.Part of the brake system
may have failed.It will take longer to stop the vehicle.You could have a collision.Have
the vehicle checked immediately.
Passenger Air Bag Disable (PAD) Light
The Passenger Air Bag Disable (PAD) Indicator Light tells the driver and front passenger
when the front passenger air bag is turned off.The PAD Indicator light illuminates to show
that the front passenger air bag will not inflate during a collision requiring air bags.When the
right front passenger seat is empty or when very light objects are placed on the seat, the pas-
senger air bag will not inflate even though the PAD indicator light is not illuminated.
WHAT TO DO IN EMERGENCIES
73
Page 85 of 116

(C) Injecting TIREFIT Sealant Into The Deflated Tire:
Always start the engine before turning ON the TIREFIT kit.
NOTE:
Manual transmission vehicles must have the parking brake engaged and the shift lever in
NEUTRAL.
After pressing the Power Button (4), the sealant (white fluid) will flow from the Sealant
Bottle (1) through the Sealant Hose (6) and into the tire.
NOTE:
Sealant may leak out through the puncture in the tire.
If the sealant (white fluid) does not flow within0–10seconds through the Sealant Hose
(6):
1.Press the Power Button (4) to turn Off the TIREFIT kit.Disconnect the Sealant Hose
(6) from the valve stem.Make sure the valve stem is free of debris.Reconnect the
Sealant Hose (6) to the valve stem.Check that the Mode Select Knob (5) is in the
Sealant Mode position and not Air Mode.Press the Power Button (4) to turn On the
TIREFIT kit.
2.Connect the Power Plug (8) to a different 12 Volt power outlet in your vehicle or
another vehicle, if available.Make sure the engine is running before turning ON the
TIREFIT kit.
3.The Sealant Bottle (1) may be empty due to previous use.Call for assistance.
NOTE:
If the Mode Select Knob (5) is on Air Mode and the pump is operating, air will dispense
from the Air Pump Hose (7) only, not the Sealant Hose (6).
If the sealant (white fluid) does flow through the Sealant Hose (6):
1.Continue to operate the pump until sealant is no longer flowing through the hose
(typically takes 30 - 70 seconds).As the sealant flows through the Sealant Hose (6),
the Pressure Gauge (3) can read as high as 70 psi (4.8 Bar).The Pressure Gauge (3)
will decrease quickly from approximately 70 psi (4.8 Bar) to the actual tire pressure
when the Sealant Bottle (1) is empty.
2.The pump will start to inject air into the tire immediately after the Sealant Bottle (1)
is empty.Continue to operate the pump and inflate the tire to the pressure indicated
on the tire pressure label on the driver-side latch pillar (recommended pressure).
Check the tire pressure by looking at the Pressure Gauge (3).
WHAT TO DO IN EMERGENCIES
83
Page 98 of 116

MAINTENANCE SCHEDULE
Your vehicle is equipped with an automatic oil change indicator system.The oil change
indicator system will remind you that it is time to take your vehicle in for scheduled
maintenance.
Based on engine operation conditions, the oil change indicator message will illuminate in
the instrument cluster.This means that service is required for your vehicle.Operating
conditions such as frequent short-trips, trailer tow and extremely hot or cold ambient
temperatures will influence when the “Change Oil” or “Oil Change Required” message is
displayed.Severe Operating Conditions can cause the change oil message to illuminate as
early as 3,500 miles (5,600 km) since last reset.Have your vehicle serviced as soon as
possible, within the next 500 miles (805 km).
Your authorized dealer will reset the oil change indicator message after completing the
scheduled oil change.If a scheduled oil change is performed by someone other than your
authorized dealer, the message can be reset by referring to the steps described under
“Electronic Vehicle Information Center (EVIC)” in “Understanding Your Instrument Panel”
in your Owners Manual on the DVD for further information.
NOTE:
Under no circumstances should oil change intervals exceed 10,000 miles (16,000 km) or
twelve months, whichever comes first.
Severe Duty All Models
Change Engine Oil at 4000 miles (6,500 km) if the vehicle is operated in a dusty and off
road environment.This type of vehicle use is considered Severe Duty
Once A Month Or Before A Long Trip:
•Check engine oil level
•Check windshield washer fluid level
•Check the tire inflation pressures and look for unusual wear or damage
•Check the fluid levels of the coolant reservoir, brake master cylinder reservoir, and
transmission as needed
•Check function of all interior and exterior lights
MAINTAINING YOUR VEHICLE
96
Page 99 of 116

Required Maintenance Intervals.
Refer to the maintenance schedules on the following page for the required maintenance
intervals.
At Every Oil Change Interval As Indicated By Oil Change Indicator System:
•
Change oil and filter.
•Rotate the tires.Rotate at the first sign of irregular wear, even if it occurs before the oil
indicator system turns on.
•
Inspect battery and clean and tighten terminals as required.
•
Inspect brake pads, shoes, rotors, drums, and hoses.
•
Inspect engine cooling system protection and hoses.
•
Check and adjust hand brake.
•
Inspect exhaust system.
•
Inspect engine air cleaner if using in dusty or off-road conditions.
MAINTAINING YOUR VEHICLE
97
Page 112 of 116

Interior and Instrument Lights........5
Inverter Outlet (115V)...........66
Inverter, Power...............66
Jack Operation................75
Key Fo b....................8
Disarm The Alarm.............9
Lane Change Assist.............19
LATCH (Lower Anchors and Tether
for CHildren)...........12, 13, 15
Liftgate....................8
Lights
Tire Pressure Monitoring (TPMS)...71
Turn Signal...............19
Locks
Key s...................8
Liftgate, Tailgate..............8
Maintenance Schedule............96
Malfunction Indicator Light
(Check Engine)..............72
Mirrors
Heated...............24, 25
Navigation..................52
New Vehicle Break-In Period........19
Oil Pressure Light..............73
Outlet
Power..................67
Overheating, Engine.............74
Phone (Pairing)...............39
Placard, Tire and Loading Information...103
Power
Door Locks...............9
Inver ter.................66
Outlet (Auxiliary Electrical Outlet)...67
Steering.................69
Programmable Electronic Features.....63
Rear Seat, Folding..............17
Reclining Front Seats............16
Recreational Towing.............68Remote Keyless Entry (RKE)Disarm The Alarm.............9
Replacement Bulbs.............104
Reporting Safety Defects..........106
Schedule, Maintenance............96
Seat Belt
Automatic Locking Retractor (ALR)...10
Child Restraints.............10
Energy Management Feature......10
Engage The Automatic Locking Mode..14
Lap/Shoulder Belts............10
Seat Belt Pretensioner.........10
Seat Belt Reminder...........10
Seats
Adjustment...............16
Heated.................18
Rear Folding...............17
Security Alarm
Disarm The System............9
Security Alarm..............8
Signals, Turn.................19
Speed Control
Accel/Decel...............22
Cancel..................23
Speed Control (Cruise Control)......22
Steering
Tilt Column...............18
Steering Wheel Audio Controls.......62
Stuck, Freeing................91
Text Messaging..............41, 57
Tilt Steering Column............18
TIREFIT...................81
Tires
Air Pressure..............103
Changing................75
Jacking..................75
Towing
Disabled Vehicle.............90
Recreational...............68
Towing Vehicle Behind a Motorhome....68
Turn Signals.................19
Uconnect® 5.0...............35
Uconnect® 6.5N..............45
Uconnect® Voice Command........41
INDEX
110