Page 203 of 420

JACK
Please note that:
❒the jack weight is 1,76 kg;
❒the jack requires no adjustment;
❒the jack cannot be repaired and in the event of a
fault it must be replaced by another original one;
❒no tool other than its cranking device may be
fitted on the jack.
To change a wheel, proceed as follows:
❒Stop the car in a position that is not dangerous for
oncoming traffic where you can change the wheel
safely. The ground must be flat and sufficiently
compact;
❒switch off the engine, pull up the handbrake and
engage the 1
stgear or reverse. Wear the reflective
safety jacket (compulsory by law) before getting
out of the car;
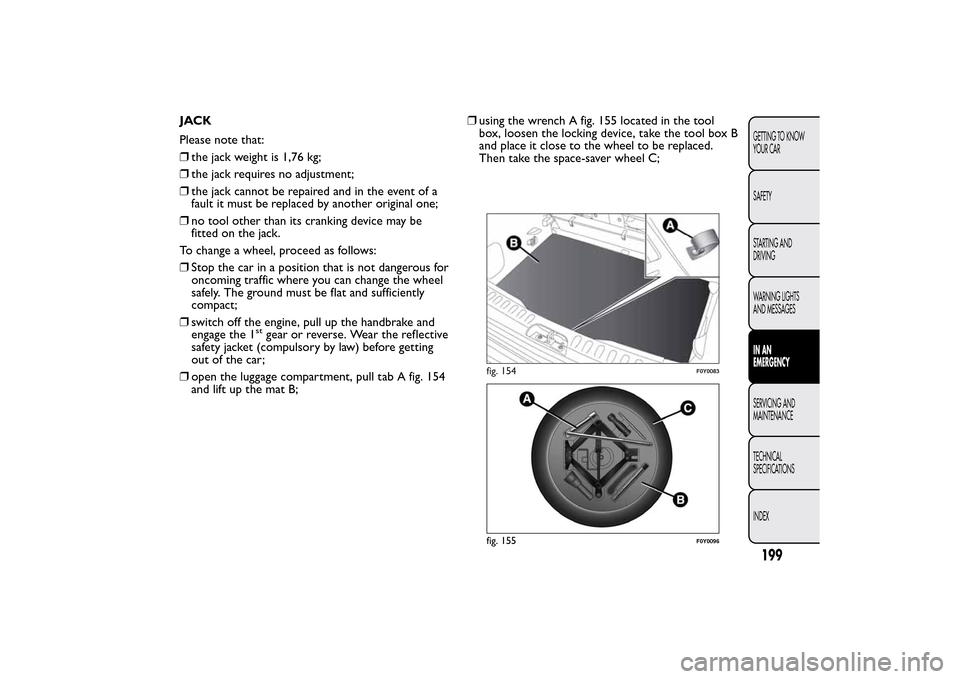
❒open the luggage compartment, pull tab A fig. 154
and lift up the mat B;❒using the wrench A fig. 155 located in the tool
box, loosen the locking device, take the tool box B
and place it close to the wheel to be replaced.
Then take the space-saver wheel C;
fig. 154
F0Y0083
fig. 155
F0Y0096
199GETTING TO KNOW
YOUR CAR
SAFETY
STARTING AND
DRIVING
WARNING LIGHTS
AND MESSAGESIN AN
EMERGENCYSERVICING AND
MAINTENANCE
TECHNICAL
SPECIFICATIONS
INDEX
Page 209 of 420

WARNING
The cylinder contains ethyl glycol.
Contains latex: may cause an allergic
reaction. Harmful if swallowed. Eye irritant .
May cause irritation if inhaled or on contact .
Avoid contact with eyes, skin and clothes. In the
event of contact , wash immediately with plenty
of water. If ingested, do not induce vomiting.
Rinse out your mouth, drink large quantities of
water and seek immediate medical attention.
Keep away from children.The product must not
be used by asthmatics. Do not inhale the
vapours during insertion and suction. Call a
doctor immediately if allergic reactions are
noted. Store the canister in its proper
compartment , away from sources of heat .The
sealant fluid has an expiry date. Replace the
bottle containing out-of-date sealant fluid.Dispose of the bottle and the sealant
liquid properly. Have the sealing fluid and
the cylinder disposed of in compliance
with national and local regulations.
INFLATING PROCEDURE
WARNING
Put on the protective gloves provided
together with quick tyre repair kit .Proceed as follows:
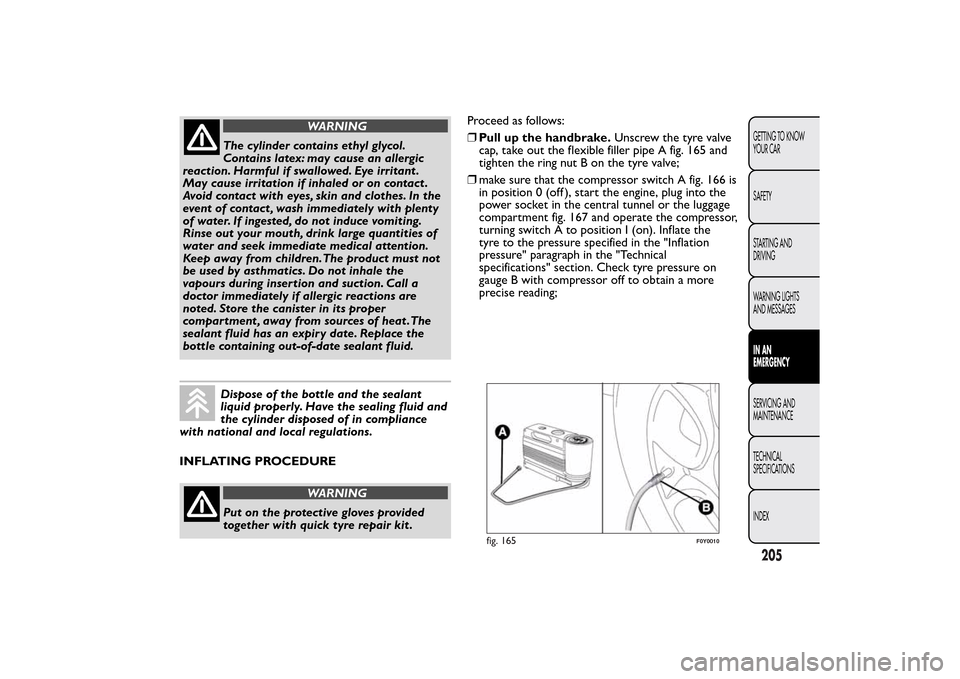
❒Pull up the handbrake.Unscrew the tyre valve
cap, take out the flexible filler pipe A fig. 165 and
tighten the ring nut B on the tyre valve;
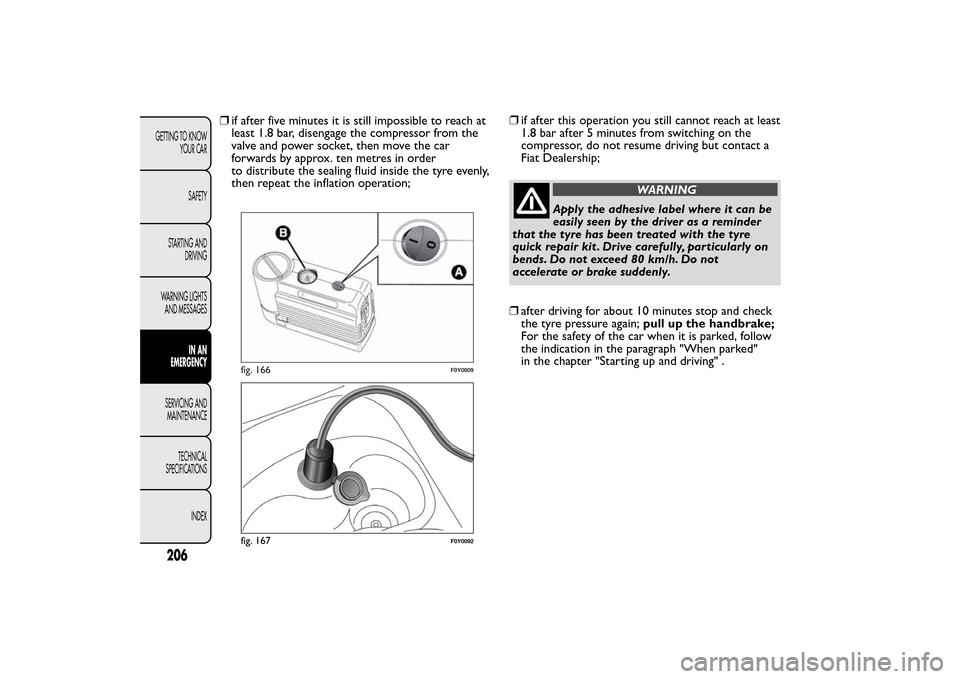
❒make sure that the compressor switch A fig. 166 is
in position 0 (off ), start the engine, plug into the
power socket in the central tunnel or the luggage
compartment fig. 167 and operate the compressor,
turning switch A to position I (on). Inflate the
tyre to the pressure specified in the "Inflation
pressure" paragraph in the "Technical
specifications" section. Check tyre pressure on
gauge B with compressor off to obtain a more
precise reading;
fig. 165
F0Y0010
205GETTING TO KNOW
YOUR CAR
SAFETY
STARTING AND
DRIVING
WARNING LIGHTS
AND MESSAGESIN AN
EMERGENCYSERVICING AND
MAINTENANCE
TECHNICAL
SPECIFICATIONS
INDEX
Page 210 of 420

❒if after five minutes it is still impossible to reach at
least 1.8 bar, disengage the compressor from the
valve and power socket, then move the car
forwards by approx. ten metres in order
to distribute the sealing fluid inside the tyre evenly,
then repeat the inflation operation;❒if after this operation you still cannot reach at least
1.8 bar after 5 minutes from switching on the
compressor, do not resume driving but contact a
Fiat Dealership;
WARNING
Apply the adhesive label where it can be
easily seen by the driver as a reminder
that the tyre has been treated with the tyre
quick repair kit . Drive carefully, particularly on
bends. Do not exceed 80 km/h. Do not
accelerate or brake suddenly.
❒after driving for about 10 minutes stop and check
the tyre pressure again;pull up the handbrake;
For the safety of the car when it is parked, follow
the indication in the paragraph "When parked"
in the chapter "Starting up and driving" .
fig. 166
F0Y0009
fig. 167
F0Y0092
206GETTING TO KNOW
YOUR CAR
SAFETY
STARTING AND
DRIVING
WARNING LIGHTS
AND MESSAGES
IN AN
EMERGENCY
SERVICING AND
MAINTENANCE
TECHNICAL
SPECIFICATIONS
INDEX
Page 211 of 420
WARNING
If the pressure has fallen below 1.8 bar,
do not drive any further: the automatic
tyre quick repair kit cannot guarantee the
correct hold because the tyre is too damaged.
Contact a Fiat Dealership.
❒if a pressure value of at least 1.8 bar is detected,
restore the correct pressure (with the engine
running and the handbrake engaged), resume
driving and drive with great care to the nearest
Fiat Dealership.
WARNING
Inform the dealership that the tyre has
been repaired using the tyre quick
repair kit . Give the instruction booklet to the
personnel charged with handling the treated
tyre.
207GETTING TO KNOW
YOUR CAR
SAFETY
STARTING AND
DRIVING
WARNING LIGHTS
AND MESSAGESIN AN
EMERGENCYSERVICING AND
MAINTENANCE
TECHNICAL
SPECIFICATIONS
INDEX
Page 215 of 420
LightsUse Type Power Ref. Figure
Dipped/main beam headlights H7 55W D
Front side lights/Day lights (DRL) W21/5W 21W/5W B
Rear side lights/Brake lights P21/5 W 21W/5W B
Front direction indicators WY21W 21 W B
Side direction indicators WY5W 5 W A
Rear direction indicators P21W 21 W B
3°Stop LED – –
Fog lights H11 55W E
Reverse W16W 16 W B
Rear fog lights W16W 16 W B
Number plate C5W 5 W C
Front roof light C5W 5 W C
Front roof lights (sun visors) C5W 5 W C
Luggage compartment roof light W5W 5 W A
Glove compartment light C5W 5 W C
Rear courtesy lights C5W 5 W C
211GETTING TO KNOW
YOUR CAR
SAFETY
STARTING AND
DRIVING
WARNING LIGHTS
AND MESSAGESIN AN
EMERGENCYSERVICING AND
MAINTENANCE
TECHNICAL
SPECIFICATIONS
INDEX
Page 221 of 420
REAR LIGHT CLUSTERS
These contain the bulbs for the side lights, brake
lights and direction indicators.
To replace the bulbs proceed as follows:
❒take the Allen key A fig. 181 provided;
❒operate tab B fig. 182 and remove protective cover
C (located in the side area of the luggage
compartment);
❒use Allen key A to unscrew fixing devices D
fig. 183 of the rear light cluster;
❒extract the light cluster by removing it with both
hands in the direction indicated by the arrows
fig. 184;❒disconnect the electrical connector, undo the
fixing screws E fig. 185 and remove the bulb holder
assembly;
❒replace the concerned bulb: F = direction
indicators, G = side lights/brake lights fig. 186.
fig. 181
F0Y0149
fig. 182
F0Y0150
fig. 183
F0Y0258
217GETTING TO KNOW
YOUR CAR
SAFETY
STARTING AND
DRIVING
WARNING LIGHTS
AND MESSAGESIN AN
EMERGENCYSERVICING AND
MAINTENANCE
TECHNICAL
SPECIFICATIONS
INDEX
Page 223 of 420
❒disconnect the electrical connector and rotate
bulb holder C anticlockwise fig. 188;
❒remove bulb D from the bulb holder and replace
it;
❒refit the new bulb on the bulb holder, making sure
it is correctly locked;
❒refit bulb holder C in the lens turning it clockwise
and reconnect the electrical connector;
❒refit the light cluster B fig. 187 correctly by
tightening the four fixing screws A, then close the
luggage compartment.THIRD BRAKE LIGHTS
These are located in the tailgate and are LED lights.
For replacement, contact a Fiat Dealership.
fig. 188
F0Y0029
219GETTING TO KNOW
YOUR CAR
SAFETY
STARTING AND
DRIVING
WARNING LIGHTS
AND MESSAGESIN AN
EMERGENCYSERVICING AND
MAINTENANCE
TECHNICAL
SPECIFICATIONS
INDEX
Page 240 of 420

WARNING
Before towing, turn the ignition key to
MAR and then to STOP without
removing it .The steering column will
automatically lock when the key is removed and
the wheels cannot be steered.
WARNING
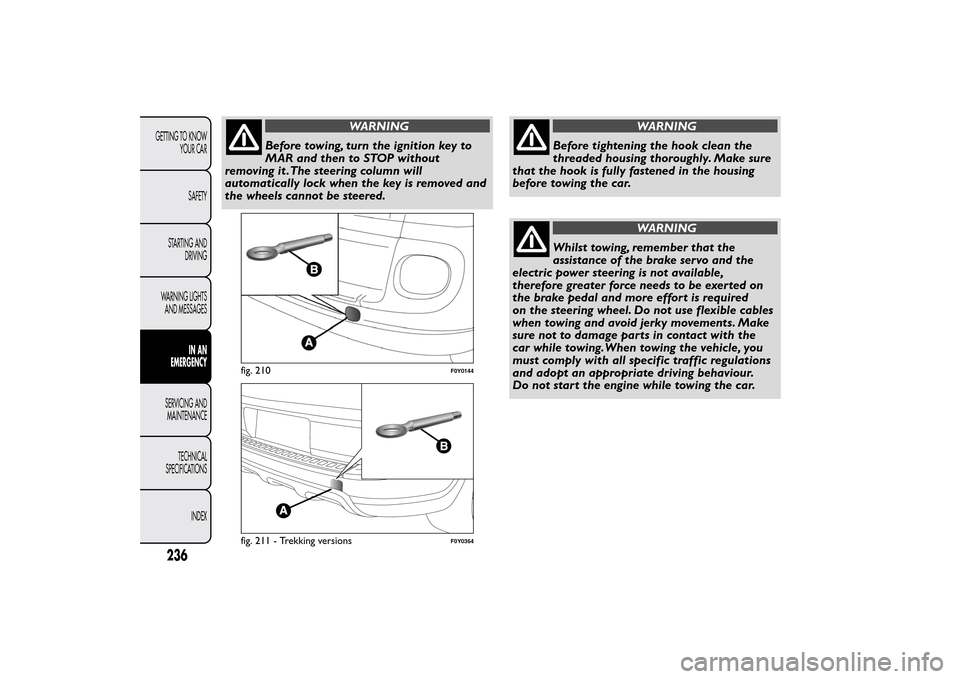
Before tightening the hook clean the
threaded housing thoroughly. Make sure
that the hook is fully fastened in the housing
before towing the car.
WARNING
Whilst towing, remember that the
assistance of the brake servo and the
electric power steering is not available,
therefore greater force needs to be exerted on
the brake pedal and more effort is required
on the steering wheel. Do not use flexible cables
when towing and avoid jerky movements. Make
sure not to damage parts in contact with the
car while towing.When towing the vehicle, you
must comply with all specific traffic regulations
and adopt an appropriate driving behaviour.
Do not start the engine while towing the car.
fig. 210
F0Y0144
fig. 211 - Trekking versions
F0Y0364
236GETTING TO KNOW
YOUR CAR
SAFETY
STARTING AND
DRIVING
WARNING LIGHTS
AND MESSAGES
IN AN
EMERGENCY
SERVICING AND
MAINTENANCE
TECHNICAL
SPECIFICATIONS
INDEX